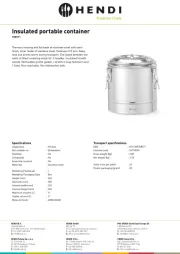
BenQ RP8604 Manual
BenQ
Ikke kategoriseret
RP8604
Læs gratis den danske manual til BenQ RP8604 (50 sider) i kategorien Ikke kategoriseret. Denne vejledning er vurderet som hjælpsom af 23 personer og har en gennemsnitlig bedømmelse på 4.3 stjerner ud af 12 anmeldelser. Har du et spørgsmål om BenQ RP8604, eller vil du spørge andre brugere om produktet?
Side 1/50

BenQ Board
RP6504/RP7504/RP8604
Interactive Flat Panel
User Manual
V 1.00

i
Copyright and disclaimer
Disclaimer
BenQ Corporation makes no representations or warranties, either expressed or implied, with
respect to the contents of this document. BenQ Corporation reserves the right to revise this
publication and to make changes from time to time in the contents thereof without obligation to
notify any person of such revision or changes.
HDMI trademark disclaimer
The terms HDMI, HDMI High-Definition Multimedia Interface, HDMI Trade Dress and the HDMI
Logos are trademarks or registered trademarks of HDMI Licensing Administrator, Inc.
Copyright
Copyright 2023 BenQ Corporation. All rights reserved. No part of this publication may be
reproduced, transmitted, transcribed, stored in a retrieval system or translated into any language
or computer language, in any form or by any means, electronic, mechanical, magnetic, optical,
chemical, manual or otherwise, without the prior written permission of BenQ Corporation.

ii
Product Support
This document aims to provide the most updated and accurate information to customers,
and thus all contents may be modified from time to time without prior notice. Please visit the
website for the latest version of this document and other product information. Available files
vary by model.
• Make sure your computer is connected to the Internet.
• Visit the local website from www.BenQ.com. The website layout and content may vary by
region/country.
• User manual and related document: www.BenQ.com > Business > SUPPORT > Downloads >
model name > User Manual
• (EU only) Dismantled information: Available on the user manual download page. This
document is provided based on Regulation (EU) 2019/2021 to repair or recycle your product.
Always contact the local customer service for servicing within the warranty period. If you
wish to repair an out-of-warranty product, you are recommended to go to a qualified service
personnel and obtain repair parts from BenQ to ensure compatibility. Do not disassemble
the product unless you are aware of the consequences. If you cannot find the dismantled
information on your product, contact the local customer service for assistance.

ii
Table of contents
Copyright and disclaimer ...................................................................................................................... i
Product Support ..........................................................................................................................................ii
Safety warnings and precautions ...................................................................................................... 1
Important safety instructions ............................................................................................................... 2
Notes on this display .............................................................................................................................................. 2
Notes on the LCD panel of this display ...................................................................................................... 2
Notes on cleaning the display .........................................................................................................................3
Safety notice for remote control ....................................................................................................................3
Battery safety notice ..............................................................................................................................................3
BenQ ecoFACTS .........................................................................................................................................................3
Package contents ......................................................................................................................................5
Set up the display ......................................................................................................................................6
Install the display on a wall ...............................................................................................................................6
Install camera ............................................................................................................................................................. 7
Install external PC .....................................................................................................................................................8
Parts of the display and their functions ...........................................................................................9
Front panel ....................................................................................................................................................................9
Rear panel .................................................................................................................................................................... 10
Remote control ..........................................................................................................................................................12
Using touch pen to launch EZWrite ............................................................................................................. 14
Connections ................................................................................................................................................ 15
Connect power ......................................................................................................................................................... 15
Turn the display on or off ................................................................................................................................... 15
Connect the touch module .............................................................................................................................. 16
Connect the VGA input .........................................................................................................................................17
Connect the digital inputs .................................................................................................................................17
Connect the video output ................................................................................................................................. 18
Connect to serial port .......................................................................................................................................... 18
Initial setup ..................................................................................................................................................19
Enable AMS service ................................................................................................................................................ 19
Log in to BenQ Board .............................................................................................................................................20
BenQ service interface ........................................................................................................................................20
Set up the Internet connection ......................................................................................................................22
System update ..........................................................................................................................................................23
Google system interface .................................................................................................................................... 24
Menu operations .......................................................................................................................................25

iii
Connection settings ..............................................................................................................................................25
Display settings ........................................................................................................................................................27
Audio settings ............................................................................................................................................................29
Advanced settings .................................................................................................................................................30
Floating tool .................................................................................................................................................32
Apps ................................................................................................................................................................33
Supported media formats ................................................................................................................... 34
Product information ................................................................................................................................ 36
Specications .............................................................................................................................................................36
Dimensions (RP6504) ...........................................................................................................................................39
Dimensions (RP7504) ...........................................................................................................................................40
Dimensions (RP8604) ........................................................................................................................................... 41
Supported input signal resolution ...............................................................................................................42
Troubleshooting ....................................................................................................................................... 43
2023/11/06

1
Safety warnings and precautions
THIS EQUIPMENT MUST BE GROUNDED
To ensure safe operation, the three-pin plug must
be inserted only into a standard three-pin power
outlet which is effectively grounded through
normal household wiring. Extension cords used
with the equipment must have three cores and be
correctly wired to provide connection to the ground.
Wrongly wired extension cords are a major cause of
fatalities.
The fact that the equipment operates satisfactorily
does not imply that the power outlet is grounded
or that the installation is completely safe. For your
safety, if you are in any doubt about the effective
grounding of the power outlet, please consult a
qualified electrician.
The lightning flash with arrowhead symbol, within
an equilateral triangle, is intended to alert the user
to the presence of uninsulated "dangerous voltage"
within the product's enclosure that may be of
sufficient magnitude to constitute a risk of electric
shock to persons.
The exclamation point within an equilateral triangle
is intended to alert the user to the presence of
important operating and maintenance (servicing)
instructions in the literature accompanying the
appliance.
The mains plug of the power supply cord shall remain readily operable. The AC receptacle
(mains socket outlet) shall be installed near the equipment and shall be easily accessible. To
completely disconnect this equipment from the AC mains, disconnect the power cord plug from
the AC receptacle.
• Do not place this display on an uneven, sloping or unstable surface (such as a trolley) where
it may fall and cause damage to itself or others.
• Do not place this display near water, like a spa or pool, or in a position which will allow the
splashing or spraying of water onto the display, like in front of an open window where rain
water may enter.
• Do not install this display in a confined space without proper ventilation and air circulation,
such as in a closed cabinet. Allow proper space around the display for dissipating heat
inside. Do not block any openings and vents on the display. Overheating may result in
hazards and electric shock.
• Installation of this display should only be performed by a qualified technician. Failure to
install this display properly may cause injuries and damages to the personnels and the
display itself. Check the installation regularly and maintain the display periodically to ensure
the best working condition.
• Use only the accessories approved or recommended by the manufacturer to mount this
display. Using wrong or unsuitable accessories may cause the display to fall and result in
serious personal injuries. Make sure that the surface and fixing points are strong enough to
sustain the weight of the display.
• To reduce the risk of electric shock, do not remove covers. No user serviceable parts inside.
Refer servicing to qualified service personnel.
• To prevent personal injuries, mounting the display or installing desktop stands is required
before use.

2
Important safety instructions
1. Do not use this apparatus near water.
2. Do not block any ventilation openings. Install in accordance with the manufacturer’s
instructions.
3. Do not install near any heat sources such as radiators, heat registers, stoves, or other
apparatus (including amplifiers) that produce heat.
4. Do not defeat the safety purpose of the polarized or grounding-type plug. A polarized plug
has two blades with one wider than the other. A grounding-type plug has two blades and
a third grounding prong. The wide blade or the third prong are provided for your safety. If
the provided plug does not fit into your outlet, consult an electrician for replacement of the
obsolete outlet.
5. Protect the power cord from being walked on or pinched particularly at plugs, convenience
receptacles, and the point where they exit from the apparatus.
6. Only use attachments/accessories specified by the manufacturer.
7. Use only with the cart, stand, tripod, bracket, or table specified by the manufacturer,
or sold with the apparatus. When a cart is used, use caution when moving the cart/
apparatus combination to avoid injury from tip-over. Unplug this apparatus during
lightning storms or when unused for long periods of time.
8. Refer all servicing to qualified service personnel. Servicing is required when the apparatus
has been damaged in any way, such as power-supply cord or plug is damaged, liquid has
been spilled or objects have fallen into the apparatus, the apparatus has been exposed to
rain or moisture, does not operate normally, or has been dropped.
Notes on this display
• To prevent the risk of physical injuries, do not attempt to lift the display alone.
• Make sure you have four or more people available to help lift or a flat cart to transport the
display to its final location.
• Keep the display horizontal as much as possible.
• Clear a floor space before unpacking.
Notes on the LCD panel of this display
• The Liquid Crystal Display (LCD) panel of this display has a very thin protective layer of glass
which is liable to marking or scratching, and cracking if struck or pressured. The liquid crystal
substrate is also liable to damage under excessive force or extreme temperatures. Please
handle with care.
• The response time and brightness of the LCD panel may vary with the ambient temperature.
• Avoid placing the display in direct sun or where direct sun or spot lighting will shine onto the
LCD panel, as the heat may damage the panel and the external casing of the display, and the
bright light will make viewing the display more difficult than necessary.
• The LCD panel consists of individual pixels to display images and is manufactured according
to the design specifications. While 99.9% of these pixels work normally, 0.01% of the pixels
may remain constantly lit (in red, blue or green) or unlit. This is a technical limitation of the
LCD technology and is not a defect.
• LCD screens, like plasma (PDP) and conventional CRT (Cathode Ray Tube) screens, are
also susceptible to ‘screen burn-in’ or ‘image retention’ which can be found on the screen
as visible fixed lines and shades. To avoid such damage to the screen, avoid displaying still
images (like On-Screen Display menus, TV station logos, fixed/inactive text or icons) for
more than 30 minutes. Change the aspect ratio from time to time. Fill the entire screen with
the image and eliminate the black bars whenever possible. Avoid displaying images in 16:9
aspect ratio over a long period of time, otherwise there may be visible burn marks on the
screen as two vertical lines.

3
• Note: Under certain circumstances, condensation may occur on the inner side of the
cover glass, it’s a natural phenomenon and will not affect the operation of the display. This
condensation will usually disappear after around 2 hours of normal operation.
• RM series does not offer image retention function. For more information, please refer to
installation guide. If a still image is required for a display, it is recommended to enable Pixel
shift.
• RM series does not support portrait use; portrait use may cause display damage. BenQ
warranty will not cover faulty usage.
Notes on cleaning the display
Please clean the frame when there is sign of malfunction on the touch screen.
1. Before you clean the screen, make sure the display is turned off, and unplug the power cord.
2. Remove dust or dirt from the screen with a dry cleaning cloth. Make sure to use minimal
force, and don’t press hard on the screen.
- Never use paper towels or anything that could leave streaks or lint on the screen.
3. Moisten a clean soft, lint-free cloth with some cleaning alcohol such as 70% isopropyl.
Gently go over the entire screen and wipe it down.
- Never use hazardous chemicals or ammonia-based cleaners
- Never fully soak the microfiber cloths in liquid.
- Never spray liquids directly onto the screen.
Safety notice for remote control
• Do not put the remote control in the direct heat, humidity, and avoid fire.
• Do not drop the remote control.
• Do not expose the remote control to water or moisture. Failure to do so could result in
malfunction.
• Confirm there is no object between the remote control and the remote sensor of the product.
• When the remote control will not be used for an extended period, remove the batteries.
Battery safety notice
The use of the wrong type of batteries may cause chemical leaks or explosion. Please note the
following:
• Always ensure that the batteries are inserted with the positive and negative terminals in the
correct direction as shown in the battery compartment.
• Different types of batteries have different characteristics. Do not mix different types.
• Do not mix old and new batteries. Mixing old and new batteries will shorten battery life or
cause chemical leaks from the old batteries.
• When batteries fail to function, replace them immediately.
• Chemicals which leak from batteries may cause skin irritation. If any chemical matter seeps
out of the batteries, wipe it up immediately using a dry cloth, and replace the batteries as
soon as possible.
• Due to varying storage conditions, the battery life for the batteries included with your product
may be shortened. Replace them within 3 months or as soon as you can after initial use.
• There may be local restrictions on the disposal or recycling of batteries. Consult your local
regulations or waste disposal provider.
BenQ ecoFACTS
BenQ has been dedicated to the design and development of greener product as part of its
aspiration to realize the ideal of the “Bringing Enjoyment ‘N Quality to Life” corporate vision with
the ultimate goal to achieve a low-carbon society. Besides meeting international regulatory
requirement and standards pertaining to environmental management, BenQ has spared no

4
efforts in pushing our initiatives further to incorporate life cycle design in the aspects of material
selection, manufacturing, packaging, transportation, using and disposal of the products. BenQ
ecoFACTS label lists key eco-friendly design highlights of each product, hoping to ensure that
consumers make informed green choices at purchase. Check out BenQ’s CSR Website at http://
csr.BenQ.com/ for more details on BenQ’s environmental commitments and achievements.

5
Package contents
Open the sales package and check the contents. If any item is missing or damaged, please
contact your dealer immediately.
LCD display Power cord (by region) VGA cable x1 2.4 GHz remote control
HDMI cable x1 Touch USB cable x1 USB Type-C cable x1 AAA battery p10-x2 *
Touch pen (with NFC
tag) x2
Camera mounting kit
Wall mount (with
installation screws)
Wireless USB Adapter
(WD02AT) *
User documents
(Quick start guide, wall mount installation
guide, regulation sheets)
• *: Availability may vary. Purchase separately if the accessories are not included in the package.
• The type of power cord supplied may differ from that illustrated depending on your region of purchase.
• Before discarding the package, check that you haven’t left any accessories inside the box.
• Dispose of packaging materials wisely. You can recycle the cardboard carton. Consider storing the
package (if possible) for future transport of the display.
• Do not leave plastic bags within reach of young children or babies.

6
Set up the display
Please pay attention to the following notes during installation:
• This display should be installed by at least two adult persons. Attempting to install this display by only one
person may result in danger and injuries.
• Refer the installation to qualified technicians. Improper installation may cause the display to fall or
malfunction.
• Stability Hazard: The flat panel may fall, causing serious personal injury or death. To prevent injury, this flat
panel must be securely attached to the wall in accordance with the installation instructions.
Install the display on a wall
1. Place a clean, dry and lint-free cloth on a flat, horizontal and object-free surface. Make sure
that the size of the cloth is larger than the display.
2. Gently lay the display on the cloth with the LCD screen facing down.
3. Identify the wall mounting screw holes on the back of the display as shown in the
illustration.
A
B
Dimension VESA spec. (A x B) Screw type Quantity
65"
600 x 400 mm M8 x 25L 4
75"
800 x 400 mm M8 x 25L 4
86"
800 x 600 mm M8 x 25L 4
4. Install the wall mounting bracket on the display and attach the display to the wall according
to the mounting bracket’s instructions. The length of the screw should exceed the thickness
of the wall mounting bracket by at least 25 mm. Make sure that all screws are tightened and
secured properly. (Recommended torque: 470 - 635N•cm).
Thickness of the
wall mounting
bracket
25 mm
(0.98")
LCD
display
• To maintain proper ventilation, keep at least 10 mm of clear space from the
back cover of the display to the wall.
• Please consult a professional technician for wall mount installations.
The manufacturer accepts no liability for installations not performed by a
professional technician.
10mm (0.39")

7
Install camera
Set up your webcam on the top of the display. Two installation methods are provided depends
on the connection port of your webcam.
• For USB-C camera (DV01K)
• For USB-A camera (DVY32)
For USB-C camera (DV01K)
The mounting components you need:
M3 screw x 2
1. Connect your camera to the USB-C port on
the top of the display.
2. Secure the camera with the provided screws.
For USB-A camera (DVY32)
The mounting components you need:
Mount 1/4" screw (8mm) M3x5 mm screw x 2
To install the camera mount:
1. Place your camera onto the mount and
secure the camera by screwing the 1/4"
screw into the camera screw hole.

8
2. Tilt the camera downward.
3. Install the mount with two M3x5mm screws
on the top of the display.
4. Tilt the camera back.
Install external PC
The back of the display has four screw holes at its bottom-left side with a dimension of VESA
mount 75x75 mm. You can secure the PC onto the display with four screws (maximum torque:
4-5 kgf-cm).

9
Parts of the display and their functions
Front panel
10 11 12 13 14 15 16 172 3 4 5 6
7
8
91
No. Name Description
1
TYPE-C*
Connects to USB-C devices for power delivery and data transfer.
Supports the transmission of video, audio, and touch function.
2
HDMI Connects to video sources that support the HDMI interface.
3
TOUCH Supports touch signal input from an external computer.
4
PUBLIC 3.0*
Connects USB devices such as keyboards, mouse, and USB
flash drives.
5
MIC-IN
Connects a microphone to send out amplified audio from the
display speaker.
This port only supports 3.5 mm TRS connector (2 rings).
6
Air ionizer Releases negative ions.
7
Array microphones Receives and transmits sound from near the display.
8
PIR sensor
Triggers the air ionizer when detecting human body near the
display.
9
NFC sensor
• Tap NFC card for AMS login.
• Use touch pen to launch EZWrite. See Using touch pen to
launch EZWrite on page 13 for details.
10
Ambient light sensor Detects the ambient light around the display.
11
IR signal receiver Receives infrared signals from remote control.
12
Power
• Tap to enter energy saving mode.
• Press and hold for 4 seconds or more to power off.
13
Home Returns to the main screen.
14
Return Returns to the previous menu.
15
Menu Enters the function menu.

1010
No. Name Description
16
Volume down Decreases the volume.
17
Volume up Increases the volume.
Rear panel
See Connections on page 15 for details.
2
3
4
5
5
6
7
9 10 11
1
12 13 14 158
18
17
16
3.0
No. Name Description
1
EARPHONE
Connects to external speakers or earphones.
This port does not support microphone function
.
2
TYPE-C Connects to USB-C devices for data transfer.
3
PUBLIC 3.0*
Connects USB devices such as keyboards, mouse, and USB flash
drives.
4
HDMI-OUT Connects to display devices with an HDMI input.
5
TOUCH 1 /
TOUCH 2
Supports touch signal input from an external computer.
6
HDMI 1 / HDMI 2 /
HDMI 3
Connects to video sources that support the HDMI interface.
7
TYPE-C*
Connects to USB-C devices for power delivery and data transfer.
Supports the transmission of video, audio, and touch function.
8
USB 3.0
Unscrew the USB cover to access the USB slot for the wireless
USB adapter and the remote control USB receiver.
9
USB 2.0
Connects USB devices such as keyboards, mice, and USB flash
drives.
10
SPDIF
Connects the SPDIF cable from external audio devices to the
display for audio out.
11
RS232 Serial interface, used for mutual transfer of data between devices.

11
No. Name Description
12
LAN
Supports LAN In & Out, 10/100/1000 Mbps for Android system
and OPS.
13
VGA Receives video input from an external device (such as a computer).
14
PC AUDIO-IN Receives audio input from an external device.
15
DP IN Connects a video source to a display device.
16
PUBLIC 3.0*
Connects to USB devices such as web cameras or USB flash
drives.
For port 16 & 17, use only one port at a time.
17
TYPE-C*
18
OPS Slot
Supports installation of an OPS (Open Pluggable Specification)
device.
* With these smart ports, a laptop (connected to BenQ Board via USB Type-C or HDMI + Touch USB) can use
the USB devices, speakers, and external cameras from BenQ Board to enhance the conference experience.
Please note that the built-in array microphone can only be accessed by an OPS source.
• USB 2.0: 5V 500mA / USB3.0: 5V 900mA
• Rear Type-C (data transfer only): 5V 0.9A
• Rear Type-C:
• 5V 3A=15W (with OPS)
• 15V 3A=45W (without OPS & turn on front 100W )
• 20V 3.25A=65W (without OPS & turn off front 100W)
• Front Type-C:
• 5V 3A=15W (without OPS)
• 15V 3A=45W (without OPS)
• 20V 3.25A=65W (with OPS; without OPS & turn off front 100W)
• 20V 5A=100W (without OPS & turn on front 100W )
• OPS= 18V 5A; 90W
• : Direct Current / DC
• : Alternating Current /AC
• Turn on/off Front USB-C 100W charging from Settings > Advanced.
• The maximum length for the cables to be used with the USB slots are 5m (USB 2.0) and 3m (USB 3.0).
• RP04 has a limit to the number of USB ports you can connect to. Do not connect a USB hub to the display
when all USB ports are occupied, as new devices may not be recognized by the system.

12
Remote control
16
15
14
12
11
10
13
17
1
2
4
8
9
3
5
6
7
No. Icon Description
1
Turns the display on or off.
2
Pointer key. Press to activate the spotlight or pointer function and follow
the instructions on the screen.
3
Press to view and switch between recent apps and input sources.
4
Press to open or close the menu.
5
Direction key. Press for upward selection.
6
Direction key. Press for left selection.
7
Press to proceed
8
Direction key. Press for right selection.
9
Direction key. Press for downward selection.
10
Android system main screen button.
11
Return key
12
Press to activate Google Assistant. Say commands to control the BenQ
Board.
13
/ Volume up/down.
14
FREEZE Freeze screen
15
BLANK
One key for blank screen. Go to > Display > Advanced options >
Blank button on remote to set up different blank mode.
16
Microphone
17
The USB receiver to pair with the remote control. See Use BenQ Board by
remote control on page 13 for details.

13
Install remote control batteries
1. Open the remote control battery cover.
2. Insert the supplied batteries, ensuring the positive and negative ends are facing in the
correct direction.
The supplied batteries are provided for your convenience so that you can operate the display straight
away. You should replace them as soon as possible.
3. Put the cover back on.
Use BenQ Board by remote control
1. Insert the remote control USB receiver into the USB-A ports at the lower left corner on the
rear side of the display.
2. Aim the remote control at the sensor at the display’s bottom-right side within a distance of
less than 8m, and a horizontal and vertical angle of less than 60 degrees.
Max. 8 m
• The remote control and the USB receiver have been paired by default.
• This remote control applies only to a specific model and operating systems. Contact your reseller if you
have any question.

14
Pair the remote control and the USB receiver
If you are experiencing issues using the function key on the remote control, please follow the
steps and pair again the remote control to resolve the issue:
1. Insert the USB receiver to BenQ Board’s USB port and place the remote control near it.
2. Press the
and BLANK at the same time, and the indicator light will start flashing.
3. The pairing is completed once the indicator stops flashing.
Remote control usage tips
• Avoid getting the remote control wet or store it in humid environments (like bathrooms).
• If the display’s remote control sensor window is exposed to direct sunlight or strong light, the
remote control may not operate properly. In this situation, change the light source, readjust
the angle of the display, or operate the remote control from a location closer to display’s
remote control sensor window.
Using touch pen to launch EZWrite
Tap the thick tip of the touch pen on the display’s NFC sensor to launch EZWrite. Note that the
horizontal and vertical angle should be less than 30 degrees.

15
Connections
Connect power
1. Plug one end of the power cord into the power jack on the display and the other end into an
appropriate power outlet.
2. Set the power switch to ON (I). The system will enter standby mode.
21
• The supplied power cord is suitable for use with 110-240V AC power only.
• The power cord and outlet illustrated may differ from the ones used in your region.
• Only use an appropriate power cord for your region. Never use a power cord which appears damaged or
frayed, or change the plug type on the power cord.
• Be aware of the power loading when you use extension cords or multiple outlet power boards.
• There are no user serviceable parts in this display. Never unscrew or remove any covers. There are
dangerous voltages inside the display. Turn off the power and unplug the power cord if you intend to move
the display.
Turn the display on or off
• To turn on the display, press the power button on the control panel or on the remote control.
• To turn off the display, press the power button on the control panel. The system will
automatically enter standby mode.
Signal receiver
Power button
The display’s standby mode still consumes power. To completely cut off power supply, set the power switch
to OFF (O) and then disconnect the power cord from the power outlet.

16
Connect the touch module
The touch module of the display supports easy plug-and-play operation. There is no need to
install additional drivers on the computer.
Try either method below to set up the video and touch input:
A
A
B1 B2 B3
A. Connect the TYPE-C port on the display to a USB Type-C port on the computer using the
supplied USB Type-C cable.
B. Connect a video cable (HDMI/IN (DP)/VGA) and the supplied touch USB cable from a
computer to the corresponding ports of the display.
• HDMI must be used with the TOUCH at the front panel.
• HDMI 1 or HDMI 2 must be used with TOUCH 1.
• HDMI 3, VGA or DP IN(DP) must be used with TOUCH 2.
or
or
+
• Avoid blocking the touch screen frame (where sensors are located) when initiating the touch module.
• If any ghost image occurs, please try to un-plug and then re-plug all USB cables. If the failure image still
exists, use another USB Type-B to Type-A cable.
• It is highly recommended that you connect the display to the PC or laptop directly. Please be noted
that using a faceplate device or an extender may cause failures in touch operations since the display
quality can be affected by many uncertainties such as cable grade, cable quality, source and destination
equipment, RF and electrical interference, and cable patches.

17
Connect the VGA input
1. Connect the VGA port on the display to the VGA output port on a computer using a D-Sub
(15-pin) cable.
2. Connect the computer’s audio output port to the PC AUDIO-IN jack on the display using a
suitable audio cable.
VGA
Connect the digital inputs
1. Connect the HDMI or DisplayPort output port of a computer or A/V device (such as a settop
box or DVD player) to the HDMI/HDMI 1/HDMI 2/HDMI 3/IN (DP) input port on the display
using an HDMI or DisplayPort cable.
2. To view video from this input, press
on the remote control to switch to the respective
input source.
or

18
Connect the video output
Use an HDMI cable to connect the HDMI-OUT port to the respective input port on the device.
HDMI-OUT
Connect to serial port
Directly connect a computer to the RS232 port on the input/output terminals.
RS232
• The applicable cable is not supplied and should be purchased separately.
• This connection is applicable to straight-through RS-232C cable only.
• After using serial port line to connect central control equipment and machine, certain function of the
machine can be controlled via central control equipment, such as: machine on/off, and adjustment of
sound volume, etc.

19
Initial setup
1. Turn on the display. Wait for the display to boot up with the BenQ screen.
2. Follow the on-screen instructions to set up the language, date and time, and network. You
can skip some of these steps and complete the setup later.
3. For copy data and set pin code section, select Skip to continue.
4. In BenQ service selection screen, set the toggle to On.
5. Select Next to continue. Your BenQ Board will restart.
Google has a default screen lock feature that locks the screen when the board is idle. To disable this
function, tap
All apps > Settings app. Go to Security > Screen lock and select None.
Enable AMS service
You may enable AMS service if account management is required. Select Enable AMS service at
the bottom left corner to activate BenQ AMS service.

20
Log in to BenQ Board
BenQ provides different login options for easier account management. Log in options are as
below.
A B
A. Guest
As a guest, you can access most of the basic functions. All data will be erased after
logging out.
B. User login
- As AMS admin, you have full access to the board.
- As AMS user, you can customize your working space and keep personal bookmarks, app
shortcuts and wallpapers. All app data will be saved individually.
* Each board stores up to 8 user information.
For more information and tutorial videos about the AMS service please visit BenQ website.
BenQ service interface
After signing in, users may access functions as below.
B
A A
C D GE HF I
A. Side tool bar (see page 21)
B. User information

21
C. App shortcuts
Add up to 7 shortcuts (sync with AMS web).
D. Connection
E. All apps
Tap to find all apps, widgets and bookmarks.
F. Help
G. Volume
H. Wi-Fi
I. Notifications
Side tool bar
Tap the side bars at the left or right of the main interface to access the side tool bar.
You may drag the tool to the top or bottom of the screen to suit your preference.
A
D
B
E
C
F
G
H
I
A. Home
B. Back
C. Recent
Switch between recent apps and input sources.
D. Quick launch
Tap to find all apps and bookmarks.
E. Recently opened apps
F. Connection
G. EZWrite
H. Freeze
I. Floating tool (see page 32)

22
Set up the Internet connection
Your display must be connected to a network to conduct OTA updates or surf the Internet.
Wireless connection
You must use a wireless adapter in order to connect the display to the Internet wirelessly. Please
contact your local dealer for more information on configuring the wireless connection.
1. To access your app list, swipe up from the bottom of your screen to the top.
2. In your app list, open the Settings app.
3. Tap Network & Internet > Internet.
4. Tap the switch to turn on Wi-Fi.
5. Tap a listed network.
Wi-Fi or LAN can’t be used at the same time. Check if LAN is turned off before you start using Wi-Fi.
Proxy settings
1. Open the Settings app.
2. Tap Network & Internet > Internet.
3. Find your Wi-Fi network.
4. Select the Gear icon on the right side and tap Modify.
5. In the popup, tap Advanced options to extend the menu.
6. In the Proxy dropdown, select Manual.
7. Enter your proxy server’s information.
8. Authenticate your proxies.
9. Save your settings.

23
System update
The system will automatically detect and prompt for software updates on every startup.
To manually update the software
1. Press on the remote control or on the control panel. The OSD menu appears.
2. Tap Advanced > System update.
3. Select Update system. The system will begin updating.
• Software update process may take some time to complete.
• During the update process, do not turn off the device or disconnect the Internet connection. Any
interruptions during the software update process may permanently damage your display.

24
Google system interface
If you did not enable BenQ services, you’ll see the Google interface as below.
A B C
A. Back
B. Home
C. Recent apps

25
Menu operations
Through BenQ Board
• To enter the OSD menu, press on the control panel.
• To make selections, directly tap an item.
• Tap a blank area outside the menu to exit.
Through remote control
• To enter the OSD menu, press on the remote control.
• To make selections, press
/ / / and press OK to confirm.
• Press to exit the menu.
Connection settings
B
A
A. Select an input source to connect.
B. See General settings.

26
General settings
b
a
c
a. Brightness
• Use the brightness bar to adjust the brightness for the display.
• To adjust picture details, go to
> Display > Picture mode.
b. Audio
• Use the volume bar to adjust the volume for the display.
• To adjust audio details, go to
> Audio.
c. Blank
• Select to temporarily blank the screen.
• Tap anywhere on the screen to exit blank mode.
• Choose to keep the sound in background or not in
> Display > Advanced settings >
Blank button on remote.

27
Display settings
Menu Descriptions
Auto backlight Switch on/off auto backlight.
Power save mode
When no input source such as HDMI, DP, VGA, Type-C
is detected, power save options are as below.
• Off: Always keep backlight on.
• Low: Turn off backlight when no input source is
detected after 5 minutes.
• High: Turn off the display when no input source is
detected after 5 minutes.
Picture mode
Switch between preset picture modes that best suit
the type of images shown on the screen. Options are
Standard, Bright, Soft, Custom1, Custom2, Custom3.
Under Android OS, all picture parameters (e.g., Brightness,
Contrast) are locked. Users may only adjust the parameters
while connecting to other input sources. See Connection
settings on page 25 for more information.
Color temperature
Adjust the color temperature of the display. Options
are Normal, Cool, Warm.
Custom source names Set unique names for each input source.

28
Menu Descriptions
Advanced settings
Adjust functions below:
• Aspect ratio
• EDID
• HDMI CEC
• Pixel shift
• Dynamic contrast (DCR)
• Auto switch source
• HDMI out
• Blank button on remote
• VGA calibration including H position, V position,
Clock, Phase.
Eye-Care solutions
Blue light with wavelengths under 455 nm could affect vision. Eye-Care solution is designed for
eyesight protection: the display provides proprietary eye-care technology with ultra-low blue light
emission and no visible or invisible flicker within the range of 0-3000Hz, preventing eyestrain
caused by extended sessions in front of a display. In addition, advanced anti-glare screen
treatment minimizes distracting reflections and glare for optimal productivity and comfort.
Suggestions for long-term use of the display:
• Rest your eyes for 10 minutes after 30 minutes of continuous use.
• For every 20 minutes of display viewing, look into the distance for 20 seconds.
• When your eyes get sore and strained, close your eyes for a minute and then roll your eyes in all directions.
Low blue light & Flicker free
• To meet the Low Blue Light TÜV certification, the display settings should be:
- Picture mode: Standard
- Color temperature: Warm
• The default settings of the display meets the Flicker-free TÜV certification.
What is Flicker-free?
The display with the Flicker-free technology maintains a stable backlight with a DC dimmer
that eliminates the primary cause of monitor flicker, making it easier on the eyes. The flicker-
free technology does not only give you a comfortable viewing experience but also offers a safer
choice that protects your eyes.

30
Advanced settings
Menu Descriptions
System toolbar Show/Hide the toolbar.
Front USB-C 100W charging
Enable the function to allow 100 W charging. If
disabled, the maximum charge rate is 65 W.
Air ionizer
Once enabled, the ionizer stays active for a maximum
of 10 minutes. Then it requires a 10-minute rest period
before another cycle.
Floating tool gesture
Enable/Disable activating Floating tool with two
fingers.
Power & sleep
Set the time you want the display to automatically
enter Sleep/Power off mode.
Boot logo and animation Customize your boot logo and animation.
Display locks
Choose to turn the lock on/off.
• Keypad lock: Lock the buttons on the control panel.
• Remote control lock: Lock the remote control IR
sensor on the control panel.
• Touch lock: Lock the display screen.
If all locks are locked all at once, press on the control
panel for 5 seconds to unlock.
InstaShare Button mode
Enable the mode to project wirelessly via InstaShare
Button.
*Available by Q1 2024
Accessories Select your microphone and webcam source.

31
Menu Descriptions
Startup settings
Set the Startup source and multiple wakeup settings.
For Slot-in PC startup, options are as below:
• Source selected: Starts up OPS by selecting OPS in
Connection.
• Board startup: Starts up OPS when BenQ Board
starts up.
Power schedule
Start up and shut down the display at a designated
time, and set a startup source. You can set up to 7
schedules.
System update
Manually update system software. See System update
on page 23 for details.
USB cloning
Import device settings from your USB storage or export
device settings to your USB storage.
*Available by Q1 2024
About View system information.

32
Floating tool
The EZWrite floating tool allows you to quickly write or create annotations on any screen that
the display is showing.
To access the floating tool use either one of the following methods:
• In the Android interface, tap in the side tool bar.
• Under any input source or in the Android interface, touch and hold two fingers spaced about
20 – 50 mm apart on the screen for more than two seconds to launch the floating tool menu
as shown below.
Icon Function Descriptions
/
Minimize/Restore Minimize or restore the floating tool.
Close Close the floating tool.
Pen Enable the Pen tool.
Highlighter Enable the highlighter tool.
Laser pointer Enable the laser point on the screen.
Eraser
Erase annotations on the screen. You may use a finger
eraser or choose to clear all annotations
Toolbox
Open the toolbox which includes the Calculator, Timer,
Stopwatch, Scoreboard, and Draw tools.
Recording Record the screen.
Screenshot Take a screenshot of the screen.
Operation mode Hide all the annotations and operate the main interface.

33
Apps
You can access all google services and some BenQ Apps by default.
BenQ apps
Icon Application name Description
AMS files
Access your personalized workspace environment and
settings, and manage your files and accounts on any BenQ
display that you have logged in to.
EZWrite 6
An interactive whiteboard software that turns your display
into a digital canvas.
InstaShare 2
Allows screen mirroring and touch control for collaborative
meetings.
BenQ App Store Allows you to download recommended apps.
Notification
Allows you to receive upgrade notifications of existing apps
and information of new apps available for download.
X-Sign Broadcast
Lets you deliver scheduled messages and instant alerts to
all your BenQ devices for any occasion.
DMS Client
Allows remote management, configuration, and monitoring
of the display.
Visit BenQ website to find the user manual for each BenQ software.

34
Supported media formats
Video
File Codec detail
Extension Video Audio Maximum transmit ratio
.3gp/.3GP2
Mpeg-4
Mpeg2 Layer2/3, AAC- LC, PCM
1920*1080 60 Fps
H.263 352*288 30 Fps
.avi
Mpeg-4
Mpeg2 Layer2/3,AAC- LC, PCM
1920*1080 60 Fps
H.263 352*288 30 Fps
H.264 3840*2160 30 Fps 100Mbps
.flv/.f4v
Mpeg-4
Mpeg2 Layer2/3,A AC- LC, PCM
1920*1080 60 Fps
H.263 352*288 30 Fps
H.264 3840*2160 30 Fps 100Mbps
.mkv
Mpeg-4
Mpeg2 Layer2/3, AAC- LC, PCM
1920*1080 60 Fps
H.264 3840*2160 30 Fps 100Mbps
VP8 1920*0 Fps
VP9 3840*2160 60 Fps
H.265 3840*2160 60 Fps
.mov
Mpeg-4
Mpeg2 Layer2/3, AAC- LC, PCM
352*288 30 Fps
H.263 1920*1080 60 Fps
H.264 3840*2160 30 Fps 100Mbps
.mp4
H.265
Mpeg2 Layer2/3, AAC- LC, PCM
3840*2160 60 Fps
Mpeg-4 352*288 30 Fps
H.263 1920*1080 60 Fps
H.264 3840*2160 30 Fps 100Mbps
.mpg/.mpeg
Mpeg-4
Mpeg2 Layer2/3, AAC- LC, PCM
352*288 30 Fps
H.264 3840*2160 30 Fps
.webm
VP9
Mpeg2 Layer2/3, AAC- LC, PCM
3840*2160 60 Fps
VP8 1920*1080 60 Fps
.ts
H.265
Mpeg2 Layer2/3, AAC- LC, PCM
3840*2160 60 Fps
Mpeg-4 352*288 30 Fps
H.264 3840*2160 30 Fps 100Mbps
Audio
File Format Audio Codec Supported range
.aac AAC AAC
Sample Rate: 8K~96KHz
Bit Rate: VBR
.flac FLAC FLAC
Sample Rate: 8K~96KHz
Bit Rate: VBR
.pcm PCM PCM Sample Rate: 8KHz-48KHz
.alac ALAC ALAC Sample Rate: 8KHz-48KHz

35
File Format Audio Codec Supported range
.mp3 MPEG Audio Layer3 MPEG2 layer2/3
Sample Rate: 8K~48KHz
Bit Rate: 8~320Kbps
.ogg Vorbis Vorbis Sample Rate: 8K~96KHz
.wav WAV PCM Sample Rate: 8K~48KHz
Photo
File Format Supported range
.bmp BMP 8000x8000
.gif GIF 6000x4500
.jpeg/jpg JPEG
Base-line 8000x8000
Progressive 8000x8000
.png PNG 8000x8000

36
Product information
Specications
Item
Specifications
RP6504 / RP7504 / RP8604
Panel
Size RP6504: 65" / RP7504: 75" / RP8604: 86"
Light Source DLED
Aspect Ratio 16:9
Resolution 3840 x 2160
Pixel Pitch(mm)
RP6504: 0.37(H) x 0.37(V)
RP7504: 0.43(H) x 0.43(V)
RP8604: 0.49(H) x 0.49(V)
Brightness with Glass
(Typical)
RP6504: 400 (typical)
RP7504: 400 (typical)
RP8604: 400 (typical)
Brightness without Glass
(Typical)
RP6504: 450 (typical)
RP7504: 450 (typical)
RP8604: 450 (typical)
Contrast Ratio (Typical) 1200:1
Viewing Angle 178
Touch
Technology IR
Touch Method Finger & Stylus
System
Windows 11/10/8/7/Windows XP/Linux/Mac OS X/
Android/Chrome
Touch Point
Up to 40pts touch for Windows; up to 32 pts touch for
Android
Minimum Object Size
2 mm, pen tip is 4 mm/9 mm, supports 2 pens writing
with 2 colors simultaneously
Response Time < 5 ms
Accuracy ±1 mm, 90% area
Glass 3.2 mm thickness, AG, 9H pencil, germ-resistant
Connectors
HDMI IN Rear: x 3, Front: x 1 (2.0)
HDMI Output x 1 (4K@60Hz with audio)
DP IN x 1
VGA IN x 1
PC-Audio IN (3.5 mm
audio-in)
x 1
Mic IN x 1
SPDIF (Optical) x 1
Audio Output (3.5mm
Earphone)
x 1

37
Item
Specifications
RP6504 / RP7504 / RP8604
Connectors
USB 2.0 (Type A) Rear I/O: x1
USB 3.0 (Type A) (OPS/
External Follow)
Front: x2
Top: x1
Rear: x2
USB 3.0 (Type A)
Wi-Fi dongle: x1
Remote control: x1
USB Touch Output (OPS/
External pass through
MIC/Camera/USB)
Rear: x 2, Front: x 1 (USB 3.0)
RS232 x1
LAN (RJ45)
OPS: 10M/100M/1000M
Android: 10M/100M/1000M
LAN IN p42-x1 / LAN Out x1
USB Type-C
Rear: Data/Power(up to 65W)/Touch/DP p42-x1 (2.0), Data
x2 (3.0)
Front: Data/Power(up to 100W)/Touch/DP p42-x1 (3.0)
Android
System
System Version Android 13
CPU A78 x 4 + A55 x 4
GPU G57 MC5
RAM 8GB
ROM 64GB
Video / Audio
Speaker Type Built in speaker
Output Power 20W x 2 w/ 16W subwoofer
Power
Power Requirements AC 100V-240V, 50/60 Hz
Standby Power <0.5W
Typical Power
Consumption (W)
RP6504: 95.0 W
RP7504: 109.3 W
RP8604: 164.4 W
Max Power Consumption
(W)
RP6504: 426.8 W
RP7504: 524.5 W
RP8604: 619.6 W
Wake Up LAN/HDMI/VGA/DP
Others
Array Mic x 8
Light Sensors Yes

38
Item
Specifications
RP6504 / RP7504 / RP8604
Mechanical
Dimension (WxHxD)
RP6504: 1488.4 × 937.6 × 117.7 mm (58.6 × 36.9 × 4.6
inch)
RP7504: 1709.4 × 1060.8 × 117.7 mm (67.3 × 41.8 ×
4.6 inch)
RP8604: 1957.0 × 1200.5 × 117.7 mm (77.0 × 47.3 ×
4.6 inch)
Dimension (Package)
(WxHxD)
RP6504: 1628(W)*1024(H)*208(D)
RP7504: 1863(W)*1155(H)*205(D)
RP8604: 2110(W)*1291(H)*205(D)
Net Weight | Gross
Weight
40.6 kg | 47.8 kg (89.5 lbs | 105.4 lbs)
52.2 kg | 64.5 kg (115.1 lbs | 142.2 lbs)
64.7 kg | 79.6 kg (142.6 lbs | 175.5 lbs)
Thickness of Machine
and Wall Mount
Wall mount (VESA Mount)
VESA for NUC 75 x 75 mm
Wall-Hanging Screw
Spec
M8*25L x 4
VESA
RP6504: 600 x 400 mm
RP7504: 800 x 400 mm
RP8604: 800 x 600 mm
Accessories
Power Cord By Region 3 m x 1
VGA Cable 3 m x 1
USB Cable (Type A-Type
B)_USB 3.0
3 m x 1
Type C Cable 1.5 m x 1
HDMI Cable 3 m x 1
Wireless USB Adapter
(WD02AT)
x 1 (inserted, detachable)
Writing Pen 2 pcs
Wall Mount x 1
Remote Control 1 pcs (BenQ customized)
Environment
Operating Temperature 0°C ~ 40°C
Operating Humidity 10% ~ 90% RH Non-Condensing
Storage Temperature -20°C ~ 60°C
Storage Humidity 10% ~ 90% RH Non-Condensing
Display Orientation Landscape Only
• Specifications and functions are subject to change without notice.
• The OPS should be equipped with fire-resistant enclosures.

39
Dimensions (RP6504)
Unit: mm

41
Dimensions (RP8604)
Unit: mm

42
Supported input signal resolution
Resolution
Input source
TYPE C VGA HDMI 2.0 DP
640 x 480 @ 60Hz
O
720 x 400 @ 85Hz
800 x 600 @ 60Hz
O O
1024 x 768 @ 60Hz
O O
1280 x 768 @ 60Hz
O O
1280 x 960 @ 60Hz
O
1280 x 1024 @ 60Hz
O O
1360 x 768 @ 60Hz
O O
1366 x 900 @ 60Hz
O O
1680 x 1050 @ 60Hz
O O
1920 x 1080 @ 60Hz
O O O O
3840 x 2160 @ 24Hz
O O O
3840 x 2160 @ 25Hz
O O O
3840 x 2160 @ 30Hz
O O O
3840 x 2160 @ 50Hz
O O O
3840 x 2160 @ 60Hz
O O O
480i (60Hz)
O O
480p (60Hz)
O O
576i (50Hz)
O O
576p (50Hz)
O O
720p (50Hz)
O O
720p (60Hz)
O O
1080i (50Hz)
O O
1080i (60Hz)
O O
1080p (50Hz)
O O
1080p (60Hz)
O O
•
O
: supported
• Blank: not supported

43
Troubleshooting
Problem Solution
No picture
Check the following:
• Is the display turned on? Check the power indicator of the
display.
• Is the signal source device turned on? Turn on the device and
try again.
• Are there any loose cable connections? Make sure that all
cables are connected firmly.
• Have you chosen an unsupported output resolution on the
computer? Refer to Supported input signal resolution on page
42 to select a supported resolution and try again.
• Have you chosen an unsupported output resolution on the
DVD or Blu-ray disc player? Refer to Supported input signal
resolution on page 42 to select a supported resolution and
try again.
No sound
Check the following:
• Have you turned on the mute function on the display or the
input source device? Turn off the mute function or increase
the audio volume level and try again.
• Are there any loose cable connections? Make sure that all
cables are connected firmly.
The computer input image
looks strange.
• Have you chosen an unsupported output resolution on the
computer? Refer to Supported input signal resolution on page
42 to select a supported resolution and try again.
• Use the Auto adjust function (VGA only) to let the display
automatically optimize the display of computer image.
• If the result of the Auto adjust function is not satisfactory, use
the Phase, H position, and V position functions to manually
adjust the image.
• Go to Display > Advanced settings > EDID. Set EDID to 1.4
and try again.
The control panel buttons do
not work.
Have you locked the control panel buttons? Unlock the buttons
and try again.
The remote control does not
work.
• Have you locked the remote control function? Unlock the
function and try again.
• Check for incorrect battery orientation.
• Check for dead batteries.
• Check your distance and angle from the display.
• Check whether remote control is properly being pointed at the
display’s remote control sensor window.
• Check for any obstacle between the remote control and the
remote control sensor window.
• Check that the remote control sensor window is not under
strong fluorescent lighting, or in direct sunlight.
• Check for any devices (computer or personal digital assistant,
PDA) nearby that transmit infrared signals which may cause
interference to signal transmission between the remote
control and the display. Turn off the infrared function of these
devices.

©2023 BenQ Corporation. All rights reserved. Trademarks and registered trademarks of
all companies and product mentioned herein belong to their respective owners.
Shape
the
of Learning
Produkt Specifikationer
Mærke: | BenQ |
Kategori: | Ikke kategoriseret |
Model: | RP8604 |
Vekselstrømsindgangsspænding: | 100-240 V |
Vekselstrømsindgangsfrekvens: | 50/60 Hz |
Bredde: | 1957 mm |
Dybde: | 117.7 mm |
Højde: | 1200.5 mm |
Vægt: | 64700 g |
Antal pr. pakke: | 1 stk |
Produktfarve: | Sort |
Pakkevægt: | 7960 g |
Pakkedybde: | 205 mm |
Pakkebredde: | 2110 mm |
Pakkehøjde: | 1291 mm |
Skærm diagonal: | 86 " |
Skærmopløsning: | 3840 x 2160 pixel |
Berøringsskærm: | Ja |
Wi-Fi: | Ja |
HD-type: | 4K Ultra HD |
Naturligt aspektforhold: | 16:9 |
Skærmens lysstyrke: | 450 cd/m² |
Responstid: | 8 ms |
Indbyggede højttaler(e): | Ja |
Opbevaringstemperatur (T-T): | -20 - 60 °C |
Relativ luftfugtighed ved drift (H-H): | 10 - 90 % |
Relativ luftfugtighed ved opbevaring (H-H): | 10 - 90 % |
Antal HDMI-porte: | 5 |
Ethernet LAN-porte (RJ-45): | 1 |
Antal USB 2.0-porte: | 1 |
Antal USB 3.2 Gen 1 (3.1 Gen 1) type-A-porte: | 7 |
Ethernet LAN: | Ja |
Processorkerner: | 4 |
VESA montering: | Ja |
Panel montering grænseflade: | 800 x 600 mm |
Strømforbrug (standby): | 0.5 W |
Strømforbrug (typisk): | 164.4 W |
Driftstemperatur (T-T): | 0 - 40 °C |
Ethernet LAN-datahastigheder: | 10,100,1000 Mbit/s |
Kabler inkluderet: | HDMI, Power, USB, USB Type-C, VGA |
Operativsystem installeret: | Android 13 |
Fjernbetjening inkluderet: | Ja |
Near Field Communication (NFC): | Ja |
Kan monteres på væggen: | Ja |
Antal indbyggede højttalere: | 2 |
Arbejdsområde: | 1895 x 1066 mm |
Paneltype: | IPS |
Indbygget mikrofon: | Ja |
S/PDIF-udgang: | Ja |
Tilslutning af hovedtelefoner: | 3,5 mm |
Antal USB type-C-porte: | 4 |
RAM kapacitet: | 8 GB |
Højttalereffekt: | 20 W |
Kontrastforhold (typisk): | 1200:1 |
Kontrastforhold (dynamisk): | 50000:1 |
Lav Blue Light teknologi: | Ja |
HDMI-version: | 2.0 |
DisplayPort-version: | 1.2a |
Antal DisplayPorts: | 1 |
Antal VGA-porte (D-sub): | 1 |
USB-stik type: | USB Type-A, USB Type-B, USB Type-C |
Berøringsskærmstype: | Infrarød |
Monteringssæt: | Ja |
Brugerhukommelse: | 64 GB |
Bevægelsessensor: | Ja |
Berøringsteknologi: | Multi-touch |
Indbygget processer: | Ja |
Linie ud: | Ja |
Line-in: | Ja |
Indbygget subwoofer: | Ja |
Grafikadapter: | Mali-G57 MC5 |
Subwoofer RMS-effekt: | 16 W |
Antirefleksskærm: | Ja |
Lydudgang: | 3 |
Tilslutning af mikrofon: | 3,5 mm |
Farveområde: | 72 % |
Processor arkitektur: | ARM Cortex A78 + ARM Cortex A55 |
Temperaturføler: | Ja |
Antal simultane touchpunkter: | 50 |
Antal HDMI-udgangsporte: | 1 |
Antal lyspenne: | 2 |
Grafikadapter familie: | ARM |
Lyspen inkluderet: | Ja |
OPS slot: | 1 |
PM2.5-sensor: | Ja |
Hårdhed: | 9H |
Fugtighedssensor: | Ja |
Pennebakke inkluderet: | Ja |
Overflademateriale: | Hærdet glas |
Svartid for berøringsfølsomme systemer: | 5 ms |
Slutdato for sikkerhedsopdateringer: | 30/11/2026 |
Interfacemodul USB 3.2 Gen 1 (3.1 Gen 1) Type-B portmængde: | 3 |
2: | 1 |
Har du brug for hjælp?
Hvis du har brug for hjælp til BenQ RP8604 stil et spørgsmål nedenfor, og andre brugere vil svare dig
Ikke kategoriseret BenQ Manualer
16 Juli 2025
14 Juli 2025
14 Juli 2025
11 Juli 2025
11 Juli 2025
11 Juli 2025
21 Februar 2025
21 Februar 2025
11 Januar 2025
26 December 2024
Ikke kategoriseret Manualer
- Imation
- Lenovo
- Murideo
- BaByliss
- Pearl Sports
- Bicker Elektronik
- Sicce
- Think Tank
- Max
- Gymrex
- Jokari
- Termozeta
- Lifenaxx
- Hämmerli
- Dracast
Nyeste Ikke kategoriseret Manualer
12 August 2025
12 August 2025
12 August 2025
12 August 2025
12 August 2025
12 August 2025
12 August 2025
12 August 2025
12 August 2025
12 August 2025