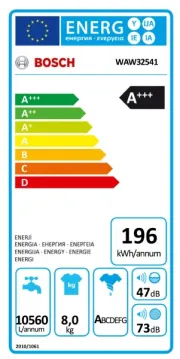
Bosch WAS24460AU Manual

Bosch Vaskemaskine WAS24460AU

Læs nedenfor 📖 manual på dansk for Bosch WAS24460AU (6 sider) i kategorien Vaskemaskine. Denne guide var nyttig for 10 personer og blev bedømt med 4.5 stjerner i gennemsnit af 2 brugere

Side 1/6
1
Safety instructions

The washing machine is heavy - take care when lifting it.
Warning: frozen hoses may tear/burst. Do not install the washing machine outdoors or in
areas where there is a risk of frost.
The washing machine may be damaged. Do not lift by projecting components (e.g. washing
machine door).
In addition to the instructions mentioned here, special regulations of the relevant water and
power supply companies may apply.
If in doubt, have the appliance connected by a technician.
Lay hoses and cables in such a way that there is no risk that they can be tripped over.
Environmental disposal
 Dispose of packaging in an environmentally friendly manner.
This appliance has been identified in accordance with the European Directive 2002/96/
EEC on Waste Electrical and Electronic Equipment (WEEE). The Directive specifies a
framework for the return and recycling of waste appliances and is valid throughout Europe.
Scope of delivery according to model Humidity in the drum is
caused by the final inspection.
Depending on the connection
A 24-40 mm dia. hose clip may also be required for connecting the siphon (available from
specialist retailers) apage 4: Water connection.
Useful tool
Spirit level for aligning the washing machine.
Water drainage
Elbow
for fixing the waste
water hose
Aqua-Stop Aqua-Secure Standard
Power cord
Water supply
Covers
Hose holder
2
Hose and cable lengths depending on model
Installation area
Stability is important to prevent the machine from wandering.
The installation area must be firm and level.
Soft floors/floor coverings such as e.g. carpets are not suitable.
If installing the appliance on a pedestal
It is to secure the washer dryer feet with holding brackets *. essential â
If installing the appliance on a wooden joist floor
If possible, install the washing machine in a corner.
Screw a water-resistant wooden panel (min. 30 mm thick) to the floor.
It is to secure the washing machine feet with holding brackets*. essential
*order no. WMZ 2200, WX 9756
Connection on left side or Connection on right side
Note
Note
Note
NoteNote: if hose holders are used, the hose lengths may be reduced.
Available from dealer/customer service:
Aqua-Stop extension hose**, approx. 2.50 m.
Longer supply hose, approx. 2.20 m, for standard model.
* GB plug: left side 145cm; right side: 185cm.
** order no. WMZ 2380, WZ 10130
Built-under/Built-in appliance
Build-under/build-in before connection to the power supply.
Installed in between kitchen units (built-under or built-in)
60 cm cavity width required.
Install washing machine only under a continuous worktop that is connected firmly to the
adjacent cupboards.
~135 cm
max. 100 cm
~100 cm
~ ~95 cm 140 cm
~ ~95 cm*135 cm*
3
Removing transport bolts
Before using the appliance for the first time, always remove and retain
all 4 transport bolts.
If transporting the appliance subsequently, always re-install the
transport bolts - this prevents damage to the machine page 6.a
Retain the screw and spacer.
1. Take the hoses (depending on the model) out of the holder and the elbow.
Remove the elbow.
2. Undo and remove all 4 transport bolts.
3. Take the power cord out of the holders. Remove the sleeves.
4. Insert the covers and lock them in place by pressing on the locking hook. Insert the hose
holders.
5. Fix the hoses in the hose holders.
4
Water connection depending on model
Risk of electric shock! Do not immerse the Aqua-Stop safety device in water (contains an
electric valve).
To prevent leakage or water damage, follow the instructions in this chapter.
: operate the washing machine with cold drinking water only.Attention
Do not connect to the mixer tap of a pressureless hot-water heater.
Do not use a used inlet hose. Only use the inlet hose supplied or one which was
purchased from an authorised specialist dealer.
If in doubt, have the appliance connected by a technician.
Water supply
Water inlet hose:
do not kink, crush, modify or cut throughAttention:
(strength is no longer guaranteed).
Optimum water pressure in the mains: 100-1000 kPa (1-10 bar)
When the tap is turned on, the water flow is at least 8 l/min.
If the water pressure is higher, install a pressure reducing valve.
Model: Aqua-Stop
Aqua-Secure
Standard
1. Connect the water supply hose to the tap.
Tighten plastic screw fittings by hand only.
2. Carefully turn on the tap and check that the connection
points are not leaking.
Attention: the screw connection is under water mains
pressure.
Water drainage
Water drainage hose:
Attention: do not kink or stretch.
Height difference between installation area and outlet:
0 - 100 cm
Drainage into a sink/bath tub:
Attention: secure the drainage hose to prevent it from slipping out of
the sink.
Attention: the plug must not be in the plug hole. When the water is being
pumped out of the washing machine, check that the water drains away
quickly enough. Do not immerse the end of the drainage hose in the water
that has been pumped out. There is a risk that water will be drawn back
into the washing machine.
Drainage into a siphon:
Attention: secure the connection with a 24-40 mm dia. hose clip
(available from a specialist retailer).
.Drainage into a plastic pipe with rubber sleeve:
Attention: Secure the drainage hose to prevent it from slipping out of
the drain.
min 10 mm
max.
max.
max.
max.max.
9
9
9
99
3/4

max.
max.
max.
max.max.
9
9
9
99
3/4

min 10 mm


Produkt Specifikationer

Mærke: Bosch
Kategori: Vaskemaskine
Model: WAS24460AU

Har du brug for hjælp?

Hvis du har brug for hjælp til Bosch WAS24460AU stil et spørgsmål nedenfor, og andre brugere vil svare dig


Vaskemaskine Bosch Manualer

Vaskemaskine Manualer

Nyeste Vaskemaskine Manualer