Canon VB-R13VE Manual
Canon
Overvågningskamera
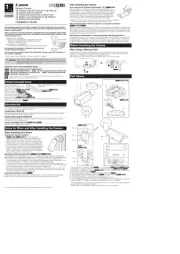
VB-R13VE

| Mærke: | Canon |
| Kategori: | Overvågningskamera |
| Model: | VB-R13VE |
| Kode for international beskyttelse (IP): | IP66 |
| Type: | IP-sikkerhedskamera |
| Vekselstrømsindgangsspænding: | 100-240 V |
| Højde: | 324 mm |
| Vægt: | 3530 g |
| Produktfarve: | Black, White |
| Kompatible hukommelseskort: | SD, SDHC, SDXC |
| Wi-Fi: | Ingen |
| Formfaktor: | Kuppel |
| Relativ luftfugtighed ved drift (H-H): | 5 - 85 % |
| Udgange til hovedtelefoner: | 1 |
| Ethernet LAN: | Ja |
| Driftstemperatur (T-T): | -10 - 55 °C |
| Maksimal opløsning: | 1920 x 1080 pixel |
| Sikkerhedsalgoritmer: | EAP-MD5, EAP-PEAP, EAP-TLS, EAP-TTLS, SSL/TLS |
| Beskyttelsesfunktioner: | Dust resistant, Water resistant |
| Understøttelse af sprog: | CHI (SIMPL), DEU, ENG, ESP, FRE, ITA, JPN, RUS, THA, TUR |
| Understøttede grafikopløsninger: | 320 x 180,320 x 240,480 x 270,640 x 360,640 x 480 (VGA),960 x 540,1280 x 720 (HD 720),1280 x 960,1920 x 1080 (HD 1080) |
| Forbindelsesteknologi: | Ledningsført |
| Certificering: | EN55032 A, FCC B A, ICES-3/NMB-3 A, VCCI A, C-tick AS/NZS EN55032 A, CNS13438 A, KN32 A, EN55024, KN35, EN50581, IEC/UL/EN 60950-1, IEC/UL/EN 60950-1/-22, EN50130-4, IEC/UL/EN 60529 IP66, IEC/UL/EN 62262 IK10, NEMA 250 4X |
| Strømforbrug (maks.): | 34.8 W |
| Kabelteknologi: | 10/100Base-T(X) |
| Netværksstandarder: | IEEE 802.1x |
| Understøttede netværksprotokoller: | IPv4, IPv6, TCP/IP, UDP, HTTP, FTP, SNMPv1/v2c/v3 (MIB2), DHCP, DNS, AutoIP, mDNS, ARP, ICMP, POP3, NTP, SMTP, RTP/RTCP, RTSP, SSL/TLS, IPsec, ONVIF, WV-HTTP |
| Webbaseret administration: | Ja |
| Strømkilde type: | PoE |
| Monteringstype: | Loft/væg |
| Diameter: | 229 mm |
| Indbygget kortlæser: | Ja |
| Full HD: | Ja |
| Indbygget HDD: | Ingen |
| Video komprimeringsformater: | H.264 |
| Understøttet placering: | Indendørs |
| Understøttede mobile operativsystemer: | Android, iOS |
| Mikrofonindgang: | Ja |
| Hvidbalance: | Auto, Daylight, Fluorescent, Halogen, Manual, Mercury lamp, Sodium lamp |
| Sensortype: | CMOS |
| Billedstabilisator: | Ja |
| Samlet antal megapixels: | 2.1 MP |
| Støjreduktion: | Ja |
| Optisk zoom: | 30 x |
| Digital zoom: | 20 x |
| Lyseksponeringstilstande: | Aperture priority AE, Auto, Manual, Shutter priority AE |
| Grænseflade: | RJ-45 |
| Autofokus: | Ja |
| Hældningsvinkelområde: | 0 - 180 ° |
| Progressiv scanning: | Ja |
| Voice codecs: | G.711 |
| Strøm over Ethernet (PoE): | Ja |
| Dag/nat funktion: | Ja |
| Minimumsbelysning: | 0.05 Lux |
| Panoreringsområde: | 0 - 360 ° |
| Optisk sensorstørrelse: | 1/3 " |
| Zoom kapacitet: | Ja |
| Maksimale blænderåbning tal: | 4.6 |
| Nattesyn: | Ja |
| Fortrolighedspolitik maskering: | Ja |
| Ethernet-grænsefladetype: | Hurtigt ethernet |
| Bevægelsessensor (video): | Ja |
| Antal kameraer: | 1 |
| Brændviddeområde: | 4.4 - 132 mm |
| Kameraets lukkerhastighed: | 1, 1/2, 1/4, 1/8, 1/15, 1/30, 1/60, 1/100, 1/120, 1/250, 1/500, 1/1000, 1/2000, 1/4000, 1/8000, 1/10000, 1/16000 sek./side |
| Hældningshastighed: | 450 grader i sekundet |
| Panoreringshastighed: | 450 grader i sekundet |
| Minimum RAM: | 2000 MB |
| Støjregistrering: | Ja |
| Advarsel notifikationstype: | |
| Forudindstillede punkter: | Ja |
| Automatisk forstærkningskontrol: | Ja |
| Adgangskodebeskyttelse type: | Bruger |
| Strømforbrug (Power over Ethernet (PoE)): | 22.4 W |
| Lydsystem fuld dupelx: | Ja |
| Antal sprog: | 10 |
Har du brug for hjælp?
Hvis du har brug for hjælp til Canon VB-R13VE stil et spørgsmål nedenfor, og andre brugere vil svare dig
Overvågningskamera Canon Manualer
8 August 2025
5 Juli 2025
26 December 2024
28 August 2024
27 August 2024
27 August 2024

14 August 2024

9 August 2024

7 August 2024

27 Juli 2024
Overvågningskamera Manualer
- Orion
- Sentry360
- TIGERSECU
- DVDO
- Ipevo
- Crestron
- Trust
- Denver
- Illustra
- Extech
- TRENDnet
- Ernitec
- ION
- Broan
- Defender
Nyeste Overvågningskamera Manualer

15 December 2025

11 December 2025

11 December 2025

11 December 2025

10 December 2025

10 December 2025

10 December 2025

7 December 2025

5 December 2025

5 December 2025