Re-attach the battery cover to its original state.
Trackball Mouse
Manual
ENGLISH
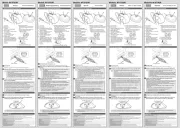
Remove the battery cover.
The LED lamp is lit red for a fixed time.
* When remaining battery is low, the LED blinks red for a fixed time.
1
Insert battery
2
Turn the power ON
3
Connecting to a PC
Slide the power mode selection switch to either the H (High speed
mode) or L (Low energy mode) position.
Connect the attached USB cable to the USB microB port on this product.
Start up the PC.
The driver is automatically installed and the trackball can be used.
21
(Power OFF)
(Low energy mode)
(High speed mode)
In High speed mode, tracking performance becomes greater when moving the ball
quickly, but battery life is shortened.
Operates with both the power ON/OFF when connected by cord. There is no difference
between High speed mode and Low energy mode.
Can be used without batteries when connected by cord.
Insert with the correct battery plus and minus orientation.
Names of Parts
Only when connecting 2.4 GHz wireless, Bluetooth Only when connecting 2.4 GHz wireless, Bluetooth
Insert battery according to instructions displayed on the bottom surface.
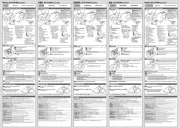
For wired connection
Start up the PC.
Insert the receiver unit into a USB port on the PC.
Change the connection mode selection switch to “2.4 GHz wireless”.
The driver is automatically installed and the trackball can be used.
Insert the USB connector of this product into the USB port of the PC.
When connecting by 2.4 GHz wireless
When cleaning around the optical sensor, take care not to damage the sensor.
Change the connection mode
selection switch to
“Bluetooth”.
Click on the “Start” button on the lower left
of the screen, and click on the “Settings”
icon.
When connecting my Bluetooth connection
Click on “Devices” on the “Windows Settings”
screen.
Click on “Bluetooth & other devices”, and click
on “Add Bluetooth or other device”.
Click “Bluetooth”.
For Windows
®
10
If your computer does not support Bluetooth 4.0 or you
upgraded from Windows 8.1 or Windows 7
Please use a Bluetooth
®
adapter compatible with
Bluetooth 4.0.
When the add device
screen is displayed, hold
down the pairing button
on the bottom for two to
three seconds, and then
release.
Click on “EX-G Pro Trackball” to
start pairing.
When it changes to “Connected”,
click on “Done”.
This product is added
to “Mouse, keyboard, &
pen”, displays
“Connected “ and
pairing is complete.
For Windows
®
7
Please purchase an adapter compatible with Bluetooth 4.0
compatible with Windows 7 that you can purchase in your region.
For the pairing method, please refer to the instruction manual
for the Bluetooth
®
adapter compatible with Bluetooth 4.0.
(* We cannot take responsibility for its operation)
Can only be used for Macintosh compatible with
Bluetooth 4.0.
Change the connection mode
selection switch to
“Bluetooth”.
From the Apple menu, click “System
Preferences...” to display the system
environment settings screen.
Click “Bluetooth” to display the “Bluetooth”
environment settings screen.
During the device
search, hold down the
pairing button on the
bottom surface for two
to three seconds, and
then release.
Select “EX-G Pro Trackball”, and click
“Connect” to start pairing.
When it changes to “Connected”, pairing is
completed.
Energy saving mode
In order to reduce battery wear, when the power mode selection switch is on H or L and is not operated for a set period of time,
the trackball automatically enters energy saving mode.
Moving the ball restores it from energy saving mode.
* For two to three seconds after restoring from energy saving mode, trackball operation may be unstable.
For macOS High Sierra (10.13)
Pairing mode is activated, and the LED lamp blinks red.
Pairing mode is activated, and the LED lamp blinks red.
Trackball main unit
Receiver unit
When connecting by cord, 2.4 GHz wireless connection and Bluetooth connection cannot be used.
Ensure the correct orientation and insertion location of the connector.
If strong resistance is felt when inserting, check the shape and orientation of the connector. Forcibly
inserting the connector may damage the connector, and there is a risk of injury.
Do not directly touch the terminal area of the USB connector.
Ensure the correct orientation and insertion location of the connector.
If strong resistance is felt when inserting, check the shape and orientation of the connector. Forcibly inserting the
connector may damage the connector, and there is a risk of injury.
Do not directly touch the terminal area of the USB connector.
Hint for when pairing
Change the connection mode
selection switch to “Bluetooth”.
Select “EX-G ProTrackball” from the
list of devices.
1
2
3
4
5
6
7
8
9
10
11
12
13
14
15
16
17
18
19
20
Pairing button
Pairing button
Setzen Sie die Batterieabdeckung wieder in ihrem ursprünglichen
Zustand auf.
Trackball-Maus
Bedienungsanleitung
Entfernen Sie die Batterieabdeckung.
Die LED-Lampe leuchtet eine bestimmte Zeit lang rot.
* Wenn die Restkapazität des Akkus niedrig ist, blinkt die LED eine bestimmte Zeit lang rot.
1
Batterie einlegen
2
Schalten Sie das Gerät EIN
3
Verbindung mit dem PC
Schieben Sie den Wahlschalter für den Leistungsmodus in die Position
„H“ (Hi-Speed/Hochgeschwindigkeitsmodus) oder „L“ (Low-Energy-Mo-
dus/Niedrigenergie-Modus).
Schließen Sie das beigefügte USB-Kabel an den USB-MicroB-Anschluss dieses
Produkts an.
Starten Sie den PC.
Der Treiber wird automatisch installiert, und der Trackball kann verwendet werden.
21
(AUS-geschaltet)
(Niedrigenergie-Modus)
(Modus mit hoher
Geschwindigkeit)
Im Hi-Speed-Modus steigt die Tracking-Leistung, wenn die Kugel schnell bewegt
wird, die Akkulaufzeit wird jedoch verkürzt.
Arbeitet sowohl mit EIN/AUS, wenn mit Kabel verbunden. Es gibt keinen Unterschied
zwischen Hochgeschwindigkeitsmodus und Niedrigenergie-Modus.
Kann bei angeschlossenem Kabel ohne Batterien verwendet werden.
Mit der richtigen Batterie Plus-und Minus-Ausrichtung einlegen.
Bezeichnung der Teile
Nur beim kabellosen Anschluss von 2,4 GHz, Bluetooth Nur beim kabellosen Anschluss von 2,4 GHz, Bluetooth
Legen Sie die Batterie gemäß den Anweisungen auf der Unterseite ein.
Für Kabelverbindung
Starten Sie den PC.
Stecken Sie die Empfängereinheit in eine USB-Büchse des Computers.
Ändern Sie die Anschluss-Modus-Wahlschalter auf „2,4 GHz kabellos“.
Der Treiber wird automatisch installiert, und der Trackball kann verwendet werden.
Stecken Sie den USB-Anschluss dieses Produkts in den USB-Port des PCs.
Bei Anschluss mit 2,4 GHz kabellos
Stellen Sie sicher, dass Sie den optischen Sensor beim Reinigen der
Oberfläche nicht beschädigen.
Verbindungsmodus ändern
Wahlschalter auf „Bluetooth“.
Klicken Sie auf die Schaltfläche „Start“ am
linken unteren Rand des Bildschirms und dann
auf das Symbol „Einstellungen“ .
Beim Verbinden meiner Bluetooth-Verbindung
Klicken Sie auf „Geräte“ auf dem Bildschirm
„Windows-Einstellungen“.
Klicken Sie auf „Bluetooth & andere Geräte“,
und klicken Sie auf „Bluetooth oder ein
anderes Gerät hinzufügen“.
Für Windows
®
10
Falls Ihr Computer Bluetooth 4.0 nicht unterstützt oder
Sie ein Upgrade von Windows 8.1 oder Windows 7
durchgeführt haben, verwenden Sie bitte einen
Bluetooth
®
-Adapter, der mit Bluetooth 4.0 kompatibel ist.
Wenn der Bildschirm
„Gerät hinzufügen“
angezeigt wird, halten Sie
die Kopplungstaste zwei bis
drei Sekunden lang gedrückt
und lassen sie dann los.
Klicken Sie auf „EX-G Pro
Trackball“, um das die
Kopplung zu starten.
Wenn es zu „Verbunden“
wechselt, klicken Sie auf
„Fertig“.
Dieses Produkt wird
zu „Maus, Tastatur &
Stift“ hinzugefügt,
zeigt „Verbunden“ an
und die Kopplung ist
abgeschlossen.
Für Windows
®
7
Bitte kaufen Sie einen Adapter, der mit Bluetooth 4.0, kompatibel
mit Windows 7, kompatibel ist und in Ihrer Gegend erhältlich ist.
Informationen zur Kopplungsmethode finden Sie in der
Bedienungsanleitung des Bluetooth
®
-Adapters, der mit
Bluetooth 4.0 kompatibel ist.
(* Wir können keine Gewähr für den Betrieb übernehmen)
Kann nur für Macintosh-Computer verwendet werden,
die mit Bluetooth 4.0 kompatibel sind.
Ändern Sie die Verbindungs-
modus-Wahlschalter auf
„Bluetooth“.
Klicken Sie im Apple-Menü auf „Systemein-
stellungen ...“, um den Bildschirm mit den
Systemumgebungseinstellungen anzuzeigen.
Klicken Sie auf „Bluetooth“, um den
Bildschirm mit den Einstellungen für die
Bluetooth-Umgebung anzuzeigen.
Halten Sie die
Paarungstaste während
der Gerätesuche zwei
bis drei Sekunden lang
gedrückt und lassen Sie
diese dann los.
Wählen Sie „EX-G Pro Trackball“, und klicken
Sie auf „Verbinden“, um die Kopplung zu
starten.
Wenn es zu „Verbunden“ wechselt, ist die
Kopplung abgeschlossen.
Energiesparmodus
Um den Batterieverschleiß zu reduzieren, schaltet der Trackball automatisch in den Energiesparmodus, wenn der Wahlschalter
für den Leistungsmodus auf H oder L steht und eine bestimmte Zeit lang nicht betätigt wird.
Ein Bewegen der Kugel stellt sie aus dem Energiesparmodus wieder zurück.
* Zwei bis drei Sekunden nach dem Zurückstellen aus dem Energiesparmodus kann der Trackball-Betrieb instabil sein.
Für macOS High Sierra (10.13)
Der Kopplungsmodus ist aktiviert, und die LED-Lampe blinkt rot.
Der Kopplungsmodus ist aktiviert, und die LED-Lampe blinkt rot.
Trackball Hauptgerät
Empfängereinheit
Achten Sie auf die richtige Ausrichtung und den richtigen Einsteckort des Steckers.
Ist beim Einsetzen starker Widerstand spürbar, überprüfen Sie die Form und Ausrichtung des Steckers. Ein gewaltsames
Einführen des Steckers kann den Stecker beschädigen, zudem besteht Verletzungsgefahr.
Berühren Sie den USB-Stecker nicht direkt.
Tipp zur Kopplung
Ändern Sie die Verbindungsmo-
dus-Wahlschalter auf „Bluetooth“.
Wählen Sie „EX-G Pro Trackball“ aus
der Liste der Geräte.
1
2
3
4
5
6
7
8
9
10
11
12
13
14
15
16
17
18
19
20
Paarungstaste
Paarungstaste
Remettez le couvercle de la batterie en place.
Souris Trackball
Manuel
Enlevez le couvercle de la batterie.
La lampe LED est rouge pendant un temps fixe.
* Lorsque la batterie restante est faible, le voyant LED clignote rouge pendant un
temps fixe.
1
Insérez la batterie
2
Mettez l’appareil sous tension
3
Connexion à un PC
Faites glisser le commutateur de sélection de mode à la position H
(mode de vitesse élevée) ou L (mode faible énergie).
Connectez le câble USB relié au port USB microB sur ce produit.
Démarrez le PC.
Le pilote est installé automatiquement et le trackball peut être utilisé.
21
(Arrêt)
(En Mode Veille)
(En Mode Haute Vitesse)
En mode de vitesse Hi, le suivi des performances augmente lorsque vous déplacez
rapidement la boule, mais l’autonomie des piles est réduite.
Fonctionne avec l’alimentation ON/OFF lorsqu’il est connecté par câble. Il n’y a pas de
différence entre les modes de vitesse Hi (élevée) et Low (mode faible énergie).
Peut être utilisé sans les piles lorsqu’il est connecté par câble.
Insérez avec la bonne orientation de la batterie indiquée par les signes plus et moins.
Noms des pièces
Uniquement lors de la connexion 2,4 GHz sans fil, Bluetooth Uniquement lors de la connexion 2,4 GHz sans fil, Bluetooth
Insérez la batterie selon les instructions affichées sur la surface inférieure.
Pour une connexion filaire
Démarrez le PC.
Connectez l’appareil récepteur à un port USB du PC.
Changez le commutateur de sélection de mode de connexion à «2,4GHz sans fil».
Le pilote est installé automatiquement et le trackball peut être utilisé.
Insérez le connecteur USB de ce produit dans le port USB du PC.
Lors de la connexion par 2,4 GHz sans fil
Veillez à ne pas endommager le capteur optique lorsque vous nettoyez la surface.
Changez le mode de connexion
depuis le commutateur de
sélection sur «Bluetooth».
Cliquez sur le bouton «Démarrer» en bas
à gauche de l’écran et cliquez sur l’icône «
Paramètres» .
Lors de l'activation de p1-ma connexion Bluetooth
Cliquez sur «Appareils» sur l’écran «Paramètres
Windows».
Cliquez sur «Bluetooth & autres appareils» et
cliquez sur «Ajouter Bluetooth ou un autre
périphérique».
Cliquez sur ’’Bluetooth’’.
Pour Windows
®
10
Si votre ordinateur ne supporte pas le Bluetooth 4.0 ou
a été mis à niveau depuis Windows 8.1 ou Windows 7,
veuillez utiliser un adaptateur Bluetooth
®
compatible
avec le Bluetooth 4.0.
Lorsque l’écran d’ajout
d’un périphérique est
affiché, maintenez le
bouton d’appariement en
bas pendant deux ou trois
secondes, et puis relâchez.
Cliquez sur «EX-G Pro Trackball»
pour démarrer l’appariement.
Quand il passe en «Connecté»,
cliquez sur «Terminé».
Ce produit est ajouté à la
«Souris, au clavier, & au
stylo», il affiche «
Connecté» et
l’appariement est complet.
Pour Windows
®
7
Veuillez acheter un adaptateur compatible avec Bluetooth 4.0
compatible avec Windows 7, que vous pouvez acheter dans
votre région.
Pour la méthode d’appariement, veuillez vous référer au manuel
d’instructions pour l’adaptateur Bluetooth
®
compatible avec le
Bluetooth 4.0
.
(* Nous ne pouvons pas assumer la responsabilité de son fonctionnement)
Utilisable uniquement sur Macintosh compatible avec
Bluetooth 4.0.
Passez le commutateur de
sélection de mode de
connexion à ’’Bluetooth’’.
A partir du menu de Apple, cliquez
sur ’’Préférences du système...’’ pour afficher
l’écran des paramètres de l’environnement
système.
Cliquez sur «Bluetooth» pour afficher l’écran des
paramètres de l’environnement «Bluetooth».
Au cours de la recherche
d’un appareil, maintenez
le bouton d’appariement
sur la surface inférieure
pendant deux ou trois
secondes, puis relâchez.
Sélectionnez «EX-G Pro Trackball » et cliquez
sur «Connecter» pour démarrer l’appariement.
Lorsqu’il passe en «Connecté»,
l’appariement est terminé.
Mode économie d’énergie
Afin de réduire l’usure de la batterie, lorsque le commutateur de sélection de mode d’alimentation est sur H ou L et ne fonctionne
pas pendant une période de temps déterminée, le trackball entre automatiquement en mode économie d’énergie.
Déplacer la boule permet sa restauration en mode économie d’énergie.
* Pendant deux ou trois secondes après la restauration du mode économie d’énergie, le fonctionnement du trackball peut être instable.
Pour macOS High Sierra (10.13)
Le mode d’appariement est activé et la lampe LED clignote
en rouge.
Le mode d’appariement est activé et la lampe LED clignote
en rouge.
Module principal du Trackball
Appareil récepteur
Assurez-vous d’avoir la bonne orientation et l’emplacement d’insertion du connecteur.
Si une forte résistance est perçue lors de l’insertion, vérifiez la forme et l’orientation du connecteur. L’insertion par la
force du connecteur peut l’endommager, et il y a un risque de lésions.
N’entrez pas en contact direct avec la surface du terminal du connecteur USB.
Astuces pour l’appariement
Passez le commutateur de sélection
de mode de connexion à ’’Bluetooth’’.
Sélectionnez «EX-G Pro Trackball»
dans la liste des périphériques ou
appareils.
1
2
3
4
5
6
7
8
9
10
11
12
13
14
15
16
17
18
19
20
Bouton
d’appariement
Vuelva a colocar la tapa de la pila a su estado original.
Ratón Trackball
Manual
Extraiga la tapa de la pila.
La lámpara LED se ilumina en color rojo por un tiempo fijo.
* Cuando queda poca batería, el LED parpadea en rojo por un tiempo fijo.
1
Introduzca la pila
2
Encienda la corriente eléctrica
3
Conexión a un PC
Deslice el interruptor de selección de modo a la posición L (modo de
ahorro de energía) o H (modo de alta velocidad).
Conecte el cable USB al puerto USB microB en este producto.
Encienda el PC.
El controlador se instala automáticamente y se puede utilizar el trackball.
21
(Apagado)
(Modo de ahorro de energía)
(Modo de alta velocidad)
En el modo de alta velocidad, aumenta el rendimiento de seguimiento cuando se
mueve la bola rápidamente, pero se acorta la duración de la batería.
Funciona con la corriente Encendida/Apagada cuando se conecta por cable. No hay
diferencia entre el modo de alta velocidad y el modo de ahorro de energía.
Puede utilizarse sin pila cuando se conecta por cable.
Introduzca con la orientación más y menos de la pila correcta.
Nombres de las partes
Sólo cuando se realiza la conexión inalámbrica de 2,4 GHz, Bluetooth Sólo cuando se realiza la conexión inalámbrica de 2,4 GHz, Bluetooth
Introduzca la pila según las instrucciones que aparecen en la superficie
inferior.
Para la conexión por cable
Encienda el PC.
Introduzca el receptor en un Puerto USB en el PC.
Cambie el interruptor de selección del modo de conexión "inalámbrica de 2,4 GHz".
El controlador se instala automáticamente y se puede utilizar el trackball.
Introduzca el conector USB de este producto en el puerto USB del PC.
Cuando se conecta a través de la conexión inalámbrica de 2,4 GHz
Tenga cuidado de no dañar el sensor óptico cuando limpie la zona.
Cambie el interruptor de
selección del modo de
conexión a "Bluetooth".
Haga clic en el botón "Inicio" en la parte
inferior izquierda de la pantalla y haga clic en
el icono "Configuración" .
Al conectar mi conexión Bluetooth
Haga clic en "Dispositivos" en la pantalla de
"Configuración de Windows".
Haga clic en "Bluetooth y otros dispositivos" y
haga clic en "Agregar Bluetooth u otro dispositivo".
Haga clic en "Bluetooth".
Para Windows
®
10
Si su ordenador no es compatible con Bluetooth 4.0 o
actualizó desde Windows 8.1 o Windows 7 por favor,
use un adaptador de Bluetooth
®
compatible con
Bluetooth 4.0.
Cuando aparezca la
pantalla de agregar
dispositivo, mantenga
presionado el botón de
sincronización en la parte inferior
durante dos o tres segundos y después suéltelo.
Haga clic en "EX-G Pro
Trackball" para iniciar la
sincronización.
Cuando cambia a
"Conectado", haga clic en
"Hecho".
Este producto se
agrega a "Ratón,
teclado y lápiz",
muestra "Conectado"
y se p1-ha completado la
sincronización.
Para Windows
®
7
Compre un adaptador compatible con Bluetooth 4.0 compatible
con Windows 7 que puede adquirir en su país o región.
Para el método de sincronización, consulte el manual de
instrucciones del adaptador Bluetooth
®
compatible con
Bluetooth 4.0.
(* No podemos asumir la responsabilidad de su funcionamiento)
Solo se puede utilizar para Macintosh compatible con
Bluetooth 4.0.
Cambie el interruptor de
selección del modo de
conexión a "Bluetooth".
En el menú Apple, haga clic en "Preferencias
del sistema...'' para que aparezca la pantalla
de configuración de entorno del sistema.
Haga clic en "Bluetooth" para que aparezca la
pantalla de configuración del entorno de
"Bluetooth".
Durante la búsqueda
de dispositivos,
mantenga pulsado el
botón de sincronización
en la superficie inferior
durante dos o tres segundos y luego suelte.
Seleccione "EX-G Pro Trackball" y haga clic
en "Conectar" para iniciar la sincronización.
La sincronización se p1-ha completado cuando
cambia a "Conectado".
Modo de ahorro de energía
Con el fin de reducir el desgaste de la pila, cuando el interruptor de selección de modo de alimentación está en H o L y no se
haya utilizado durante un periodo de tiempo, el trackball entra automáticamente en modo de ahorro de energía.
El mover la bola lo restaura desde el modo de ahorro de energía.
* Durante dos o tres segundos después de restaurar desde el modo ahorro de energía, el funcionamiento de trackball puede ser
inestable.
Para macOS High Sierra (10.13)
Se activa el modo de sincronización, y la lámpara LED
parpadea en rojo.
Se activa el modo de sincronización, y la lámpara LED
parpadea en rojo.
Unidad principal de trackball
Receptor
Garantice la ubicación correcta de la orientación y la inserción del conector.
Si no se puede introducir fácilmente, compruebe la forma y la orientación del conector. Introducir por la fuerza el
conector puede dañar el conector y corre el riesgo de lesionarse.
No toque directamente la zona del terminal del conector USB.
Sugerencia para cuando se están sincronizando
Cambie el interruptor de selección del
modo de conexión a "Bluetooth".
Seleccione "EX-G Pro Trackball" en la
lista de dispositivos.
1
2
3
4
5
6
7
8
9
10
11
12
13
14
15
16
17
18
19
20
Botón de
sincronización
Botón de
sincronización
DEUTSCH
Falls Sie die Verbindung über ein Kabel herstellen, können die 2,4-GHz-Drahtlosverbindung und die
Bluetooth-Verbindung nicht verwendet werden.
Achten Sie auf die richtige Ausrichtung und den richtigen Einsteckort des Steckers.
Ist beim Einsetzen starker Widerstand spürbar, überprüfen Sie die Form und Ausrichtung des
Steckers. Ein gewaltsames Einführen des Steckers kann den Stecker beschädigen, zudem besteht
Verletzungsgefahr.
Berühren Sie den USB-Stecker nicht direkt.
FRANÇAIS
Lors de la connexion par câble, la connexion sans fil de 2,4 GHz et la connexion Bluetooth sont
inutilisables.
Assurez-vous d’avoir la bonne orientation et l’emplacement d’insertion du connecteur.
Si une forte résistance est perçue lors de l’insertion, vérifiez la forme et l’orientation du connecteur.
L’insertion par la force du connecteur peut l’endommager, et il y a un risque de lésions.
N’entrez pas en contact direct avec la surface du terminal du connecteur USB.
Bouton
d’appariement
ESPAÑOL
Cuando se conecta por cable, no se pueden utilizar la conexión inalámbrica de 2,4 GHz y la
conexión Bluetooth.
Garantice la ubicación correcta de la orientación y la inserción del conector.
Si no se puede introducir fácilmente, compruebe la forma y la orientación del conector. Introducir
por la fuerza el conector puede dañar el conector y corre el riesgo de lesionarse.
No toque directamente la zona del terminal del conector USB.
Klicken Sie auf „Bluetooth“.
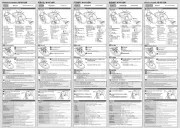
Count number 500/1000/1500 dpi (switchable)
Interface USB
* For wired/wireless 2.4 GHz connection mode
Connector shape USB (A) male
* For wired/wireless 2.4 GHz connection mode
Compatible OS Windows
®
10
、
Windows
®
8.1
、
Windows
®
RT 8.1
、
Windows
®
7
、
macOS High Sierra(10.13) *
*
Support only for models with
Bluetooth4.0 or later installed as standard
(You may need to update to the latest
version of each OS or install service packs.)
Communication
method
GFSK method
Radio frequency 2.4 GHz band
Radio wave range Non-magnetic materials (such as wooden
desks): approximately 10 m
Magnetic materials (such as iron desks):
approximately3 m
* These are test values in company
environment and
are not guaranteed.
Read method Optical sensor method
Emitted light type Non-visible wavelength range
Number of buttons 8 * including wheel button
External
dimensions
Trackball main unit:
approx. W108 mm × D135 mm × H48 mm
Receiver unit:
approx. W14 mm × D19 mm × H5 mm
Weight Trackball main unit:
Approximately 260 g (not including batteries)
Receiver unit: Approximately 2 g
Operational
temperature/humidity
5°C to 40°C/up to 90%RH (without
condensation however)
Storage temperature/
humidity
-10°C to 60°C/up to 90%RH (without
condensation however)
Supported batteries Any 1 of AA alkaline battery, AA
manganese battery, AA type nickel-metal
hydride battery
Operational time Estimate when using alkaline battery
<Low energy mode>
Continuous operation time:
(2.4 GHz) approx. 134 hours
(Bluetooth) approx. 167 hours
Continuous standby time:
(2.4 GHz) approx. 925 days
(Bluetooth) approx. 925 days
Estimated usage time:
(2.4 GHz) approx. 301 days
(Bluetooth) approx. 366 days
<High speed mode>
Co
ntinuous operation time:
(2.4 GHz) approx. 91 hours
(Bluetooth) approx. 104 hours
Continuous standby time:
(2.4 GHz) approx. 925 days
(Bluetooth) approx. 925 days
Estimated usage time:
(2.4 GHz) approx. 211 days
(Bluetooth) approx. 240 days
(The above is assuming the computer is
used for eight hours a day with 5% of that
time spent operating the trackball.)
Zählnummer 500/1000/1500 dpi (einstellbar)
Interface USB
* Für kabelgebundenen/kabellosen
2,4-GHz-Verbindungsmodus
Steckerform USB (A) Stecker
* Für kabelgebundenen/kabellosen
2,4-GHz-Verbindungsmodus
Kompatibel OS Windows
®
10, Windows
®
8.1,
Windows
®
RT 8.1, Windows
®
7, macOS
High Sierra(10.13) *
*
Unterstützung nur für Modelle mit Bluetooth 4.0
oder höher, die standardmäßig installiert sind
(Sie müssen möglicherweise auf die neueste
Version des jeweiligen Betriebssystems
aktualisieren oder Service Packs installieren.)
Kommunikationsverfahren
GFSK Methode
Funkfrequenz 2,4 GHz Band
Radiowellenbereich Nicht magnetische Materialien (wie
Holzschreibtische): etwa 10 m
Magnetische Materialien (wie
Schreibtische aus Eisen): etwa 3 m
*
Es handelt sich um Testwerte in der Unter-
nehmensumgebung, die nicht garantiert sind.
Lesemethode Optisches Sensorverfahren
Typ emittiertes Licht Bereich nicht sichtbarer Wellenlängen
Anzahl der Tasten 8 * darunter Radtaste
Außenmaße Trackball Hauptgerät:
Ungefähr B 108 mm × T135 mm × H 48 mm
Empfängereinheit:
Ungefähr B 14 mm × T 19 mm × H 5 mm
Gewicht
Trackball Hauptgerät: Ca. 260 g (ohne Batterien)
Empfängereinheit: Ca. 2 g
Betriebstemperatur/
Betriebsfeuchtigkeit
5° bis 40° C/bis zu 90 % relative
Luftfeuchtigkeit (doch ohne Kondensation)
Lagertemperatur/
Lagerfeuchtigkeit
-10° bis 60° C/biss zu 90 % relative
Luftfeuchtigkeit (doch ohne Kondensation)
Unterstützten
Batterien
Jede 1 AA Alkali-Batterie, AA Mangan-
Batterie, AA Nickel-Metallhydrid-Batterie
Betriebszeit
Schätzung bei der Verwendung einer Alkali-Batterie
<Niedrigenergie-Modus>
Dauerbetriebszeit:
(2,4 GHz)Ungefähr 134 Stunden
(Bluetooth)Ungefähr 167 Stunden
Dauer der Standby-Zeit:
(2,4 GHz)Ungefähr 925 Tage
(Bluetooth)Ungefähr 925 Tage
Geschätzte Nutzungsdauer:
(2,4 GHz)Ungefähr 301 Tage
(Bluetooth)Ungefähr 366 Tage
<High-Speed-Modus>
Dauerbetriebszeit:
(2,4 GHz)Ungefähr 91 Stunden
(Bluetooth)Ungefähr 104 Stunden
Dauer der Standby-Zeit:
(2,4 GHz)Ungefähr 925 Tage
(Bluetooth)Ungefähr 925 Tage
Geschätzte Nutzungsdauer:
(2,4 GHz)Ungefähr 211 Tage
(Bluetooth)Ungefähr 240 Tage
(Obige Berechnung geht davon aus, dass
der Computer acht Stunden am Tag
benutzt wird, wobei 5 % der Zeit mit dem
Betrieb des Trackballs verbracht werden.)
Nombre de compte 500/1000/1500 ppp (commutables)
Interface USB
* Pour le mode de connexion filaire/sans
fil de 2,4 GHz
Forme du
connecteur
USB (A) mâle
* Pour le mode de connexion filaire/sans
fil de 2,4 GHz
Systèmes
d’exploitation
compatibles
Windows
®
10, Windows
®
8.1,
Windows
®
RT 8.1, Windows
®
7,
macOS High Sierra(10.13) *,
*
Prise en charge uniquement pour les
modèles avec Bluetooth4.0 ou une
version ultérieure installée en standard
(vous devrez peut-être le mettre à jour vers
la toute dernière version de chaque système
d’exploitation ou installer des packs de service.)
Méthode de
communication
Méthode GFSK
Fréquence radio Bande 2,4 GHz
Méthode par onde
radio
Matériaux non magnétiques (tels que des
pupitres en bois): environ 10 m
Matériaux magnétiques (tels que des
pupitres en fer): environ 3 m
*
Ce sont des valeurs d’essai en environnement
de l’entreprise et elles ne sont pas garanties.
Lire la méthode Méthode de capteur optique
Type de lumière émis Gamme de longueurs d’onde non visibles
Nombre de boutons 8 * y compris le bouton de la boule
Dimensions
externes
Module principal du Trackball:
Environ L108 mm × P135 mm × H48 mm
Appareil récepteur:
Environ L14 mm × P19 mm × H5 mm
Poids Module principal du Trackball:
Environ 260g (batteries non incluses)
Appareil récepteur: Environ 2g
Température de fonc-
tionnement/humidité
5°C à 40°C / jusqu’à 90% de RH
(cependant sans condensation)
Température de
stockage/humidité
-10°C à 60°C / jusqu’à 90% de RH
(cependant sans condensation)
Batteries prises en
charge
N’importe quelle batterie alcaline AA,
batterie au manganèse AA, batterie de
nickel-métal hydrure de type AA
Temps
d’exploitation
Estimez quand vous utiliserez des
batteries ou piles alcalines
<Mode Veille ou mode faible énergie>
Temps de fonctionnement continu:
(2,4 GHz)Environ 134 heures
(Bluetooth)Environ 167 heures
Temps de veille continu:
(2,4 GHz)Environ 925 jours
(Bluetooth)Environ 925 jours
Temps d’usage estimé:
(2,4 GHz)Environ 301 jours
(Bluetoo
th)Environ 366 jours
<Mode Haute Vitesse>
Temps de fonctionnement continu:
(2,4 GHz)Environ 91 heures
(Bluetooth)Environ 104 heures
Temps de veille continu:
(2,4 GHz)Environ 925 jours
(Bluetooth)Environ 925 jours
Temps d’usage estimé:
(2,4 GHz)Environ 211 jours
(Bluetooth)Environ 240 jours
(Les points sus cités partent de l’hypothèse que
l’ordinateur est utilisé pendant 8 heures par jour,
avec 5% de temps passé à utiliser le trackball.)
Número de recuento 500/1000/1500 dpi (conmutable)
Interfaz USB
*
Para el modo de conexión por cable e
inalámbrico de 2,4 GHz
Forma de conector USB (A) male
*
Para el modo de conexión por cable e
inalámbrico de 2,4 GHz
Sistema operativo
compatible
Windows
®
10, Windows
®
8.1,
Windows
®
RT 8.1, Windows
®
7,
macOS High Sierra(10.13) *
*
Soporte sólo para los modelos con Bluetooth4.0
o una versión posterior instalada de serie
(puede que necesite actualizar a la última versión de
cada sistema operativo o instalar el service pack.)
Método de
comunicación
Método GFSK
Frecuencia de radio Banda de 2,4 GHz
Alcance de las
ondas de radio
Materiales no-magnéticos (tales como
escritorios de madera): aproximadamente 10 m
Materiales magnéticos (tales como
escritorios de hierro): aproximadamente 3 m
*
Estos son valores de prueba en el entorno
de la empresa y no están garantizados.
Método de lectura Método de sensor óptico
Tipo de luz emitida Alcance de longitud de onda no visible
Número de botones 8 * incluido el botón de rueda
Dimensiones
exteriores
Unidad principal de trackball:
Aprox. An 108 mm × Pr 135 mm × Al 48 mm
Receptor:
Aprox. An 14 mm × Pr 19 mm × Al 5 mm
Peso Unidad principal de trackball:
Aprox. 260 g (pilas no incluidas)
Receptor: Aproximadamente 2 g
Humedad/temperatura
de funcionamiento
5°C a 40°C/ hasta 90%RH
(sin condensación)
Humedad/temperatura
de almacenamiento
-10°Ca 60°C/ hasta 90%RH
(sin condensación)
Pilas compatibles Cualquier pila alcalina AA, pila de
manganeso AA, batería recargable de
níquel hidruro metálico de tipo AA
Tiempo de
funcionamiento
Estimación al usar pilas alcalinas
<Modo de ahorro de energía>
Tiempo de funcionamiento continuo:
(2,4 GHz)Aproximadamente 134 horas
(Bluetooth)Aproximadamente 167 horas
Tiempo en espera continuo:
(2,4 GHz)Aproximadamente 925 días
(Bluetooth)Aproximadamente 925 días
Tiempo de uso estimado:
(2,4 GHz)Aproximadamente 301 días
(Bluetooth)Ap
roximadamente 366 días
<Modo de alta velocidad>
Tiempo de funcionamiento continuo:
(2,4 GHz)Aproximadamente 91 horas
(Bluetooth)Aproximadamente 104 horas
Tiempo en espera continuo:
(2,4 GHz)Aproximadamente 925 días
(Bluetooth)Aproximadamente 925 días
Tiempo de uso estimado:
(2,4 GHz)Aproximadamente 211 días
(Bluetooth)Aproximadamente 240 días
(Lo anterior es suponiendo que se utiliza el
ordenador durante ocho horas al día con
un 5% del tiempo usando el trackball.)
Download "ELECOM Mouse Assistant" from the
ELECOM website to use its button assignment
and high-speed scrolling functions.
https://www.elecom.co.jp/r/132.html
https://www.elecom.co.jp/r/133.html
Mac
Win
Laden Sie „ELECOM Mouse Assistant“ von der
ELECOM-Webseite herunter, um die Funktionen für
Tastenzuordnung und Hochgeschwindigkeits-Scrolling zu nutzen.
https://www.elecom.co.jp/r/132.html
https://www.elecom.co.jp/r/133.html
Mac
Win
Téléchargez ‘’ELECOM Mouse Assistant’’ depuis le
site web de ELECOM afin d’utiliser ses fonctions
d’attribution et de défilement à haute vitesse.
https://www.elecom.co.jp/r/132.html
https://www.elecom.co.jp/r/133.html
Mac
Win
Descargue ‘’ELECOM Mouse Assistant’’ desde la
página web para usar las funciones de desplazamiento
de alta velocidad y la asignación de botón.
https://www.elecom.co.jp/r/132.html
https://www.elecom.co.jp/r/133.html
Mac
Win
Bluetooth 2.4 GHz wireless
Blue indicator
Red indicator
Red indicator
Contact surface
Blue indicator
The pairing method may differ depending on the PC you are using.
In that case, please read the instruction manual for your PC.
Blue indicator
Blue indicator
Bluetooth 2,4 GHz kabellos
Blaue Anzeige
Rote Anzeige
Rote Anzeige
Kontaktfläche
Blaue Anzeige
Die Kopplungsmethode kann je nach eingesetztem PC unterschiedlich sein.
Bitte lesen Sie in diesem Fall die Bedienungsanleitung Ihres PCs.
Blaue Anzeige
Blaue Anzeige
Bluetooth
2,4 GHz sans fil
Voyant bleu
Voyant rouge
Voyant rouge
Surface de contact
Voyant bleu
La méthode d’appariement peut différer selon le PC que vous utilisez.
Dans ce cas, veuillez lire le manuel d’instructions pour votre PC.
Voyant bleu
Voyant bleu
Bluetooth 2.4 GHz wireless
Indicador azul
Indicador rojo
Indicador rojo
Zona de contacto
Indicador azul
El método de sincronización puede variar en función del PC que se está utilizando.
En ese caso, lea el manual de instrucciones para su PC.
Indicador azul
Indicador azul
Model: M-XPT1MR Modell: M-XPT1MR
Modèle: M-XPT1MR Modelo: M-XPT1MR
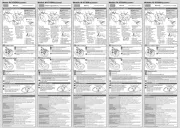
4 “Back” button
3 Tilt wheel
Operates the “Back” button on the
Web browser.
5 “Forward” button
Operates the “Forward” button on the
Web browser.
6,
7,
8
Function buttons 1 to 3
Functions can be assigned to this
button.At the time of purchase, no
functions have been assigned. In
order to assign functions, acquire and
install the Elecom Mouse Assistant.
18
Receiver unit storage
section
15
Pairing button
19
Battery cover
20
Battery storage section
21 USB connector (male)
17 Ball removal hole
16 Optical sensor
(reverse side of ball)
Remove ball during maintenance
13 Power mode selection
switch
14
Pointer speed change switch
9 Trackball
10 LED lamp
11 USB [A] connector
12 Connection mode selection switch
Each time the button is pressed, the count
number (movement speed of the pointer)
switches between three stages of
500/1000/1500.
When the count number is changed, the
current count number is shown by the
number of times the LED lamp blinks.
one blink 500 counts
two blinks 1000 counts
three blinks 1500 counts
Switches between 2.4 GHz wireless
connection and Bluetooth
connection.
* Cannot connect to two units at the
same time, such as to a PC and
tablet.
During pairing standby state, the
LED blinks red.
When power is ON, the LED is lit
red for a fixed time.
When remaining battery becomes
low during use, the LED blinks red.
1 Left button
2 Right button
Use a cotton bud or similar to remove the dust accumulated on the
three contact surfaces of the red ball.
How to clean the trackball
Specifications
Use a finger (or a pen) to push the ball out from the reverse side.
4 Schaltfläche „Zurück“
3 Tilt-Wheel
Betätigt die Schaltfläche „Zurück“ im
Web-Browser.
5 Schaltfläche „Vorwärts“
Betätigt die Schaltfläche „Weiter“ im
Web-Browser.
6,
7,
8
Funktionstasten 1 bis 3
Dieser Schaltfläche können
Funktionen zugewiesen werden. Zum
Zeitpunkt des Kaufs wurden keine
Funktionen zugewiesen. Um
Funktionen zuzuweisen, erwerben
und installieren Sie den Elecom
Maus-Assistenten.
18
Speicherbereich für
Empfängereinheit
15
Paarungstaste
19
Batterieabdeckung
20
Batteriespeicherbereich
21 USB-Verbindung (Stecker)
17 Loch zur Entfernung des Balls
16 Optischer Sensor
(Rückseite der Kugel)
Kugel während der Wartung
entfernen
13
Power-Modus-Wahlschalter
14
Schalter zum Ändern der Zeigergeschwindigkeit
9 Trackball
10 LED-Leuchte
11 [A] USB-Anschluss
12 Wahlschalter Verbindungsmodus
Immer wenn die Taste gedrückt wird,
wechselt die Zählnummer (Bewegungsge-
schwindigkeit des Zeigers) zwischen drei
Stufen 500/1000/1500.
Wird die Zählnummer geändert, so wird die
aktuelle Zählnummer durch die Anzahl der
Male angezeigt, wenn die LED-Lampe blinkt.
einmal blinken 500 Zählungen
zweimal blinken 1000 Zählungen
dreimal blinken 1500 Zählungen
Wechselt zwischen 2,4 GHz WLAN-
und Bluetooth-Verbindung.
* Es kann nicht gleichzeitig mit zwei
Geräten verbunden werden, z. B.
mit einem PC und einem Tablet.
Während der Paarung im
Ruhezustand blinkt die LED rot.
Wenn das Gerät EIN-geschaltet ist,
leuchtet die LED eine bestimmte
Zeit lang rot.
Wenn die verbleibende Batterie
während des Gebrauchs schwach
wird, blinkt die LED rot.
1 Linke Taste
2 Rechte Taste
Entfernen Sie den Staub auf den drei Orten, wo die roten
Supportballs den Trackball berühren, mit einem Wattetampon.
Reinigung des Trackballs
Technische Daten
Drücken Sie den Ball hinten mit Ihrem Finger oder einem Kulli heraus.
4 Bouton ‘’Retour’’
3 Boule directionnelle
Actionne le bouton «Retour» du
navigateur Web.
5 Bouton ‘’Avancer’’
Actionne le bouton «Avancer» du
navigateur Web.
6,
7,
8
Boutons de fonction 1 - 3
Les fonctions peuvent être attribuées
à ce bouton. Au moment de l’achat,
aucune fonction n’a été attribuée.
Pour attribuer des fonctions, veuillez
acquérir et installer l’Aide pour la
souris Elecom.
18
Section de stockage de
l’appareil récepteur
15
Bouton d’appariement
19
Couvercle de la batterie
20
Section de la batterie
de stockage
21 Connecteur USB (mâle)
17 Trou de retrait de la boule
16 Capteur optique
(verso de la boule)
Retirez la boule pendant
l’entretien
13 Commutateur de sélection
de mode d’alimentation
14
Commutateur de changement de
vitesse du pointeur
9 Trackball
10 Lampe à LED
11 Connecteur USB [A]
12 Commutateur de sélection de
mode de connexion
Chaque fois que le bouton est appuyé,
le nombre de compte (vitesse de
déplacement du pointeur) bascule
entre trois étapes de 500/1000/1500.
Lorsque le nombre de compte est
modifié, le nombre de compte courant
est indiqué par le nombre de fois que le
voyant LED clignote.
un clignotement 500 comptes
deux clignotements 1000 comptes
trois clignotements 1500 comptes
Permet de basculer entre la
connexion sans fil 2,4 GHz et la
connexion Bluetooth.
* Impossible de se connecter à deux
unités en même temps, comme à
un PC et une tablette.
Au cours de l’état de veille de
l’appariement, le voyant LED
clignote rouge.
Lorsque l’appareil est sous tension,
le voyant LED est rouge pendant
un temps fixe.
Lorsque la batterie restante baisse
pendant l’utilisation, le voyant LED
clignote rouge.
1 Bouton gauche
2 Bouton droit
Ôtez la poussière des surfaces où les trois roulements rouges
entrent en contact avec le trackball en utilisant un tampon de coton.
Nettoyage du trackball
Spécifications
Poussez la boule vers l’extérieur depuis l’arrière avec votre doigt ou
un stylo.
4 Botón “Retroceso”
3 Rueda de inclinación
Funciona el botón "Retroceso" en el
navegador Web.
5 Botón “Avance”
Funciona el botón "Avance" en el
navegador Web.
6,
7,
8
Botones de función 1 a 3
Se pueden asignar funciones a este
botón. No hay asignada ninguna
función en el momento de la compra.
Para poder asignar funciones, adquirir e
instalar el Asistente de Elecom Mouse.
18
Sección de almacenamiento
del receptor
15
Botón de sincronización
19
Tapa de la pila
20
Sección de almacenamiento
de la pila
21 Conector USB (macho)
17 Orifico de extracción de la bola
16 Sensor óptico
(parte de atrás de la bola)
Extraiga la bola durante el
mantenimiento
13 Interruptor de selección
de modo de alimentación
14
Interruptor de cambio de velocidad
de puntero
9 Trackball
10 Lámpara LED
11 Conector USB [A]
12 Interruptor de selección de modo
de conexión
Cada vez que se presiona el botón, el
cuenta números (velocidad de
movimiento del puntero) cambia entre
tres etapas de 500/1000/1500.
Cuando se cambia el cuenta números, el
cuenta números actual aparece a través
del número de veces que parpadea la
lámpara LED.
un parpadeo 500 recuentos
dos parpadeos 1000 recuentos
tres parpadeos 1500 recuentos
Cambia entre la conexión inalámbrica
de 2,4 GHz y la conexión Bluetooth.
* No se puede conectar a dos
unidades al mismo tiempo, como a
un PC y un tablet.
Durante la sincronización del estado de
suspensión, el LED parpadea en rojo.
Cuando está encendido, el LED se
ilumina en color rojo por un tiempo fijo.
Cuando queda poca batería durante el
uso, el LED parpadea en rojo.
1 Botón izquierdo
2 Botón derecho
Limpie el polvo de las zonas donde las tres bolas de soporte rojo
hacen contacto con el trackball con un bastoncillo de algodón.
Limpieza del trackball
Especificaciones
Saque la bola de la parte posterior con la ayuda de su dedo o un
bolígrafo.