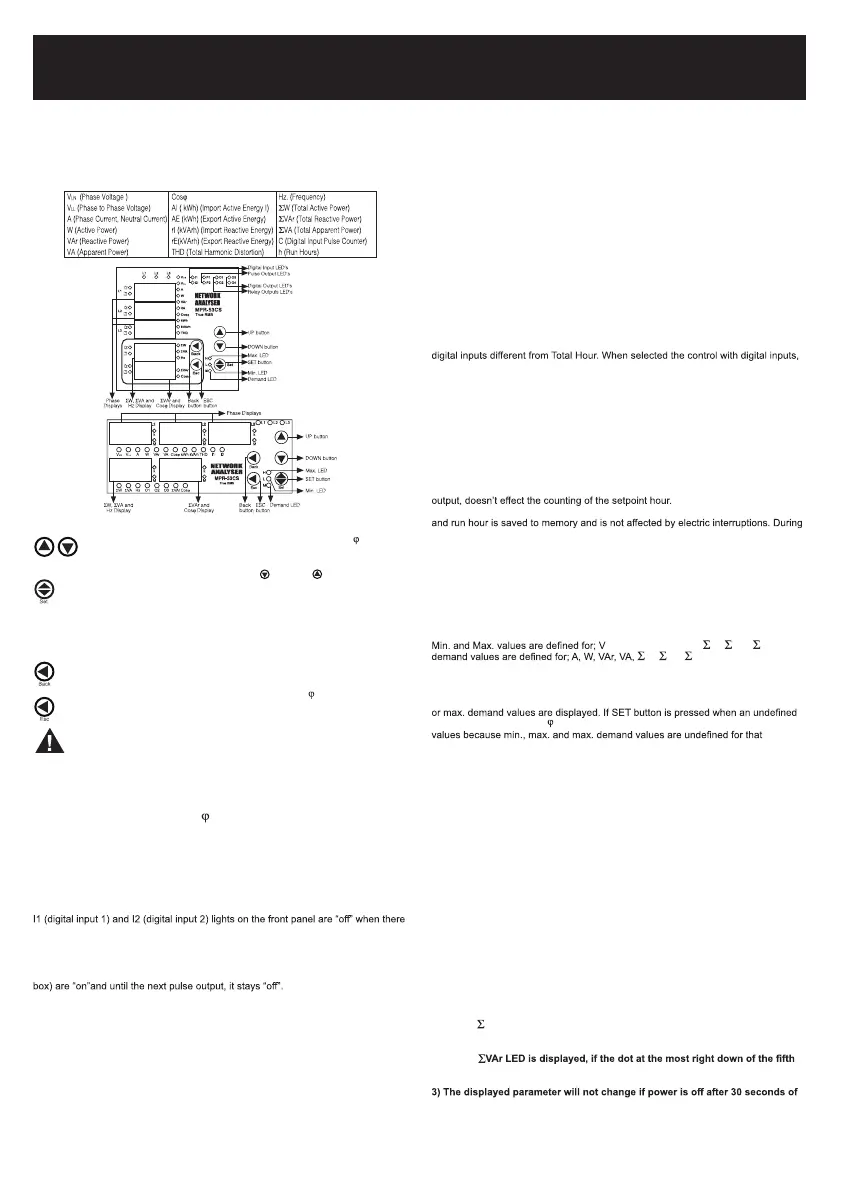
ENTES MPR-53CS-DIN Manual

ENTES Ikke kategoriseret MPR-53CS-DIN

Læs gratis den danske manual til ENTES MPR-53CS-DIN (16 sider) i kategorien Ikke kategoriseret. Denne vejledning er vurderet som hjælpsom af 18 personer og har en gennemsnitlig bedømmelse på 4.7 stjerner ud af 9.5 anmeldelser. Har du et spørgsmål om ENTES MPR-53CS-DIN, eller vil du spørge andre brugere om produktet?

Side 1/16
NETWORK ANALYZER
MPR-53CS
General
MPR-53CS measures all the electrical parameters that belong to network. MPR-
53CS is designed for protection of electrical system. Measured parameters are
shown in 5 separate displays. This allows to monitor more than 50 parameters at the
same time. MPR-53CS has also MODBUS serial interface feature.
The table below shows the parameters that are measured by MPR-53CS:
Functions of Buttons
Used for switching between (VLN, VLL, A, W, VAr, VA, Cos , kWh,
kVarh, THD, C-1, C-2, tot-h, run-h) parameters in the monitoring
mode.
Used for switching between previous ( ) or next ( ) menu in main
menu or submenus and also use for changing chosen values.
(SET) Used for switching between min., max demand and instant
values in the monitoring mode. In display when run hour (run -h) is
displayed, if SET button is pressed, it shows setpoint hours
(SP -h) counted time. In latch function when button feature is used,
with SET button latch position operation is done. Switching to the
programming mode if it pressed for 3 sec. It is used for switching to the
menu and saving changes for the parameters in programming mode.
(Back) Used for switching between SW, SVA and Hz parameters in the
monitoring mode. Used for switching previous digit in submenu.
(ESC) Used for switching between SVAr and Cos values in the
monitoring mode. Used for entering to upper menu or it is used to quit
from the programming mode without saving values in the programming
mode.
When Pin is activated, after pressed “SET” button for 3 seconds, PIN is
required; after entering correct PIN code, you can enter to menu.
Use of MPR-53CS:
By using Up/Down buttons parameters are shown in L1, L2, L3 displays (VLN; VLL;
A; IN; W; VAr; VA; Cosj; kWh, kVarh, THD, C-1, C-2, tot-h, run-h). Total Active (SW),
Total Apparent Power (SVA) and Frequency (Hz) are selected by Back button.
Total Reactive Power (SVAr) and Cos are selected by Esc button.
Digital Inputs
MPR-53CS has 2 digital inputs. Digital inputs have 2 functions :
- If remote control is activated (battery, thermostat, circuit breaker, engines status)
the status of devices connected to digital input will be seen according to datas in
time regiters.
- When digital inputs of energy count, run hour and latch menus are selected, digital
inputs controls these menu’s functions ( It is used for measuring of energyExample:
separately at the using of network and generator).
aren’t any signal in digital inputs. Otherwise “on”.
Energy Pulse Outputs
MPR-53CS has 2 energy pulse outputs. Pulse outputs give the pulses only for
E-1 (energy counter). Pulse outputs can be programmed one by one. When pulse
outputs give pulse “P1” (Pulse 1) and “P2” (Pulse 2) lights (Not included in the PK-26
Pul1 ve Pul2 : There are sub menus o-1 (pulse 1) and o-2 (pulse 2) in pulse out
menu. Device gives pulse according to chosen energy parameters [Active energy
(ACt, A-I, A-E), Reactive energy (rEA, r-L, r-C)]. For energy count values, look at
the pulse menu.
Pulse Counter
MPR-53CS has 2 pulse counters (C-1, C-2). C-1 counts the pulses from digital input
1 and C-2 counts the pulses from digital input 2.
Pulse counter detect the pulses which are in condition of signal 1. When the number
of pulses reach “pulse C1/2 ratio” value, releated pulse counter is increase by 1.
When C-1/C-2 counters are not activated in pulse counter menu, instant values of
C-1/C-2 are not displayed.
Note: DC signals must be use supplied in order to use this menu.
Digital Outputs
MPR-53CS has 6 digital outputs. Only 2 of them have LED on the front panel. These
are “O-3” and “O-4” LEDs (“O-4” light is not available in the PK-26 box).
When digital outputs are activated, related addresses can be displayed with “xxx”
values, only “O-3” and “O-4” LEDs are lighted for digital outputs 1 and 2 on front
panel. Digital output on devices menu’s output parameters; 1/2/3/4/5/6 correspond
to “3/4/5/6/7/8” parameters.
User can check the digital output register for fault about set parameters by
communicating with the device.
Relay Outputs
MPR-53CS has 2 NO contact outputs. On front panel, MPR-53CS has
o-1 and o-2 LEDs. When alarm parameters are selected 1 (out 1) and 2
(out 2) for output, device gives alarm. Related contact outputs will close and LEDs
will be on.
Total Hours
Shows running time of MPR-53CS from the beginning. User can not reset this
counter.
Run Hours
Shows MPR-53CS’s running hour. This can be resetted and can be controlled by
it runs if there is a signal in digital inputs. It does not run if there is no signal in digital
inputs.
Setpoint Hours
By pressing SET button during monitoring of Run Hour, set point hour can be
monitored. Setpoint hour runs according to run hour. When run hour runs actively,
setpoint hour runs. When set time value reaches to “hoU r SP” which set by user,
selected output will be active (1) and give an alarm and setpoint hour continues to
count. This alarm can be erased by resetting setpoint hour or getting out from locked
position. When setpoint output is required to remove by using latch function, “latch
auto” function can’t be used. If MPR-53CS returned to normal operation from failure
by using latch function, it automatically starts the time from zero. To make setpoint
hour passive, the value of SP hour is set “0000”. This setting only closes the setpoint
Note: Total hour and run hour do not count during electric interruptions. Total hour
measurement mode, by scrolling UP and DOWN buttons, user can see running
time. Run hour display is shown is “HH HHH H.HH” (H=Hour) form. All the values
shown on the display are in terms of hour. For example, if displayed value is 00 000
1.75, means that device worked for 1.75 hours. If the user wants to convert last digit
to minutes, last digitx0.6 (75x0.6=45 minutes) formula is used conversion. Device
worked 1 hour 45 minutes.
İmportant: In “hoU r SP” menu when chosen output is activated and devices is set
for giving an alarm at the end of one hour. After counting to 99 on display, devices
gives an alarm (1 hour = 60 min. for MPR-53CS on display “99” corresponds to “59”).
Monitoring of Min.- Max. and Max. Demand Values:
LN LL, V , A, W, VAr, VA, W, VAr, VA;
W, VA, VAr.
If measured instant value is smaller than min. value, they are saved as new min. and
if measured instant value is bigger than instant max. value, new max. value is saved.
During demand time (example 15 min.) demand value is got max. demand.
If press SET button when the device is in any parameter (example “A”) min., max.
parameter (example “Cos ”) is displayed, the device continues to display instant
parameters.
Monitoring THD Values
If “VLN” and “THD” LED’s light on together, voltage “THD” is monitored. And if “A”
and “THD” LEDs light on, current “THD” is monitored.
Monitoring Neutral Current
When instant current values of 3 phases are shown on the display, by pressing the
“DOWN” button, I-n (neutral current) is displayed. “A” LED continues light on. When
connection form is chosen as delta, this display will be closed.
Monitoring Setpoint Parameters Fault Warning
Device activates the selected output if there is a failure because of any causes.
User can set more then one parameters to output, so outputs can be monitored
depending which parameter and this parameters protection type (low, high, both of
them) even in failure situation when “rUn -h” menu is displayed, pushing “DOWN”
button or when VLN is displayed pushing “UP” button, failure parameter will be seen
as “SP -xx h/L/hL x-x x-x”. If there is a no failure, you will not see such a display.
After pressing SET button you can see other failure parameter.
Calculation Methods for Active / Reactive Values
If the dot on the right down corner blinks it shows that active power and reactive
powers directions are negative. There are 2 methods for calculating total active and
total reactive powers.
1) Active and reactive powers are calculated by summing import and export values
and shown as a single value.
2) Active and reactive powers are calculated one by one according to import/export
condition.
Note :
1)
During W LED is displayed, if the dot at the most right down digit of the forth
display lights on, it represents that displayed value is export active power value.
If not, it represents that displayed value is import active power value.
2) During
display lights on, it represents that displayed value is capacitive reactive power
value. If not, it represents that displayed value is inductive reactive power value.
stand by.
1
“CAL CUL Atı on” menu.
Press SET button (Most right digit of 5th display blinks)
By using UP/DOWN buttons select energy calculation method.
Press SET button, “CAL CUL Atı on” is displayed. (Data is entered but is
not activated yet, for activating new data please follow below steps.)
Press ESC button one by one until “SAU E SEt yES” is displayed.
When “SAU E SEt yES” is displayed, press SET button (When “SAU E
SEt yES” is displayed. If you press ESC button or choose “no” option
instead of “yES” option, new data will be cancelled and previous value
will be activated).
Max. Demand Time Setup:
In this menu, Max. demand time is set between 01 - 60 minutes.
Press SET button for 3 sec. (trA Fo menu is displayed.)
Press SET button (Most right digit of 5th display blinks)
By using UP/DOWN buttons, blinking digit value can be programmed.
By using SET button, switch respectively to the digits. Use BACK button
go to go previous digit. After you entered last digit, press SET button,
“de tı” is displayed in the display. (Data is entered but is not activated
yet. For activating new data please follow the below steps.)
Press ESC button one by one until “SAU E SEt yES” is displayed.
When “SAU E SEt yES” is displayed, press SET button (When
“SAU E SEt yES” is displayed. If you press ESC button or choose “no
option instead of “yES” option, new data will be cancelled and previous
value will be activated).
Reset Menu (hL, dE, E-1, E-2, C-1, C-2, rUn hoUr, SP hoU r):
In this menu value of min., max., max. demand, energy values, pulse
counters, run hour and alarm clock are erased. It saves the instant
measured min., max., max. demand energy values, the devices running
time, time after the device is setted into its memory. In this menu when
you enter “rES Et hL/dE/E-1/E-2/C-1/C-2/rUn hoUr/SP hoU r” menu
changes all the values are erased at the same time.
Note:
from power cut.
Reset Menu (hL, dE, E-1, E-2, C-1, C-2, rUn hoUr, SP hoU r):
Press SET button for 3 sec. (trA Fo menu is displayed.)
Press SET button (rES Et hL menu is
displayed.)
By using UP/DOWN buttons “rES Et hL/dE/E-1/E-2/C-1/C-2/
rUn hoU r/SP hoU r” menu.
Press SET button (rES Et hL/dE/E-1/E-2/C-1/C-2/rUn hoU r/
SP hoU r is displayed).
By using UP/DOWN buttons, if you want to delete, the min., max., max.
demand, energy values, the running time of the device and the running
time after the device is set; select “yES” otherwise select “no” option.
Press SET button, “rES Et hL/dE/E-1/E-2/C-1/C-2/rUn hoU r/SP hoU r”
is displayed. (Data is entered but is not activated yet. For activating new
data please follow the below steps)
Press ESC button one by one until “SAU E SEt yES” is displayed.
When “SAU E SEt yES” is displayed, press SET button (When “SAU E
SEt yES” is displayed. If you press ESC button or choose “no” option
instead of “yES” option, new data will be cancelled and previous value
will be activated).
NETWORK ANALYZER
MPR-53CS
Current Transformer Ratio Setup:
In this menu current transformer ratio is set (There is no in CT-25
models).
Current transformer ratio can be set between 1 ..... 2000.
Note: If the current transformer is not used between the system and the
device, current transformer ratio is entered as “1”.
Example: If between the device and the system there is a 30A/5A current
transformer is used;
Current transformer ratio = 30/5 = 6 must be setup.
Press SET button for 3 sec. (trA Fo menu is displayed)
Press SET button, trA Fo Ctr menu is displayed (For CT-25 models
trA Fo trn menu is displayed).
(Note: trA Fo Utr / Con nEC tıo n menu can be displayed by scrolling UP/
DOWN buttons.)
(trA Fo Utr or Con nEC tıo n menus can be programmed similarly.)
Using the UP/DOWN buttons and program the blinking digit. Switch
to other digits by using SET button, use BACK button to go topevious
digit. After programming last digit press SET button, “trA Fo Ctr” is
displayed. (Data is entered but is not activated yet. For activating new
data please follow the below steps.)
Press ESC button one by one until “SAU E SEt yES” is displayed on
display.
When “SAU E SEt yES” is displayed, press SET button. If you press ESC
button or choose “no” option instead of “yES” option by using UP/DOWN
buttons, new data will be cancelled and previous value will be activated.
Entering Turn Number:
This menu is available for CT-25 adapted devices. Turn number is chosen
from CT-25 current transformer (How many tour the current cable has
rounded). The values between 1 and 20 can be written. Greater the
number of turn means greater the sensivity.
Transformer Ratio Setup:
In this menu, voltage transformer ratio setup is set.
Voltage Transformer ratio is set between 0000,1 - 4000,0.
Note: If the voltage transformer is not used between the system and the
device. The voltage transformwer ratio is entered as “1”.
Example: Between the voltage transformer and the device, if there is a
34,5KV/100V voltage transformer is used;
Voltage transformer ratio = 34500/100 = 345 can be entered.
Chosing connection option:
In this menu connection option is selected. There are 2 option as
“delta” and “star”.
When “Star” connection is chosen, the device makes a protection
between phase-neutral for voltage.
When “Delta” connection is chosen, the device makes a protection
between phase-phase for voltage.
NOTE: When “Delta” is chosen Neutral Current (IN) and
Phase-Neutral Voltage (V ) values can not be shown in instant LN
values. Functions that belong to this parameters are inactive.
Energy Calculation Method Settings:
Informations about Reactive energy calculation method is explained in
below table. The method of active and reactive energy calculation of
mechanic and electrical counters must be chosen from the table.
Press SET button for 3 sec. (trA Fo menu is displayed.)
Press SET button (TrA Fo Ctr menu is displayed.)
2


Produkt Specifikationer

Mærke: ENTES
Kategori: Ikke kategoriseret
Model: MPR-53CS-DIN

Har du brug for hjælp?

Hvis du har brug for hjælp til ENTES MPR-53CS-DIN stil et spørgsmål nedenfor, og andre brugere vil svare dig


Ikke kategoriseret ENTES Manualer

ENTES

ENTES GKRC-22E Manual

3 Januar 2025
ENTES

ENTES GKRC-21E Manual

3 Januar 2025
ENTES

ENTES SER-YU Manual

20 November 2024
ENTES

ENTES ERB-50 Manual

6 September 2024
ENTES

ENTES GEM-10SH Manual

6 September 2024

Ikke kategoriseret Manualer

Nyeste Ikke kategoriseret Manualer