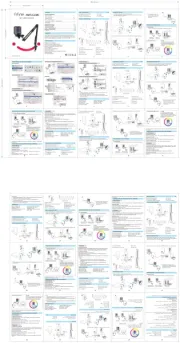
Step 1:The receiver is with amplifier circuit, your sound would
be enhanced when output from the speaker.When using with
high-power amplifier speaker, please turn down the mic
volume on K036 and adjust the volume on your sound system
from zero to the desired loudness to avoid distortion.
2.How to work with system for karaoke amplifier?
1. What to do if the background music is too loud and the
mixed mics are too quiet?
- Use the 1/4'' instead of the 3.5mm/ 3.5mm to RCA cable to
connect the receiver with the speaker/ amplifier.
- Turn down the input music . Or stream the music to the
speaker/ amplifier directly. And then adjust the volume of
music and mic separately on your mixer board or amplifier.
A
A
A
AS Ve
S Ve
S Ve
S Ver
r
r
rs
s
s
si
i
i
io
o
o
on
n
n
n:
:
:
:
2
2
2
24
4
4
4-
-
-
-V
V
V
V7
7
7
7AS Version: 24 -V7
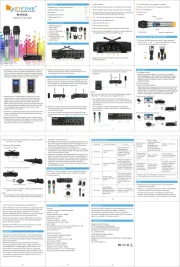
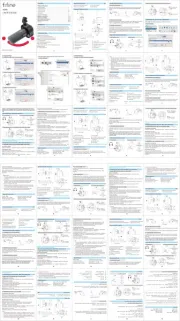
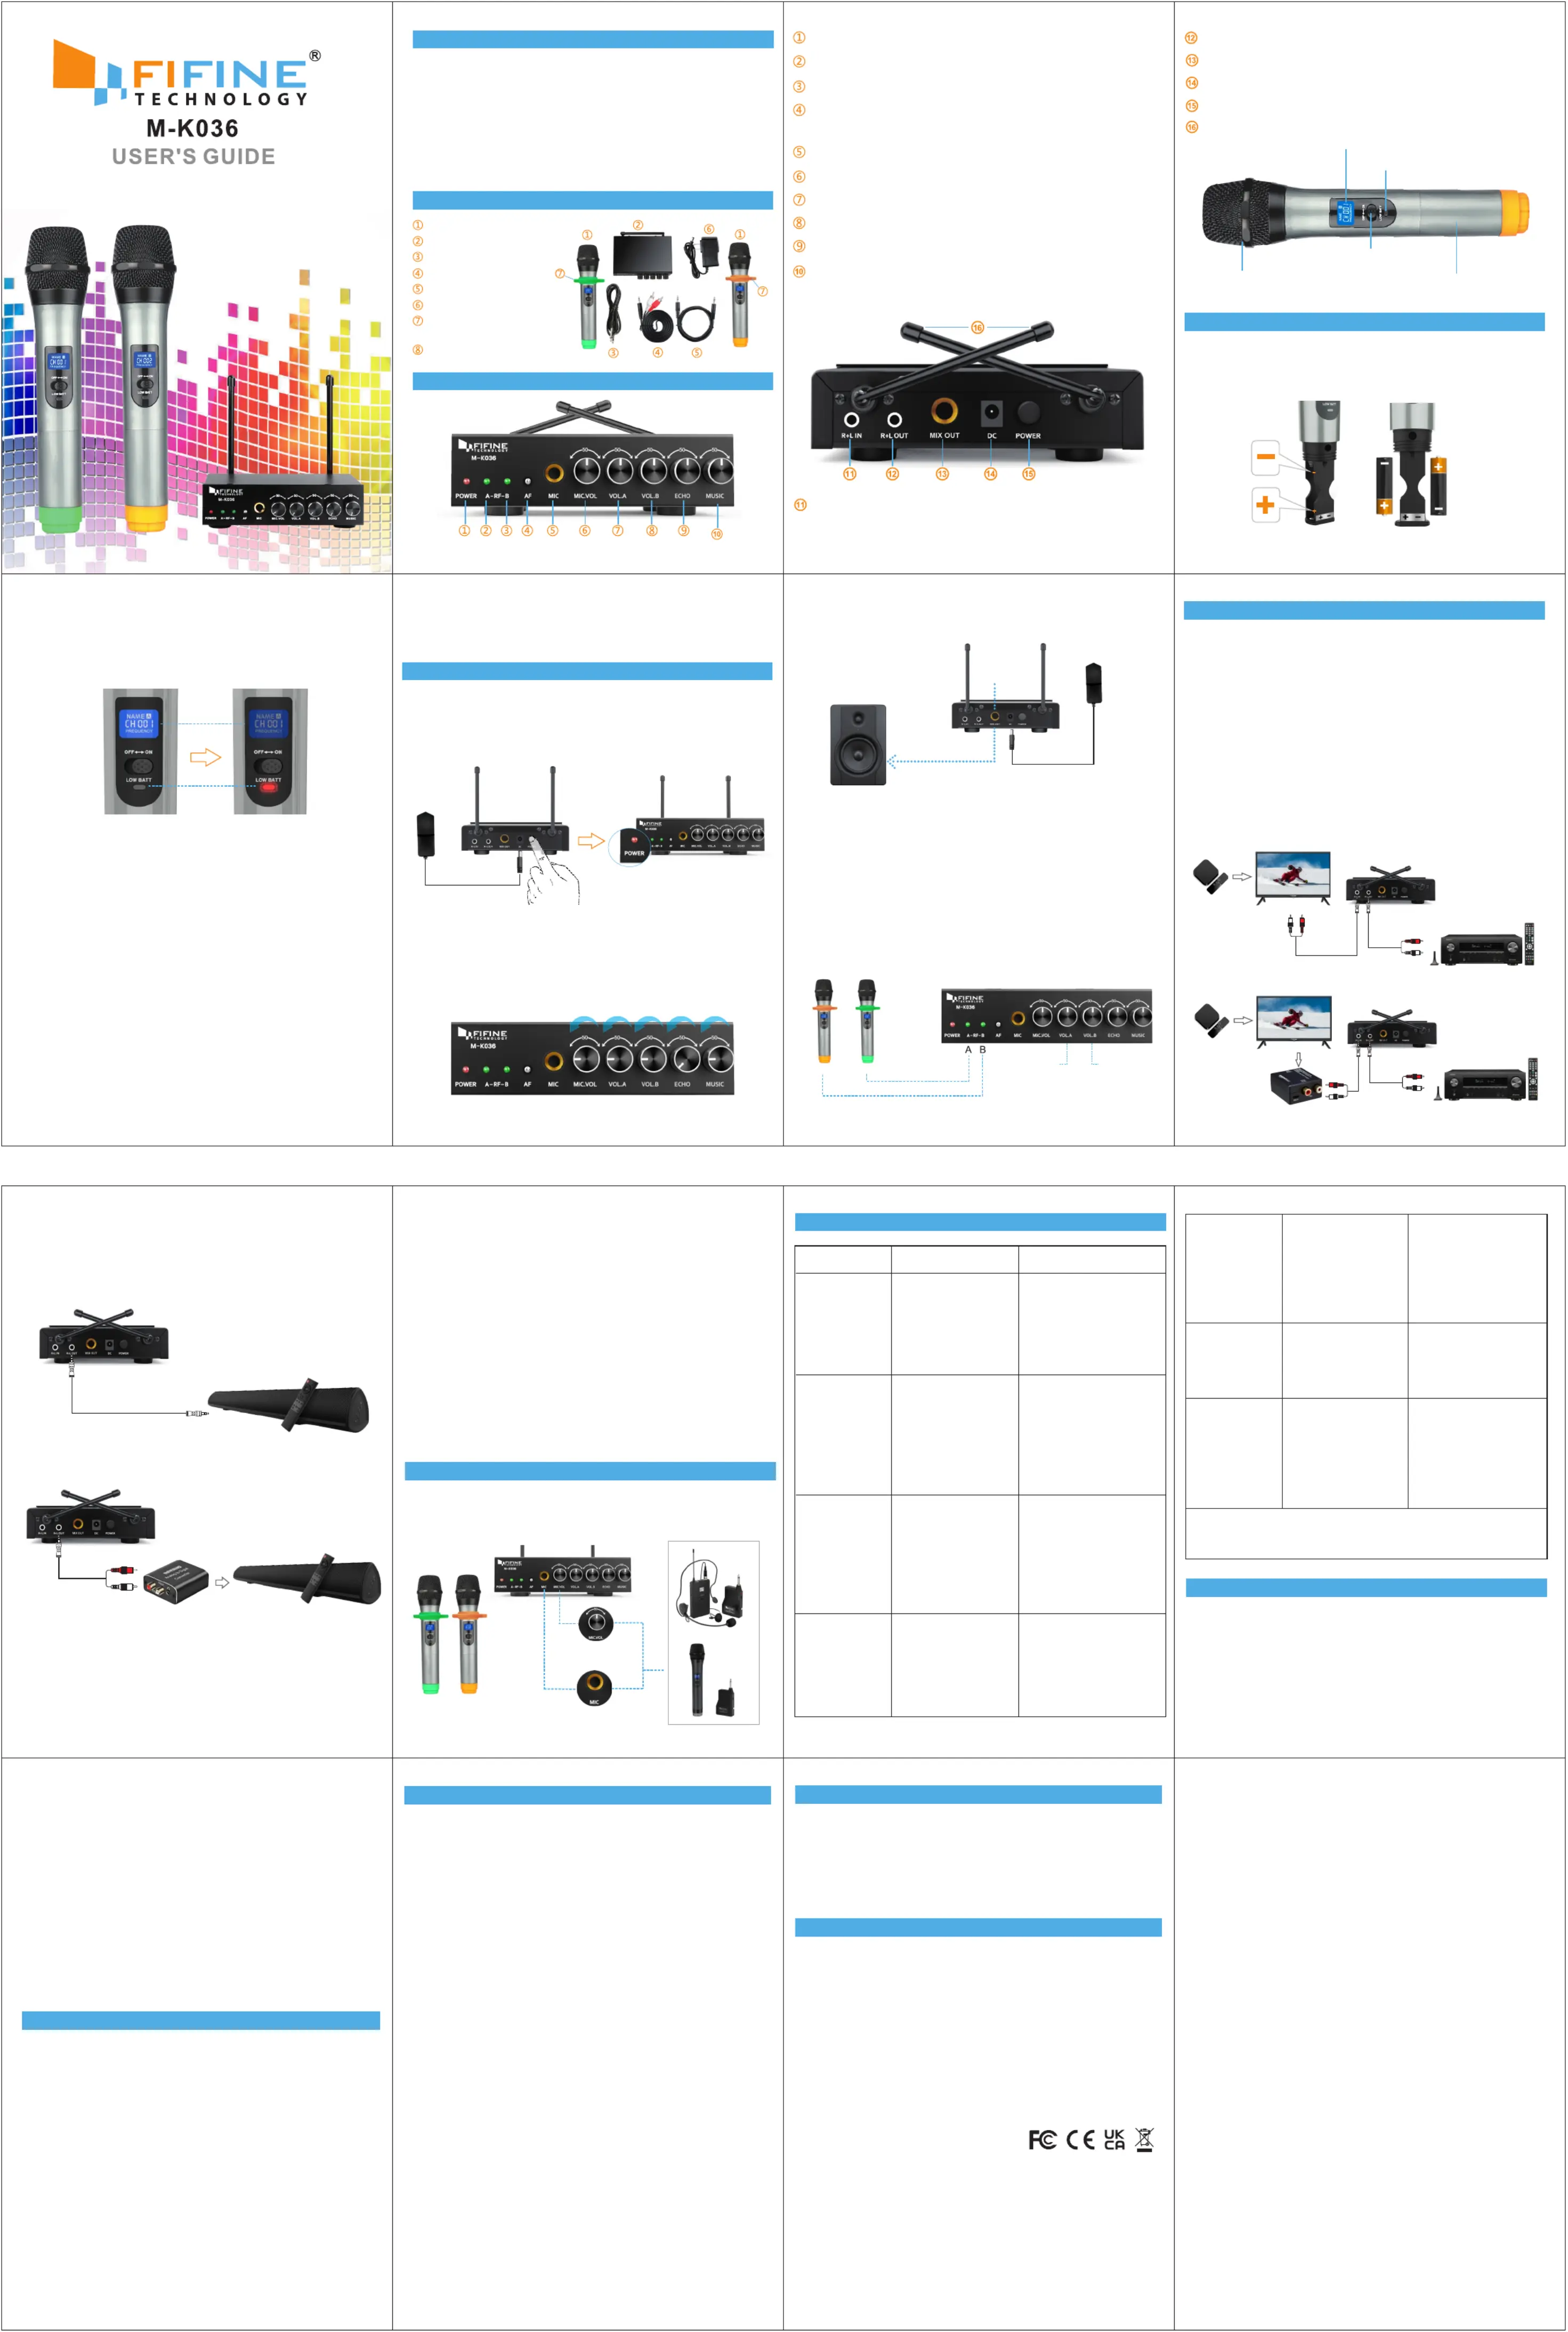
WARNNING OF LOW BATTERY POWER
Audio input (Computer/phone as input device to stream
Quarter inch output (It’s for plugging in speaker.)
3.5mm output (It’s for plugging in speaker.)
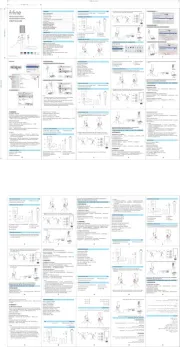
1. Pls Install the 2AA batteries correctly. (Insert batteries
confirming to “+” and “-”). Incorrect installation will result
in not working and damage the microphone.
WARNNING OF LOW BATTERY POWER
2. Microphone screen will darken and low batt light flashes red
for seconds, warning low-battery, sometimes the warning
time is too short to notice the change.Pls change new fresh
batteries in advance when you are going to take part into the
important activities, in case any cuts in and out issue.
3. Operation time is limited relative to battery life; To save
power,please turn off microphone after use and take the
batteries out in time.Not used for a long time will cause
battery leaked acid,destroyed microphone equipment
(Battery acid is very corrosive and if you have had a leakage
then the acid could have gotten further up into the mic and
corroded some of the components, most likely a small
power lead from the contact. )
4. Sometimes a battery gets poor contact with the connector
inside microphone will result in the same symptoms just
5. Dying batteries will often register a lower voltage. Some
batteries will show nearly full voltage until just before they
die. Please replace the new fresh battery in time when low
voltage or the mic cut in and out some time.
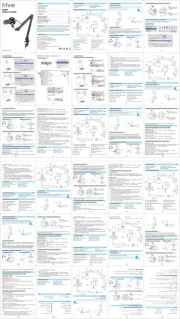
1. Receiver Power Connection: Connect the AC adapter into the DC
power connector on the back of the receiver first.Secondly plug
the AC adapter into a AC120V/220V 50Hz outlet. Press the power
button and you will see the power indicator is on.
Plug the smart phone, laptop, etc. to the R+L IN of K036 to
stream background music. Output the mixed sound of mic and
music to the speaker from the R+L OUT or MIX OUT of K036.
(You don't have to use the R+L IN jack if you don't need the
There is a 1/4" input of receiver for extra wireless microphone.
You can either buy Fifine K025 or Fifine K037B to have three
the speaker to the output
receiver, not the jack in
Move transmitter closer to
receiver or contact FIFINE
We do not recommend to use with portable bluetooth speakers
lower than 15 watt, such as JBL charge, Doss touch.
4. Pair the Receiver and Transmitter: Install AA battery to
microphone correctly and then turn it on. With paired ID for
each receiver and microphones, they will pair and connect
RF.A indicator is on green light when A microphone is
connected with receiver successfully. The same goes for
. . . . . . . . . . . . . . . . .
. . . . . . . . . . . . . . . . . . . . . . . . . . . . . .
. . . . . . . . . . . . . . . . . . . . . . . . . . . . . . . . . . . . . . . .
. . . . . . . . . . . . . . . . . . . . . . . . . . . . . .
. . . . . . . . . . . . . . . . . . . . . . . . . . . . . . . . .
. . . . . . . . . . . . . . . . . . . . . . . . . . . . . . . . . . . . . . . . . . . . . . .
3. Audio Connection: Connect the audio cable from the audio
output on the receiver to the input on your amplifier
2. Please turn the echo knob all the way to the left if you don't
like the echo effect. Sound will be not clear enough going
Turn the volume knob left to reduce the sound level when
first time use ,and slowly adjust to the appropriate volume to
AF signal indicator (It flashes when the receiver is turned on/off
and the sound picked by microphone is too loud.)
B RF indicator(It turns on when B microphone is connected)
A RF indicator(It turns on when A microphone is connected)
Volume control for background music (You can also adjust the
background music on your phones/PC device).
Echo control (It’s for adding sound effect for all three mics)
Volume control for additional mic
1/4'' input jack for additional mic (not for speaker)
Observing battery(“+/-”).
electrical outlet and into
sure ac electrical outlet
works and supplier proper
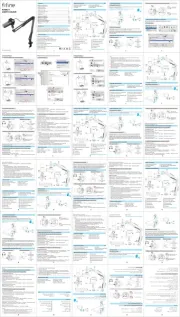
1) Smart TV+K036+AV Receiver
Please identify the wiring connection point at the rear of your TV.
There is RCA OUT (composite OUT). Then the TV audio can go
from here to the "R+L IN" Jack of K036. If only optical output, an
optical to RCA converter and an extra RCA to 3.5mm cable are
needed. TV optical jack-converter-"R+L IN" Jack of K036.
Note: Converter Input: analog (RCA), output: digital (optical/coaxial).
Note: Converter Input: digital (optical/coaxial), output: analog (RCA).
TV has AUX OUT or RCA OUT
TV has only optical out or coaxial out
Soundbar has only optical in or coaxial in
digital to analog converter
analog to digital converter
Converter is not included.
Converter is not included.
2X Microphone Anti-rolling
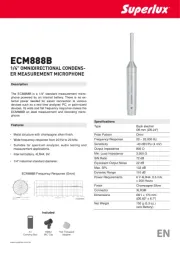
Frequency response: UHF565-584MHz
Image interference ratio: >88dB
Frequency stability: <0.002%
Frequency jamming ratio: >90dB
Working distance: Under standard conditions, 10-30m
Power supply voltage: AC/100-240V
Carrier frequency: UHF565-584MHz
Sub-harmonic: <main harmonic 40dB
Standard: Constant Frequency
Battery: 2 X 1.5V AA batteries
Range of kinetic energy: >95dB
System distortion: <1%, 1 kHz modulation
Frequency response: 50Hz-18kHz(±3dB)
Step 3:If there is EQ function on your sound system, you can
adjust the bass, mid and treble to your liking.
Step 2 :Turn down echo to avoid muffles. Max level of echo is
easy to generate muffles or delay. To achieve satisfied effect.
pls turn echo down as well.
6. Higher coverage will likely result in quicker battery
draining.Please prepare a replacement batteries in case
microphone set that runs out of charge.
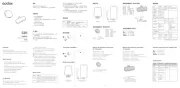
1. This package only contains the wireless microphone system.
You still need to have an additional audio device (speaker or
amplifier) to output the sound
2. We suggest to connect dynamic microphone to the extra 1/4”
jack of the receiver.Pls ready for the Phantom power if you are
going to work the condenser microphone with.(The receiver
can’t provide enough power for condenser mic)
3. To avoid interference, the frequency of each mic is randomly
preset different from CH001 to CH020. The mics you received
might not show CH001 & Ch002.
4. There are compatibility risks associated with using third-party
audio converters to connect to televisions, home theaters, or
other devices! Connection failure, silence, noise or distortion
issues may be caused by converter mismatch or target device
limitations, rather than microphone system malfunction.
More guidance for connection could be found from the blogs
on Fifine official website.
Note:If the above troubleshooting can't help you,pls contact with
FIFINE customer service for further assistance.
Every Fifine product comes with a Limited Warranty that in normal
use of product will be free of any defects in material or
workmanship for a period of one year from its original date of
purchase. For detailed warranty info, please refer to the warranty
policy on our website, or contact us directly.
Eligible to bear CE Marking.
Authorized European Representative:
Name: AOCE INFORMATION TECHNOLOGY
Address: 61 rue de Lyon 75012 Paris France
Authorized British Representative:
Address: Office Suite 29a 3/F 23 Wharf Street, London, England,
When used to connect TVs (TV OUT), home theater systems
(AUX IN), or other non-standard karaoke devices, third-party
audio converters (such as Digital to Analog, Analog to Digital)
Please note that the quality, specifications (impedance
matching, signal attenuation, power supply requirements),
and compatibility of the target device of the converter will
directly affect the connection effect. Refer to the detailed
connection guide and compatibility recommendations in the
user manual. In case of connection issues, prioritize checking
the converter connection and compatibility, or contact our
customer service for support.