WIFI CONNECT MODE
When control is awake (set point temperature is displayed), WiFi Connect
mode can be initiated by depressing the “+” and ”-” buttons simultaneously for 3
seconds. Refer to geappliances.com/connect for WiFi Connect procedure using
applicable APP. Note that WiFi icon will start flashing when in connection mode
and will light solid, once connected. The icon will remain unlit when not connected
to WiFi, otherwise.
Temperature Sensors
Sensor Description
(wire color)
Normal
Temperature Range
Resistance
range in ohms
Resistance at
77º F
T1 Lower Tank (blue) 32º F - 180º F 33.9K - 1.09K 10K
T2 Upper Tank (red) 32º F - 180º F 33.9K - 1.09K 10K
T6* Water Outlet (red) 32º F - 180º F 32.7K - 1.17K 10K
T7* Water Inlet (blue) 32º F - 180º F 32.7K - 1.17K 10K
*If Equipped (EMV models only)
**** FOR TECHNICIAN USE ONLY****
GE Standard Electronic (GE30S**BLM, GE40S**BLM, GE50S**BLM, GE30T**BLM, GE40T**BLM, GE50T**BLM) and integrated
Electronic Mixing Valve (EMV) Water Heaters (GE30S**BMM, GE40S**BMM, GE50S**BMM)
VLJQL¿HVOLPLWHGSDUWVZDUUDQW\LQ\HDUV
IMPORTANT SAFETY NOTICE
This information is intended for use by individuals
possessing adequate background of electrical, electronic
and mechanical experience. Any attempt to repair a major
appliance may result in personal injury and property damage.
The manufacturer or seller cannot be responsible for the
interpretation of this information, nor can it assume any
liability in connection with its use. This quick reference
guide is provided for information purposes only and does not
replace, modify or change in any manner the Owner’s Manual
and Installation Instructions.
DISCONNECT POWER BEFORE SERVICING
IMPORTANT- RECONNECT ALL GROUNDING
DEVICES
All parts of this appliance capable of conducting electrical
current are grounded. If grounding wires, screws, straps,
clips, nuts or washers used to complete a path to ground are
removed for service, they must be returned to their original
condition and properly fastened.
SPECIFICATIONS
Capacity...........................................30/40/50 US gal
Tank Max Working Pressure ........................150 PSI
Water Temperature Set Point Range ..100F - 140F
Electrical ........................... 240/208VAC 60 Hz 1-PH
Circuit Breaker .............................................. 30 Amp
Upper Element Wattage ....................... 5500/4131W
Lower Element Wattage ....................... 5500/4131W
DISPLAY FAULT MODE
DISPLAY FAULT Mode can be accessed by pressing and holding the ”Enter” button
for 3 seconds. A two-tone sound will be heard, indicating the action was successful.
Critical Faults will be displayed to user without entering Fault Mode (normal
consumer operation mode). Note that control must first be awake to enter this mode,
(press any button to awake control, illuminating the 7 segment LEDs, showing set
point temperature). Control display will scroll through all active faults in Fault Mode
(both critical and non-critical Faults).
Faults can be cleared, in Fault Mode by pressing and holding the “+” and ”-” buttons
simultaneously for 3 seconds. A two-tone sound will be heard, indicating the action
was successful. Faults will return, if condition triggering faults reoccurs. Exit Display
Fault Mode by pressing “Enter” key or after 1 minute of button inactivity.
MONITOR MODE / LOAD STATUS
Monitor Mode can be accessed by pressing and holding the “+” and ”Enter” buttons
simultaneously for 5 seconds. Note that control must first be awake to enter this mode,
(press any button to awake control, illuminating the 7 segment LEDs, showing set point
temperature). A two-tone sound will be heard, indicating the action was successful. A
moment later, the control will display the Software Version. Press the “+” or “-” key to
move between, T1, T2,T6, T7, Mixing Valve Position (if equipped) Voltage, Current, WiFi
Strength, % Anode Life remaining (if equipped) and Personalities. The item ID will first
display and then the display will list values. Exit Monitor Mode by pressing the Enter key or
after 15 minutes of button inactivity.
Item ID Description
SW version Software Version: 606-128, etc.
T1 sensor Tank (Water) Lower Temperature
T2 sensor Tank (Water) Upper Temperature
T6 sensor* EMV Water Outlet Temperature
T7 sensor* EMV Water Inlet Temperature
Valve Position* Range: full cold = 25; full hot = 330
Voltage Voltage Reading (Volts)
Current Current Reading (Amps)
WiFi strength 5DQJH2ႇ ZHDN VWURQJ
Anode Life # Percent Anode Life remaining (alarm at 25%)
Personality Model personality ID (see Personality Table)
* If equipped (EMV models only)
# If equipped (sensing anode)
SERVICE MODE - ID:
When in Monitor Mode, Service Mode can be accessed by pressing and holding
the “+” and ”Enter” buttons simultaneously for 5 seconds. A two-tone sound will be
heard, indicating the action was successful. The control will display “SEr” to indicate
the control is now in SERVICE mode. Press the “+” or “-“ keys to select the desired
component to control. Hit the “Enter” key to toggle control of the selected component.
When controlling the upper or lower heating element, the display will first show “UE0”
or LE0, indicating that the UE or LE is OFF (signified as 0). The display will then show
the current draw (in Amps), followed by “A”. Pressing the “Enter” key, will turn the
respective element ON (signified as 1), displaying “UE1” or “LE1”. The display will then
show the current draw, when the element is energized. Note that only one element can
be energized at a time, so turning ON a second element will turn OFF the first element.
When controlling the mixing valve, the display will show “tSt” and will then indicate
the test position of “Hot” (indicating the normal operating position, set by the control).
Pressing the “Enter” key will then move the mixing valve to the full cold position
(displayed as “Cld”). Pressing the “Enter” key repeatable, will toggle the mixing valve
between the “Cld” and “Hot” positions. Exit Service mode by pressing “+” or “-“ keys
until “SEr” is displayed and then press “Enter” to exist Service mode, returning to
Normal Operation. Note that in Service mode the selected heating element will remain
ON for 5 min. and will then turn OFF. Upon exiting service mode or after 15min. of
inactivity, the control will revert back to normal operation mode.
Item ID Operational Procedure
Upper
Element Upper Heating Element (UE0=OFF; UE1=ON). Press “+” or “-“ key to
select component. Press “Enter” key to turn element ON (1) or OFF (0).
2QFH21WKHFXUUHQWGUDZZLOOEHVKRZQRQGLVSOD\VLJQL¿HGDV³$´IRU
Amps. The heating element will turn OFF after 5 min., or when turning LE
ON, or upon exiting Service Mode.
Lower
Element Lower Heating Element (LE0=OFF; LE1=ON). Press “+” or “-“ key to
select component. Press “Enter” key to turn element ON (1) or OFF (0).
2QFH21WKHFXUUHQWGUDZZLOOEHVKRZQRQGLVSOD\VLJQL¿HGDV³$´IRU
Amps. The heating element will turn OFF after 5 min., or when turning
UE ON, or upon exiting Service Mode.
Electronic
Mixing
Valve
EMV Test (CLd = full cold; Hot = Normal Control position). Press “+” or “-“
key to select component “tSt”. Press Enter key to toggle control between
“CLd” and “Hot” position. Mixing valve returns to normal operating state
after 5 min. or upon exiting Service Mode.
PERSONALITY MODE
When in Service Mode, Personality Set-Up Mode can be accessed by pressing and
holding the “+” and ”Enter” buttons simultaneously for 5 seconds. A two-tone sound will
be heard, indicating the action was successful. A moment later, the control will display
the Personality ID of the model (signified by PER). The Personality ID number can be
changed by selecting the “+” or “-” key (per Personality Table). Press the “Enter” key to
Select the Personality and Exit Personality Set-up mode.
Item ID Operational Procedure
Personality
ONLY requires update if e2 personality module and Control Board
is replaced. Press “+” to increase or “-” to decrease. Press “Enter”
to select change per Personality Table in the next column and Exit
Personality Set-up Mode.
31-6000228 Rev. 1 07-20
Printed in USA
GE is a trademark of the General Electric Company. Manufactured under trademark license.
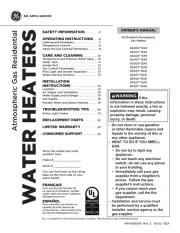
:L¿,QGLFDWRU
• Solid when connected
• )ODVKLQJGXULQJFRQ¿JXUDWLRQ
set-up mode
%XWWRQV
• Increase/Decrease Temperature
or adjust vacation days
(vacation mode)
(QWHU/('
%OLQNVZKHQFRQ¿UPDWLRQUHTXLUHG
for control change. Normally
appears dark.
(QWHU%XWWRQ
“Enter” selection required for
FRQ¿UPDWLRQRIDQ\FRQWUROFKDQJH
$QRGHUHSODFHPHQW,QGLFDWRU
5HVHW
Illuminates when Anode
replacement required. Depress
once to silence alarm. Depress
and Hold to Reset button after
replacement completed.
&DSDFLW\6HOHFW%XWWRQ
,QGLFDWRU
Toggle between Normal, High, or
X-High
'LVSOD\
• Temperature setting
• # vacation days setting
(in vacation mode)
(To display setpoint if screen is
inactive, press any button)
0RGH6HOHFW%XWWRQ,QGLFDWRU
• Normal or Vacation
(Press and hold to switch
between °F and °C).
T6* EMV water
outlet sensor (hot)
T7* EMV water
inlet sensor (cold)
T2 Upper
Tank Sensor
T1 Lower
Tank Sensor
3HUVRQDOLW\ 0RGHO1XPEHU
0 No Model (F90 Fault)
1 GE30S10BLM (no Sensing Anode)
2 GE40S10BLM (no Sensing Anode)
3 GE50S10BLM (no Sensing Anode)
4 GE30T10BLM (no Sensing Anode)
5 GE40T10BLM (no Sensing Anode)
6 GE50T10BLM (no Sensing Anode)
7 GE30S12BLM (Sensing Anode)
8 GE40S12BLM (Sensing Anode)
9 GE50S12BLM (Sensing Anode)
10 GE30T12BLM (Sensing Anode)
11 GE40T12BLM (Sensing Anode)
12 GE50T12BLM (Sensing Anode)
13 GE30S10BMM (EMV, w/ Sensing Anode)
14 GE40S10BMM (EMV, w/ Sensing Anode)
15 GE50S10BMM (EMV, w/ Sensing Anode)
If equipped (model dependent)