Hotpoint FIT 804 H AN HA Manual
Læs gratis den danske manual til Hotpoint FIT 804 H AN HA (8 sider) i kategorien Ovn. Denne vejledning er vurderet som hjælpsom af 19 personer og har en gennemsnitlig bedømmelse på 4.7 stjerner ud af 10 anmeldelser.
Har du et spørgsmål om Hotpoint FIT 804 H AN HA, eller vil du spørge andre brugere om produktet?

Produkt Specifikationer
| Mærke: | Hotpoint |
| Kategori: | Ovn |
| Model: | FIT 804 H AN HA |
| Afrimningsfunktion: | Ja |
| Vekselstrømsindgangsspænding: | 220 - 240 V |
| Vekselstrømsindgangsfrekvens: | 50 - 60 Hz |
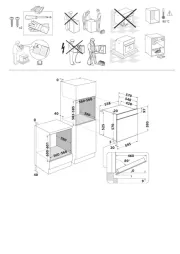
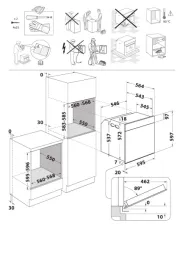
| Bredde: | 595 mm |
| Dybde: | 564 mm |
| Højde: | 595 mm |
| Vægt: | 35500 g |
| Produktfarve: | Anthracit |
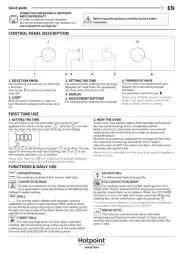
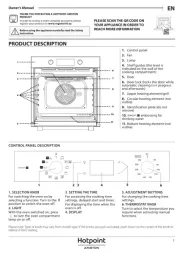
| Kontroltype: | Dreje |
| Lampe type: | Halogen |
| Indbygget skærm: | Ingen |
| Strøm: | 13 A |
| Ledningslængde: | 0.9 m |
| Placering af apparat: | Indbygget |
| Indvendig belysning: | Ja |
| Dørhængsel: | Ned |
| Integreret ur: | Ja |
| Urtype: | Mekanisk |
| Installationsrum bredde: | 560 mm |
| Installationsrum dybde: | 550 mm |
| Installationsrum højde: | 600 mm |
| Tilsluttet belastning: | 2600 W |
| Genopvarmningsfunktion: | Ingen |
| Grill: | Ja |
| Damp madlavning: | Ingen |
| Rotisserie: | Ja |
| Konvektion madlavning: | Ja |
| Energieffektivitetsskala: | A+++ til D |
| Selvrensende: | Ja |
| Kontrolposition: | Front |
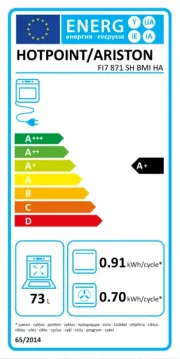
| Energieffektivitetsklasse: | A |
| Rengøringstype: | Hydrolytisk |
| Antal gitre: | 1 |
| Ovn - størrelse: | Medium |
| Ovntype: | Elektrisk ovn |
| Samlet indvendig ovn kapacitet: | 73 L |
| Antal ovne: | 1 |
| Ovn nettokapacitet: | 73 L |
| Ovn termostatinterval: | 0 - 250 °C |
| Konventionel madlavning: | Ja |
| Holde varm funktion: | Ingen |
| Pizza fremstillingsfunktion: | Ingen |
| Antal lamper: | 1 Lampe( r) |
| Energiforbrug (konventionel): | 0.91 kWh |
| Energiforbrug (tvungen konvektion): | 0.82 kWh |
| Hurtig varme: | Ingen |
| Bageplade: | Ja |
| Grillrist inkluderet: | Ja |
| Opvarmning i både top og bund: | Ja |
| Mikroovn madlavning: | Ingen |
| Blæser grillfunktion: | Ja |
| Grill med fuld overflade: | Ja |
| Antal bageplader: | 2 |
| Strømstiktype: | Intet stik |
| Rengøringsteknologi: | Hydrolytisk |
| Brødfremstilling kapacitet: | Ingen |
| Maksimal temperatur (varmluft): | 250 °C |
| Maksimal temperatur (konventionel): | 250 °C |
| Fuld overflade grill + varmluft (enkelt tilstand): | Ja |
| Stegetermometer: | Ingen |
| Indvendig materiale: | Emalje |
| Spildbakke: | Ingen |
| Afkalkningsfunktion: | Ingen |
| Bageplade håndtag: | Ja |
| Desinficering: | Ingen |
Har du brug for hjælp?
Hvis du har brug for hjælp til Hotpoint FIT 804 H AN HA stil et spørgsmål nedenfor, og andre brugere vil svare dig
Ovn Hotpoint Manualer


Ovn Manualer
- PITSOS
- Rosieres
- OutdoorChef
- Heller
- Artusi
- Electrolux
- Friac
- K&H
- Indesit
- M-System
- Constructa
- Morphy Richards
- Krups
- Wiggo
- Hitachi
Nyeste Ovn Manualer


