Huawei G6603 Manual


Læs gratis den danske manual til Huawei G6603 (35 sider) i kategorien Mobiltelefon. Denne vejledning er vurderet som hjælpsom af 42 personer og har en gennemsnitlig bedømmelse på 4.9 stjerner ud af 21.5 anmeldelser. Har du et spørgsmål om Huawei G6603, eller vil du spørge andre brugere om produktet?

Side 1/35
GSM Mobile Phone
HUAWEI G6603
User Guide
Copyright © Huawei Technologies Co., Ltd. 2011. All
rights reserved.
No part of this document may be reproduced or transmitted in any
form or by any means without prior written consent of Huawei
Technologies Co., Ltd.
The product described in this manual may include copyrighted
software of Huawei Technologies Co., Ltd. and possible licensors.
Customers shall not in any manner reproduce, distribute, modify,
decompile, disassemble, decrypt, extract, reverse engineer, lease,
assign, or sublicense the said software, unless such restrictions are
prohibited by applicable laws or such actions are approved by
respective copyright holders under licenses.
Trademarks and Permissions
, HUAWEI, and are trademarks or registered
trademarks of Huawei Technologies Co., Ltd.
Other trademarks, products, services, and company names
mentioned are the property of their respective owners.
Notice
Some features of the product and its accessories described herein
rely on the software installed, capacities and settings of the local
network, and may not be activated or may be limited by local
network operators or network service providers. Thus, the
descriptions herein may not exactly match the product or its
accessories you purchase.
Huawei Technologies Co., Ltd. reserves the right to change or modify
any information or specifications contained in this manual without
prior notice or obligation.
NO WARRANTY
THE CONTENTS OF THIS MANUAL ARE PROVIDED “AS IS”. EXCEPT
AS REQUIRED BY APPLICABLE LAWS, NO WARRANTIES OF ANY
KIND, EITHER EXPRESS OR IMPLIED, INCLUDING BUT NOT LIMITED
TO, THE IMPLIED WARRANTIES OF MERCHANTABILITY AND FITNESS
FOR A PARTICULAR PURPOSE, ARE MADE IN RELATION TO THE
ACCURACY, RELIABILITY OR CONTENTS OF THIS MANUAL.
TO THE MAXIMUM EXTENT PERMITTED BY APPLICABLE LAW, IN NO
CASE SHALL HUAWEI TECHNOLOGIES CO., LTD BE LIABLE FOR ANY
SPECIAL, INCIDENTAL, INDIRECT, OR CONSEQUENTIAL DAMAGES,
OR LOST PROFITS, BUSINESS, REVENUE, DATA, GOODWILL OR
ANTICIPATED SAVINGS.
Import and Export Regulations
Customers shall comply with all applicable export or import laws and
regulations and will obtain all necessary governmental permits and
licenses in order to export, re-export or import the product
mentioned in this manual including the software and technical data
therein.
i
Table of Contents
1 In
1 In
1 In
1 In1 Introd
trod
trod
trodtroduct
uct
uct
uctuction
ion
ion
ion ion
.............................................................................
.............................................................................
.............................................................................
............................................................................. .............................................................................
1
1
1
11
SIM Card .............................................................................. 1
microSD Card ....................................................................... 2
Charging the Battery ............................................................ 2
Your Phone .......................................................................... 3
Keys and Functions ............................................................... 4
Screen Icons ......................................................................... 5
2 Ge
2 Ge
2 Ge
2 Ge2 Gettin
ttin
ttin
ttintting S
g S
g S
g Sg Start
tart
tart
tarttarted
ed
ed
ed ed ........................................................................
........................................................................
........................................................................
........................................................................ ........................................................................
7
7
7
77
Phone Code ......................................................................... 7
PIN and PUK ........................................................................ 7
Automatically Switching Between Profiles ............................. 8
File Management ................................................................. 8
Other Applications ............................................................... 8
3 V
3 V
3 V
3 V3 Voice Ser
oice Ser
oice Ser
oice Seroice Services
vices
vices
vices vices ..........................................................................
..........................................................................
..........................................................................
.......................................................................... ..........................................................................
9
9
9
99
Making a Call ....................................................................... 9
Answering a Call ................................................................ 10
Background Sound ............................................................. 10
4 T
4 T
4 T
4 T4 Tex
ex
ex
exext In
t In
t In
t Int Input
put
put
put put ..............................................................................
..............................................................................
..............................................................................
.............................................................................. ..............................................................................
11
11
11
1111
Changing the Text Input Mode ........................................... 11
Using the FN Key ................................................................ 11
Entering Words .................................................................. 11
Entering Digits .................................................................... 12
Entering Symbols ................................................................ 12
5 Mes
5 Mes
5 Mes
5 Mes5 Messag
sag
sag
sagsaging
ing
ing
ing ing
.............................................................................
.............................................................................
.............................................................................
............................................................................. ............................................................................. 12
12
12
1212
Creating and Sending a Text Message ................................. 13
Creating and Sending a Multimedia Message ...................... 13
ii
6 Em
6 Em
6 Em
6 Em6 Email
ail
ail
ail ail
.....................................................................................
.....................................................................................
.....................................................................................
..................................................................................... ..................................................................................... 14
14
14
1414
Creating and Activating an Email Account ........................... 14
Creating and Sending an Email ........................................... 15
7 Con
7 Con
7 Con
7 Con7 Contac
tac
tac
tactacts
ts
ts
ts ts
................................................................................
................................................................................
................................................................................
................................................................................ ................................................................................ 15
15
15
1515
Creating a Contact ............................................................. 15
Searching for a Contact ...................................................... 16
8 Mul
8 Mul
8 Mul
8 Mul8 Multim
tim
tim
timtimedia
edia
edia
ediaedia
............................................................................
............................................................................
............................................................................
............................................................................ ............................................................................ 16
16
16
1616
Camera .............................................................................. 16
Video Recorder .................................................................. 17
Video Player ....................................................................... 17
Audio Player ....................................................................... 18
FM Radio ........................................................................... 19
Image Editor ...................................................................... 20
Audio Recorder .................................................................. 20
Ebook ................................................................................ 20
9 Con
9 Con
9 Con
9 Con9 Connec
nec
nec
necnectivi
tivi
tivi
tivitivity
ty
ty
ty ty
...........................................................................
...........................................................................
...........................................................................
........................................................................... ........................................................................... 21
21
21
2121
USB ................................................................................... 21
Bluetooth ........................................................................... 21
10 W
10 W
10 W
10 W10 WAP
AP
AP
APAP
....................................................................................
....................................................................................
....................................................................................
.................................................................................... ....................................................................................
22
22
22
2222
Setting the Connection Profile ............................................ 23
Connecting to the Network ................................................ 23
11 W
11 W
11 W
11 W11 Warnin
arnin
arnin
arninarnings and Pr
gs and Pr
gs and Pr
gs and Prgs and Precaution
ecaution
ecaution
ecautionecautions
s
s
s s
.....................................................
.....................................................
.....................................................
..................................................... .....................................................
24
24
24
2424
1
1 Introduction
All the figures in this guide are provided only for your reference.
The actual appearance and display depends on your phone.
SIM Card
Insert your SIM card before using your phone. Remove the SIM card
and the battery only after powering off your phone.
The following figures show the installation of the SIM card.
2
Your phone may support two SIM cards. In this case, you can
insert two SIM cards into the phone at one time, and select
Menu
Menu
Menu
MenuMenu > Settings
Settings
Settings
SettingsSettings > Dual SIM settings
Dual SIM settings
Dual SIM settings
Dual SIM settingsDual SIM settings > Dual SIM open
Dual SIM open
Dual SIM open
Dual SIM openDual SIM open to enable
the dual-SIM mode.
microSD Card
Your phone supports a microSD card with a capacity of up to 16 GB.
The following figure shows the installation of the microSD card.
Charging the Battery
1. Connect the charger to an AC power socket.
2. Connect the charger to the charger jack on the phone.
3. Wait until the battery is fully charged.
During the charging, the charging icon is displayed in animation.
When the charging icon becomes static, it indicates that the
battery is fully charged.
4. Disconnect the charger from the phone.
5. Disconnect the charger from the AC power socket.
3
Your Phone
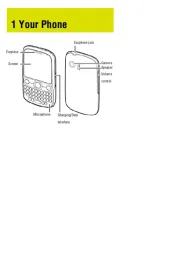
The following figure shows the appearance of your phone and it is
for your reference only.
4
1 Charger/ Headset jack 9 FN key
2 Earpiece 10 T9 key
3 Screen 11 microSD card slot
4 Navigation keys 12 Messaging key
5 Left soft key 13 End/Power key
6 Call/Answer key 14 Right soft key
7 Menu key 15 Confirm key
8 Keyboard 16 Volume/Scroll key
Keys and Functions
In this guide, the following icons indicate the navigation keys of
your phone: , , , , . , and
Press … To …
z Make a call.
z Answer an incoming call.
z View call logs in standby mode.
z Power on or power off the phone (by pressing
and holding the key for about 3s).
z End a call or reject an incoming call.
z Return to the standby mode.
Select the option displayed in the lower left corner
of the screen.
Select the option displayed in the lower right
corner of the screen.
Access the main menu in standby mode.
Access Messagi
Messagi
Messagi
MessagiMessaging
ng
ng
ngng.
5
Press … To …
z Access the main menu in standby mode.
z Confirm a selection.
Access functions assigned to the navigation keys in
standby mode.
To customize navigation keys as the shortcuts to
different functions, select Menu
Menu
Menu
MenuMenu > >
Settings
Settings
Settings
SettingsSettings Phone
Phone
Phone
Phone Phone
settings
settings
settings
settingssettings > Dedicated key
Dedicated key
Dedicated key
Dedicated keyDedicated key.
z Enter digits, letters, and symbols.
z Call the voicemail in standby mode by pressing
and holding the 1
1
1
11 key for about 3s.
z Speed-dial phone numbers in standby mode by
pressing and holding the keys 2
2
2
22 9
9
9
99 for about 3s.
Activate or deactivate the Meeting
Meeting
Meeting
MeetingMeeting profile in
standby mode by pressing and holding the key for
about 3s.
Lock the keyboard in standby mode by pressing
and holding the key for about 3s.
Screen Icons
Icon Indicates …
Signal strength.
GPRS signal.
EDGE signal.
The Genera
Genera
Genera
GeneraGeneral
l
l
ll profile is activated.
6
Icon Indicates …
The Meeting
Meeting
Meeting
MeetingMeeting profile is activated.
The Outdo
Outdo
Outdo
OutdoOutdoor
or
or
oror profile is activated.
The Silence
Silence
Silence
SilenceSilence profile is activated.
The phone is in roaming state.
The Bluetooth function is enabled.
The Headset
Headset
Headset
HeadsetHeadset profile is activated.
Missed call(s).
The call forwarding function is enabled.
A new text message is received.
A new multimedia message is received.
A new email is received.
An alarm or a schedule is activated.
The keyboard is locked.
A microSD card is inserted into the phone.
Battery power level.
7
2 Getting Started
Phone Code
The phone code is used to protect your phone from unauthorized
use and restore factory settings. If the phone lock function is enabled,
you need to enter the phone code every time you power on the
phone. By default, the phone lock function is disabled.
The phone code is set to 1234
1234
1234
12341234 by default. You can select Menu
Menu
Menu
MenuMenu >
Settings
Settings
Settings
SettingsSettings > Security settings
Security settings
Security settings
Security settingsSecurity settings > Cha
Cha
Cha
ChaChange password > Phon
nge password > Phon
nge password > Phon
nge password > Phonnge password > Phone password
e password
e password
e passworde password to
change the phone code to any numeric string of four to eight digits.
Do remember your phone code. If you forget the phone code,
contact the service center.
PIN and PUK
The personal identification number (PIN) protects your SIM card from
unauthorized use. The PIN unblocking key (PUK) can unlock the
blocked PIN. Both the PIN and the PUK are delivered with the SIM
card. For details, contact your service provider.
If you enter wrong PINs for a specified number of times consecutively,
the phone asks you to enter the PUK.
If you enter wrong PUKs for a specified number of times
consecutively, the SIM card becomes invalid permanently. In this case,
contact your service provider for a new one.
8
Automatically Switching Between Profiles
You can set your phone to activate different profiles at different
times. The phone can automatically switch between profiles
according to your settings.
1. Select Menu
Menu
Menu
MenuMenu > Profiles
Profiles
Profiles
ProfilesProfiles >
Profile auto switch
Profile auto switch
Profile auto switch
Profile auto switchProfile auto switch .
2. Select a clock.
3. Set the status, time, and repetition days, and then assign a
profile.
4. Press (Done
Done
Done
DoneDone) to save the settings.
File Management
The File Manager manages the multimedia files saved in the phone
memory or on the microSD card. Through the File Manager, you can
view the sizes and creation dates of ebooks, images, photos, videos,
and audios, and open the multimedia files.
Other Applications
z Calendar: to view dates and set events.
z Tasks: to view and set tasks.
z Alarm: to set alarms.
z World clock: to view and set the world clock.
z Calculator: to perform simple calculation.
z Currency converter: to set an exchange rate and perform
currency conversion.
z Stopwatch: to time a process.
z Ebook reader: to read ebooks.
z Java: to download and install java applications and games.
z Games: to play funny games.
9
3 Voice Services
Making a Call
1. In standby mode, enter the phone number.
z To make an international call, enter the international
long-distance code (+
+
+
++), country code or region code, area code,
and phone number in sequence.
z To call an extension number, enter the phone number, P
P
P
PP or W
W
W
WW,
and extension number in sequence.
2. Press to dial the number.
3. Press to end the call.
z If you enter P
P
P
PP between the phone number and the extension
number, after the phone number is connected, the phone
automatically dials the extension number.
z If you enter W
W
W
WW between the phone number and the
extension number, after the phone number is connected, the
phone prompts you to choose whether to dial the extension
number.
z You can also make a call through call logs, contacts, and
messages.
z During a call, you can press or to adjust the volume.
z If your phone supports two SIM cards and if the dual-SIM
mode is enabled, select the SIM card you want to use
according to the prompt on the screen.
10
Answering a Call
When there is an incoming call, you can do as follows:
z Press to answer the call.
z Select Option
Option
Option
OptionOptions
s
s
ss > Ans
Ans
Ans
AnsAnswer
wer
wer
werwer
to answer the call.
z Press , and then select An
An
An
AnAnswe
swe
swe
sweswer
r
r
r r to answer the call.
z Press to reject the call.
z Press (Silent
Silent
Silent
SilentSilent) to mute the speaker, and then press
(Rejec
Rejec
Rejec
RejecReject
t
t
tt) again to reject the call.
z If the any-key answer function is enabled, you can press any key
except and to answer the call.
Background Sound
Your phone supports background sound, through which you can
imitate the environment where you are. By default, the background
sound is disabled.
To enable the background sound, select Menu
Menu
Menu
MenuMenu > Settings
Settings
Settings
Settings Settings > Call
Call
Call
Call Call
settings
settings
settings
settings settings > Ad
Ad
Ad
AdAdvance settings
vance settings
vance settings
vance settings vance settings > Background sound
Background sound
Background sound
Background soundBackground sound > Select when
Select when
Select when
Select when Select when
make call
make call
make call
make callmake call, and then select On
On
On
OnOn. You can also select a default
background sound.
If the background sound function is enabled and if you make a call,
the other party will hear the background sound you configured.
If the background sound function is enabled and if you answer a call,
you can select Options
Options
Options
OptionsOptions > Call back
Call back
Call back
Call backCall background sound
ground sound
ground sound
ground soundground sound to activate the
background sound, and then select a background sound to imitate
the environment where you are.
To disable the background sound during a call, select Options
Options
Options
OptionsOptions >
Background sound
Background sound
Background sound
Background soundBackground sound > Status
Status
Status
StatusStatus, and then select Off
Off
Off
OffOff.
11
4 Text Input
Changing the Text Input Mode
The indicator of the current text input mode is displayed in the upper
left corner of the screen. You can press to change the text
input mode.
z Press to delete the character on the left of the cursor.
Press and hold for about 3s to clear all the characters.
z Press to enter a space.
z Press to move the cursor to the next line.
z Press to switch to the upper case or the lower case.
Using the FN Key
Press and then press a key labeled with the number or
symbol to enter the corresponding number or symbol labeled in the
upper right part of the key.
Press twice consecutively, and then press keys labeled with
numbers or symbols to enter corresponding numbers or symbols
labeled in the upper right part of the keys continuously.
Entering Words
To enter a word, press the keys according to the spelling sequence of
the word.


Produkt Specifikationer

Mærke: Huawei
Kategori: Mobiltelefon
Model: G6603

Har du brug for hjælp?

Hvis du har brug for hjælp til Huawei G6603 stil et spørgsmål nedenfor, og andre brugere vil svare dig


Mobiltelefon Huawei Manualer
Huawei

Huawei M615 Manual

3 August 2025
Huawei

Huawei Mate X6 Manual

11 Juli 2025
Huawei

Huawei Nova 12i Manual

16 August 2024
Huawei

Huawei G6608 Manual

5 Maj 2024
Huawei

Huawei G6609 Manual

6 Marts 2024
Huawei

Huawei T211 Manual

21 Januar 2024
Huawei

Huawei G2800 Manual

3 Januar 2024
Huawei

Huawei Ascend Y336 Manual

9 December 2023
Huawei

Huawei G7210 Manual

10 August 2023

Mobiltelefon Manualer

Nyeste Mobiltelefon Manualer