Indesit IFW 6540 P IX Manual

| Mærke: | Indesit |
| Kategori: | Ovn |
| Model: | IFW 6540 P IX |
| Vekselstrømsindgangsspænding: | 220 - 240 V |
| Bredde: | 595 mm |
| Dybde: | 551 mm |
| Højde: | 595 mm |
| Vægt: | 26300 g |
| Produktfarve: | Rustfrit stål |
| Kontroltype: | Dreje |
| Lampe type: | Halogen |
| Indbygget skærm: | Ja |
| Skærmtype: | LED |
| Strøm: | 16 A |
| Ledningslængde: | 1 m |
| Pakkevægt: | 25000 g |
| Pakkedybde: | 650 mm |
| Pakkebredde: | 640 mm |
| Pakkehøjde: | 670 mm |
| Placering af apparat: | Indbygget |
| Indvendig belysning: | Ja |
| Dørhængsel: | Ned |
| Integreret ur: | Ja |
| Urtype: | Elektronisk |
| Tilsluttet belastning: | 3300 W |
| Genopvarmningsfunktion: | Ingen |
| Grill: | Ja |
| Damp madlavning: | Ingen |
| Konvektion madlavning: | Ja |
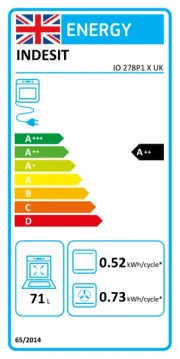
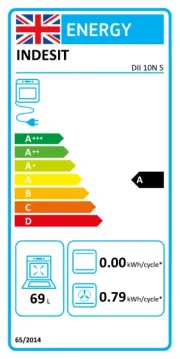
| Energieffektivitetsskala: | A til G |
| Selvrensende: | Ja |
| Kontrolposition: | Front |
| Timer type: | Digital |
| Wi-Fi kontrolleret: | Ingen |
| Energieffektivitetsklasse: | A |
| Rengøringstype: | Pyrolyse |
| Antal glasdørpaneler: | 3 |
| Antal gitre: | 1 |
| Ovn - størrelse: | Medium |
| Ovntype: | Elektrisk ovn |
| Samlet indvendig ovn kapacitet: | 66 L |
| Strøm for samtlige ovne: | - W |
| Antal ovne: | 1 |
| Ovn nettokapacitet: | 66 L |
| Holde varm funktion: | Ingen |
| Pizza fremstillingsfunktion: | Ingen |
| Energieffektivitetsindeks (EEI): | 95.2 |
| Energiforbrug (konventionel): | 0.89 kWh |
| Energiforbrug (tvungen konvektion): | 0.79 kWh |
| Oprindelsesland: | Polen |
| Dør med blød lukning: | Ingen |
| Udtrækkelige drejeknapper: | Ingen |
| Mikroovn madlavning: | Ingen |
| Grill med fuld overflade: | Ja |
| Aftaglig ovndør: | Ingen |
| Antal hylder: | 1 hylder |
| Ovn effekt: | - W |
| Aftagelig dørglas: | Ja |
| Dørmateriale: | Glas |
| Brødfremstilling kapacitet: | Ingen |
| Bund opvarmning: | Ingen |
Har du brug for hjælp?
Hvis du har brug for hjælp til Indesit IFW 6540 P IX stil et spørgsmål nedenfor, og andre brugere vil svare dig
Ovn Indesit Manualer

20 November 2025
25 August 2025
3 Juli 2025
1 Juli 2025
30 Juni 2025

30 Juni 2025
30 Juni 2025
30 Juni 2025
29 Juni 2025

29 Juni 2025
Ovn Manualer
Nyeste Ovn Manualer

20 December 2025

20 December 2025

20 December 2025

20 December 2025

19 December 2025

19 December 2025

18 December 2025

18 December 2025

18 December 2025

17 December 2025