Indesit Slimline DI9E 2B10 UK Manual
Læs gratis den danske manual til Indesit Slimline DI9E 2B10 UK (16 sider) i kategorien Opvaskemaskine. Denne vejledning er vurderet som hjælpsom af 52 personer og har en gennemsnitlig bedømmelse på 4.4 stjerner ud af 26.5 anmeldelser.
Har du et spørgsmål om Indesit Slimline DI9E 2B10 UK, eller vil du spørge andre brugere om produktet?

Produkt Specifikationer
| Mærke: | Indesit |
| Kategori: | Opvaskemaskine |
| Model: | Slimline DI9E 2B10 UK |
| Vekselstrømsindgangsspænding: | 220-240 V |
| Vekselstrømsindgangsfrekvens: | 50 Hz |
| Bredde: | 448 mm |
| Dybde: | 555 mm |
| Højde: | 820 mm |
| Vægt: | 27200 g |
| Kontroltype: | Knapper |
| Indbygget skærm: | Ingen |
| Strøm: | 13 A |
| Ledningslængde: | 1.3 m |
| Pakkevægt: | 29000 g |
| Pakkedybde: | 675 mm |
| Pakkebredde: | 500 mm |
| Pakkehøjde: | 890 mm |
| Strømforbrug (slukket): | 0.5 W |
| Placering af apparat: | Fuldt indbygget |
| Indvendig belysning: | Ingen |
| Tilsluttet belastning: | 1900 W |
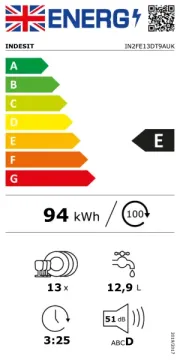
| Støjniveau: | 51 dB |
| Antal vaskeprogrammer: | 5 |
| Forsinket start-timer: | Ingen |
| Børnesikring: | Ingen |
| Balje materiale: | Rustfrit stål |
| Vandforbrug pr. cyklus: | 11.5 L |
| Indbygget vandblødgører: | Ja |
| Bestik rum type: | Kurv |
| Farve på kontrolpanel: | Hvid |
| Antal kuverter: | 9 kuverter |
| Cyklustid: | 240 min. |
| Opvaskeprogrammer: | Eco 50°C, Intensive 65°C, Mixed, Quick 45°C |
| Halv belastning: | Ingen |
| Indikator for afspændingsmiddel: | Ingen |
| Energiforbrug pr. cyklus: | 0.78 kWh |
| Antal temperaturindstillinger: | 3 |
| Glasbeskyttelse: | Ingen |
| Indikator for resterende tid: | Ingen |
| Produktstørrelse: | Slimline (45 cm) |
| Vandpåfyldning: | Kold |
| Overløbsbeskyttelse: | Ja |
| Støjemissionsklasse: | D |
| Energieffektivitetsklasse: | F |
| Energiforbrug pr. 100 cyklusser: | 78 kWh |
| Temperatur (maks): | 70 °C |
| Cyklustid (hurtigt vaskeprogram): | 40 min. |
| Saltindikator: | Ingen |
| Øverste kurv indstillelig højde: | Ja |
| Strømforbrug (fortsat-tændt): | 5 W |
| Oprindelsesland: | Polen |
| Tørresystem: | Statisk |
| Ekstra tørt: | Ingen |
| Belastningsensor: | Ingen |
| Antal kurve: | 2 kurv(e) |
| Automatisk døråbning: | Ingen |
| Maksimal varmtvandsforsyning temperatur: | 60 °C |
| Eksportkontrolklassisfikationsnummer (ECCN): | 84221100 |
| Varighed af tilstanden fortsat-tændt: | 12 min. |
| Gulvindikatorlys: | Ingen |
| Automatiske programmer: | Ingen |
| Toldproduktkode (TARIC): | 84221100 |
Har du brug for hjælp?
Hvis du har brug for hjælp til Indesit Slimline DI9E 2B10 UK stil et spørgsmål nedenfor, og andre brugere vil svare dig
Opvaskemaskine Indesit Manualer


Opvaskemaskine Manualer
- Zerowatt
- Barazza
- Meireles
- De Dietrich
- Schock
- Hotpoint
- PKM
- Imperial
- Signature
- Insignia
- FAR
- Bertazzoni
- XD Enjoy
- Hotpoint Ariston
- Summit
Nyeste Opvaskemaskine Manualer


