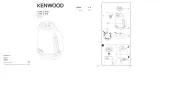
Cable conector de 12 contactos
POWERED ENCLOSED SUBWOOFER
ALTAVOZ DE SUBGRAVES CON CERRADO ALIMENTACION
2020 JVCKENWOOD Corporation B5E-0264-00/00 (W)
Design and specifications are subject to change
Maximum output ....................................................................1,200 W
RCA input – ........................................................................0.18 V 1.7 V
Speaker input – ................................................................1.7 V 12.0 V
Input impedance 10 kΩ .........................................................................
Power ........................................................................................... DC14.4 V
(Opating voltage 11V - 16V)
Current consumption 40 A ..................................................................
Frequency response 40 Hz–250 Hz ................................................
Sensitivity...........................................................................................76 dB
Cut-off frequency 50 Hz – 150 Hz (variable) ..............................
Bass boost control ..........................................0 – +8 dB (variable)
Phase 0˚, 180˚ ...............................................................................................
Dimensions ...................................................Width : 360 mm
Weight 9.0 kg ...............................................................................................
El diseño y las especificaciones se encuentran
sujetos a cambios sin previo aviso.
Potencia máxima ....................................................................1.200 W
Entrada RCA ...................................................................0,18 V–1,7 V
Entrada de altavoz .....................................................1,7 V–12,0 V
Impedancia de entrada 10 kΩ ...........................................................
Potencia .....................................................................................14,4 V CC
(Tensión de funcionamiento 11V - 16V)
Consumo 40 A .............................................................................................
Respuesta de frecuencia 40 Hz–250 Hz ......................................
Sensibilidad 76 dB .....................................................................................
Frecuencia de corte 50 Hz – 150 Hz (variable) .........................
Control acentuador de graves ...............0 – +8 dB (variable)
Fase ..................................................................................................0˚, 180˚
Dimensiones ...............................................Ancho : 360 mm
Peso 9,0 kg .....................................................................................................
.............................................................................1,200 W
RCA输入连接 ..................................................................0.18 V–1.7 V
扬声器输入连接 ............................................................1.7 V–12.0 V
输入阻抗 ............................................................................................10 kΩ
功率 ............................................................................................. 14.4 V DC
消耗电流 ...............................................................................................40 A
频率响应 ......................................................................... 40 Hz–250 Hz
灵敏度 .................................................................................................76 dB
截止频率 ..........................................................50 Hz – 150 Hz ( )可变
低音增强控制 可变 ............................................................0 – +8 dB ( )
相位 ..................................................................................................0˚, 180˚
外形尺寸 幅 ............................................................................ : 360 mm
重量 ..................................................................................................... 9.0 kg
IMPORTANT SAFETY INSTRUCTIONS
Caution: Read this page carefully to ensure safe operation.
• Before mounting or wiring etc., be sure to remove the wire from the battery minus
terminal. (Not doing so can cause shorts or fires.)
• When extending the ignition, battery, or ground wires, make sure to use automo-
tive-grade wires or other wires with a 5.5 mm
(AWG 10) or more to prevent wire
deterioration and damage to the wore coating.
• To prevent a short circuit, never put or leave any metallic objects (such as coins or
metal tools) inside the speaker.
• In the event the unit generates smoke or abnormal smell, immediately switch the
power OFF. After this, please contact your dealer or nearest service station as soon
• Connect the speaker to DC 12 V, negative ground.
• Do not attempt to open or modify the unit, for this could cause fire hazard or mal-
• After taking the unit out of the polyethylene bag, be sure to dispose of the poly-
ethylene bag out of the reach of children. Otherwise, they may play with the bag,
which could cause hazard of suffocation.
• Installation and wiring of the product requires expert skill and experience. To ensure
safety, be sure to have your dealer or specialist perform the installation and wiring.
• Do not install the speaker in a spot exposed to direct sunlight or excessive heat or
• Do not install the speakers in locations which may be subject to water or moisture.
• Do not install the speakers in unstable locations or locations subject to dust.
• If the fuse blows, after checking to see if the wiring cord has shorted, be sure to
replace with the stipulated size (amperage) fuse as displayed on the fuse box. (Using
fuses other than the stipulated size can cause fires.)
To replace the fuse, refer to the vehicle instruction manual.
• To prevent a short circuit when replacing a fuse, disconnect the wiring harness at
• Do not use gasoline, naphtha, or any type of solvent to clean the speaker. Clean by
wiping with a soft, dry cloth.
• Connect the speaker wires to appropriate speaker connectors separately. Sharing
the negative wire of the speaker or grounding speaker wires to the metal body of
the car can cause this unit to fail.
• When making a hole under a seat, inside the trunk, or somewhere else in the vehi-
cle, check that there is nothing hazardous on the opposite side such as a gasoline
tank, brake pipe; or wiring harness, and be careful not to cause scratches or other
• For ground wire mounting, do not fasten the wire to an airbag, steering or brake
line system or other critical safety unit bolts or nut. (Can cause accidents.)
• When mounting, be sure to mount in a place that will not interfere with driving or
be dangerous to passengers during sudden braking etc. (Cause of injury or acci-
• After installing the unit, check to make sure that electrical equipment such as the
brake lamps, turn signal lamps and windshield wipers operate normally.
• The driver should always stop the vehicle in a safe place before performing the
– Remote control operation
• Keep the volume of sound at an optimum level. Not being able to hear sounds from
outside of your car can lead to traffic accidents.
• Do not place hands on the speaker. The speaker becomes hot after extended opera-
tion. Touching it in such a condition may cause burns.
The protection function is activated in the following situations:
This unit is equipped with a protection function for protecting this unit from various
accidents or problems that can occur.
When the protection function is triggered, the power indicator goes off and the ampli-
• When the unit malfunctions and a DC signal is sent to the speaker output.
• When the internal temperature is high and unit won’t operate.
INSTRUCCIONES DE SEGURIDAD IMPORTANTES
Precaución : Lea cuidadosamente estas páginas para asegurar una operación sin anomalías.
• Antes de realizar el montaje o el cableado, etc., asegúrese de retirar el cable del ter-
minal negativo de la batería.
(De lo contrario pueden producirse cortocircuitos o incendios).
• Cuando extienda los cables de encendido, batería o masa, asegúrese de utilizar
cables para uso en automóviles u otros cables de 5,5 mm
impedir que se deterioren los propios cables o se desgaste el revestimiento.
• Para impedir cortocircuitos, nunca ponga o deje objetos metálicos (tales como
monedas o herramientas metálicas) en el interior de un altavoz.
• En el caso de que la unidad genere humo o un ruido anormal, desconecte inme-
diatamente la alimentación. Después, consulte con su concesionario o centro de
reparaciones más cercano tan pronto como sea posible.
DESCONECTE LA ALIMENTACION!
• Conecte el altavoz a una batería de 12 V CC con puesta a masa negativa.
• No trate de abrir ni modificar la unidad porque podría producirse un peligro de
• Después de cesar la unidad de la bolsa de polietileno, asegúrese de poner la bolsa
de polietileno donde no puedan alcanzarla los niños. De otra forma, éstos podrán
jugar con la bolsa y se podría producir un peligro de asfixia.
• La instalación y cableado del producto requiere la habilidad y la experiencia de los
expertos. Para garantizar la seguridad, cerciórese de que sea su concesionario o un
especialista quien realice la instalación y el cableado.
• No instale el altavoz en un lugar expuesto a la luz solar directa o a un calor o hume-
• No instale los altavoces en lugares sometieses al agua o a la humedad.
• No instale los altavoces en lugares inestables ni en lugares donde haya polvo.
• Si saltara el fusible, después de comprobar si el cable p1-ha sufrido un cortocircuito,
asegúrese de reemplazarlo por un fusible de la capacidad (amperaje) estipulada, tal
como se indica en la caja de fusibles. (El uso de fusibles de una capacidad que no
sea la estipulada, puede ser motivo de incendios).
¡Compruebe las indicaciones!
Para cambiar el fusible, remítase al manual de instrucciones del vehículo.
• Para impedir un cortocircuito cuando sustituya un fusible, desconecte primero el
• No utilice gasolina, naftalina u otro tipo de disolvente para limpiar el altavoz. Lim-
pielo pasando un paño blando y seco.
• Conecte separadamente los cables de los altavoces a los conectores de altavoces
apropiados. Compartir el cable negativo del altavoz o poner a masa los cables del
altavoz en la carrocería del automóvil puede ser la causa de que esta unidad no
• Cuando haga un agujero debajo de un asiento, en el portamaletas o en cualquier
otro punto del vehículo, compruebe que no haya nada peligroso al otro lado como,
por ejemplo, un deposito de gasolina, tubería de frenos o conjuntos de cables, y
tenga cuidado para no dejar marcas y hacer otros daños.
• Para el montaje de tierra no sujete el cable a un airbag, la dirección o el sistema
de frenado ni a ningún tornillo o tuerca críticos de la unidad de seguridad. (Puede
• Durante el montaje, asegúrese de realizar el mismo en un sitio que no interfiera
con la conducción o que resulte peligroso para los pasajeros al frenar bruscamente,
etc. (Causa de lesiones o accidentes).
• Después de instalar la unidad, asegúrese de que el equipo eléctrico tal como luces
de frenos, luces de intermitentes y limpiaparabrisas funcionen normalmente.
• El conductor deberá parar siempre el vehículo en un lugar seguro antes de hacer lo
– Utilizar el mando a distancia
• Mantenga el volumen de sonido a un nivel óptimo. No escuchar los sonidos del
exterior del vehículo podría ocasionar un accidente de tráfico.
• No coloque las manos sobre el altavoz. El altavoz se calentará tras un periodo de
funcionamiento prolongado. Tocarlo entonces podría ocasionar quemaduras.
La función de protección se activa en los casos siguientes:
Este aparato está equipado con una función de protección que protege el aparato de
diversos accidentes y problemas que pueden ocurrir.
Cuando la función de la protección está activada, el indicador de potencia se apaga y
el amplificador se interrumpe.
• Cuando el aparato funciona mal y se envía una señal de DC a la salida de los altavo-
• Cuando la temperatura interna sea alta y la unidad no funcione.
在进行安装或布线等作业之前,请务必将电线从电池负极端子上取下。(否则会导致短路或火灾。)
为了防止短路等事故,请勿将金属物品 (硬币,工具等) 掉落在扬声器中。
如果本机产生烟雾或异味,请立即关闭电源。 在此之后,请尽快联系您的经销商或最近的维修站。
请勿尝试打开或改装本机,否则可能导致火灾风险或故障。
将本机从聚乙烯袋中取出后,请务必将聚乙烯袋放在儿童接触不到的地方。 否则,他们可能会摆弄袋子,而
产品的安装和布线需要专业技能和经验。 为确保安全,请务必让经销商或专业人员进行安装和布线。
请勿将扬声器安装在暴露于直射阳光中或者过热或过湿的地方。
如果保险丝熔断,在检查电线是否短路后,请务必使用保险丝盒上显示的规定尺寸(安培数)的保险丝进行
更换保险丝时,为了防止短路事故,请先拔下电源线束再进行更换。
请勿使用汽油、挥发油或任何类型的溶剂来清洁扬声器。 用柔软的干布擦拭清洁。
将扬声器导线分别连接至相对应的扬声器接头。 将扬声器的负极线或扬声器接地线连接至汽车的金属车
在车座,行李箱底部或车子其它部位打孔时,应确认其背面有没有会受到损坏的物件,诸如油箱、刹车用配
对于接地线的安装,请勿将电线固定至安全气囊、转向或制动线系统或者其他关键安全单元的螺栓或螺母
对于接地线的安装,请勿将电线固定至安全气囊、转向或制动线系统或者其他关键安全单元的螺栓或螺母
安装本机后,请检查以确保如刹车灯、转向信号灯和挡风玻璃刮水器等电气设备工作正常。
在执行以下操作之前,司机应始终将车辆停在安全的地方。
将音量控制到适当程度。 如果听不到车辆外面的声音,就有可能发生交通事故。
不要触碰扬声器。 长时间使用后扬声器会发热。此时触碰扬声器会造成烫伤。
本机装有保护功能,可以保护本机以及扬声器不会受到可能发生的各种意外事故的损害。
当保护功能被触发时,电源指示灯将熄灭,放大器也停止工作。
当本机出现误动作,有DC (直流) 信号传送到扬声器输出端时。
▪Dimensions / Dimensiones / 外形尺寸
• The fuse is blown. • Check the
polarity of the power cord and that the cords are
not shorted, then replace with a fuse with the rated capacity.
• Re-connect the cords correctly by referring to the connection ex-
ample (refer to “Connections”).
• The power supply pin (yellow) of the 12-pin connection cord is
• Connect the cord correctly by referring to the connection example
(refer to “Connections”).
• Attach the grounding terminal to the metallic section of the vehicle
(not a coated surface) by tightly screwing it.
• Insert the connector all the way in.
• Check the connections of all cords, then connect the
• The power control pin (blue) of the 12-pin connection cord is not
• The grounding pin (black) of the 12-pin connection cord is not
• The 12-pin connector is not plugged in completely.
cable of the car battery is disconnected. • Check the connections of all cords, then connect the
• The attenuator of the audio components is set to ON. • Switch the attenuator OFF.
• The speaker cords or RCA cord are connected improperly. • Connect the cords correctly by referring to the connection example
(refer to “Connections”).
• Connection terminals are connected improperly. • Insert the connectors or jacks all the way in to the terminals.
• The remote control cord is unplugged. • Plug the cord into the REMOTE terminal.
• The input level is set to low. • Turn the VOLUME control knob and set the input level to an opti-
• The VOLUME control is set to the MIN position. • Increase the volume to an optimum level (refer to “Operation”).
• Connection terminals are connected improperly. • Check that the speaker cord or the RCA cable is connected properly.
• Large power input causes the protection circuit for this unit to
• Turn the volume to MIN for a while.
• The input level is set to high. • Turn the volume control knob and set the input level to an opti-
• Both the speaker cords and RCA cords are connected. • Connect either the speaker cord or the RCA cord (refer to “Connec-
• The speaker is not properly installed in the vehicle. • Install the speaker properly in the vehicle and insert the included
• The luggage board cause buzzing sounds. • Install the luggage board firmly.
• The speaker cords are connected with incorrect positive
• Connect the cords correctly by referring to the connection example
(refer to “Connections”).
• The grounding pin (black) of the 12-pin connection cord is poorly
• Attach the grounding terminal to the metallic section of the vehicle
(not a coated surface) by tightly screwing it.
• The remote control cord is unplugged. • Plug the cable into the REMOTE terminal.
• Insert the connector all the way in.
(refer to “Connections”).
Often, what appears to be a malfunction is due to user error. Before calling for service, please consult the following table.
A menudo, lo que parece una avería se debe a un error del usuario. Antes de llamar al servicio de reparaciones, consulte la tabla siguiente.
通常情况下,故障多由于用户错误而出现。 在致电维修之前,请查询下表。
• El fusible está fundido. • Compruebe que la polaridad
del cable de alimentación no
esté cortocircuitada, y luego ponga un fusible del amperaje nomi-
• Vuelva a conectar correctamente los cables consultando el ejemplo
de conexión (consulte “Conexiones”).
• El contacto de alimentación (amarillo) del cable de conexión de
12 contactos no está conectado.
• Conecte correctamente el cable consultando el ejemplo de cone-
xión (consulte “Conexiones”).
• Coloque el terminal de masa en la sección metálica del vehículo
(superficie sin cubrir) apretándolo firmemente.
• Introduzca a fondo el conector.
• Compruebe las conexiones de todos los cables y luego conecte el
• El contacto de control de alimentación (azul) del cable de cone-
xión de 12 contactos no está conectado.
• El contacto de masa (negro) del cable de conexión de 12 contac-
• El contacto de masa (negro) del cable de conexión de 12 contac-
de la batería del automóvil está desconecta-
• Compruebe las conexiones de todos los cables y luego conecte el
• El atenuador de los componentes de audio está en ON. • Desconecte el atenuador.
• Los cables de los altavoces o el cable RCA están conectados inco-
• Conecte correctamente el cable consultando el ejemplo de cone-
xión (consulte “Conexiones”).
• Los terminales de conexión están mal conectados. • Inserte a fondo los conectores o las tomas en los terminales.
• El cable del mando a distancia está desenchufado. • Enchufe el cable en el terminal REMOTE.
• El nivel de entrada está ajustado demasiado bajo. • Gire el control VOLUME y ajuste el nivel de entrada óptimo.
• El control VOLUME está en la posición MIN. • Aumente el volumen a un nivel óptimo. (consulte “Operación”).
• Los terminales de conexión están mal conectados. -• Compruebe que el cable del altavoz o el cable RCA estén conecta
• Una gran entrada de energía causará el accionamiento del circuito
de protección de la unidad.
• Ajuste el volumen en MIN durante unos instantes.
• El nivel de entrada está ajustado demasiado alto. • Gire el control VOLUME y ajuste el nivel de entrada óptimo.
• Tanto los cables del altavoz como los cables RCA están conecta-
• Conecte el cable del altavoz o el cable RCA (consulte “Conexiones”).
• El altavoz no está instalado correctamente en el vehículo. -• Instale el altavoz correctamente en el vehículo e inserte las almoha
dillas incluidas si es necesario.
• El tablero del maletero causa zumbidos. • Instale firmemente el tablero del maletero.
• Los cables del altavoz están conectados con sus polaridades posi-
• Conecte correctamente el cable consultando el ejemplo de cone-
xión (consulte “Conexiones”).
• El contacto de tierra (negro) del cable de conexión de 12 contac-
• Coloque el terminal de masa en la sección metálica del vehículo
(superficie sin cubrir) apretándolo firmemente.
• El cable del mando a distancia está desenchufado. • Enchufe el cable en el terminal REMOTE.
• Introduzca a fondo el conector.
通过参考连接示例 (”连接” 参照) 重新正确连接电线。
请参阅连接示例 (”连接” 参照) 正确连接电线。
通过将其拧紧、将接地端子连接至车辆的金属部分(而不是涂层表面)。
请参阅连接示例 (”连接” 参照) 正确连接电线。
请参阅连接示例 (”操作” 参照) 正确连接电线。
通过将其拧紧、将接地端子连接至车辆的金属部分(而不是涂层表面)。
×: 表示该有害物质至少在该部件的某一均质材料中的含量
Información acerca de la eliminación de equipos eléctricos y electrónicos al final de la vida útil (aplicable a los países que hayan adoptado sistemas indepen-
dientes de recogida de residuos)
Los productos con el símbolo de un contenedor con ruedas tachado no podrán ser desechados como residuos domésticos. Los equipos eléctricos y electrónicos
al final de la vida útil, deberán ser reciclados en instalaciones que puedan dar el tratamiento adecuado a estos productos y a sus subproductos residuales corres-
pondientes. Póngase en contacto con su administración local para obtener información sobre el punto de recogida más cercano. Un tratamiento correcto del
reciclaje y la eliminación de residuos ayuda a conservar los recursos y evita al mismo tiempo efectos perjudiciales en la salud y el medio ambiente.