ES ES ES ES ESES
IAN 352698_2010
IT/MTIT/MTIT/MTIT/MT PT
Legenda dos pictogramas utilizados
Ler as instruções!
Candeeiro para a montagem
em / nos móveis, superfície de
fixação em operação normal até
95 °C não inflamável.
Este candeeiro destina-se exclusiva-
mente à utilização no interior, em
espaços secos e fechados.
Considerar as indicações de
aviso e de segurança!
V
Volt Aviso de choque elétrico!
Tensão alternada
(tipo de corrente e tensão)
Perigo de morte e acidentes para
bebés e crianças!
Hertz (frequência) Procedimento correto
Watt (potência efetiva)
Cuidado! Perigo de queimaduras
através de superfícies quentes!
Classe de proteção II
Ra
Índice de restituição das cores
Montagem no teto
Temperatura da lâmpada em
Kelvin
Montagem na parede Lumen
ON OFF
Ciclos de ligação
b
a
Elimine a embalagem e o
aparelho de forma ecológica!
Este candeeiro não é adequado para
redutores de luminosidade externos e
interruptores eletrónicos.
A embalagem é composta por
papel 100 % reciclado.
Durabilidade
Calha de iluminação LED
Q
Introdução
Congratulamo-lo pela aquisição do
seu novo aparelho. Decidiu-se, assim,
por um produto de elevada qualida
de.
Por favor, leia atentamente todo o manual de
instruções. Este manual pertence a este produto
e contém informações importantes relativas à
colocação em funcionamento e ao manuseam
ento.
Siga sempre todas as indicações de segurança.
Verifique, antes da colocação em funcioname
nto,
se existe a tensão correcta e se todas as peças
estão correctamente montadas. Caso tenha dú-
vidas ou se sinta inseguro no que diz respeito
ao manuseamento do aparelho, contacte o fa-
bricante ou o ponto de assistência. Guarde este
manual com cuidado e, se necessário, entregue
o a terceiros.
Q
Utilização correcta
Este candeeiro é exclusivamente para
a utilização no interior, e em espaços
secos e fechados.
Para poder accionar facilmente o interruptor, o
candeeiro deve ser montado numa zona acessí-
vel. O candeeiro pode ser montado em superfí-
cies normais. Uma outra utilização para além dos
pontos acima mencionados ou uma alteração
do aparelho não são permitidas, uma vez que
causariam danos. Adicionalmente, pode causar
outros perigos de vida e ferimentos, bem como
anomalias técnicas (p. ex. curto-circuito,
incêndio,
choque eléctrico). Este aparelho só se destina ao
uso doméstico e privado. Este produto destina-se
ao funcionamento normal.
Q
Material fornecido
Após desempacotar o aparelho verifique sempre
o volume de fornecimento quanto à integridade
e ao estado perfeito do aparelho.
1 Calha de iluminação
LED, Modelo
14137306L
1 Cabo de
alimentação
1 Cabo de ligação
2 Buchas
2 Agrafos
2 Parafusos
1 Manual de mon-
tagem e instruções
Q
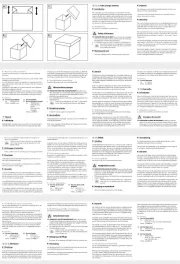
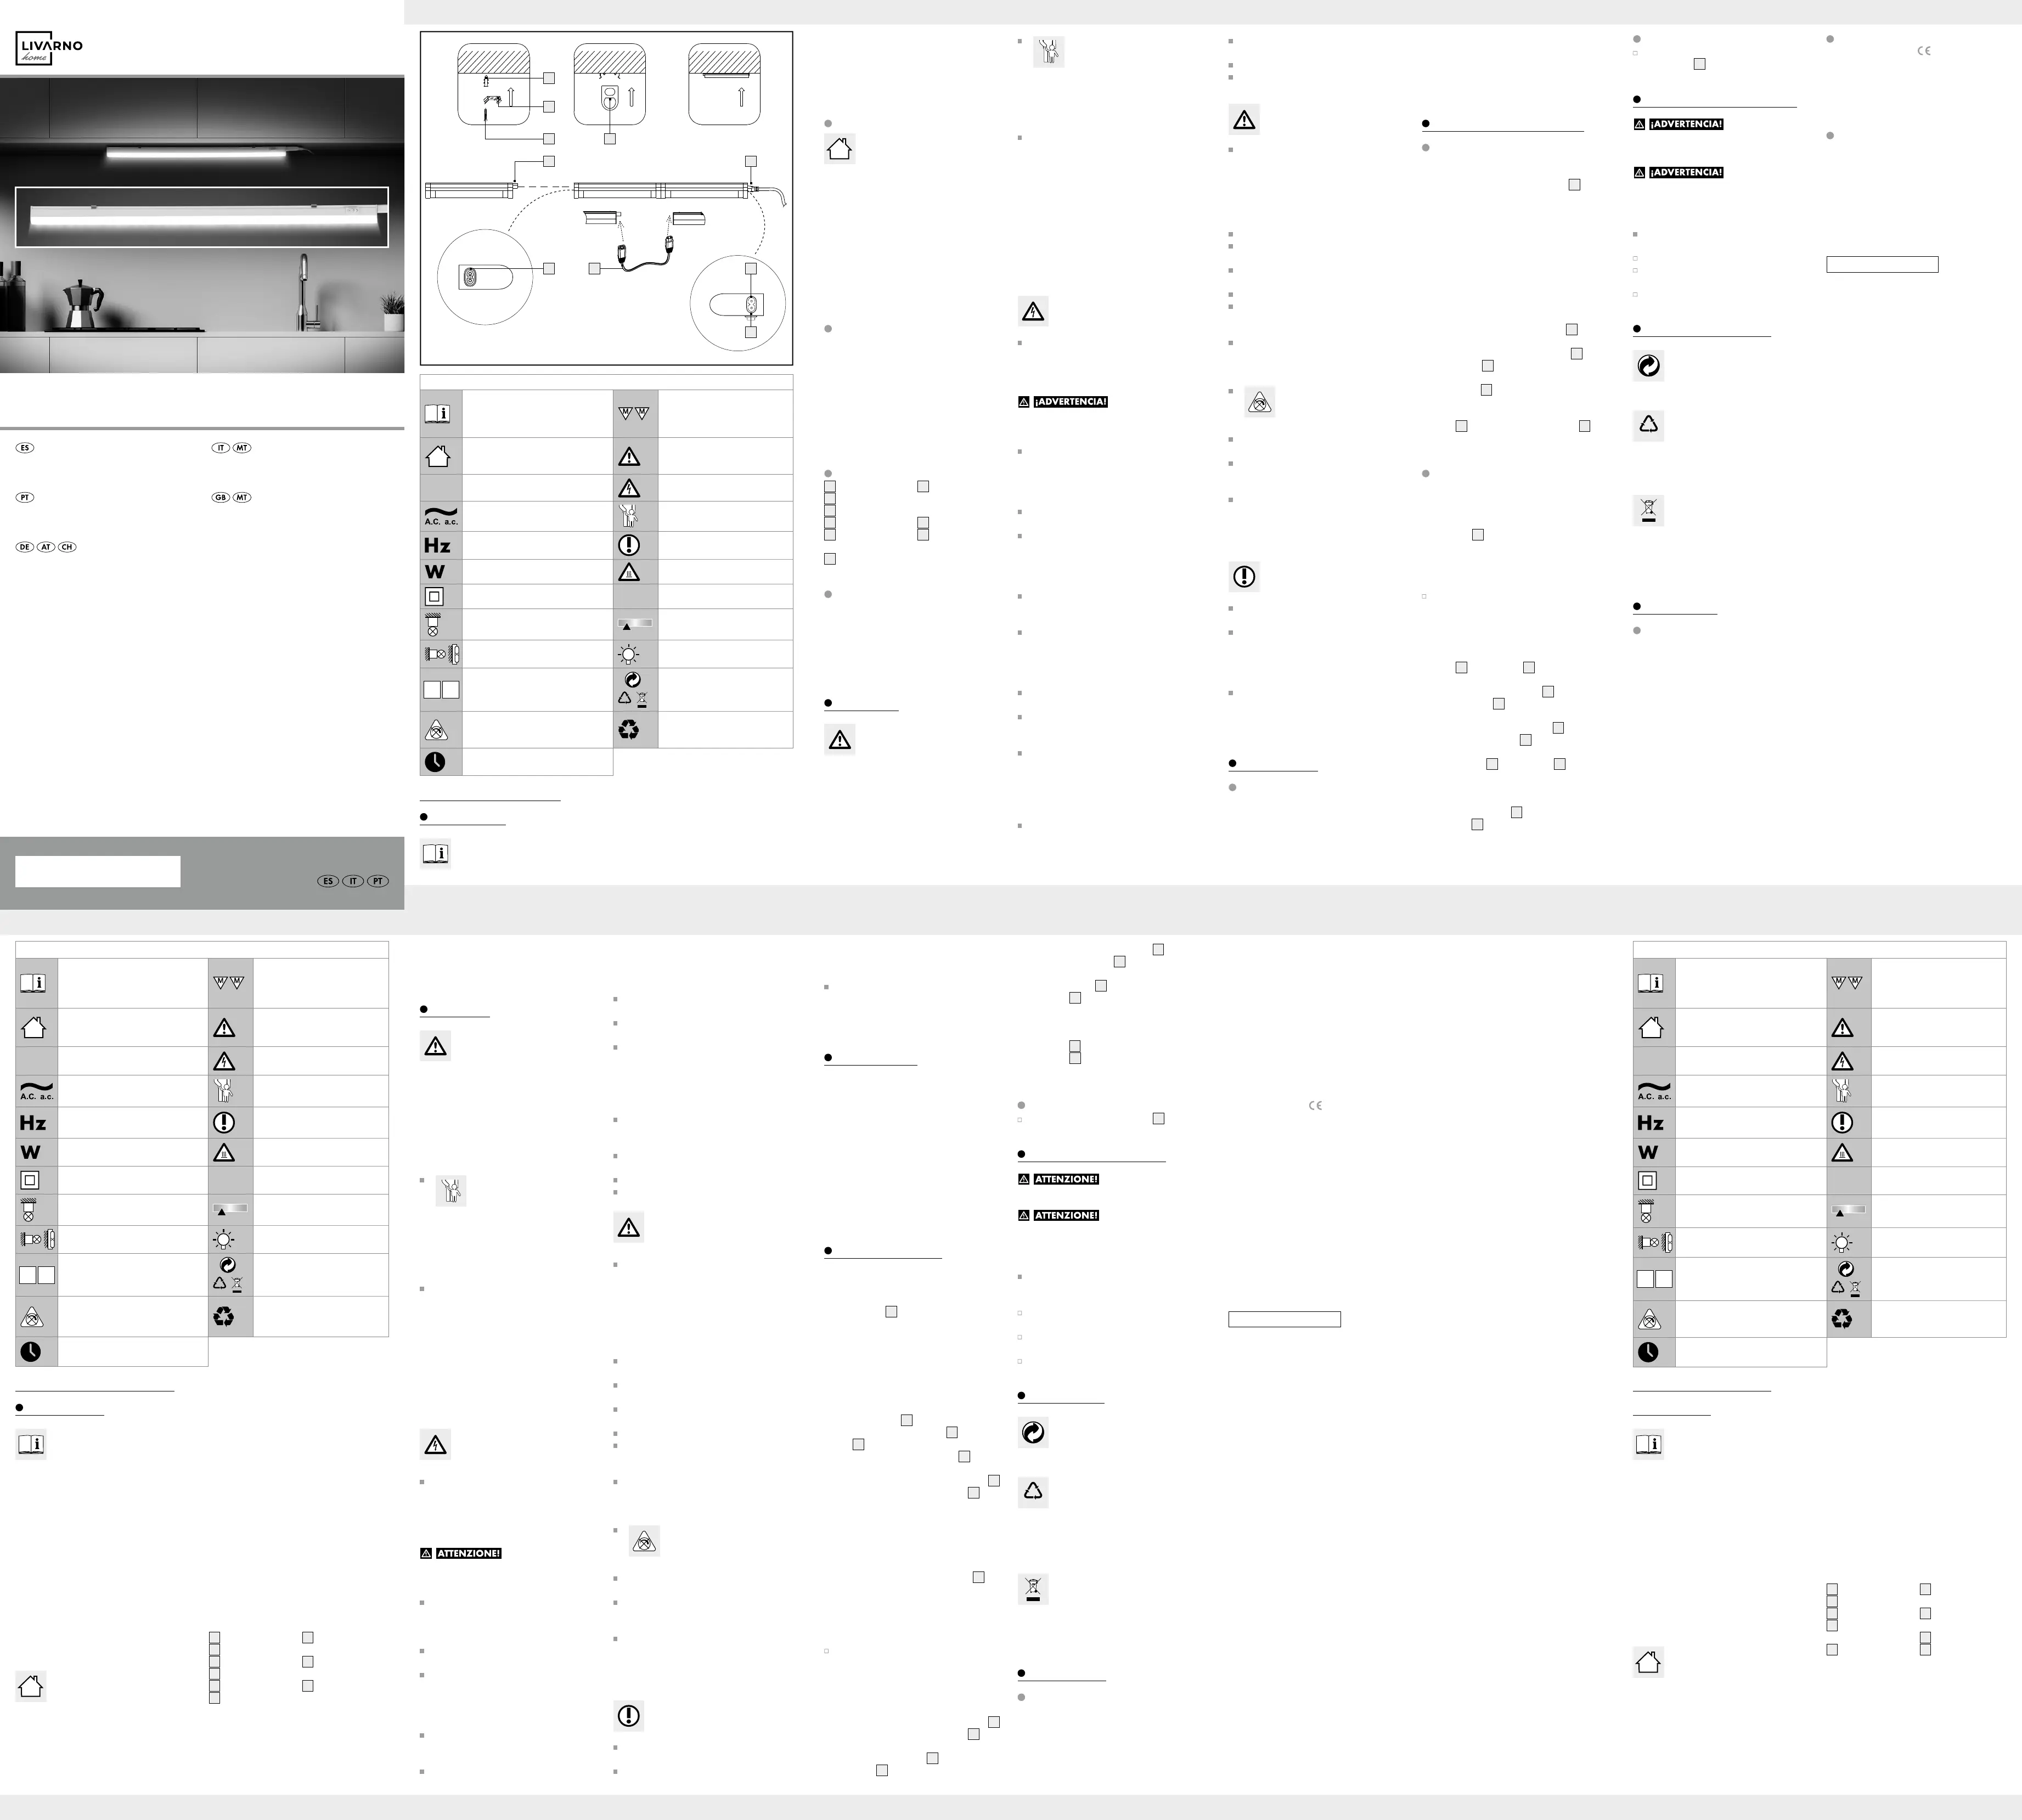
Descrição das peças
1
Bucha
2
Grampo
3
Parafusos
4
Tampa de
cobertura
5
Cabo de rede
6
Conexão do
candeeiro
7
Interruptor LIGAR /
DESLIGAR
8
Cabo de ligação
9
Tomada do
candeeiro
Q
Dados técnicos
Tensão de rede: 230–240 V∼ 50 Hz
Lâmpadas: 43 LEDs
Potência nominal: máx. 8 W
Dimensões: 57,3 x 3,0 x 2,2 cm
(C x L x A)
Classe de protecção: II
Tipo de protecção: IP20
Se tuttavia si dovessero riscontrare dei difetti du-
rante il periodo di garanzia, si prega di inviare
l’apparecchio all’indirizzo di assistenza riportato
indicando il codice del modello: 14137306L.
Sono esclusi dalla garanzia danni provocati da
uso non conforme, mancata osservanza delle
istruzioni d‘uso o intervento da parte di persone
non autorizzate, oltre ai componenti soggetti a
usura (come ad es. le lampadine). Un eventuale
intervento in garanzia non prolunga né rinnova
il periodo di garanzia stesso.
Q
Dichiarazione di
conformità
Questo prodotto è conforme ai requisiti stabiliti
dalle direttive europee e nazionali vigenti. La
conformità è stata comprovata. Le relative dichia-
razioni e la documentazione pertinente sono
depositate presso il produttore.
Q
Produttore / assistenza
Briloner Leuchten GmbH & Co. KG
Im Kissen 2
59929 Brilon
GERMANIA
Tel.: +49 29 61 / 97 12–800
Fax: +49 29 61 / 97 12–199
E-mail: kundenservice@briloner.com
www.briloner.com
IAN 352698_2010
Per qualsiasi richiesta conservare lo scontrino
e il codice dell‘articolo (ad es. IAN
123456_7890) come prova d‘acquisto.
modo ordinato e a portata di mano tutti i
componenti ed eventuali attrezzi o materiali
necessari.
Prestare sempre la massima attenzione! Stare
sempre attenti a quel che si fa e procedere
sempre con prudenza. Non montare mai la
lampada se non si è concentrati o non ci si
sente bene.
Preparazione
Q
Attrezzi e materiali necessari
Gli attrezzi e i materiali indicati non sono inclusi
nella fornitura. Si tratta in questo caso di dati e
valori non vincolanti, forniti a titolo orientativo.
Le caratteristiche del materiale dipendono dalle
specifiche condizioni in loco.
- Matita / strumento di marcatura
- Cacciavite
- Trapano
- Punta per trapano
- Livella
- Nastro metrico
Messa in funzione
Q
Montaggio della lampada
Nota: prima del montaggio, assicurarsi che
nelle vicinanze vi sia una presa raggiungibile
dal cavo di rete
5
in dotazione.
1. Misurare la parete o la superficie di mon-
taggio per l‘esecuzione dei fori. Utilizzare
una livella per un allineamento preciso.
2. Segnare la distanza dei due fori di fissaggio.
3. Eseguire ora i fori per il fissaggio (ø ca.
6 mm, profondità ca. 30 mm). Assicurarsi di
non danneggiare alcuna conduttura.
4. Inserire i tasselli
1
in dotazione nei fori.
5. Avvitare saldamente i ganci
2
tramite le
viti
3
(vedi fig. A).
6. Spingere la lampada nei ganci
2
fissati
(vedi fig. B).
7. Infilare l‘allacciamento del cavo di rete
5
nell‘allacciamento della lampada
6
.
8. Inserire la spina nella presa di corrente. La
lampada è ora pronta per l‘uso.
Q
Collegamento di più lampade
CAUTELA!
Assicurarsi che tutte le lampade sottopensili siano
collegate, prima di inserire il cavo di rete
5
nella
presa di corrente.
Nota: assicurarsi di collegare tra loro al mas-
simo 10 lampade sottopensili dello stesso tipo
a una presa.
Montare fino a 10 lampade dello stesso
tipo una accanto all‘altra. A tale scopo leg-
gere attentamente i punti 1–5 del capitolo
„Montaggio della lampada“.
Nota: assicurarsi che la distanza tra le
lampade non sia maggiore di 16 cm.
1. Infilare l‘allacciamento del cavo di rete
5
nell‘allacciamento della lampada
6
della
prima lampada.
2. Rimuovere il cappuccio
4
della presa della
lampada
9
con cautela, mediante un cac-
ciavite.
3. Inserire il cavo di collegamento
8
nella
presa della lampada
9
.
4. Infilare il secondo allacciamento del cavo
di collegamento
8
nell‘allacciamento della
lampada
6
della lampada successiva.
5. In alternativa è possibile collegare le lam-
pade direttamente l‘una con l‘altra, allac-
ciando le lampade tramite la presa della
lampada
9
situata sull‘allacciamento della
lampada
6
.
6. Inserire la spina nella presa di corrente. La
lampada è ora pronta per l‘uso.
Accensione / Spegnimento
Toccare l’interruttore ON / OFF
7
per
accendere o spegnere la lampada.
Manutenzione e pulizia
PERICOLO DI
FOLGORAZIONE!
Estrarre la spina dalla presa elettrica.
PERICOLO DI
FOLGORAZIONE!
Per motivi di sicurezza elettrica, la lampada
non deve essere mai pulita con acqua o
altri liquidi, né immersa in acqua.
Non usare solventi, benzina o simili. Queste
sostanze potrebbero danneggiare la lam-
pada.
Lasciare raffreddare completamente la
lampada.
Per la pulizia utilizzare soltanto un panno
asciutto e privo di pelucchi.
Dopo la pulizia, infilare nuovamente la
spina nella presa.
Smaltimento
L’imballaggio è composto da mate-
riali ecologici che possono essere
smaltiti presso i siti di raccolta locali
per il riciclo.
b
a
Osservare l‘identificazione dei mate-
riali di imballaggio per lo smaltimento
differenziato, i quali sono contrasse-
gnati da abbreviazioni (a) e da nu-
meri (b) con il seguente significato:
1–7: plastiche / 20–22: carta e car-
tone / 80–98: materiali compositi.
Per questioni di tutela ambientale non
gettare il prodotto usato tra i rifiuti
domestici, ma provvedere invece al
suo corretto smaltimento. Presso l’am-
ministrazione competente è possibile
ricevere informazioni circa i siti di
raccolta e i relativi orari di apertura.
Informazioni
Garanzia
L‘apparecchio è provvisto di una garanzia di
36 mesi a decorrere dalla data di acquisto.
L‘apparecchio è stato prodotto con estrema
cura ed è stato sottoposto a severi controlli di
qualità. Per la durata del periodo di garanzia
risolviamo gratuitamente qualunque problema
legato a difetti di materiale o di produzione.
Dimensioni: 57,3 x 3,0 x 2,2 cm
(L x L x A)
Classe di isolamento: II
Grado di protezione: IP20
Sicurezza
Indicazioni di sicurezza
Il diritto di garanzia decade in caso di danni
provocati dal mancato rispetto delle indicazioni
contenute in questo manuale di istruzioni per
l‘uso! Si declina ogni responsabilità per danni
indiretti! Si declina ogni responsabilità per le-
sioni personali o danni materiali causati da un
uso improprio o dal mancato rispetto delle av-
vertenze per la sicurezza!
PERICOLO DI MORTE E DI
INCIDENTE PER NEONATI
E BAMBINI!
Non lasciare mai i bambini privi di sorve-
glianza in presenza del materiale di imbal-
laggio. Il materiale di imballaggio potrebbe
provocarne il soffocamento. I bambini sotto-
valutano spesso i pericoli. Tenere sempre il
prodotto lontano dalla portata dei bambini.
Questo apparecchio può essere utilizzato dai
bambini dagli 8 anni in su, da persone con
capacità fisiche, sensoriali o mentali limitate
o da persone inesperte, solo se supervisiona
te
o preventivamente istruite sull’utilizzo sicuro
dell‘apparecchio e solo dopo che abbiano
compreso i pericoli ad esso correlati. I bam-
bini non possono giocare con questo appar
ec-
chio. La pulizia e la manutenzione eseguibili
dall‘utente non possono essere effettuate da
bambini senza la supervisione di un adulto.
Evitare situazioni che
espongano al pericolo di
morte per folgorazione
Prima di ogni collegamento alla rete elettrica
controllare che la lampada, il cavo di rete
ed eventualmente il cavo di collegamento
non presentino danneggiamenti. Non utiliz-
zare mai la lampada se si notano segni di
danneggiamento.
In presenza di cavi di rete e di cavi di colle-
gamento danneggiati sussiste il pericolo di
morte per folgorazione.
Prima del montaggio assicurarsi che la
tensione di rete presente coincida con la
tensione di esercizio necessaria alla lam-
pada (vedi “Specifiche tecniche”).
Evitare tassativamente che la lampada entri
in contatto con acqua o altri liquidi.
Non aprire mai uno dei dispositivi elettrici (ad
es. interruttore, portalampada o simili, ecc.)
e non inserire oggetti nei medesimi. Inter-
venti di questo tipo provocano un pericolo
di morte per folgorazione.
Per il collegamento o lo scollegamento dalla
corrente elettrica toccare solo la parte iso-
lata della spina!
Qualora il cavo flessibile esterno di questa
lampada fosse danneggiato, sarà possibile
sostituirlo soltanto con un cavo o un cavo
speciale che può essere acquistato solo dal
produttore o presso un centro di assistenza
autorizzato.
Collegare la lampada sottopensile alla rete
elettrica soltanto con il cavo di rete originale.
Collegare soltanto lampade sottopensili
originali dello stesso tipo.
Inserire lampade sottopensili collegate tra
di loro solamente a una presa elettrica. As-
sicurarsi di allacciare al massimo 10 lampade
sottopensili della stesso tipo a una sola presa
elettrica. In caso contrario si può giungere
a sovraccarichi dei collegamenti e dei cavi.
Assicurarsi che tutte le lampade sottopensili
siano collegate con il cavo di collegamento
prima di inserire il cavo di rete nella presa.
Non montare la lampada su superfici umide
o conduttrici di elettricità.
Non piegare il cavo di rete.
Non posare il cavo su bordi pronunciati.
Evitare situazioni di pericolo
che possano causare incendi
o lesioni
PERICOLO DI LESIONI!
Controllare ogni lampadina e plafoniera
immediatamente dopo averle estratte dall‘im-
ballaggio, per assicurarsi che non siano
danneggiate. Non utilizzare la lampada
se la lampadina e / o la plafoniera sono
difettose. In tal caso contattare il servizio
di assistenza per la sostituzione.
Lasciare raffreddare completamente la
lampada.
Non rivolgere lo sguardo direttamente verso
la fonte luminosa (lampadina a LED, ecc.).
Non esaminare i LED con strumenti ottici
(ad es. con una lente di ingrandimento).
La lampadina non è sostituibile.
Una volta che la fonte luminosa sarà giunta
al termine della propria vita utile, sostituire
l‘intera lampada.
PERICOLO DI USTIONE!
Per evitare ustioni, assicurarsi che la lampada
sia spenta e raffreddata prima di toccarla.
Le lampadine producono un forte calore.
Non utilizzare questa lampada
con un regolatore di luminosità
esterno o con un interruttore elet-
tronico. Essa non è idonea a questo uso.
Non lasciare la lampada incustodita quando
è in funzione.
Non coprire la lampada con oggetti. Un‘ec-
cessiva produzione di calore può provocare
un incendio.
Non lasciare incustoditi la lampada o il ma-
teriale di imballaggio. I sacchetti, le pellicole
in plastica, i pezzi in plastica, ecc. possono
diventare un giocattolo pericoloso per i
bambini.
Questa è la procedura
corretta
Montare la lampada in modo tale che sia
protetta da umidità e sporcizia.
Predisporre con cura il montaggio e impie-
gare tutto il tempo necessario. Disporre in
Legenda dei pittogrammi utilizzati
Leggere le istruzioni!
Faretti per il montaggio sopra / in-
terno a mobili, superfice di fissag-
gio a funzionamento normale
non infiammabile fino a 95 °C.
Questa lampada è idonea esclusiva-
mente all'uso in ambienti interni, asciutti
e chiusi.
Rispettare le avvertenze e le
indicazioni di sicurezza!
V
Volt
Attenzione: rischio di folgorazione!
Tensione alternata
(tipo di corrente e di tensione)
Pericolo di morte e di incidente
per neonati e bambini!
Hertz (frequenza) Questa è la procedura corretta
Watt (potenza attiva)
Cautela! Pericolo di ustione a
causa di superfici bollenti!
Classe di isolamento II
Ra
Indice di resa cromatica
Montaggio a soffitto Temperatura luce in gradi Kelvin
Montaggio a parete Lumen
ON OFF
Cicli di accensione
b
a
Smaltire l'imballaggio e l'appa-
recchio in modo ecocompatibile!
Questa lampada non è idonea per
regolatori di luminosità esterni e inter-
ruttori elettronici.
La confezione è realizzata al
100 % in carta riciclata.
Vita di servizio
Lampada sottopensile a LED
Introduzione
Vi ringraziamo per l‘acquisto del
Vostro nuovo apparecchio. Con il Vo-
stro acquisto avete scelto un prodotto
di alta qualità. Leggere interamente e attentame
nte
queste istruzioni per l‘uso. Queste istruzioni sono
parte integrante del prodotto e contengono im-
portanti indicazioni per la sua messa in funzione
e il suo utilizzo. Rispettare sempre tutte le avver-
tenze in materia di sicurezza. Prima della messa
in funzione, controllare che la tensione elettrica
presente sia quella corretta e che tutti i compo-
nenti siano stati montati correttamente. In caso
di domande o dubbi circa l‘utilizzo dell‘appa-
recchio, contattare il proprio rivenditore oppure
il servizio di assistenza. Conservare con cura
queste istruzioni e consegnarle a terzi in caso
di cessione del prodotto.
Q
Utilizzo conforme alla
destinazione d‘uso
Questa lampada è idonea esclusiva-
m
ente all‘uso in ambienti interni, asc
iutti
e chiusi.
Per poter utilizzare l‘interruttore la lampada deve
essere posta a portata di mano. La lampada può
essere fissata su tutte le superfici con un grado di
infiammabilità nella norma. Non si ammettono
un utilizzo diverso da quello precedentemente
descritto o la modifica dell’apparecchio, giacché
essi possono provocare danni allo stesso appa-
recchio. Inoltre possono crearsi pericoli, dannosi
per la vita e ferite, come anche funzionamenti
tecnici difettosi (ad es. corto circuito, incendio,
scosse elettriche). Questo apparecchio è desti-
nato esclusivamente all‘utilizzo domestico privato.
Questo prodotto è destinato a un utilizzo normale.
Q
Contenuto della confezione
Dopo aver aperto l‘imballaggio, controllare
subito che la fornitura sia completa e che l‘ap-
parecchio sia in perfette condizioni.
1 lampada sottopensile
a LED, modello
14137306L
1 cavo di rete
1 cavo di
collegamento
2 tasselli
2 ganci
2 viti
1 manuale d‘uso
e di montaggio
Q
Descrizione dei componenti
1
Tassello
2
Gancio
3
Viti
4
Cappuccio
5
Cavo di rete
6
Allacciamento
della lampada
7
Interruttore
ON / OFF
8
Cavo di
collegamento
9
Presa della
lampada
Q
Specifiche tecniche
Tensione di esercizio: 230–240 V∼ 50 Hz
Lampadine: 43 LED
Potenza nominale: max. 8 W
Encendido / Apagado
Accione el interruptor de ENCENDIDO /
APAGADO
7
para encender o apagar la
lámpara.
Mantenimiento y limpieza
¡PELIGRO DE
DESCARGA ELÉCTRICA!
Desconecte el enchufe de la toma de
corriente.
¡PELIGRO DE
DESCARGA ELÉCTRICA!
Por razones de seguridad eléctrica, nunca
limpie la lámpara con agua u otros líquidos
ni la sumerja en agua.
No utilice disolventes, gasolina o similares,
ya que la lámpara se dañaría.
Deje que la lámpara se enfríe completamente.
Limpie la lámpara únicamente con un paño
seco y sin pelusas.
Tras la limpieza, introduzca nuevamente el
enchufe en la toma de corriente.
Desecho del producto
El embalaje está compuesto por ma-
teriales no contaminantes que pueden
ser desechados en el centro de reci-
claje local.
b
a
Tenga en cuenta el distintivo del em-
balaje para la separación de residu
os.
Está compuesto por abreviaturas (a) y
números (b) que significan lo sig
uiente:
1–7: plásticos / 20–22: papel y car-
tón / 80–98: materiales compuestos.
Para proteger el medio ambiente no
tire el producto junto con la basura
doméstica cuando p1-ya no le sea útil.
Deséchelo en un contenedor de reci-
claje. Diríjase a la administración com-
petente para obtener información so
bre
los puntos de recogida de residuos y
sus horarios.
Información
Garantía
Este aparato cuenta con una garantía de 36 me-
ses a partir del momento de la compra. Este apa-
rato p1-ha sido meticulosamente fabricado y p1-ha sido
sometido a estrictos controles de calidad. Dentro
del período de garantía, reparamos gratuitamente
todos los defectos de los materiales o de fabrica-
ción. Si aún así detecta defectos durante el pe-
ríodo de garantía, por favor, envíe el aparato a
la dirección de servicio que figura indicando el
siguiente número de modelo: 14137306L.
Quedan excluidos de la garantía los daños pro-
ducidos por manejo incorrecto, incumplimiento
del manual de instrucciones o manipulación del
producto por parte de personas no autorizadas,
así como las piezas de desgaste (por ej. las
bombillas). Si se hace uso de la garantía, no se
prolongará ni renovará el período de garantía.
Declaración de
conformidad
Este producto cumple las exigencias de las direc-
tivas europeas y nacionales vigentes. Se p1-ha com-
probado la conformidad. El fabricante dispone
de las declaraciones y documentos correspon-
dientes.
Fabricante / Asistencia
Briloner Leuchten GmbH & Co. KG
Im Kissen 2
59929 Brilon
ALEMANIA
Tel.: +49 29 61 / 97 12–800
Fax: +49 29 61 / 97 12–199
E-Mail: kundenservice@briloner.com
www.briloner.com
IAN 352698_2010
Para realizar cualquier consulta, tenga a mano
el ticket y el número de artículo (por ej. IAN
123456_7890) como justificante de compra.
No instale la lámpara en superficies húme-
das o conductoras de la electricidad.
No tuerza el cable de alimentación.
No coloque el cable cerca de bordes
afilados.
Evite riesgos de incendio
y lesiones
¡PELIGRO DE LESIONES!
Compruebe el estado de cada vidrio y bom-
billa inmediatamente después de desempa-
quetar. No monte la lámpara con bombillas
defectuosas y / o vidrios defectuosos. En este
caso, póngase en contacto con el servicio de
mantenimiento para su sustitución.
D
eje que la lámpara se enfríe completam
ente.
No mire directamente al foco de luz (bom-
billa LED, etc.).
No mire los LED a través de un instrumento
óptico (por ej. lupa).
La bombilla no es reemplazable.
Si la fuente de iluminación llega al final de
su vida útil, deberá reemplazar la lámpara
por completo.
¡PELIGRO DE QUEMADURAS!
Asegúrese de que la lámpara esté apagada
y fría antes de tocarla para evitar quema-
duras. Las bombillas generan mucho calor.
No emplee estas lámparas con
reguladores externos ni con inte-
rruptores electrónicos. Ya que no
son adecuadas para estos productos.
Nunca deje la lámpara en funcionamiento
sin vigilancia.
No cubra la lámpara con ningún objeto.
Si se genera demasiado calor, podría pro-
vocarse un incendio.
No deje la lámpara ni el material de emba-
laje sin supervisión. Las láminas y bolsas de
plástico, las piezas de plástico, etc., pueden
convertirse en juguetes peligrosos para los
niños.
Así procederá de
forma correcta
Monte la lámpara de modo que esté prote-
gida de la humedad, el viento y la suciedad.
Prepare cuidadosamente el montaje y dedí-
quele el tiempo suficiente. Antes de comenz
ar,
ordene todas las piezas y asegúrese de que
las tiene a mano junto con el resto de herra-
mientas o material que se necesite.
¡Proceda siempre con sumo cuidado! Preste
mucha atención a lo que hace y actúe siem-
pre con sentido común. Bajo ningún concepto
monte la lámpara si está distraído o no se
encuentra bien.
Preparativos
Herramientas y materiales
necesarios
Las herramientas y los materiales mencionados
no se incluyen en el volumen de suministro. Los
valores y datos tratados son aproximados y me-
ramente orientativos. Los materiales necesarios
dependerán de las circunstancias particulares
de cada situación.
- Lápiz / herramienta de marcación
- Destornillador
- Taladro
- Broca
- Nivel de agua
- Cinta métrica
Puesta en funcionamiento
Cómo montar la lámpara
Nota: Antes de la instalación asegúrese de que
está cerca una toma de corriente que se pueda
alcanzar con el cable de alimentación
5
sumi-
nistrado.
1. Mida la pared o la superficie de montaje
para los orificios. Emplee un nivel de burbuja
para una correcta alineación.
2. Marque la distancia para ambos orificios
de fijación.
3. A continuación taladre los orificios de fijación
(ø aproximado 6 mm, profundidad aproxi-
mada 30 mm). Asegúrese de no dañar ning
ún
cable.
4. Introduzca los tacos suministrados
1
en los
orificios que acaba de taladrar.
5. Atornille firmemente los enganches
2
con
los tornillos
3
(ver fig. A).
6. Fije la lámpara presionándola contra los
enganches
2
que acaba de atornillar
(ver fig. B).
7. Conecte la conexión del cable de alimenta-
ción
5
a la conexión de la lámpara
6
.
8.
Introduzca el enchufe en la toma de co
rriente.
La lámpara está ahora lista para usarse.
Conectar varias
lámparas entre sí
¡CUIDADO!
Tenga en cuenta que todas las luminarias deben
estar conectadas antes de enchufar el cable de
alimentación
5
a la toma de corriente.
Indicación: Tenga en cuenta que sólo puede
interconectar como máximo 10 luminarias del
mismo tipo a una toma de corriente.
No instale más de 10 luminarias del mismo
tipo juntas. Para ello siga los pasos 1–5 del
apartado „Cómo montar la lámpara“.
Nota: Tenga en cuenta que la distancia
entre las lámparas no sea mayor que 16 cm.
1. Conecte la conexión del cable de alimenta-
ción
5
a la conexión
6
de la primera
lámpara.
2. Retire la tapa de protección
4
de la clavija
de la lámpara
9
con cuidado utilizando
un destornillador.
3. Conecte el cable de conexión
8
a la
clavija de la lámpara
9
.
4. Conecte la segunda conexión del cable
de conexión
8
a la conexión
6
de la
siguiente lámpara.
5. También tiene la opción de conectar las lám-
paras directamente entre sí conectándolas
mediante la clavija
9
a la conexión de la
lámpara
6
.
6. I
ntroduzca el enchufe en la toma de corrie
nte.
La lámpara ya está lista para usarse.
l
a tensión correcta y si todas las piezas están bi
en
montadas. Si tiene dudas o no sabe cómo ma-
nejar el aparato, póngase en contacto con su
distribuidor o el servicio de asistencia. Conserve
estas indicaciones en lugar seguro y, en caso
necesario, entrégueselas a terceros.
Uso adecuado
Esta lámpara sólo es apta para el
uso en interiores, en espacios secos
y cerrados.
Durante la operación de conexión la lámpara
debe colocarse al alcance de la mano. Puede
montarse sobre todas las superficies inflamables
normales. Cualquier uso diferente al descrito con
anterioridad o una modificación del aparato es
inadmisible y puede deteriorarlo. Además de
esto, puede provocar riesgos y lesiones mortales
así como fallos técnicos (por ej. cortocircuitos,
incendios, descargas eléctricas). Este aparato p1-ha
s
ido diseñado exclusivamente para uso doméstic
o.
Este producto p1-ha sido diseñado para un funcio-
namiento normal.
Volumen de suministro
Compruebe siempre inmediatamente después
de desembalar el producto la integridad del
contenido y el perfecto estado del aparato.
1 regleta led bajo
mueble, modelo
14137306L
1 cable de alimentación
1 cable de conexión
2 tacos
2 enganches
2 tornillos
1 manual de instruc-
ciones de montaje
y manejo
Descripción de las piezas
1
Taco
2
Enganche
3
Tornillo
4
Tapa de protección
5
Cable de
alimentación
6
Conexión de la
lámpara
7
Interruptor
ENCENDIDO /
APAGADO
8
Cable de conexión
9
Clavija de la
lámpara
Características técnicas
Tensión de
funcionamiento: 230–240 V
~
50 Hz
Bombilla: 43 LEDs
Potencia nominal: máx. 8 W
Dimensiones:
57,3 x 3,0 x 2,2 cm (L x A x H)
Clase de protección:
II
Tipo de protección: IP20
Seguridad
Indicaciones de seguridad
¡El derecho de garantía quedará anulado en
caso de producirse daños por no tener en cuenta
estas instrucciones de uso! !No se asumirá res-
ponsabilidad alguna por daños indirectos! En
caso de que el manejo inadecuado del producto
o el incumplimiento de las indicaciones de segu-
ridad provoquen daños materiales o personales,
¡no se asumirá ninguna responsabilidad!
¡PELIGRO DE MUERTE O
ACCIDENTE PARA BEBÉS
Y NIÑOS!
No deje nunca a los niños sin vigilancia con
el material de embalaje. Existe peligro de
asfixia. Los niños no suelen ser conscientes
del peligro. Mantenga siempre el producto
fuera del alcance de los niños.
Este aparato puede ser utilizado por niños
mayores de 8 años, así como por personas
con capacidades físicas, sensoriales o men-
tales reducidas o que cuenten con poca
experiencia y / o falta de conocimientos,
siempre y cuando se les haya enseñado
cómo utilizar el aparato de forma segura y
hayan comprendido los peligros que pueden
resultar de un mal uso del mismo. No per-
mita que los niños jueguen con el aparato.
La limpieza y el mantenimiento nunca deben
llevarse a cabo por niños sin la vigilancia
de un adulto.
Evite el peligro de muerte
por descarga eléctrica
Antes de cada conexión a la toma de cor-
riente, compruebe que la lámpara, el cable
de red y, eventualmente, el cable de conex
ión,
no estén dañados. Nunca utilice la lámpara
si detecta algún tipo de daño.
Los cables de red y los cables para líneas
auxiliares dañados implican peligro de
muerte por descarga eléctrica.
Antes de comenzar el montaje asegúrese de
que la corriente nominal disponible coincida
con la tensión de funcionamiento necesaria
para la lámpara (consultar „Características
técnicas“).
Evite que la lámpara entre en contacto con
agua u otros líquidos.
Nunca abra ninguna parte del equipo eléc-
trico (por ejemplo un interruptor, el portalám-
paras, etc.), ni introduzca objetos en el m
ismo.
Esto puede suponer peligro de muerte por
descarga eléctrica.
Para conectar o desconectar el cable a la
corriente sujete solo por la zona aislada
del conector.
Si el cable externo de esta lámpara está
dañado, deberá ser cambiado únicamente
por un cable especial o por uno que pueda
adquirirse exclusivamente a través del fabri-
cante o su distribuidor.
Conecte la luminaria a la corriente únicam
ente
con el cable de red original.
Combine solo soportes para lámpara del
mismo tipo. Para ello, utilice únicamente ca-
bles de conexión originales y suministrados.
Conecte las luminarias interconectadas úni-
camente a un enchufe. Tenga en cuenta que
sólo puede interconectar como máximo
10 luminarias del mismo tipo a una toma
de corriente. En caso contrario, se pueden
sobrecargar las conexiones y los cables.
Tenga en cuenta que todos los soportes de
lámparas deben conectarse primero por
medio del cable de conexión antes de en-
chufar el cable de red a la toma de corriente.
Leyenda de pictogramas utilizados
¡Lea las instrucciones!
Lámparas para instalación en /
sobre muebles, superficie de mon-
taje no inflamable hasta 95 °C
en funcionamiento normal.
Esta lámpara solo está indicada para
ser utilizada en espacios interiores,
secos y cerrados.
¡Tenga en cuenta las adverten-
cias e indicaciones de seguridad!
V
Voltio
¡Precaución frente a descargas
eléctricas!
Corriente alterna
(tipo de corriente y de tensión)
¡Peligro mortal y de accidentes
para bebés y niños!
Hercio (frecuencia) Cómo proceder de forma segura
Vatio (potencia real)
¡
Precaución! ¡Peligro de quemad
u-
r
as debido a superficies caliente
s!
Clase de protección II
Ra
Índice de reproducción cromática
Montaje en el techo Temperatura lumínica en kelvin
Montaje en la pared Lumen
ON OFF
Ciclos de encendido
b
a
¡Deseche el embalaje y el apa-
rato de forma respetuosa con
el medioambiente!
Esta lámpara no está diseñada para
utilizarse con interruptores electrónicos
ni con reguladores externos.
El embalaje está compuesto
por papel 100 % reciclado.
Vida útil
Regleta LED bajo mueble
Introducción
Le damos la enhorabuena por haber
adquirido este nuevo producto. Ha
elegido un producto de alta calidad.
Lea atenta y completamente las siguientes instruc-
ciones de uso. Estas instrucciones pertenecen
a este producto y contienen indicaciones impor-
tantes sobre la puesta en funcionamiento y el
manejo. Tenga en cuenta siempre todas las in-
dicaciones de seguridad. Antes de poner el
artí-
culo en funcionamiento, compruebe si disp
one de
REGLETA LED BAJO MUEBLE /
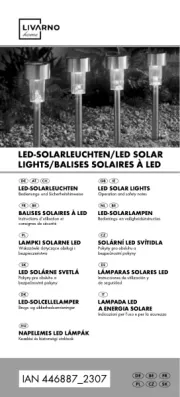
LAMPADA SOTTOPENSILE A LED
CALHA DE ILUMINAÇÃO LED
Indicações de montagem, utilização e segurança
REGLETA LED BAJO MUEBLE
Instrucciones de montaje, de uso y de seguridad
UNDER-CABINET LED LIGHT
Assembly, operating and safety instructions
LED-UNTERBAULEUCHTE
Montage-, Bedienungs- und Sicherheitshinweise
LAMPADA SOTTOPENSILE A LED
Istruzioni di montaggio, d’uso e di sicurezza
1
2
3
8 6
7
A B C
4
5
9
6