The unit has a built-in Li-ion rechargeable battery, charge it before first time use or when it is drained
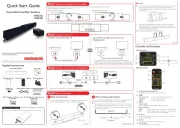
1. Connect the small plug from the supplied USB Connection Cable to the DC 5V (Micro USB) Port on
2. Connect the full size USB Plug from the supplied USB Connection Cable to the USB Port on the
3. When charging, the Red LED Charging Indicator on the unit will illuminate. When charging is
will turn off.complete, it
4. When charging, you can also play and listening music at the same time.
1. DC 5V (Micro USB) Port (For charging only)
2. Red LED Charging Indicator
4. (Skip Backward) Buttton
5. MIC VOL (Microphone Volume Control) Knob
7. (Skip Forward) Buttton
1. Recharge the built-in Li-ion battery as previously instructed.
2. Turn the Power ON-OFF/Volume Control Knob clockwise to power on the unit and set the volume level
as desired. The LED Display and Decorative Lights will illuminate.LED on the speaker
3. Press the Button repeatedly to switch to desired playback mode. The unit will display with your
selection (see list below):
“bLUE” will appear on the (and blink).display
“USB” will appear on the display; music in the USB Device will be
“SD” will appear on the displaymusic in the card will be playback
“ ” will appear on the display.
If the AUX (Aux/Line in) plug, Micro SD (TF) Card and/or USB Device had NOT been inserted into
the unit, the correspondence selection will not available.
4. During playback, turn the Power ON-OFF/Volume Control Knob to adjust volume level as desired.
5. Press and hold the (Mode/Decorative Light On-Off) Button to turn off the Decorative LED Lights;
press again to turn it back. and hold
6. When finished listening, turn the Power ON-OFF/Volume Control Knob counterclockwise until Click
sound is heard to shut off the unit.
First time use or re-pairing the unit to a new BT Device, pairs as follows:
1. Power on the unit and enter to BT mode as previously instructed. “bLUE” will appear on the display
2. Power on the external BT Device and enter to BT search mode. Start pairing following the on screen
instructions from the external BT Device. When paired. “bLUE” on the display will stop blinking.
3. If pairing is complete you may now play music with your external BT Device.
Turn the Power O -O /Volume Control Knob to adjust volume level as desired. N FF
Press the Button on the unit to pause, press again to resume normal playback.
Press the or buttons repeatedly to skip tracks.
5. When finished listening, turn the Power ON-OFF/Volume Control Knob counterclockwise until “Click”
sound is heard to shut off the unit.
When the external BT Device searches for the unit, our model number “MMA3717” will appear on the
display of external BT Device.
If while pairing you are asked for a code please try "0000" or "1234".
Listen from an external Audio Player such as MP3 Player, Discman…etc.
1. In power off mode, connect one end of the supplied Audio Connection Cable to the AUX Out/Line Out/Phone
Jack on the external Audio Player.
2. Connect the other end of the cable to the AUX (Aux/Line in) Jack on the unit as illustrated below:
3. Power on the unit and enter to AUX (Aux/Line in) mode as previously instructed. “ ” will appear on the
4. Play the music on the connected Player as usual. (Make sure the volume level of the connected Audio
is turned to high level.)Player
Turn the Power O -O /Volume Control Knob to adjust volume level as desired.N FF
Press the Button to mute the sound, press again or turning the Power O -ON FF/Volume Control
Knob to turn the sound back.
6. When finished listening, turn the Power O -ON FF/Volume Control Knob counterclockwise until “Click”
heard to shut off the unit.sound is
To play the music in USB Device:
1. In power off mode, connect the USB Device into
2. Power on the unit and enter to USB mode as previously instructed:
“US ” will appear on the display.B
Music in the USB Device will be playback automatically.
Turn the Power O -O /Volume Control Knob to adjust volume level as desired. N FF
Press the Button on the unit to pause, press again to resume normal playback.
Press the or buttons repeatedly to skip tracks.
2. Power on the unit and enter to Micro SD TF Card mode as previously instructed:( )
“S ” will appear on the display.D
Music in the card will be playback automatically.
Turn the Power O -O /Volume Control Knob to adjust volume level as desired. N FF
Press the Button on the unit to pause, press again to resume normal playback.
Press the or buttons repeatedly to skip tracks.
4. When finished listening, turn the Power N FF/Volume Control Knob counterclockwise until “Click” O -O
sound is heard to shut off the unit.
Up to 16 GB Micro SD ( ) Card/USB Device supported.TF
When inserting the Micro SD ( ) Card/USB Device, make sure the direction you selected is correct. TF
Never insert violently to avoid damaging the Micro SD ( ) Card/USB Device or the unit. If it doesn’t TF
work, please check if the direction is correct.
Before replacing Micro SD ( ) Card/USB Device, make sure the unit has been powered off.TF
You also need to download the desired music in MP3 format into the Micro SD ( ) Card/USB Device TF
before insert into the unit.
Check the following before requesting service:
The unit in power off mode
Recharge the battery as page 1-2
Turn the Power On-Off/Volume Control
Knob clockwise unit “Click” sound was
heard to power on the unit.
Volume of the unit was set to
Increase the volume level by turn the Power
On-Off/Volume Control Knob clockwise
Volume level of paired/connected
Rise the volume level of the
Volume level too high Reduce the volume level by turn the Power
On-Off/Volume Control Knob
Volume level of the paired/
connected device too high
Reduce the volume level of the paired/
BT not functioning The external BT device had
Pair the external BT device to the unit as
The external BT device too far
Place the external BT device close to
Power Source: Built-in DC 3.7 V, 1200 mAh (4.44 WH) rechargeable Li-ion Battery;
recharge by DC 5 V through the DC 5V (Micro USB) Port
Up to 32 Feet in open area
1 x USB Connection Cable (For Charging only)
1 x Audio Connection Cable with 3.5 mm plugs
SPECIFICATIONS AND ACCESSORIES ARE SUBJECT TO CHANGE WITHOUT NOTICE
This equipment has been tested and found to comply with the limits for a Class B digital device,
pursuant to Part 15 of the FCC Rules. These limits are designed to provide reasonable
protection against harmful interference in a residential installation. This equipment generates,
uses and can radiate radio frequency energy and, if not installed and used in accordance with
the instructions, may cause harmful interference to radio communications. However, there is no
guarantee that interference will not occur in a particular installation. If this equipment does
cause harmful interference to radio or television reception, which can
be determined by turning the equipment off and on,
the user is encouraged to try to correct the interference by one or more of the following measures:
● Reorient or relocate the receiving antenna.
● Increase the separation between the equipment and receiver.
● Connect the equipment into an outlet on a circuit different from that to which the receiver is
● Consult the dealer or an experienced radio/TV technician for help.
1. This device complies with Part 15 of the FCC Rules.
Operation is subject to the following two conditions:
(1) This device may not cause harmful interference, and
(2) This device must accept any interference received,including interference that may cause
2. Changes or modifications not expressly approved by the party responsible for compliance
could void the user's authority to operate the equipment.
To assure continued operation, follow the attached installation instructions and use only shield
cables when connecting to other devices. Changes or modifications not expressly approved by
the party responsible for compliance could void the user's authority to operate the equipment.
To sing with playing music:
To sing while music is playing:
1. Power on the unit and plays music in any modes as instructed earlier.
2. Connect the plug from the Microphone (not included) into the MIC (Microphone Input) Jack on the unit.
3. Turn the MIC VOL (Microphone Volume Control) Knob to adjust the sound level of microphone as desired.
If feedback noise (high audio frequency noise) is hearing from the speaker, turn the Power N FF/O -O
Volume Control Knob counterclockwise to reduce the microphone sound level or moving the Microphone
8. ECHO (Microphone Echo Volume Control) Knob
10. MIC (Microphone InputJack)
11. MICRO SD (TF) Card Slot
12. AUX (Aux/Line In) Jack
Your battery will last longer if you’re following these simple guidelines for caring and storing:
A. Before first time use, recharge the unit approximately 5 hours until the unit is fully charged.
B. Charge and store the unit within the temperature range of 5°C - 35°C (40°F - 95°F).
C. Do not overcharge (longer than 24 hours). Excessive charging or running the unit until battery
fully drains will damage battery. Battery life will be extended if you keep the battery fully charged.
D. Battery life naturally shortens slowly over time.
E. The rechargeable battery incorporated in this product is not user replaceable.
Normal operation after pairing:
1. Power on the external BT Device and enter to BT playback mode.
2. Power on the unit and enter to BT mode as previously instructed. “bLUE” will appear on the display
3. Wait a few seconds until the unit is automatically paired to the external BT Device. “bLUE” on the
display will stop blinking.
4. After pairing is complete you may now play music with your external BT Device.
4. When finished listening, turn the Power N FF/Volume Control Knob counterclockwise until “Click” O -O
heard to shut off the unit.sound is
To play the music in Micro SD TF Card:( )
1. In power off mode, insert the Micro SD TF Card (not included) into the Micro SD TF Card Slot on the ( ) ( )
contacts facing down as illustrated below:unit with
To the USB Port of supplied
Radio frequency will appear on the display.
To AUX (Aux/Line in) Jack
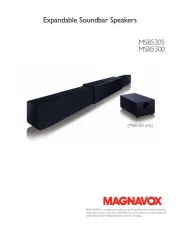
15 Speaker with Decorative LED Lights.
The location not good for radio
Reassemble the unit to other direction/
location to improve reception
The unit was moved in a new
location or the available FM
stations had not stored into the
Press the Button to search and store
all the available FM stations again
1 x USB Charger (Input: AC 110-240V~, 50/60Hz,0.4A; Output: DC 5V, 1A, )
the USB Port on the unit as illustrated on right:
This unit has a built-in FM antenna, which provides adequate reception in most areas. If reception is weak,
reassemble the other direction/location to improve reception.
4. Turn the ECHO (Microphone Echo Effect Control) Knob to adjust the echo effect of microphone as desired.
1. Power on the unit and enter to radio mode as previously instructed. Radio frequency will appear on the
2. In first time use (or relocated the unit to a new location), search and store the available FM stations by
press the Button. The unit will automatically to search and store all available FM radio stations then
play the first stored FM station. Press the or buttons repeatedly to select and plays the desired
3. During playback, turn the Power ON-OFF/Volume Control Knob to adjust volume level as desired.
4. When finished listening, turn the Power ON-OFF/Volume Control Knob counterclockwise until “Click”
sound was heard to shut off the unit.