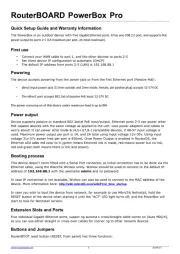
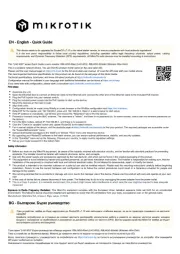
Mikrotik RB5009UG+S+IN Manual

Mikrotik Router RB5009UG+S+IN

Læs gratis den danske manual til Mikrotik RB5009UG+S+IN (5 sider) i kategorien Router. Denne vejledning er vurderet som hjælpsom af 50 personer og har en gennemsnitlig bedømmelse på 4.8 stjerner ud af 25.5 anmeldelser. Har du et spørgsmål om Mikrotik RB5009UG+S+IN, eller vil du spørge andre brugere om produktet?

Side 1/5
1.
RB5009UG+S+IN
RB5009UG+S+IN
RB5009UG+S+IN
RB5009UG+S+INRB5009UG+S+IN
RB5009UG+S+IN
Safety Warnings
Before you work on any equipment, be aware of the hazards involved with electrical circuitry, and be familiar with standard practices for preventing
accidents.
Ultimate disposal of this product should be handled according to all national laws and regulations.
The Installation of the equipment must comply with local and national electrical codes.
This unit is intended to be installed in the rackmount. Please read the mounting instructions carefully before beginning installation. Failure to use the
correct hardware or to follow the correct procedures could result in a hazardous situation to people and damage to the system.
This product is intended to be installed indoors. Keep this product away from water, fire, humidity or hot environments.
Use only the power supply and accessories approved by the manufacturer, and which can be found in the original packaging of this product.
Read the installation instructions before connecting the system to the power source.
We cannot guarantee that no accidents or damage will occur due to the improper use of the device. Please use this product with care and operate at your
own risk!
In the case of device failure, please disconnect it from power. The fastest way to do so is by unplugging the power plug from the power outlet.
It is the customer's responsibility to follow local country regulations, including operation within legal frequency channels, output power, cabling
requirements, and Dynamic Frequency Selection (DFS) requirements. All Mikrotik devices must be professionally installed.
Setup
Make sure your ISP is allowing hardware change and will automatically issue an IP address.
Connect your ISP cable to the first Ethernet port.
Connect your PC to any of the Ethernet ports.
Connect the device to the power source.
Use a Web browser or WinBox to connect to the default IP address of 192.168.88.1 from any port, with the username and no password.
admin
If IP is not available, download WinBox from our webpage and use it to connect through MAC address.
Update RouterOS software to the latest version, make sure that the device has an internet connection.
If the device does not have an internet connection update software by downloading the latest version from our webpagehttps://mikrotik.com
/download
Find the latest software and choose your packages.
To get the architecture type of your device model, open WinBox, WebFig go to (System/Resources).
Download packages to the PC and upload them to the WinBox, WebFig, (Files) menu, and reboot the device.
Set up your password to secure the device.
Powering
The power consumption under maximum load can reach 20 W. The device accepts power from the power jack or from the first Ethernet port:
Direct-input power jack (5.5 mm outside and 2 mm inside, female, pin positive plug) accepts 24-57 V DC.
The First Ethernet port accepts Power over Ethernet 24-57 V DC.
Connecting to a POE Adapter:
Connect the Ethernet cable from the device to the POE port of the POE adapter.
2.
3.
1.
2.
3.
Connect an Ethernet cable from your LAN to the LAN port of the POE adapter, please mind arrows for data and power flow.
Connect the power cord to the adapter, and then plug the power cord into a power outlet.
Configuration
Once logged in, we recommend clicking the "Check for updates" button in the QuickSet menu, as updating your RouterOS software to the latest version
ensures the best performance and stability. For wireless models, please make sure you have selected the country where the device will be used, to
conform with local regulations.
RouterOS includes many configuration options in addition to what is described in this document. We suggest starting here to get yourself accustomed to
the possibilities: . In case an IP connection is not available, the Winbox tool ( ) can be used to connect to the MAC https://mt.lv/help https://mt.lv/winbox
address of the device from the LAN side (all access is blocked from the Internet port by default).
For recovery purposes, it is possible to boot the device for reinstallation, see section .Buttons and jumpers
Mounting
The device is designed to use indoors and it can be mounted on the wall, or it can be placed on the desktop.
Find the designed mounting holes on both sides of the device, as shown in the picture;
Use provided screws to secure device to the wall;
Based on the wall material you can use a drill bit and provided dowels.
The device has no protection from water contamination, please ensure the placement of the device in a dry and ventilated environment.
We recommend Cat6 cables for our devices.
The mounting and configuration of this device should be done by a qualified person.
Rackmount
If desired placement is rackmount, additional brackets can be purchased separately:
RB5009 rackmount kit K-79
RB5009 rackmount kit K-79RB5009 rackmount kit K-79


Produkt Specifikationer

Mærke: Mikrotik
Kategori: Router
Model: RB5009UG+S+IN
Produktfarve: Sort
Generering af mobilnetværk: Ingen
Opbevaringstemperatur (T-T): -40 - 60 °C
Ethernet LAN-porte (RJ-45): 1
Strømforbrug (typisk): 20 W
Ethernet LAN-datahastigheder: 10,100,1000 Mbit/s
Certificering: CE, EAC, ROHS
Ethernet WAN: Ja
Netværksstandarder: IEEE 802.3af,IEEE 802.3at
DC-in-stik: Ja
Strømkilde type: DC
Harmoniseret systemkode (HS): 85176990
USB version: 3.2 Gen 1 (3.1 Gen 1)
Antal USB-porte: 1
Bæredygtighedscertifikater: RoHS
Strøm over Ethernet (PoE): Ja
Ethernet-grænsefladetype: 2.5 Gigabit Ethernet
Gennemsnitstid mellem fejl (MTBF): 200000 t
Gigabit Ethernet (kobber) porte, antal: 7
Power over Ethernet (PoE) porte, antal: 1
Antal installerede SFP+ moduler: 1

Har du brug for hjælp?

Hvis du har brug for hjælp til Mikrotik RB5009UG+S+IN stil et spørgsmål nedenfor, og andre brugere vil svare dig