Visit www.navman.com.au/faq | www.navman.co.nz/faq for more information
All brand and product names are trademarks or registered trademarks of their respective companies.
Specifications and documents are subject to change without notice. Navman does not warrant this document is error-free. Navman assumes no liability for damage
incurred directly or indirectly from errors, omissions, or discrepancies between the device and the documents. Visit www.navman.com.au or www.navman.co.nz for
Not all models and features are available in all regions.
Depending on the specific model purchased, the colour and look of your device and accessories may not exactly match the graphics shown in this document. It is
recommended that you contact a skilled installer (e.g. the service personnel of the vehicle or an authorised auto technician) for assistance and installation.
For regulatory identification purposes, this Navman device is assigned a model number of N676. Marking labels located on the exterior of your device indicate the
regulations that your model complies with. Please check the marking labels on your device and refer to the corresponding statements in this section. Some notices
apply to specific models only. The user needs to switch off the device when exposed to areas with potentially explosive atmospheres such as petrol stations, chemical
storage depots and blasting operations.
This product must not be disposed of as normal household waste, in accordance with the EU directive for
waste electrical and electronic equipment (WEEE – 2012/19/EU). Instead, it should be disposed of by
returning it to the point of sale, or to a municipal recycling collection point.
5 6 1 5 N 6 7 6 0 0 0 5 R 0 1
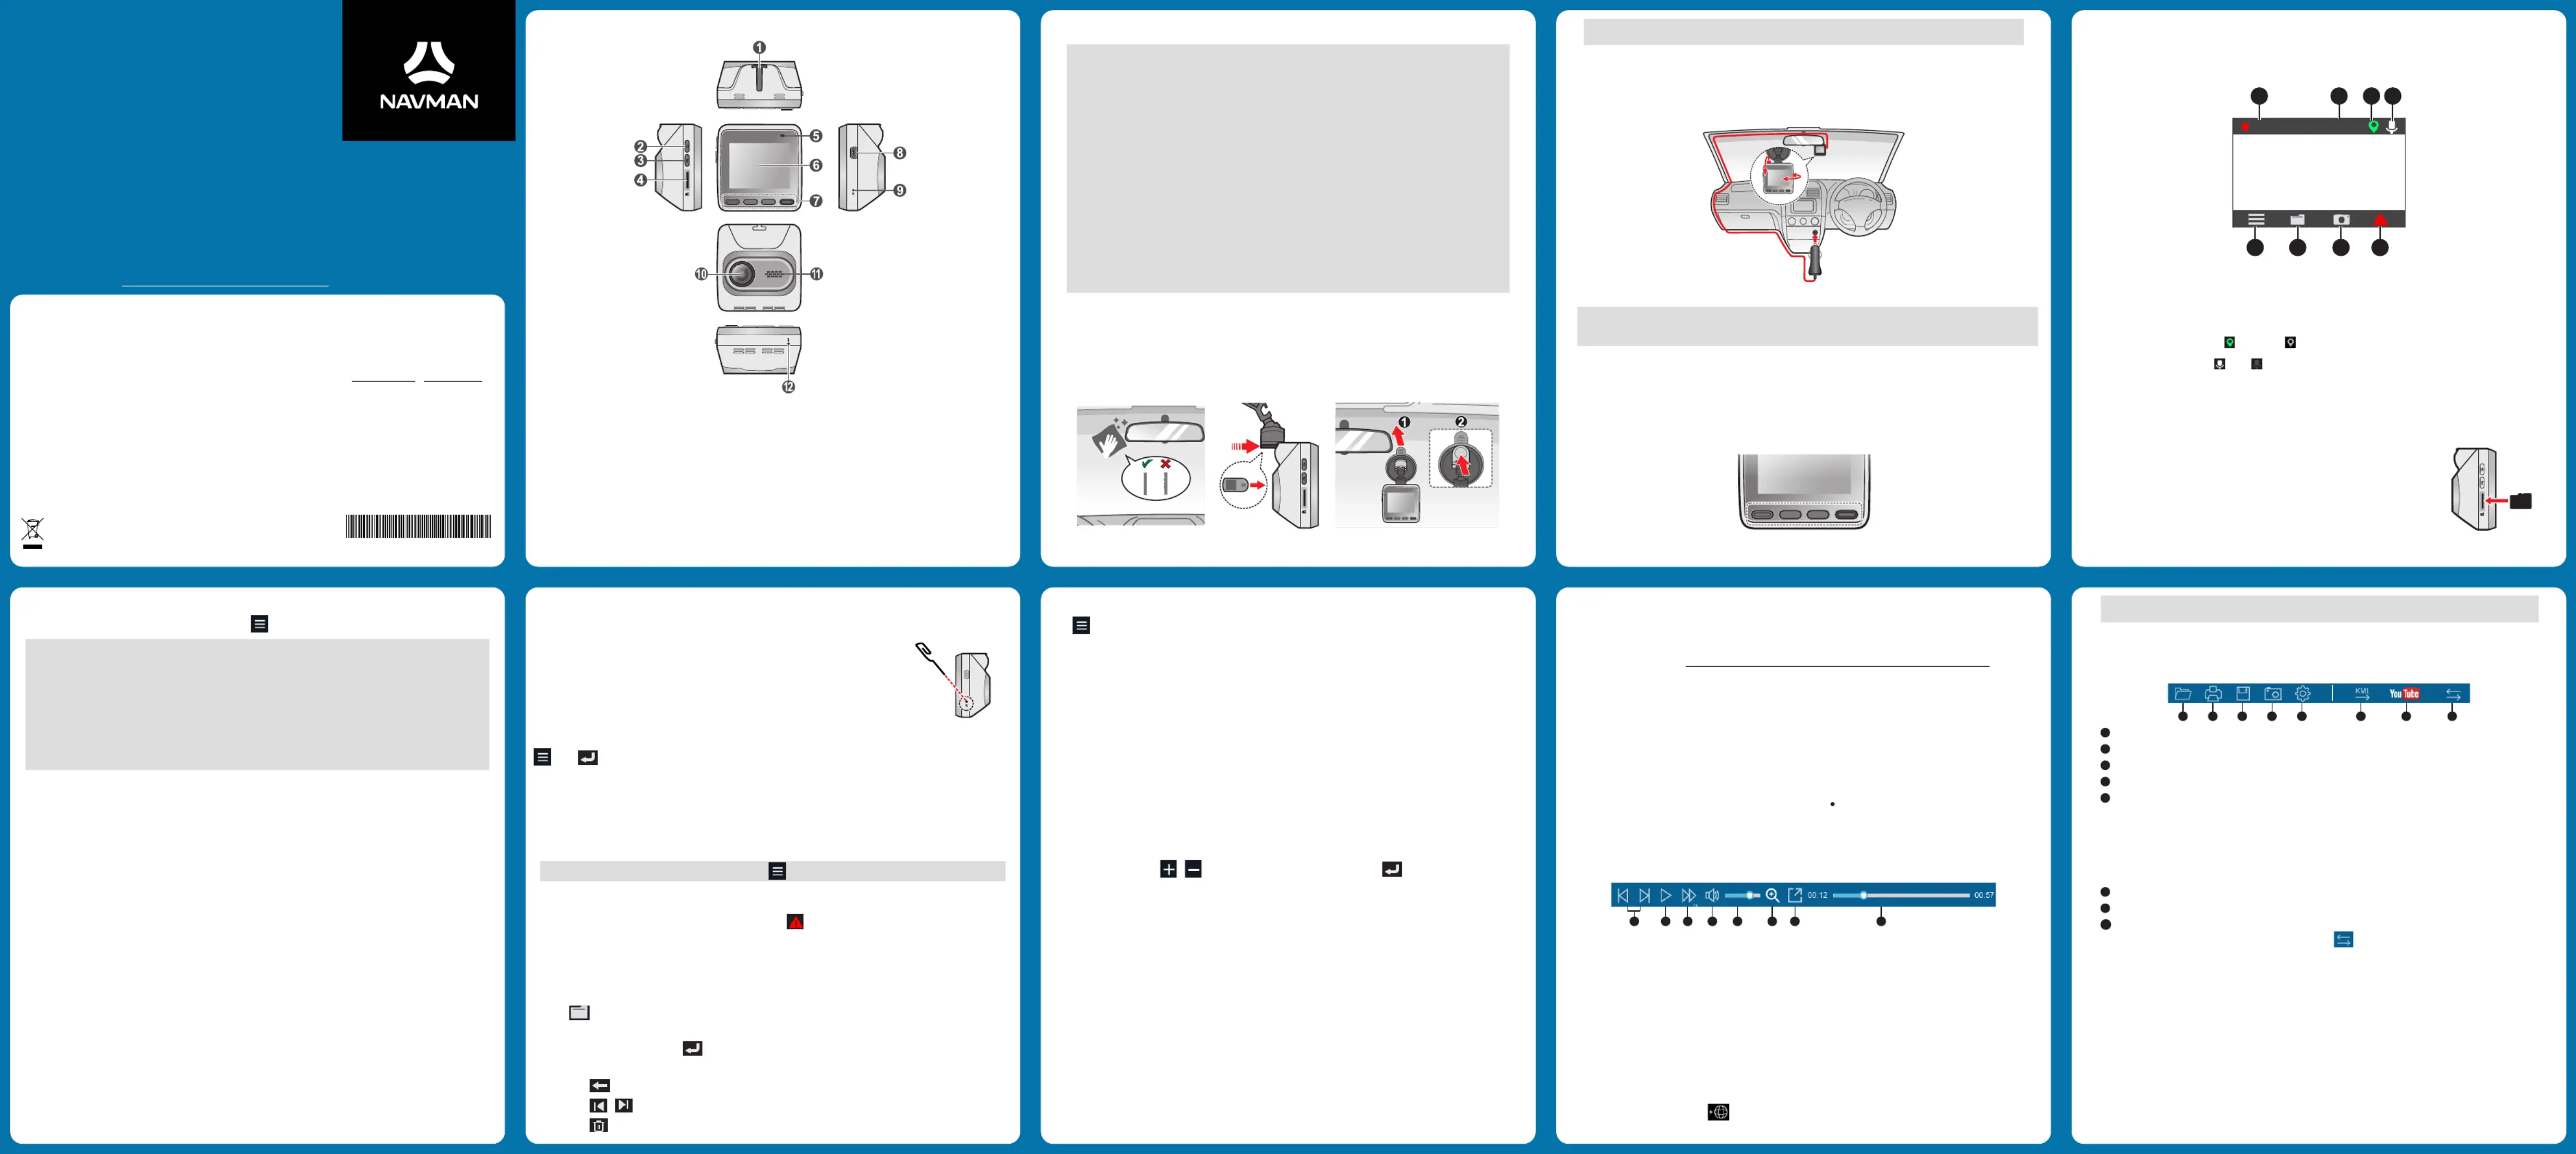
2. Using your dashcam in a vehicle
The dashcam should be placed near the rear-view mirror to ensure optimal camera angle and video quality.
For your own safety, do not operate the controls of the product while driving. Using this product does not
exempt the driver from taking full responsibility for his/her driving behaviour, which includes observing all
traffic rules and safety regulations.
Make sure the dashcam is mounted at a location that does not obstruct the driver’s view or airbag de-
Make sure that the camera lens is not blocked and no reflective material appears near the lens. Please
Video quality may degrade if the vehicle's windscreen is tinted.
The system will automatically calibrate the G-sensor during start-up. If the device's viewing angle or
installation position was changed from the original position after start-up, please turn the device off and
on again to recalibrate the G-sensor. Otherwise the G-sensor may malfunction and impact other features
of the device such as event-driven recording.
The dashcam is designed to stay connected with the vehicle power adapter at all times. The internal
battery is designed to allow the dashcam to save the last recording in case the vehicle’s power system
fails during an incident. The internal battery is not the primary power source. Battery life may vary under
Before attaching the device mount to the windscreen, it is recommended to clean the windscreen with rubbing alcohol
and make sure that the installation area is free of dust, oil and grease.
Make sure your car is parked on level ground and follow the steps below to securely mount your dashcam in a vehicle.
Note: When adjusting the viewing angle, make sure that the camera’s view is parallel with level ground and
the ground to sky ratio is close to a 50/50 split.
Connect the vehicle power adapter to the cigarette lighter. Route the cables through the top ceiling and the A-pillar so
that it does not interfere with driving. Make sure that the cable installation does not interfere with the vehicles airbags or
Note: The installation illustrations are for reference only. Device and cable placement may vary depending on
the vehicle model. If you encounter any problems during installation, contact a skilled installer (such as the service
personnel of the vehicle) for assistance.
The four function keys control the corresponding icons displayed on the LCD screen. Key functions may vary
depending on the current screen and features enabled.
The status bar on the top of the screen contains various system icons to provide status information about your device, and
the system toolbar provides quick access to a number of important features.
Recording indicator/timer
Views captured videos & photos
GPS status: Locked ( )/No signal ( )
Microphone: On ( )/Off ( )
Activates/deactivates emergency recording
In order to record video footage, Navman MiVue
dash cameras need a microSD
card (must be purchased separately). It is very important to use a microSD card
specifically designed to be used in dash cameras. It will ensure the card will be more
reliable and last longer; the wrong type of card has a greater chance of failing, even
after a short period of time. Please visit www.navman.com.au/memory-card or
www.navman.co.nz/memory-card for more information on recommended SD
To insert the SD card, hold its edges and gently insert it into the slot as shown in the
illustration. To remove a card, gently push the top edge of the card inwards to release it
and pull it out of the slot.
To format the memory card (all data will be erased), press > .Format
DO NOT apply pressure to the centre of the memory card.
Navman cannot guarantee product compatibility with memory cards from all manufacturers. Please always
check the specifications/warranty to ensure the memory card can be used in dash cameras and loop recording
Please format the memory card to avoid recording errors caused by missing system files or folders.
You may need to format your memory card periodically to ensure it remains in good working condition.
You should use separate MicroSD cards for the dashcam and other electronic products (such as a digital
You are advised to turn the device off before removing the memory card.
Important microSD card information
The minimum requirement for Navman dash cameras is a Class 10/UHS 1 Micro SD card.
Only use a micro SD card that is specially designed and built for high intensity recording devices such as dash cameras
and security cameras, using a micro SD card that isn’t designed to be used in high intensity recording devices will greatly
increase the chances of memory corruption resulting in freezing problems with your device and even worse, the loss of
Navman have tested the following cards:
We can confirm they are suitable for our devices.
Always format your micro SD card on a monthly basis to keep the memory card in good health For more information on
recommended and compatible MicroSD Cards, please visit www.navman.com.au/memory-card
4. Turning the dashcam on/off
Complete the installation according to the instructions in the “Using your dashcam in a vehicle” section. Once the
vehicle engine is started, the dashcam will turn on automatically.
When you power on your dashcam for the first time, follow the on-screen prompts to complete the following:
Select your preferred language.
Set up the correct date and time for your recordings.
Set the preferred distance unit.
Shutting down the dashcam
Occasionally you may need to perform a hardware reset when the dashcam stops responding or if it appears to be
“frozen” or unresponsive. To shut down the dashcam, press and hold the power button until the system powers off.
If you cannot turn the dashcam off by using the power button, insert a pointy object (such as
a straightened paper clip) into the Reset button to shut down the dashcam.
5. Recording videos while driving
Continuous recording will automatically commence after the system is turned on. Recording can be paused by pressing
. Press to return to the home screen and resume recording.
Videos taken during continuous recording are divided into multiple clips and saved under the "Video" folder, but recording
will not stop between video clips. Once the folder has reached its allocated capacity, the system will automatically record
over the oldest video saved under this folder.
During continuous recording, if a sudden event has been detected, such as running over a road bump, vehicle collision,
high-speed driving, or making a sharp turn, the G-sensor will prompt the dashcam to record the event.
Note: G-sensor sensitivity can be adjusted by going to > > Video Recording G-sensor Sensitivity.
The actual recording will begin when an event has been detected and continue for 30 seconds. Event-driven recordings
are saved in the "Event" folder. Once the folder has reached its allocated capacity, the system will automatically record
over the oldest video saved under this folder. You can also press to manually activate event-driven or emergency
recording while continuous recording is in progress.
6. Viewing videos and photos
To view a video or photo captured by the dashcam:
1. Press to open the Playback screen.
3. Select a video or image then press to view the file.
4. While viewing a file, you can:
Press to return to the file list.
Press / to play the previous/next video.
Press to delete the current file:
Press to access the Menu screen that includes the following device settings:
File playback: Plays recorded videos and photos.
Sound Recording: Enables/disables audio recording during video capture.
Video Clip Length 1 min 3 min 5 min: Sets the length of video clips ( / / ) captured during continuous
Video Resolution 1080p 30fps 720p 30fps: Sets the recording resolution ( / ).
Frequency: Sets the camera frequency to avoid problems caused by artificial light sources that are not constant.
EV: Sets the proper exposure level to adjust the brightness of the image.
G-Sensor Sensitivity: Sets the G-sensor’s sensitivity level for triggering event-driven recording.
Satellites: Displays GPS signal strength.
Use GPS time: Select the time zone of your location. The system will set date and time according to the
Manual: Use / to adjust the value of the selected field; press and repeat until all fields have
System Sound: Enables /disables system notification sounds.
Volume: Adjusts the volume level.
LCD Standby Always On 10 sec 1 min 3 min: Sets the length of time ( / / / ) before the display shuts off
Language: Sets the language.
Distance Unit: Sets the preferred system (Metric/Imperial) for measuring distances.
Restore to Defaults: Restores the device to factory default settings.
Version: Displays software information.
Format: Formats the memory card (all data will be erased).
Manager is a tool for viewing videos recorded by the MiVue
Download the Setup file from www.navman.com.au/mivue-update or www.navman.co.nz/mivue-update. Double-
click Setup.exe and follow the on-screen prompts to install MiVue
IMPORTANT! You may be prompted to install MOV and AVI codecs for video playback if they are missing on your
computer. Search online to install the required codecs.
Playing the recording files
1. Remove the memory card from the dashcam and access the card on the computer via a card reader. You are
advised to copy the recording files to your computer for backup and playback.
Manager shows the calendar and the file list on the right.
If a recording exists, you will see the date marked with a “ ”. Click to display files recorded on that date.
You can choose the file type to display: / .Event Normal
To display all files in the current folder, click . To return to the calendar view, click .All Calendar
3. Double-click the desired file on the file list to start playback.
4. The playback controls are described as follows:
Skips to the previous/next file on the list.
Starts or pauses video playback.
Changes the playback speed to 1/4x, 1/2x, 1x (default), 1.5x, or 2x.
Mutes or unmutes the volume.
Adjusts the volume level.
Activates the Zoom Tool where a section of the image is magnified.
Plays the video in full screen.
Displays the playback progress. You can click on a point along the track bar to jump to a different spot in the
5. During playback, you can check more driving information from the dashboard panel and the G-sensor chart that
are displayed below the video playback screen.
On the dashboard panel, click to display the map screen.
Note: The map may not display correctly if the computer is not connected to the Internet or your product
does not support GPS function.
The G-sensor chart displays data in 3-axis waveform about the car’s shift forward/backward (X), to the right/
left (Y) and upward/downward (Z).
6. The tool bar allows you to do the following:
Selects the folder that stores the recording files.
Previews and prints the current video image.
Saves the selected files to the specified location on your computer.
Captures and saves the current video image to the specified location on your computer.
Opens the Settings Menu. The Settings items are described as follows:
: Sets the display language of MiVueChange Language
: Sets the colour scheme of MiVueChange Skin
: Checks if there is any new version of MiVueCheck for Update
Manager. Internet access is
required for this feature.
: Displays the version and copyright information of MiVueAbout
Exports the GPS information of the selected file in the KML format to the specified location on your computer.
Opens YouTube™ on a web browser for you to upload videos..
In the playlist, an "F" or "R" next to a filename denotes the video is paired with a front (F) or rear (R) video.
The video is shown in picture-in-picture mode. Click to switch between front and rear videos.
About the vehicle power adapter
Use only the vehicle power adapter supplied with your device. Use of another type of the vehicle power adapter
may result in malfunction and/or danger.
This product is intended to be supplied by a LISTED Power Unit marked with “LPS”, “Limited Power Source” and
output rated + 5 V dc / 2 A.
Do not use the vehicle power adapter in a high moisture environment. Never touch the vehicle power adapter
when your hands or feet are wet.
Allow adequate ventilation around the vehicle power adapter when connected to the device. Do not cover the
vehicle power adapter with paper or other objects that will reduce cooling. Do not use the vehicle power adapter
while it is inside a carrying case.