Visit www.navman.com.au/faq | www.navman.co.nz/faq for more information
All brand and product names are trademarks or registered trademarks of their respective companies.
Specifications and documents are subject to change without notice. Navman does not warrant this document is error-free. Navman assumes no liability
for damage incurred directly or indirectly from errors, omissions, or discrepancies between the device and the documents. Visit www.navman.com.au
| www.navman.co.nz to downlaod the latest user manual.
Not all models are available in all regions.
Depending on the specific model purchased, the colour and look of your device and accessories may not exactly match the graphics shown in this
document. It is recommended that you contact a skilled installer (e.g. the service personnel of the vehicle or an authorised auto technician) for assistance
or regulatory identification purposes, this Navman device is assigned a model number of N583. Marking labels located on the exterior of your device
indicate the regulations that your model complies with. Please check the marking labels on your device and refer to the corresponding statements in
this section. Some notices apply to specific models only. The user needs to switch off the device when exposed to areas with potentially explosive
atmospheres such as petrol stations, chemical storage depots and blasting operations.
This product must not be disposed of as normal household waste, in accordance with the EU directive
for waste electrical and electronic equipment (WEEE – 2012/19/EU). Instead, it should be disposed of
by returning it to the point of sale or to a municipal recycling collection point.
5 6 1 5 N 5 8 3 0 0 1 8 R 0 0
Note: Images may differ slightly from the actual product.
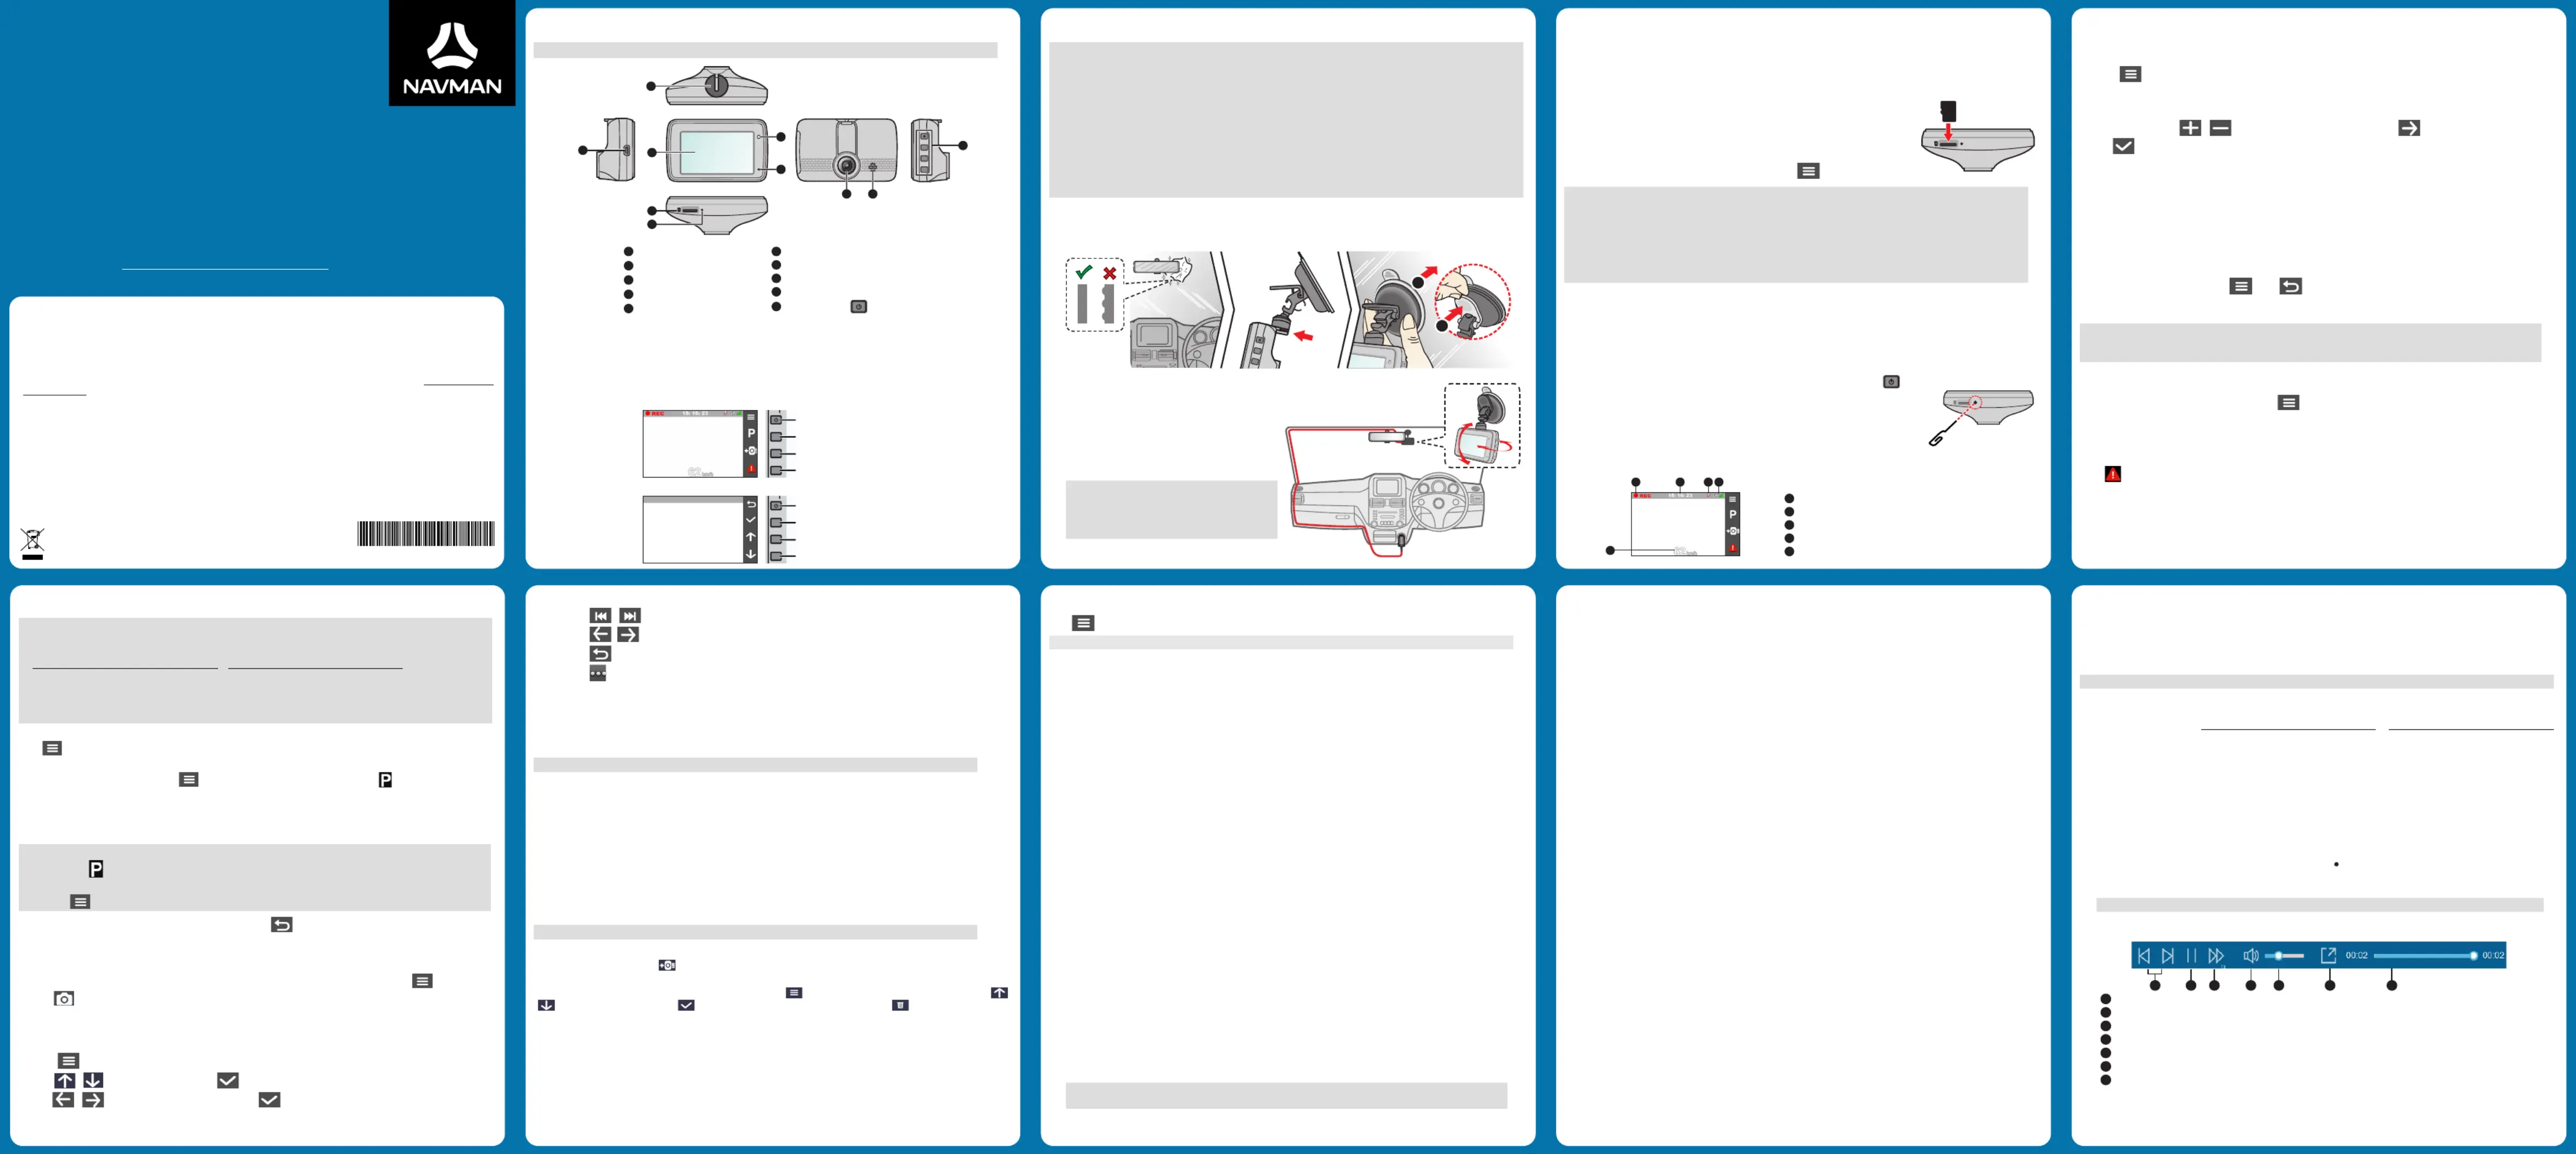
Power button ( ) / Function keys
Press and hold for 2 seconds to turn the dash cam on and off.
The four function keys control the corresponding icons displayed on the LCD screen. Key function may vary
depending on the current screen.
Starts/stops emergency recording
Enters Parking Mode (if activated)
Moves to the previous item
Returns to the previous page
2. Using your dash cam in a vehicle
The dash cam should be placed near the rear-view mirror to ensure optimal camera angle and video quality.
Select an appropriate location for mounting the device in a vehicle. Never place the device where the driver’s
field of vision is blocked.
If the windscreen is tinted with a reflective coating, it may be athermic and impact GPS reception. In this instance,
please mount the device in a “clear area".
The system will automatically calibrate the G-sensor during start-up. If the device's viewing angle or installation
position was changed from the original position after start-up, please turn the device off and on again to
recalibrate the G-sensor. Otherwise the G-sensor may malfunction and impact other features of the device (such
as event-driven recording and Parking Mode).
The dash cam is designed to stay connected with the vehicle power adapter at all times. The internal battery
is designed to allow the dash cam to save the last recording in case the vehicle’s power system fails during an
incident. The internal battery is not the primary power source.
Make sure the vehicle is parked on level ground and follow the instructions below to mount your dash cam.
1. Cleaning the windscreen with rubbing alcohol before attaching the suction cup mount to the windscreen is highly
2. When adjusting the dash cam's viewing angle, make
sure the camera’s view is parallel with the level ground
and the ground to sky ratio is about a 50/50 split.
3. Connect the vehicle power adapter to the cigarette
lighter. Route the cable through the ceiling and the
A-pillar so that it does not interfere with driving. Make
sure the cable installation does not interfere with the
vehicle's airbags or other safety features.
Note: The installation illustrations are for reference
only. The placement of the device and cables may
vary depending on the vehicle. If you encounter
any problems during installation, contact a service
technician for assistance.
In order to record video footage, Navman MiVUE dash cameras need a microSD. It is very important to use a
microSD card specifically designed to be used in dash cameras. It will ensure the card will be more reliable and
last longer; the wrong type of card has a greater chance of failing, even after a short period of time. Please visit
www.navman.com.au/memory-card www.navman.co.nz/memory-card or for more information on
To insert the SD card, hold the card by the edges and gently insert it into the slot
as shown in the illustration. To remove a card, gently push the top edge of the card
inwards to release it and pull it out of the slot.
To format the memory card (all data will be erased), press > .Format
DO NOT apply pressure to the centre of the memory card.
Navman does not guarantee the product’s compatibility with memory cards from all manufacturers. Please
always check the specifications/warranty to ensure the memory card can be used in dash cameras and loop
Please format the memory card to avoid recording errors caused by missing system files or folders.
You may need to format your memory card periodically to ensure it remains in good working condition.
You are advised to turn the device off before removing the memory card.
4. Turning the dash cam on/off
The dash cam turns on automatically once vehicle engine is started. The System indicator glows in green when the dash
Shutting down the dash cam
Occasionally you may need to perform a hardware reset when the dash cam stops responding or if it becomes “frozen”
or unresponsive. To shut down the dash cam, press and hold the Power button ( ) until the system powers off.
If the system does not turn off by keeping the Power button pressed, you can force it
to shut down by inserting a pin or paper clip) into the Shutdown button.
The status bar on the top of the screen contains various system icons to provide status information about your device.
Icons displayed may vary depending on your device model and its current state.
6. Setting the date and time
The system date and time must be correct in order for the videos to display accurate timestamps. You can access the
1. Press > .System > Date/Time
2. Select one of the following methods to change the date and time:
Select the appropriate and settings for your location.Use GPS time: Time Zone Daylight Saving Time
Manual: Press / to adjust the highlighted value and press to navigate to the next field. Press
7. Recording videos while driving
Continuous recording will automatically commence shortly after the system is powered up, and the system indicator
will flash while recording is in progress.
Videos taken during continuous recording are divided into multiple clips and saved under the "Normal" folder,
but recording will not stop between video clips. Once the folder has reached its allocated capacity, the system will
automatically record over the oldest video saved under this folder.
Recording can be paused by pressing . Press to return to the recording screen and resume recording.
Note: The device will automatically calibrate its G-sensor during start-up. If the device's viewing angle or mounting
location was changed from the original position after start-up, the G-sensor must be recalibrated by restarting the
device to avoid malfunction and impact the Event-Driven recording feature.
During continuous recording, if a sudden event has been detected, such as running over a road bump, vehicle collision,
high-speed driving, or making a sharp turn, the G-sensor will prompt the dash cam to record the event. The sensitivity
level of the G-sensor can be adjusted by going to .> Video Recording > G-Sensor Sensitivity
The event-driven recording saves the duration from 3 seconds before the event until 17 seconds after the event. The
event recording can last up to 1 minute if the sensor is triggered again during the recording. Event-driven recordings
are saved in the "Event" folder. Once the folder has reached its allocated capacity, the system will automatically record
over the oldest video saved under this folder.
Press to manually activate event-driven recording while continuous recording is in progress. Press the button again
to stop event-driven recording and resume continuous recording.
8. Recording videos while parked
The dash cam cannot operate in Parking Mode by relying on its internal battery power. An additional
accessory such as an uninterruptible power cable or the Smart Box is required. Please visit
www.navman.com.au/mivue-smartbox www.navman.co.nz/mivue-smartbox or for purchasing
The device will automatically calibrate its G-sensor during start-up. If the device's viewing angle or mounting location
was changed from the original position after start-up, the G-sensor must be recalibrated by restarting the device to
avoid malfunction and impact the Parking Mode recording feature.
Parking Mode is disabled by default. Before enabling Parking Mode, please check your device memory storage allocation.
Go to to set a proper allocation for parking recording. Changing memory > System > Storage Allocation
allocation will erase the contents on the memory card, so save any videos or photos to your computer first.
You can enable the function by selecting > Parking Mode > Detection > On. (The icon will appear on the
screen). When movements or vibrations are detected during Parking Mode, the system will save the duration from 3
seconds before the event until 17 seconds after the event. Parking Mode recordings are saved in the "Parking" folder.
Once the folder has reached its allocated capacity, the system will automatically record over the oldest video saved under
You can press to manually enter Parking Mode while continuous recording is in progress.
Parking Mode recording is triggered by the G-sensor and motion detection. You can change the sensitivity levels by
selecting > and entering and Parking mode Motion Detection G-Sensor Sensitivity.
To exit Parking Mode (and resume continuous recording), press . You will be prompted to play the saved Parking
Mode recording (if available).
The dash cam can also be used as a camera to take photographs. Access Camera Mode by going to > Camera and
pressing to capture a still image. Photos captured by the dash cam are stored in the "Photo" folder.
10. Viewing videos and photos
To view a video or photo captured by the dash cam:
1. Press .> File Playback
2. Use / to select a folder then press to enter the highlighted folder.
3. Use / to select the video or photo then press to view the file.
4. While viewing a file, you can:
Press / to play the previous/next video.
Press / to display the previous/next photo.
Press to return to the list.
Press to display a pop-up menu to perform the following actions:
Play/Pause: Plays or pauses the current video (this option is unavailable while viewing a photo).
Move to Event: Moves the file to the “Event” folder (this option is unavailable while viewing a photo).
Caution: The safety camera feature may not be available in all countries due to legal reasons.
The system can issue alerts if the vehicle is approaching a safety/speed camera to help drivers monitor their speed.
The driver will receive a visual alert on the screen as well as an audio warning (Beep/Voice) when there is a safety
If the > setting is set to Safety Cam Alert Sound Beep:
The dash cam will beep once to alert the driver of the safety camera ahead.
If the vehicle is travelling over the speed limit while approaching a safety camera, the driver will hear continuous
beeping until the driver slows down to the proper speed.
The dash cam will beep again once the vehicle has passed the safety camera.
Note: A custom safety camera can only be added after a GPS fix is established.
Up to 100 custom safety camera locations can be added to the built-in database. To add a custom safety camera at the
vehicle's current location, press on the recording screen. After a location has been added, the dash cam will issue
alerts the next time you pass through this location.
To view detailed information on a custom safety camera, press > > Safety Cam Custom Safety Cam, use
/ to select a location, then press to view its GPS coordinates and timestamp; press to delete the record.
Press to customise system settings.
Note: Certain menu options may not be available on your device due to model variations.
Plays the recorded videos and photos.
Activates Camera mode for capturing still images.
Enables/disables audio recording during video capture.
The dash cam provides a number of advanced driving safety functions to make your driving safer.
Headlight Reminder: Once enabled, the system will remind you to turn the lights on when driving after dark.
Driver Fatigue Alert: Once enabled, the system will remind you to take a break every two/three four/ hours
Eco Drive Indicator: Once enabled, a red/yellow/green indicator is used to represent your driving efficiency.
Alert Sound: Selects Beep/Voice Mute or turns off ( ) audio alerts.
Alert Distance: The system will alert you at a preset distance (Short/Medium/Long) when your vehicle is
approaching a safety camera.
Smart Alert: Alert distance is adjusted dynamically according to vehicle speed.
Standard Alert: Alert distance remains constant regardless of vehicle speed.
Threshold: Sets the speed value for the dash cam to start offering alerts
Cruise Speed Alert: Sets the cruise speed limit. Alerts are issued when you drive at a cruise speed over the set
Custom SafetyCam: Lists all custom safety cameras sorted by creation timestamp.
Detection: Enables/disables video capture based on a specific detection method.
Detection Method: Only G-sensor/Only Motion/BothSets the detection method to .
Note: G-sensor detection is based on movements/vibrations of the vehicle detected by the gravity sensor;
motion detection captures movements in the camera's field of view.
Auto Entry: Sets the G-sensor's sensitivity level (Easy/Medium/Difficult/Manual) for activating Parking
Mode. For example, when the option is set to , the G-sensor will have a low sensitivity level and Parking Mode is Easy
Motion Detection: Sets the sensitivity level (Low/Medium/High) of motion detection that triggers video
recording during Parking Mode.
G-Sensor Sensitivity: Sets the sensitivity level (Low/Medium/High) of the G-sensor for triggering video
recording during Parking Mode.
Video Clip Length: Sets the length (1 3/ /5 min) of video clips captured during continuous recording.
WDR: Enables/disables the Wide Dynamic Range (WDR) function to improve the dash cam's image quality under
high-contrast lighting conditions.
EV: Sets the exposure level to adjust the brightness of the image.
Frequency: 50 Sets the frequency ( /60 Hz) for the camera to avoid problems caused by artificial light sources that
G-Sensor Sensitivity: Sets the G-sensor's sensitivity level for triggering event-driven recording.
Stamps: Coordinates/G-SensorSpecifies the information ( ) displayed on each recorded video.
Speed Stamp: Displays the driving speed on each recorded video.
Text Stamp: Displays customisable text information on each recorded video.
Satellites: Displays the status of GPS signal reception.
Date/Time: Sets the system date and time.
System Sound: Enables/disables system notification sounds.
Volume: Adjusts the volume level.
Always On: Keeps the LCD on.
HUD: Activates Driving Speed Display Mode where the LCD only displays current time and vehicle speed.
10 sec/1 min/3 min: Sets the timer for the LCD to turn off automatically after recording starts.
Language: Sets the language.
Distance Unit: Sets the preferred system (Metric/Imperial) for measuring distances.
Storage Allocation: The system provides several sets of memory configurations for storing videos and photos.
Select the proper configuration based on your usage.
Restore to Defaults: Restores the device to factory default settings.
Version: Displays software information.
Formats the memory card (all data will be erased).
MiVue Manager™ is a tool for viewing videos recorded by the MiVue™ dash cam on your PC.
Note: Not all features are available for every model.
Download the Setup file from www.navman.com.au/mivue-update www.navman.co.nz/mivue-update or .
Double-click Setup.exe and follow the on-screen prompts to install MiVue Manager.
IMPORTANT! You may be prompted to install MOV and AVI codecs for video playback if they are currently not
installed on your PC. Please search online to install the required codecs.
Playing the recording files
1. Access data stored on the memory card by removing the card from the dash cam and inserting it into a card reader,
or by connecting the dash cam to a PC via a USB cable (not included). You are advised to copy all data files to the
PC for backup and playback.
2. Start MiVue Manager on the computer.
By default, MiVue Manager shows the calendar and file list on the right side of the main window.
Dates with recordings available are marked with a dot (
. Select a date to display files recorded on that date.
You can filter the file list by video category ( / /Event Normal Parking).
To display all files in the current folder, click . To return to the calendar view, click .All Calendar
Note: Your model may not support all file types.
3. Double-click the desired file on the file list to start playback.
4. The playback controls are described as follows:
Skips to the previous/next file on the list.
Starts or pauses playback.
Changes the playback speed to 1/4x, 1/2x, 1x (default), 1.5x, or 2x.
Mutes or unmutes the volume.
Adjusts the volume level.
Plays the video in full screen.
Displays the playback progress. You can click on a point along the track bar to jump to a different spot in the
5. During playback, additional vehicle information such as the dashboard panel and G-sensor chart are displayed
below the video playback screen.