MINI HAND LAUNCH GLIDER /
RAKETA IN JADRALNO LETALO /
LETALO / JADRALNO LETALO S
MINI ELHAJÍTHATÓ SIKLÓREPÜLŐ /
ROCKET & GLIDER / MINI HAND LAUNCH GLIDER /
DELTA-SPORT HANDELSKONTOR GMBH
Wragekamp 6 • DE-22397 Hamburg
Delta-Sport-Nr.: FS-10891, FS-10892,
You have chosen to purchase a high-quality
product. Familiarise yourself with the product
before using it for the first time.
Read the following instructions for
Use the product only as described and only
for the given areas of application. Store these
instructions for use carefully. When passing the
product on to third parties, please also hand
over all accompanying documents.
1 x rubber catapult (3-part)
Date of manufacture (month/year):
Delta-Sport Handelskontor GmbH
hereby declares that this product
meets the following basic require-
ments, as well as other important regulations:
2009/48/EC – Toy Safety Directive
Delta-Sport Handelskontor GmbH
hereby declares that this product
meets the following basic requirements, as well
as other important regulations:
Toys (Safety) Regulations 2011
This product is a toy for private use and for
children aged 5 years and above.
• Warning. Not suitable for children under 36
months. Choking hazard. Small parts.
• Warning. Do not aim at eyes or face.
• Use of this product requires care and prac-
• Children may only play with the product
• Never let the product fly in nature reserves,
scenic areas, bird sanctuaries, above roads
or wherever flying is expressly prohibited!
• Never let the product fly in the vicinity of
• Never let the product fly in the vicinity of
• Let it fly only in open areas, at sufficient
distance from people and animals!
• Do not attach any additional loads to the
• When landing on hard surfaces such as
asphalt, pavement, stone or the like, the mate-
rial may become worn by abrasion.
• Warning. The packaging and mounting mate-
rials are not a constituent part of the toy and
they must be removed in all cases for safety
reasons before the product is given to children
• Check the product for damage and wear be-
fore each use. The product may only be used
in good order and condition!
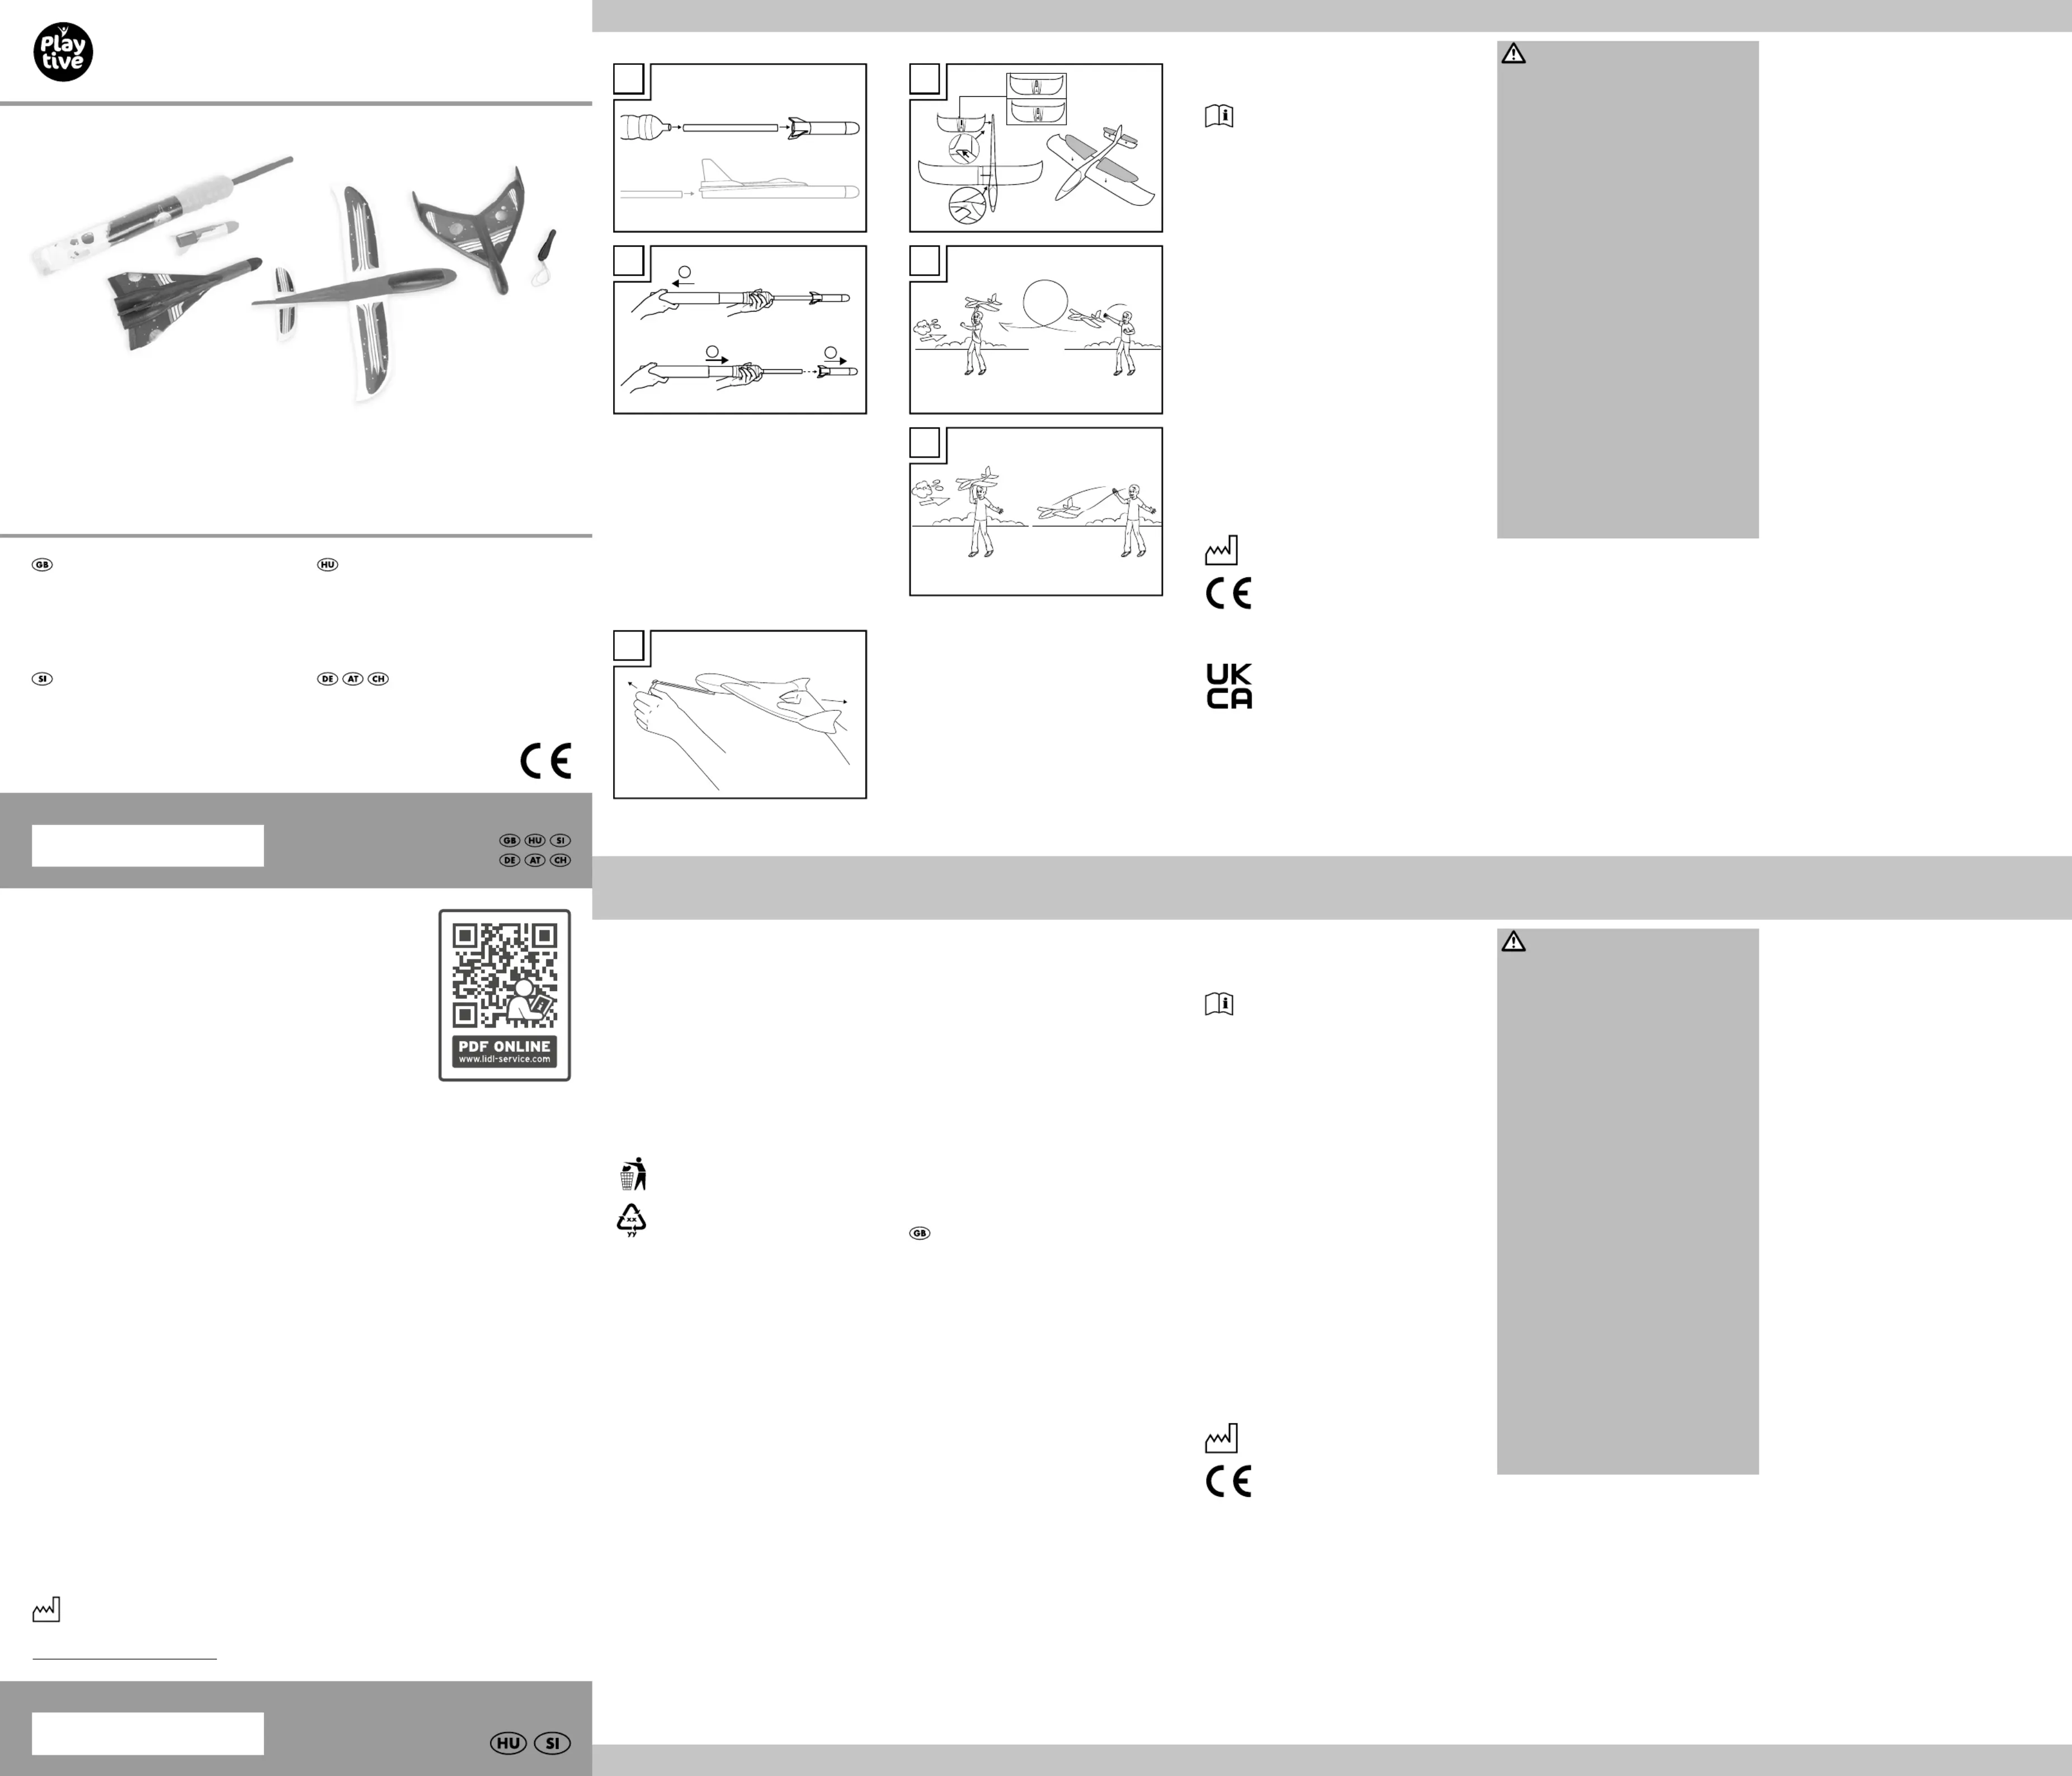
Put the attachment on the air pressure pump, as
shown in fig. A. Then place either the rocket or
the glider on the attachment.
1. Pull back the rear section of the air pressure
Note: Pull the rear section of the air pressure
pump back but not too far. It might damage the
2. In one quick and forceful move press the rear
part of the air pressure pump forwards to
launch the rocket or glider.
Affixing stickers (fig. A)
Peel the stickers off the sheet and attach them
correspondingly to wing and rudder.
Insert the wing into the slot on the fuselage, as
shown in fig. A, allowing it to lock in the centre.
On one side of the rudder is a part marked
“T” and on the other a “P”. The “T” stands for
looping and the “P” stands for gliding.
Note: When positioning the rudder always
handle at the fuselage end.
Insert the rudder into the fuselage with the “T”
upwards (the “P” faces downwards), as shown
Hold the product with the fuselage nose slightly
inclined upwards and throw it with full force into
Insert the rudder into the fuselage with the “P”
upwards (the “T” faces downwards), as shown
Hold the product with the fuselage nose slightly
inclined downwards and without applying too
much force throw it into the wind (fig. C).
Note: Gliding can be adjusted by bending the
rudder slightly at the fuselage end.
1. Hook the elastic band to the underside of the
Note: Use only the elastic band provided.
2. Pull the rubber catapult forwards and the
slider backwards at the same time.
3. Release the glider to let it fly.
When not in use, always store the product clean
and dry at room temperature.
Only clean the product with a damp cloth and
IMPORTANT! Never clean the product with
Dispose of the article and the packaging materi-
als in accordance with current local regulations.
Packaging materials such as foil bags are not
suitable to be given to children. Keep the pack-
aging materials out of the reach of children.
Dispose of the products and the
packaging in an environmentally friendly
The recycling code is used to identify
various materials for recycling.
The code consists of the recycling symbol
– which is meant to reflect the recycling cycle –
and a number which identifies the material.
Notes on the guarantee and
The product was produced with great care and
under continuous quality control. DELTA-SPORT
HANDELSKONTOR GmbH gives private end
customers a three-year guarantee on this product
from the date of purchase (guarantee period) in
accordance with the following provisions.
The guarantee is only valid for material and
manufacturing defects. The guarantee does not
cover parts subject to normal wear and tear that
are thus considered wear parts (e.g. batteries)
or fragile parts such as switches, rechargeable
batteries, or parts made of glass.
Claims under this guarantee are excluded if the
product has been used incorrectly, improperly,
or contrary to the intended purpose, or if the
provisions in the instructions for use were not
observed, unless the end customer proves that
a material or manufacturing defect exists that
was not caused by one of the aforementioned
Claims under the guarantee can only be made
within the guarantee period by presenting the
original sales receipt. Please therefore keep the
original sales receipt. The guarantee period is
not extended by any repairs carried out under
the guarantee, under statutory guarantees, or
as a gesture of goodwill. This also applies to
replaced and repaired parts.
If you wish to make a claim please first contact
the service hotline mentioned below or contact
us by e-mail. If there is a guarantee case, then
the product will be repaired or replaced free
of charge to you or the purchase price will be
refunded, depending on our choice.
Your legal rights, in particular guarantee claims
against the respective seller, are not limited by
E-Mail: deltasport@lidl.co.uk
Vásárlásával kiváló minőségű terméket válasz-
tott. Használatba vétele előtt ismerkedjen meg a
Figyelmesen olvassa el az alábbi
A terméket kizárólag az itt ismertetett módon, a
rendeltetésének megfelelően használja. Gondo-
san őrizze meg a használati útmutatót. A termék
továbbadásakor adja át az összes kapcsolódó
1 x gumikatapult (3 részes)
Gyártás dátuma (hónap/év):
A Delta-Sport Handelskontor GmbH
kijelenti, hogy a termék megfelel az
alábbi általános követelményeknek és
az egyéb vonatkozó rendelkezéseknek:
2009/48/EK – Irányelv a játékok biztonságáról
Rendeltetésszerű használat
Jelen termék 5 éves korú gyermekek számára
készült játékszer privát használatra.
• Figyelmeztetés. Csak 36 hónaposnál idősebb
gyermekek számára alkalmas. Fulladásve-
• Figyelmeztetés. Ne célozzon szemre vagy
• A termék használata körültekintést és gyakor-
• Gyermekek csak felnőtt felügyelete mellett
• Soha ne használja a terméket természet-
védelmi, tájvédelmi vagy madárvédelmi
területen, az utcán, vagy ott, ahol a reptetés
• Soha ne használja a terméket szabadon
kifeszített elektromos vezeték közelében!
• Soha ne használja a terméket fák közelében!
• A terméket csak szabadtéren, emberektől és
állatoktól megfelelő távolságban használja!
• Ne rögzítsen semmilyen tárgyat a termékhez!
• Ha a termék kemény felületre, például
aszfaltra, útburkolatra, köves talajra vagy
hasonlóra érkezik, az anyaga a súrlódás
• Figyelmeztetés. A csomagoló- és rögzítőanya-
gok nem képezik a játék részét, és biztonsági
okból mindenképpen el kell őket távolítani,
mielőtt a terméket odaadná a gyermekeknek
• Minden használat előtt ellenőrizze, hogy a
termék nem sérült vagy kopott-e! A terméket
csak kifogástalan állapotban szabad hasz-
Helyezze a feltétet a légpumpára az A képen
látható módon. Ezután helyezze a rakétát vagy
a siklórepülőt a feltétre.
1. Húzza hátrafelé a légpumpa hátsó részét.
Megjegyzés: ne húzza túlságosan hátra a
légpumpa hátsó részét. Ez az anyag károsodá-
2. Egy gyors és erőteljes mozdulattal nyomja
előrefelé a légpumpa hátsó részét, hogy
kilője a rakétát, illetve a siklórepülőt.
Húzza le a matricákat a fóliáról, és ragassza
fel őket a szárnyra és a kormányra.
Összeszerelés (A, B, C ábra)
A szárnyat helyezze a törzs mélyedésébe az A
ábrán látható módon, és hagyja, hogy a szárny
A kormány egyik oldalán a „T”, a másikon a
„P” jelzés látható. A „T” a körzésre, a „P” a
Megjegyzés: a kormány átállításakor mindig
A kormányt a „T” jelzéssel felfelé (a „P” lefelé
néz) dugja be a törzsbe az A ábrán látható
Úgy tartsa a terméket, hogy a törzs orra eny-
hén felfelé nézzen, majd nagy lendülettel dobja
el a széllel szemben (B ábra).
A kormányt a „P” jelzéssel felfelé (a „T” lefelé
néz) dugja be a törzsbe az A képen látható
Úgy tartsa a terméket, hogy a törzs orra eny-
hén lefelé nézzen, majd kis lendülettel dobja el
a széllel szemben (C ábra).
Megjegyzés: a siklást a kormány enyhe
hajlításával a törzs végén tudja beállítani.
1. Akassza a gumiszalagot a siklórepülő alsó
Megjegyzés: csak a mellékelt gumiszalagot
2. Húzza előre a gumikatapultot, és ezzel
egyidőben húzza hátra a siklórepülőt.
3. Engedje el a siklórepülőt, hogy elrepüljön.