Smeg BM93P Manual
Læs gratis den danske manual til Smeg BM93P (38 sider) i kategorien Komfur. Denne vejledning er vurderet som hjælpsom af 74 personer og har en gennemsnitlig bedømmelse på 5.0 stjerner ud af 37.5 anmeldelser.
Har du et spørgsmål om Smeg BM93P, eller vil du spørge andre brugere om produktet?

Produkt Specifikationer
| Mærke: | Smeg |
| Kategori: | Komfur |
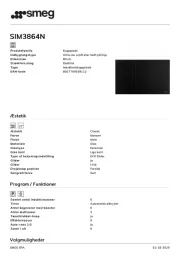
| Model: | BM93P |
| Bredde: | 900 mm |
| Dybde: | 600 mm |
| Højde: | 900 mm |
| Produktfarve: | Black,Cream colour |
| Kontroltype: | Buttons,Rotary |
| Indbygget skærm: | Ja |
| Produkttype: | Fritstående komfur |
| Strøm: | 30 A |
| Timer: | Ja |
| Indvendig belysning: | Ja |
| Integreret ur: | Ja |
| Urtype: | Elektronisk |
| Grill: | 2700 W |
| Konvektion madlavning: | Ja |
| Selvrensende: | Ja |
| Komfurtype: | Gaskomfur |
| Antal kogeplader / madlavningsområde: | 5 |
| Blus/kogeplade zone 1 strøm: | 100 W |
| Blus/kogeplade zone 2 strøm: | 1800 W |
| Blus/kogeplade zone 1 type: | Lille |
| Blus/kogeplade zone 2 type: | Mellem |
| Kontrolposition: | Front |
| Tilsluttet belastning (elektrisk): | 7500 W |
| Blus/kogeplade zone 3 type: | Stor |
| Blus/kogeplade zone 4 type: | Ekstra stor |
| Timer type: | Digital |
| Tilsluttet belastning (gas): | 11500 W |
| Energieffektivitetsklasse: | A |
| Rengøringstype: | Damp |
| Antal glasdørpaneler: | 3 |
| Ovn - størrelse: | Medium |
| Samlet indvendig ovn kapacitet: | 158 L |
| Strøm for samtlige ovne: | - W |
| Antal ovne: | 2 |
| Ovn nettokapacitet: | 61 L |
| Ovn termostatinterval: | 50 - 245 °C |
| Energiforbrug (konventionel): | - kWh |
| Energiforbrug (tvungen konvektion): | 0.85 kWh |
| Opvarmning i både top og bund: | Ja |
| Alarm klar: | Ja |
| Aftaglig ovndør: | Ja |
| Antal hyldepositioner: | 4 |
| Aftagelig dørglas: | Ja |
| Top opvarmning: | Ja |
| Antal gasbrændere: | 5 |
| Blus/kogeplade zone 4 strøm: | 4000 W |
| Blus/kogeplade zone 3 strøm: | 2900 W |
| Elektronisk tænding: | Ja |
| Ovn strømkilde: | Elektrisk |
| Ovn samlet kapacitet: | 61 L |
| Understøttet grydemateriale: | Støbejern |
| Ovn 2 energieffektivitetsklasse: | B |
| Indvendig belægning: | Emalje |
| Ovn, indvendige dimensioner (B x D x H): | 444 x 425 x 316 mm |
| Ovn 2 samlet kapacitet: | 62 L |
| Stegeplade: | Ja |
| Ovn 2 konvektionstilberedning: | Ja |
| Ovn 2 energiforbrug (tvungen varmluft): | 0.97 kWh |
| Højhastighedsbrænder/kogezone: | Ja |
Har du brug for hjælp?
Hvis du har brug for hjælp til Smeg BM93P stil et spørgsmål nedenfor, og andre brugere vil svare dig
Komfur Smeg Manualer

Komfur Manualer
- Melchioni
- Rocktrail
- Eta
- Enkho
- Flavel
- Artusi
- EasyMaxx
- Signature
- Premium Levella
- Ardes
- Kero
- CDA
- Micromaxx
- Kruger
- Campart
Nyeste Komfur Manualer


