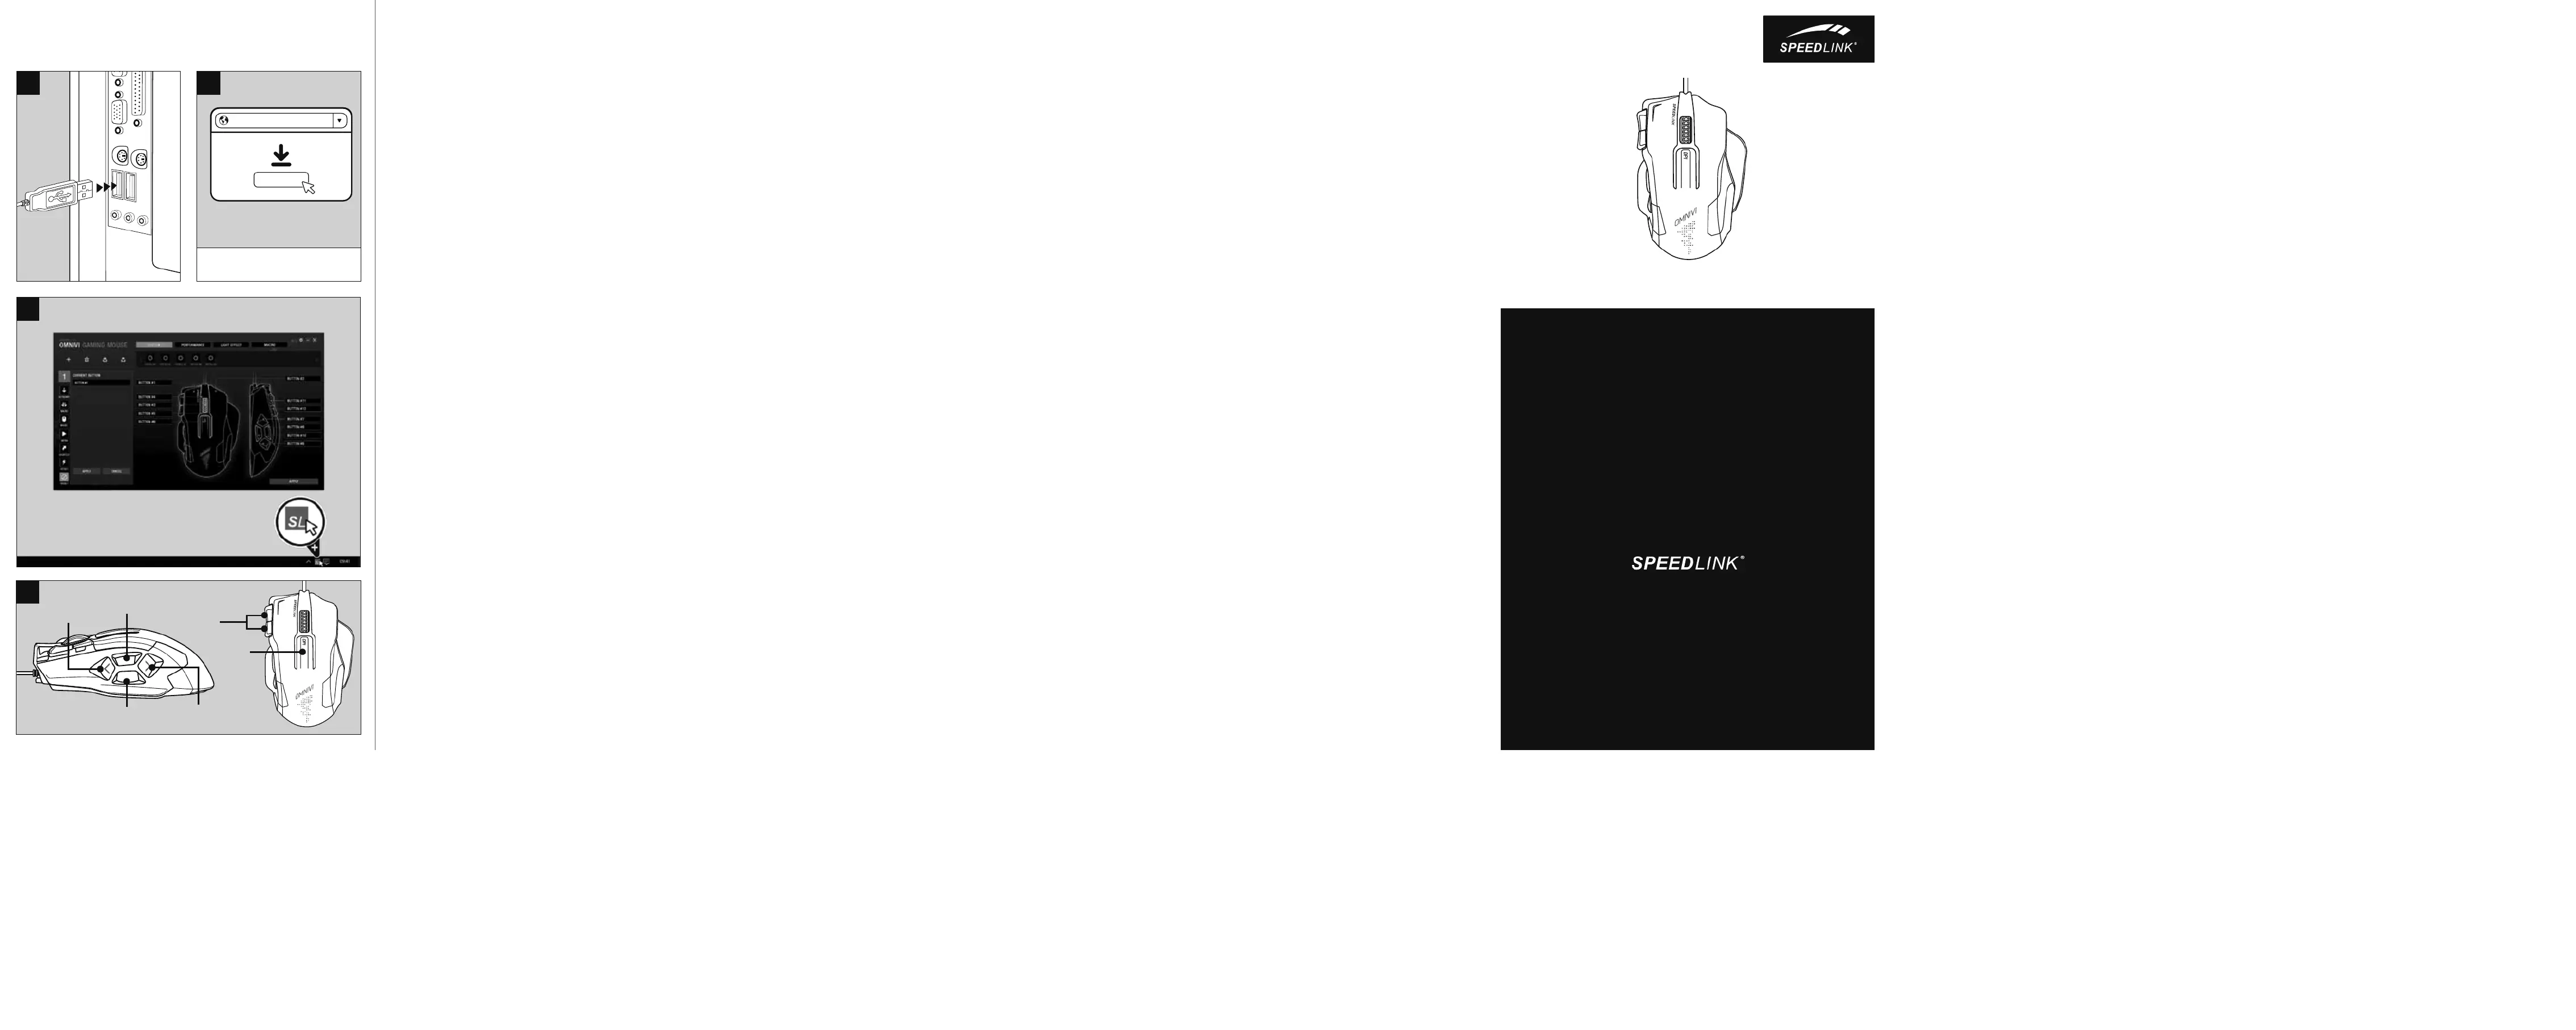
© 2016 Jöllenbeck GmbH. All rights reserved. SPEEDLINK, the SPEEDLINK word mark and
the SPEEDLINK swoosh are registered trademarks of Jöllenbeck GmbH.
* Windows is a registered trademark of Microsoft Corporation in the United States and
other countries. All trademarks are the property of their respective owner. Jöllenbeck
GmbH shall not be made liable for any errors that may appear in this manual.
Information contained herein is subject to change without prior notice. Please keep this
information for later reference.
JÖLLENBECK GmbH, Kreuzberg 2, 27404 Weertzen, GERMANY
Having technical problems with this product? Get in touch with our Support team – the
quickest way is via our website: www.speedlink.com
Bei technischen Schwierigkeiten mit diesem Produkt wenden Sie sich bitte an unseren
Support, den Sie am schnellsten über unsere Webseite www.speedlink.com erreichen.
1. Plug the USB cable into a USB port on your computer.
The mouse will be detected automatically and will be
ready to use shortly after that.
2. Download the driver to install the OMNIVI Gaming
Mouse software. Always use the latest driver
version. To download it, go to www.speedlink.com/
support. Detailed information is also given there on
3. To configure your mouse, open the driver menu by
double-clicking the SPEEDLINK icon on the bottom
right in the Windows* taskbar. You can now fully
4. Default button assignments:
Front/back thumb buttons:
automatic fire (rapid left-click sequence)
(temporarily reduces the sensor resolution)
Central button in front of scroll wheel:
1. Stecken Sie das Kabel an einen USB-Anschluss Ihres
Rechners. Die Maus wird automatisch erkannt und
ist kurz darauf einsatzbereit.
2. Laden Sie den Treiber herunter, um die Software
für die OMNIVI Gaming Mouse zu installieren.
Bitte verwenden Sie stets die aktuelle Version des
Treibers, der online unter www.speedlink.com/
support zum Download zur Verfügung steht. Dort
finden Sie ebenfalls ausführliche Informationen zur
3. Önen Sie für eine detaillierte Konfiguration das
Treibermenü durch einen Doppelklick auf das
SPEEDLINK-Symbol rechts unten in der Windows*-
Taskleiste. Über das Menü können Sie umfangreiche
4. Standard-Tastenbelegung:
Daumentasten hinten/vorne:
Dauerfeuer (schnelle Linksklick-Folge)
(temporäres Absenken der Sensorauflösung)
Zentrale Taste vor Mausrad:
dpi-Einstellungen durchschalten
1. Inserire il cavo in una porta USB del computer. Il
mouse viene riconosciuto automaticamente e poco
2. Scaricare il driver per installare il software per
il OMNIVI Gaming Mouse. Utilizzare sempre una
versione aggiornata del driver, disponibile per il
download dal sito www.speedlink.com/support. Sul
sito trovate anche le informazioni dettagliate per
3. Per una configurazione dettagliata fare doppio clic
sul simbolo SPEEDLINK in basso a destra nella barra
delle applicazioni Windows*. Con il menu si possono
configurare numerose impostazioni.
4. Configurazione tastiera standard:
Tasti pollice dietro/avanti:
fuoco continuo (rapida sequenza clic sinistro)
(riduzione temporanea della risoluzione del sensore)
Tasti aggiuntivi a sinistra:
Tasto centrale davanti alla rotella mouse:
attivazione delle diverse impostazioni dpi
1. Branchez le câble sur un port USB de votre
ordinateur. La souris est installée automatiquement
et aussitôt opérationnelle.
2. Téléchargez le pilote pour installer le logiciel de
la souris OMNIVI Gaming Mouse. Veuillez toujours
utiliser la version actuelle du pilote, disponible
en téléchargement à l’adresse
www.speedlink.com/support. Vous y trouverez
également des informations détaillées concernant
3. Pour procéder à la configuration détaillée, ouvrez
le menu du pilote d’un double-clic sur l’icône
SPEEDLINK dans la barre des tâches Windows* en
bas à droite. Le menu permet de paramétrer de
4. Aectation standard des boutons :
Boutons pour le pouce arrière/avant :
Bouton pour le pouce du haut :
tir continu (succession rapide de clics gauches)
Bouton pour le pouce du bas :
(diminution temporaire de la sensibilité du capteur)
Boutons supplémentaires de gauche :
augmenter/diminuer le volume
Bouton au centre devant la roulette :
défilement des réglages dpi
1. Enchufa el cable a un puerto USB de tu ordenador. El
ratón se instala automáticamente y puedes utilizarlo
2. Descargue el controlador para instalar el software
del OMNIVI Gaming Mouse. Utiliza siempre la última
versión de controlador, la cual puedes descargarte
www.speedlink.com/support. En esta página web
también encontrarás información detallada
sobre la utilización del controlador.
3. Para conseguir la configuración más detallada abre
el menú del controlador, haciendo doble clic en el
icono SPEEDLINK, abajo a la derecha, en la barra
de tareas de Windows *. Dentro del menú podrás
efectuar diversas opciones de configuración.
Botón del pulgar hacia atrás/hacia delante:
hacia delante/hacia atrás
Botón del pulgar hacia arriba:
(secuencia rápida de clics a la izquierda)
Botón del pulgar hacia abajo:
(la resolución del sensor baja temporalmente)
Botón adicional a la izquierda:
Botón central antes de la rueda del ratón:
conmutar entre los ajustes de dpi
1. Вставьте кабель в USB-разъем компьютера.
Мышь автоматически распознается и поле этого
немедленно готова к работе.
2. Загрузите драйвер, чтобы установить ПО для
OMNIVI Gaming Mouse. Всегда пользуйтесь самой
свежей версией драйвера, которую можно
загрузить с сайта www.speedlink.com/support.
По этому адресу также можно ознакомиться
с подробной информацией по использованию
3. Для детального конфигурирования откройте меню
драйвера, для этого щелкните двойным щелчком
символ SPEEDLINK справа внизу на панели
задач Windows*. В меню можно производить
4. Стандартное распределение кнопок:
Кнопки под большой палец сзади/спереди:
Кнопка под большой палец вверху:
(быстрая последовательность левых кликов)
Кнопка под большой палец внизу:
(временное уменьшение разрешения датчика)
Дополнительные кнопки слева:
громкость увеличить/уменьшить
Центральная кнопка перед колесиком мыши:
переключение настроек dpi
1. Sluit de kabel aan op een USB-poort van uw
computer. De muis wordt automatisch herkend en is
meteen gereed voor gebruik.
2. Download het stuurprogramma om de software voor
de OMNIVI Gaming Mouse te installeren. Gebruik
altijd de actuele versie van het stuurprogramma
zoals dit online beschikbaar is onder www.
speedlink.com/support om te downloaden. Daar
vindt u ook uitgebreide informatie over het gebruik
3. Dubbelklik op het pictogram SPEEDLINK rechts onder
op de Taakbalk van Windows* om het menu van
het stuurprogramma te openen en gedetailleerde
configuratie-instellingen op te geven. In het menu
staan opties voor een groot aantal instellingen.
4. Standaard-toetsenlayout:
Continu vuren (snelle linkse kliksequentie)
(tijdelijke verlaging van de sensorresolutie)
Centrale toets voor muiswiel:
dpi-instellingen doorschakelen
1. Podłącz przewód USB do wolnego złącza USB
komputera. Mysz zostanie automatycznie
zainstalowana i za chwilę będzie gotowa do pracy.
2. Pobierz sterowniki, by zainstalować oprogramowanie
do OMNIVI Gaming Mouse. Zawsze korzystaj z
aktualnej wersji sterowników, które są dostępne do
pobrania na stronie www.speedlink.com/support.
Pod tym adresem internetowym można także znaleźć
wyczerpujące informacje na temat stosowania
3. Otwórz menu szczegółów konfiguracji sterownika
podwójnym kliknięciem symbolu SPEEDLINK u dołu
po prawej stronie ekranu, na pasku zadań Windows*.
Za pomocą tego menu można wykonać wiele
4. Standardowy układ przycisków:
Przyciski na kciuki do tyłu/do przodu:
Przycisk na kciuk na górze:
(szybka sekwencja kliknięć po lewej stronie)
Przycisk na kciuk na dole:
(tymczasowe obniżenie rozdzielczości czujnika)
Dodatkowe przyciski po lewej stronie:
Centralny przycisk przed kółkiem myszy:
przełączanie ustawień dpi
1. Liitä johto yhteen tietokoneesi USB-porttiin. Hiiri
tunnistetaan automaattisesti ja se on käyttövalmis
2. Lataa ajuri koneellesi asentaaksesi ohjelmiston
OMNIVI Gaming Mouse iä varten. Käytä aina ajurin
ajankohtaisinta versiota, jonka voi ladata online
osoitteesta www.speedlink.com/support. Sieltä
löydät myös kattavia tietoja ajurin käytöstä.
3. Suorita yksityiskohtaiset asetukset avaamalla
ajurivalikko kaksoisnapsauttamalla SPEEDLINK-
symbolia alaoikealla Windows*-tehtäväpalkissa.
Valikon kautta voidaan suorittaa kattavia asetuksia.
4. Näppäinten vakiovaraukset:
Peukalopainikkeet takana/edessä:
(nopea vasemman painikkeen painallussarja)
(anturitarkkuuden hetkellinen vähentäminen)
Lisäpainikkeet vasemmalla:
äänenvoimakkuuden lisääminen/vähentäminen
Keskipainike hiiripyörän edessä:
dpi-asetusten muuttaminen
1. Dugja be a kábelt a számítógépe USB-nyílásába.
A gép egyből felismeri az egeret és nemsokára
2. Töltse le a meghajtót, hogy telepíthesse a OMNIVI
Gaming Mouse szoftvert. Használja a telepítő
program aktuális változatát, mely az interneten a
www.speedlink.com/support oldalon tölthető le. Ott
megtalálja a meghajtó használatához szükséges
3. A részletes konfigurációhoz a SPEEDLINK
szimbólumra duplán kattintva nyissa meg a
meghajtó menüjét a jobb alsó sarokban található
Windows* menüsávban. A menün keresztül is sok
4. Szabványos gombkiosztás:
Állandó tüzelés (gyors bal oldali kattintás-sorozat)
(az érzékelő felbontás ideiglenes leeresztése)
Középső gomb az egérgörgő előtt:
dpi-beállítások átkapcsolása
ULTOR Illuminated Mechanical Gaming Keyboard
Hand-to-hand combat or area damage, spells or base expansion: the ULTOR Illuminated
Mechanical Gaming Keyboard lets you customise your gaming profile, create complex
macros and dramatically enhance your fighting repertoire. Red mechanical Kaihua Kailh
switches combined with the keyboard’s ultra-simple design and aluminium body oer
maximum durability, while the feature-packed driver, n-key rollover and configurable
polling rate will set your gaming heart racing.
http://www.speedlink.com/support
OMNIVI – CORE GAMING MOUSE