Whirlpool WHE2535 F Manual

| Mærke: | Whirlpool |
| Kategori: | Frysere |
| Model: | WHE2535 F |
| Bredde: | 1010 mm |
| Dybde: | 698 mm |
| Højde: | 916 mm |
| Vægt: | 39500 g |
| Produktfarve: | Hvid |
| Produkttype: | Kummefryser |
| Ledningslængde: | 2.45 m |
| Pakkevægt: | 40800 g |
| Pakkedybde: | 743 mm |
| Pakkebredde: | 1042 mm |
| Pakkehøjde: | 962 mm |
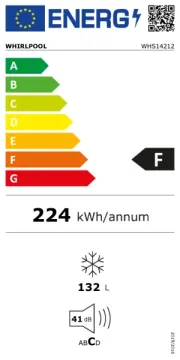
| Energieffektivitetsklasse (gammel): | A+ |
| Årligt energiforbrug: | 260 kWh |
| Placering af apparat: | Fritstående |
| Indikatorlampe: | Ja |
| Indvendig belysning: | Ja |
| Dørhængsel: | Op |
| Tilsluttet belastning: | 100 W |
| Støjniveau: | 42 dB |
| Vendbare døre: | Ingen |
| Fryser, netto rumindhold: | 251 L |
| Fryser, brutto rumindhold: | 255 L |
| Frysekapacitet: | 18 kg/24t |
| Opbevaringstid under strømafbrydelse: | 45 t |
| Klimaklasse: | SN-T |
| Frostfri system: | Ingen |
| Stjernebedømmelse: | 4* |
| Automatisk afrimning (fryser): | Ja |
| Hurtig frys funktion: | Ja |
| Fryser antal hylder/kurve: | 2 |
| Energiforbrug: | 18 kWh/24t |
| Termostat: | Ja |
Har du brug for hjælp?
Hvis du har brug for hjælp til Whirlpool WHE2535 F stil et spørgsmål nedenfor, og andre brugere vil svare dig
Frysere Whirlpool Manualer

13 Januar 2025
12 Januar 2025

13 Juli 2024

13 Juli 2024

13 Juli 2024

12 Juli 2024

6 Juli 2024

6 Oktober 2022

6 Oktober 2022
6 Oktober 2022
Frysere Manualer
- Maytag
- Kelvinator
- Constructa
- Hoover-Helkama
- Logik
- Hotpoint
- Zanker
- Eurotech
- Pelgrim
- Balay
- Iberna
- Infiniton
- Proline
- Neff
- Summit
Nyeste Frysere Manualer
15 Januar 2025

14 Januar 2025
14 Januar 2025

14 Januar 2025

14 Januar 2025

14 Januar 2025
13 Januar 2025

12 Januar 2025

12 Januar 2025

12 Januar 2025