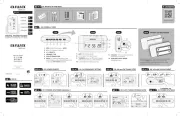
ACCESORIES / ACCESORIOS / ACCESSOIRES BUTTONS FUNCTION / FUNCIÓN DE LOS BOTONES
/ FONCTION DES BOUTONS
BUTTONS FUNCTION / FUNCIÓN DE LOS BOTONES
/ FONCTION DES BOUTONS
Pocket radio
Radio de bolsillo
Radio de poche
Aiwa-Q Design in-ear
headphones
Auriculares estéreo
Aiwa-Q Design
Modelè de casque stéréo
Aiwa-Q Design
AAA Batteries Aiwa Xtra+
Alkaline Power
Pilas AAA Aiwa Xtra+
Alkaline Power
Batteries AAA Aiwa Xtra+
Alkaline Power
Manual / Warranty sheet
Manual / Hoja de garantia
Manuel / Fiche de garante
Frequency tuner
Sintonizador de frecuencia
Syntoniseur de fréquence
Radio band selector (AM/FM)
Selector de banda de radio (AM/FM)
Sélecteur de bande radio (AM/FM )
Radio frequency indicator
Indicador de frecuencia de radio
Indicateur de fréquence de radio
VOLUME
open
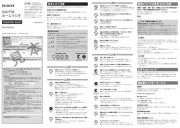
AIWA CO., LTD. TO KYO, JAPAN
EU REPRESENTAT IVES:
MEDIA ELECT RONICS S.L, ES-08440
MADE IN P.R.C.
2 LR 03, AA A Ba tter ies 3V
AM: 522 - 1710 kHz
FM: 87 - 10 8 MHz
MODEL: R -2 2
Battery compartment
Compartimento de las baterías
Compartiment à piles
Volume tuner
Dial de volumen
Cadran de volume
Headphone jack
Toma de auriculares
Prise casque
Turn on the radio
1. Push the ON AND OFF SWITCH upwards to turn ON
the unit.
2. Tune to a radio station using FREQUENCY TUNER.
3. Push the ON AND OFF SWITCH downwards to turn OFF
the unit.
Listen to FM Band Function
Fully extend the cord of the earphones as it functions, as
antenna and slide the RADIO BAND SELECTOR to FM, then
rotate the to your desired FM station.FREQUENCY TUNER
Listen to AM Band
Slide th . Rotate the e RADIO BAND SELECTOR to AM
FREQUENCY TUNER to your desired station, then place
the radio in the best position for optimal reception as the
device is provided with a built-in ferrite bar as an antenna.
Encender la radio
1. Desplace el INTERRUPTOR DE ENCENDIDO Y APAGADO
hacia arriba para encender la radio.
2. Sintonice una emisora de radio utilizando el dial
SINTONIZADOR DE FRECUENCIA.
3. Apague la radio desplazando el INTERRUPTOR DE
ENCENDIDO Y APAGADO hacia abajo.
Banda FM
Extienda completamente el cable de los auriculares ya que
funciona como antena, deslice el SELECTOR DE BANDA
DE RADIO a la posición , luego gire el FM SINTONIZADOR
DE FRECUENCIA a la emisora de FM deseada.
Banda AM
Deslice el SELECTOR DE BANDA DE RADIO a la posición
AM. Ajuste el SINTONIZADOR DE FRECUENCIA a la emisora
deseada, y gire la unidad hasta lograr una posición óptima
para obtener la mejor recepción ya que la radio cuenta con
una barra de ferrita incorporada como antena.
Allumer la radio
1. Déplacez le commutateur INTERRUPTEUR MARCH ET
ARRÊT pour allumer la radio.
2. Syntonisez une station de radio à l’aide du SYNTONISEUR
DE FRÉQUENCE.
3. Eteignez la radio en déplaçant le SUR ET VOLUME.
Bande FM
Déployez complètement le câble du casque car il fonctionne
comme une antenne, faites glisser le SÉLECTEUR DE BANDE
RADIO à la position FM, puis tournez le SYNTONISEUR DE
FRÉQUENCE sur la station FM souhaitée.
Bande AM
Placez le sur la position SÉLECTEUR DE BANDE RADIO
AM. Réglez le SYNTONISEUR DE FRÉQUENCE sur la
station souhaitée, puis allumez-le pour obtenir la meilleure
réception possible, car AM utilise une tige de ferrite
incorporée comme antenne.
Volume
Adjust the sound with the VOLUME TUNER.
Connect the headph to the 3.5mm ones (included)
HEADPHONE JACK on the top of the radio.
Volumen
Ajuste el volumen girando el DIAL DE VOLUMEN.
Conecte los auriculares en la (incluidos) TOMA DE
AURICULARES de 3.5 mm en la parte superior e la radio.
Volume
Ajustez le volume en tournant le CADRAN DE VOLUME.
Connectez le casque a la 3,5 mm (fourni) PRISE CASQUE
sur le dessus de la radio.
Battery installation
Open the battery cover and insert 2x AAA/LR03/UM-4
batteries according to the polarity diagram imprinted
on the battery compartment.
Instalación de baterías
Abra la tapa de la batería e inserte 2 pilas tipo AAA/
LR03/UM-4 de acuerdo con el diagrama de polaridad
impreso en el compartimiento de la batería.
Installation de piles
Ouvrez le couvercle du compartiment à piles et insérez 2
piles AAA/LR03/UM-4 conformément au diagramme de
polarité imprimé sur le compartiment à piles.
• Power: 0.5W
• Battery Operated: DC 3V (2 x “AAA/LR03/UM-4”)
• Puissance de sortie: 0.5W
• Batterie: DC 3V (2 x “AAA/LR03/UM-4”)
• Potencia de salida: 0.5W
• Batería: DC 3V (2 x “AAA/LR03/UM-4”)
When this crossed-out wheeled bin symbol is attached to a
product, it means the product is covered by the European
Directive 2012/19/EC.
All electrical and electronic products including batteries
should be disposed separately from the municipal waste
stream via designated collection facilities appointed by
the government or the local authorities.
The correct disposal of your old device will help prevent
potential negative consequences for the environment and
human health.
Due to continual revision and improvement of our products,
design and specifications are subject to change without
further notice.
Debido a la continua revisión y mejora de nuestros
productos, el diseño y las especificaciones están sujetos a
cambios sin previo aviso.
En raison de la révision et des améliorations constantes
de nos produits, la conception et les spécifications sont
sujettes à modifications sans préavis.
1. Open flame sources, such as candles, should not be
placed near the device.
2. Do not expose the unit to extreme temperatures or high
humidity to ensure the proper functioning and durability
of your device.
3. In order to clean the device:
Remove the batteries before cleaning.
Do not use liquid cleaners or aerosol cleaners.
Always use a damp cloth for cleaning.
Notes:
This radio uses a DSP system, (Digital Signal Processing)
this enhances the sound quality, reception and sensivility
during the listening of radio stations by locking digitally the
radio signal, and rejecting interferences or static noises.
Notas:
Esta radio utiliza un sistema procesamiento de señal
digital (DSP), mejorando la calidad de sonido, recepción
y sensibilidad durante la escucha de emisoras de radio.
Bloqueando digitalmente la señal de radio y rechazando
interferencias o ruidos estáticos.
Note:
Cette radio utilise un système de traitement du signal
numérique (DSP), améliorant la qualité du son, la
réception et la sensibilité pendant l’écoute de la station
de radio. Bloquer numériquement le signal radio et
rejeter les interférences ou le bruit statique.
Warning:
Avoid listening to headphones at high volume levels to
prevent possible hearing damage.
Atención:
Evite el uso de auriculares con volumen alto para prevenir
posibles daños auditivos.
Avertissement:
Évitez d’utiliser des écouteurs à volume élevé pour éviter
tout dommage auditif.
Notes:
Check the condition of your batteries regularly.
Old or discharged batteries should be replaced.
Notas:
Compruebe el estado de sus baterías regularmente.
Las baterías viejas o descargadas deben ser reemplazadas.
Notes:
Cérifiez régulièrement l’état de vos piles.
Les piles usages ou déchargées doivent être remplacées.
4. Do not leave the batteries in the compartment for a long
time. Remove the batteries to prevent leakage and damage.
5. Dierent types of batteries, new and used batteries should
not be mixed.
If the sound becomes low or distorted, replace the
batteries with new ones.
6. If you notice that the unit is not working properly, take it
to your nearest repair center.
Do not try to repair it yourself.
1. Las fuentes candentes, como las velas, no deben colocarse
cerca del dispositivo.
2. No exponga la unidad a temperaturas extremas ni a
humedades para así garantizar un correcto funcionamiento
durante toda su vida útil.
3. Para limpiar el dispositivo:
Retire las pilas antes de limpiar.
No utilice líquidos o aerosoles de limpieza.
Use un paño húmedo para la limpieza.
4. Si no va a utilizar la radio durante un tiempo, retire las
pilas del compartimiento dado que podría deteriorarse
y dañar la radio.
5. No se deben mezclar pilas nuevas con usadas.
Si el sonido se vuelve bajo o distorsionado, cambie las
pilas por otras nuevas.
6. Si advierte que la unidad no funciona correctamente,
pongase en contacto con el servicio técnico.
No intente reparar la radio usted mismo.
1. Les sources chaudes, telles que les bougies, ne doivent
pas être placées à proximité de l’appareil.
2. N’exposez pas l’appareil à des températures extrêmes
ou à l’humidité pour assurer un fonctionnement correct
pendant toute sa durée de vie.
3. Pour nettoyer l’appareil:
Retirez les piles avant de nettoyer.
N’utilisez pas de nettoyants liquides ni d’aérosols.
Utilisez un chion humide pour le nettoyage.
4. Si vous n’allez pas utiliser la radio pendant un moment,
retirez les piles du compartiment, car elles pourraient
se détériorer et endommager la radio.
5. Ne mélangez pas des piles neuves et usagées.
Si le son devient faible ou déformé, remplacez les piles par
des piles neuves.
6. Si vous remarquez que l’appareil ne fonctionne pas
correctement, contactez le support technique.
N’essayez pas de réparer la radio vous-même.
El símbolo del cubo de basura tachado sobre el producto,
significa que el producto cumple con la Directiva Europea
2012/19 / EC.
Todos los productos eléctricos y electrónicos, incluida la
batería, deben arrojarse por separado cumpliendo con la
regulación de desechos municipales a través de las
instalaciones de recolección designadas por el gobierno o
las autoridades locales.
La eliminación correcta de su aparato antiguo ayudará a
reducir posibles consecuencias negativas en la salud humana
y el medioambiente.
Le symbole de la poubelle à roulettes barrée sur le produit,
signifie que le produit est couvert par la directive Union
européenne 2012/19 / CE.
Tous les produits électriques et électroniques, y compris
la batterie, doivent être retirés séparément du flux de
déchets municipaux à travers les installations de collection
désignée par le gouvernement ou autorités locales.
Le retrait correct de votre ancien appareil aidera réduire
les conséquences négatives possibles sur la santé l’homme
et l’environnement.