1
3
6
7
8
2
5
1010
2
3 4
8
5
6
7
9
11
12
1
1010
2
3 4
8
5
6
7
9
11
12
1
4
1
3
6
7
8
2
5
4
1
3
6
7
8
2
5
4
DOWNLOAD THE FULL USER GUIDE TO LEARN MORE
ALESIS.COM
DESCARGUE LA GUÍA DEL USUARIO COMPLETA PARA APRENDER MÁS
ALESIS.COM
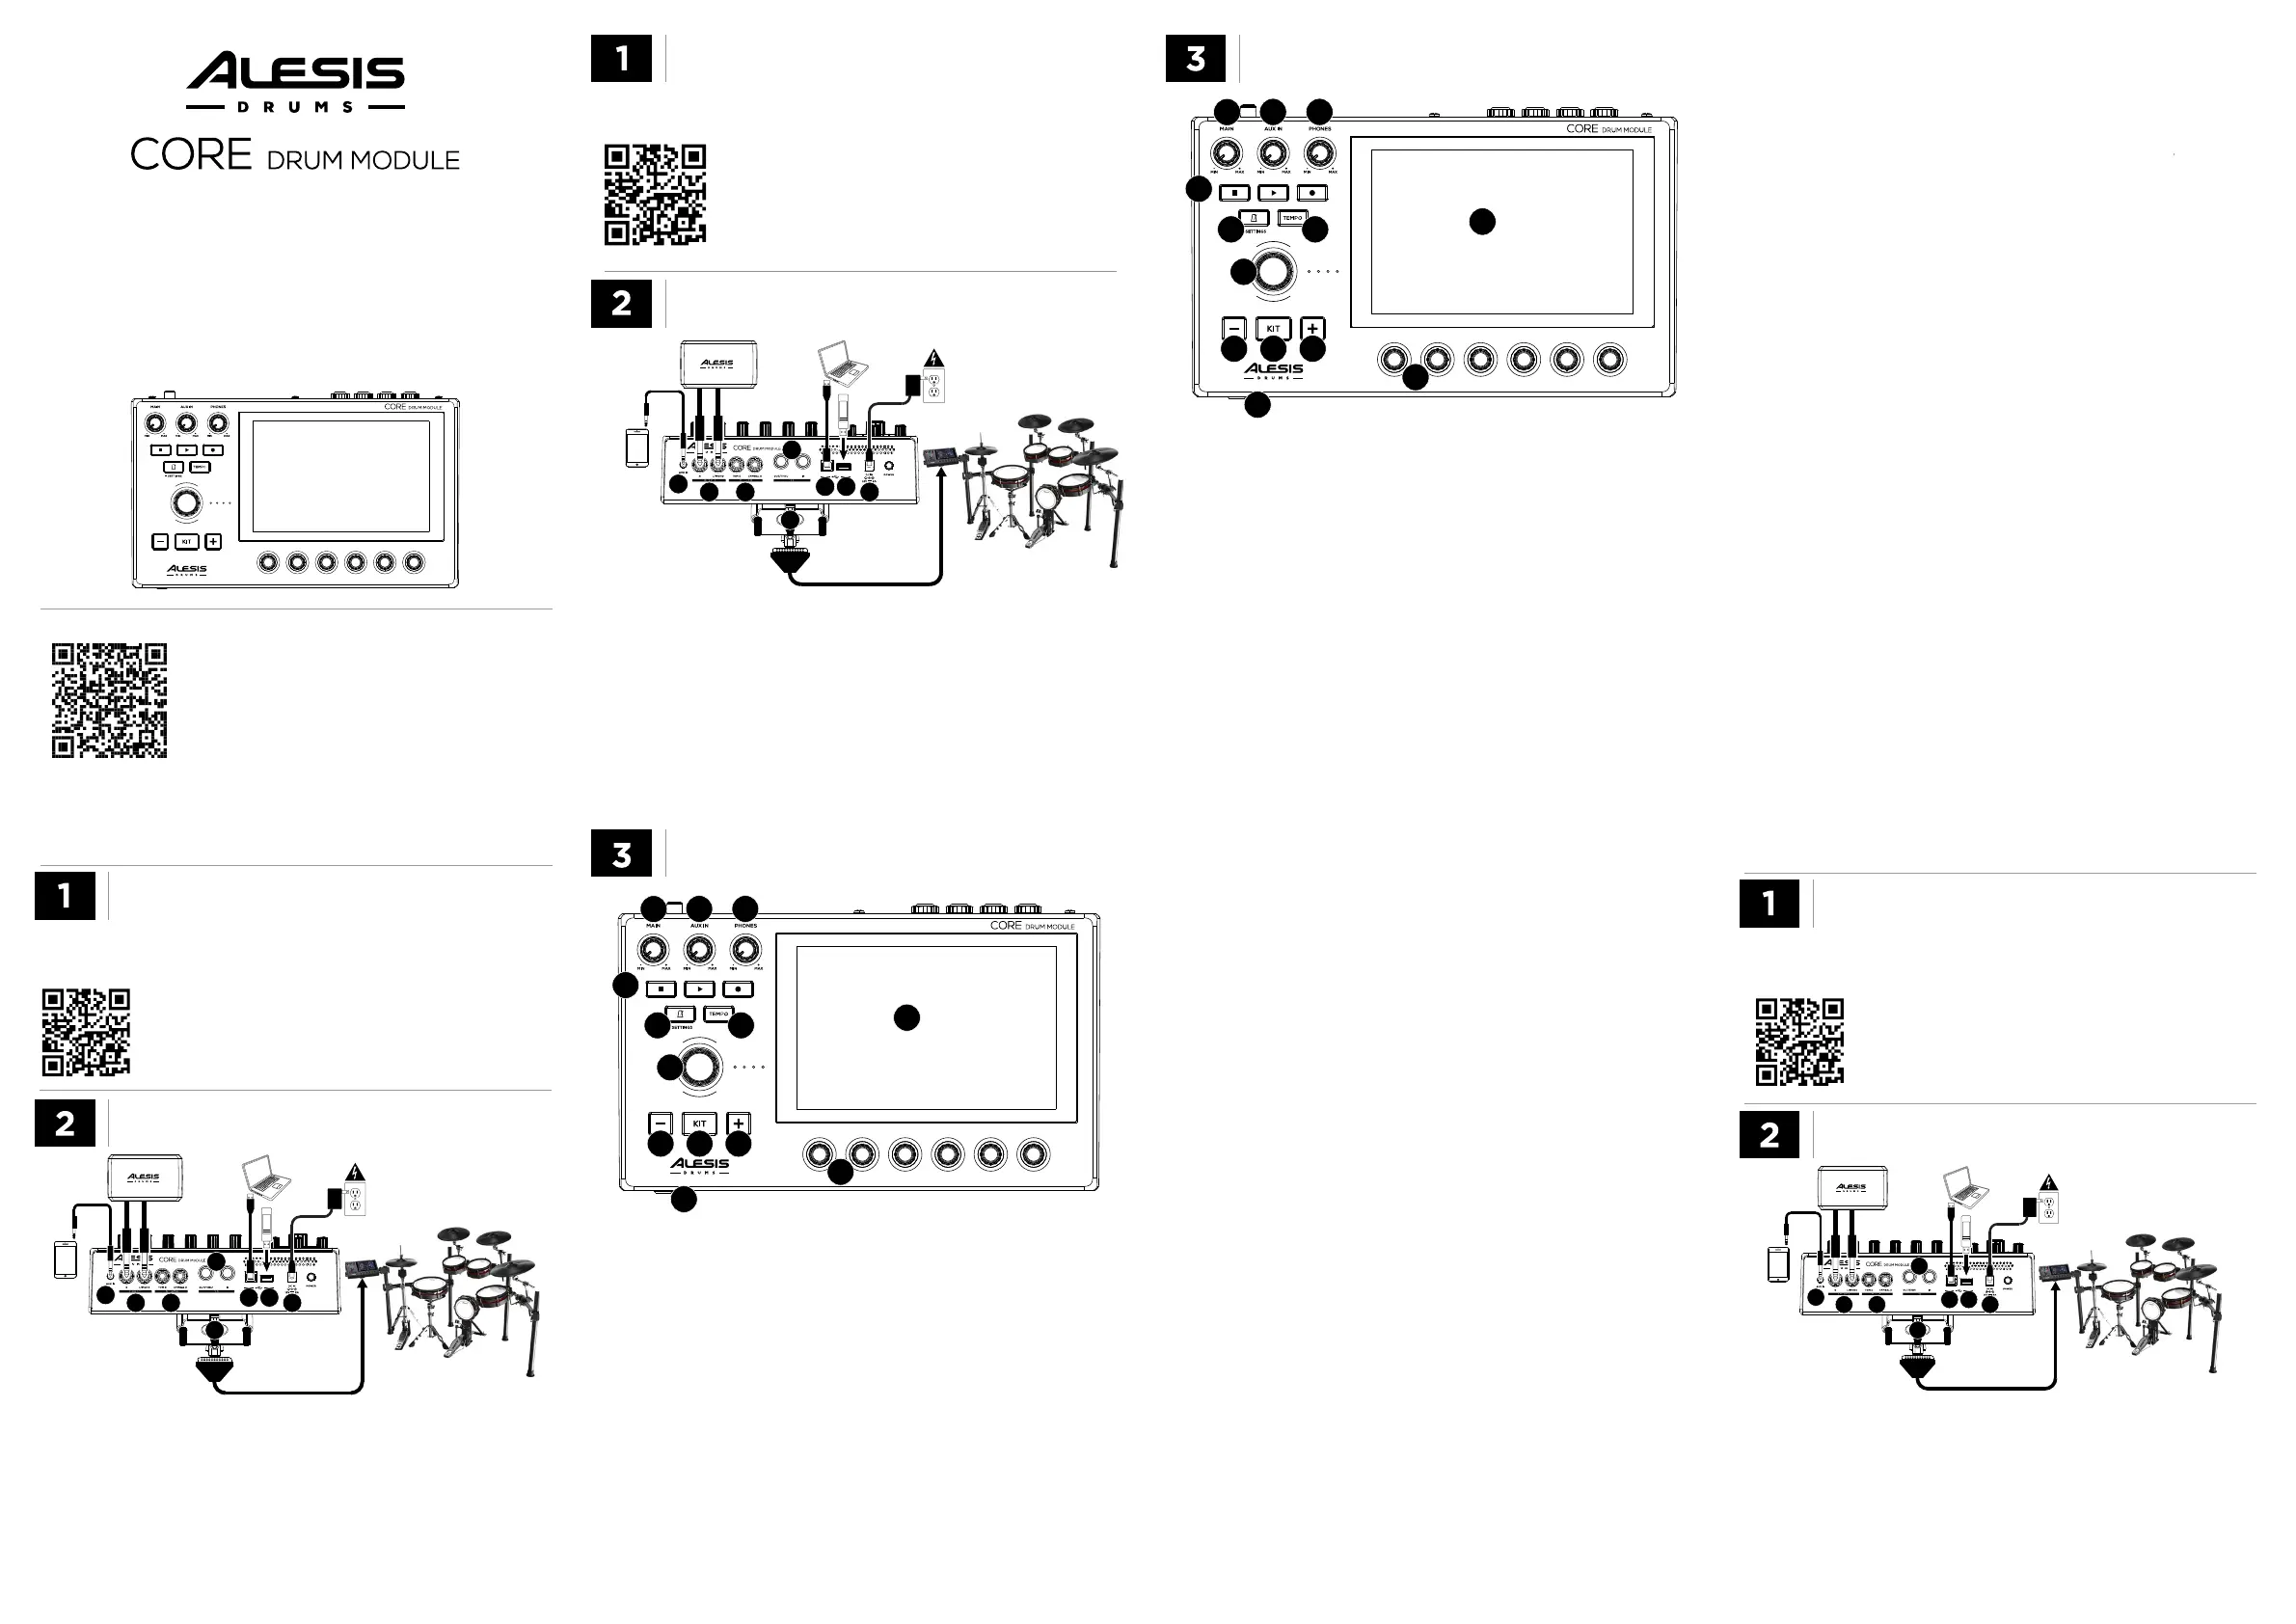
1. Power: Connect the included power adapter (12V, 2A center positive) here.
2. USB-A Port: Connect a USB drive (exFAT or FAT32 formatted) to import samples.
3. USB-B Port: Connect to a computer’s USB port to send/receive MIDI data.
4. MIDI Input/Output: Connect to external MIDI devices (synthesizer, drum machine,
etc.).
5. Trigger Inputs (1/4” [6.35 mm] TRS): Connect trigger cables here to receive signals
from an additional connected drum pad and cymbal.
6. Main Output (1/4” [6.35 mm] TRS): Connect your monitors, mixer, etc. here.
7. Aux Input (1/8” [3.5 mm] TRS): Connect to an audio source (phone, mixer,
synthesizer, sampler, etc.).
8. Module Mount: Connect the included module mount to CORE’s bottom panel using
the 2 supplied screws to secure to the rack. Use the supplied screws only.
OPERATION
DIAGRAMA DE CONEXIÓN
SCHÉMA DE CONNEXION
Para artículos, videos y soporte web.
Pour des articles, des vidéos et de l’assistance technique
par web.
Per articoli, video, e supporto di web.
Für Artikel, Videos und Web-Support.
GUÍA DE INICIO RÁPIDO (ESPAÑOL)
GUIDE D’UTILISATION RAPIDE (FRANÇAIS)
• REGISTRE SU PRODUCTO
• DESCARGUE LA GUÍA DEL USUARIO
• DESCARGUE EL SOFTWARE INCLUIDO
• VER VÍDEO TUTORIALES
• ENREGISTREZ VOTRE PRODUIT
• TÉLÉCHARGEZ LE GUIDE DE L'UTILISATION
• TÉLÉCHARGEZ LE LOGICIEL INCLUS
• REGARDEZ DES TUTORIELS VIDÉO
ALESIS.COM/SUPPORT
ALESIS.COM
ALESIS.COM
For articles, videos, and web support.
• REGISTER YOUR PRODUCT
• DOWNLOAD THE USER GUIDE
• DOWNLOAD INCLUDED SOFTWARE
• WATCH TUTORIAL VIDEOS
ALESIS.COM
GETTING STARTED
Contenido del paquete: Módulo de batería CORE, Cable de alimentación,
Guía de inicio rápido, Contenido de la caja y Guía de armado, Manual
sobre la seguridad y garantía
CONNECTION DIAGRAM
PARA COMENZAR
MISE EN ROUTE
FUNCIONAMIENTO
Package Contents: Core Drum Module, Power Cable, Quickstart
Guide, Box Contents and Assembly Guide, Safety & Warranty Manual
Contenu de l'emballage : Module de percussion CORE, Câble d’alimentation,
Guide d’utilisation rapide, Contenu de la boîte et Guide d’assemblage,
Consignes de sécurité et informations concernant la garantie
QUICKSTART GUIDE (English)
GUÍA DE INICIO RÁPIDO (Español)
GUIDE D’UTILISATION RAPIDE (Français)
GUIDA RAPIDA (Italiano)
SCHNELLSTART-ANLEITUNG (Deutsch)
v1.00
Using the Touch Screen
Tap a button or option to enable it or select it on the Touch Screen.
1. Touch Screen Display: The full-color 7” multi-touch display shows information
relevant to the current operation. Touch the display (and use the hardware
controls) to control the interface.
2. Main: Turn this knob to adjust the level of the Main Outputs.
3. Aux In: Turn this knob to adjust the level of the Aux Input.
4. Phones: Turn this knob to adjust the level of the headphone outputs.
5. Transport Controls: Use these controls to start/stop playback and recording.
6. Metronome: Press to turn the metronome on/o. Press and hold to open the
Metronome menu.
7. Tap Tempo: Tap this button to manually enter a tempo.
8. Main Encoder (with push functionality): Turn this to change kits, edit on-screen
parameters, navigate menus, and more.
9. Kit Button: Press to toggle between Kit mode and the other current active mode
(Kit Edit, Mixer, Backing Track, Trigger Edit, and Settings).
10.Selection Up/Down: Press these buttons to move your selection up or down. The
functionality of these buttons depends on what current mode is active.
11. Small Encoders: Turn these to adjust parameters in the menus such as volume
levels, panning, etc.
12. Headphone Output (Front panel, 1/8” [3.5 mm] or 1/4” [6.35 mm] stereo): Connect
standard stereo headphones to one of these front panel outputs.
Triggering a Sound
1. Ensure the drum pads are mounted securely to the rack. Place the rack on a
carpet or drum rug to reduce vibration and prevent it from moving.
2. Connect drum pads to the applicable trigger inputs.
3. Connect speakers or headphones to CORE.
4. Power on CORE.
5. Hit a pad to trigger a sound.
Model: LDMF
Cómo utilizar la pantalla táctil
Toque un botón u opción para habilitarla o seleccionarla en la pantalla táctil.
Cómo disparar un sonido
1. Asegúrese de que los pads de los tambores estén montados firmemente en la estructura.
Coloque la estructura sobre una alfombra para reducir la vibración e impedir que se
desplace.
2. Conecte los pads de los tambores a sus correspondientes entradas de disparadores.
3. Conecte altavoces o auriculares al CORE.
4. Encienda el CORE.
5. Golpee un pad para disparar un sonido.
1. Alimentación: Conecte aquí el adaptador de corriente incluido 12 V, 2 A centro positivo.
2. Puerto USB-A: Conecte una unidad USB (formateada en exFAT o FAT32) para importar muestras.
3. Puerto USB-B: Conecte este puerto con el puerto USB de un ordenador para enviar/recibir
datos MIDI.
4. Entrada/Salida MIDI: Conecte aquí dispositivos MIDI externos (sintetizador, caja de
ritmos, etc.).
5. Salidas de disparador (TRS de 6,35 mm [1/4 pulg.]): Conecte aquí los cables disparadores
para recibir señales de un pad de tambore y un platillo conectados adicionales.
6. Salida principal (TRS de 6,35 mm [1/4 pulg.]): Conecte aquí sus monitores, mesa de
mezclador, etc.
7. Entradas auxiliares (TRS de 3,5 mm [1/8 pulg.]): Conecte estas entradas a una fuente
de audio (mezclador, sintetizador, muestreador, etc.).
8. Placa de soporte del módulo: Sujete la placa de soporte del módulo incluida contra el
panel inferior del CORE utilizando los 2 tornillos provistos para sujetarlo a la estructura.
Utilice únicamente los tornillos provistos.
1. Entrée d'alimentation : Brancher l’adaptateur secteur fourni à cette entrée 12 V, 2 A,
centre positif.
2. Port USB-A : Connectez une clé USB (formatée exFAT ou FAT32) pour importer des échantillons.
3. Port USB-B : Raccordez ce port au port USB d'un ordinateur pour envoyer et recevoir des
données MIDI.
4. Entrée/Sortie MIDI : Connectez-vous à des appareils MIDI externes (synthétiseur,
batterie, etc.).
5. Entrées de déclenchement (TRS, 6,35 mm) : Connectez les câbles de déclenchement à
cette entrée pour recevoir les signaux d'un pad de batterie et d'une cymbale connectés
supplémentaires.
6. Sortie principale (TRS, 6,35 mm) : Connectez vos moniteurs, une console de mixage, etc. ici.
7. Entrées auxiliaires (TRS, 6,35 mm) : Connectez-vous à une source audio (console de
mixage, synthétiseur, échantillonneur, etc.).
8. Support pour module (non illustré; panneau inférieur) : Connectez le support pour
module fourni au panneau inférieur du CORE à l'aide des 2 vis fournies pour le fixer au
support. Utilisez uniquement les vis fournies.
Adjusting the Hi-Hat Pedal
To optimize performance for your particular hi-hat stand, run the hi-hat calibration
found in the Trigger Edit menu and tap the HH Setup button. Follow the on-screen
instructions to complete the calibration. To fine-tune the hi-hat performance, in the
Trigger Edit mode tap the HH trigger slot, then tap the Advanced tab. Adjust the
Pedal Bottom parameter until you are comfortable with the performance of the
open and closed hi-hat sounds.
If you are experiencing crosstalk (striking one drum will trigger another), from the
Kit mode go to the Trigger Edit menu, select the Zone (KD, SD, T1, etc.) that's
causing the crosstalk, and select Learn XTalk. Follow the on-screen instructions.
Once changes have been made, press Save. Repeat this process for any other
drums or cymbals you're experiencing crosstalk with.
Selecting a Kit
To enter Kit selection mode, (if the Kits menu is not shown), press the Kit button
to list the kits on-screen. Press the -/+ buttons, use the Touch Screen to scroll
up/down, or use the Main Encoder to view the list of kits. Tap the kit on the Touch
Screen or press the Main Encoder to select the kit.
Editing a Kit
To edit a Kit, from the Kit mode press the Kit Edit button. Touch a drum trigger slot
to select it for editing. Swipe up/down, use the -/+ buttons, or scroll with the Main
Encoder to assign the selected Instrument to that zone.
Removing Crosstalk Issues
1. Pantalla táctil: Esta pantalla multitáctil a todo color de 17,8 cm (7 pulg.) muestra información
relevante para el funcionamiento actual. Toque la pantalla (y utilice los controles de hardware)
para controlar la interfaz.
2. Perilla principal: Gire esta perilla para ajustar el nivel de las salidas principales.
3. Entrada auxiliar: Gire esta perilla para ajustar el nivel de la entrada auxiliar.
4. Auriculares: Gire esta perilla para ajustar el nivel de las salidas para auriculares.
5. Controles de transporte: Utilice estos controles para iniciar/detener la reproducción y
grabación.
6. Metrónomo: Pulse este botón para encender y apagar el metrónomo. Manténgalo pulsado
para abrir el menú del metrónomo.
7. Marcar tempo: Toque este botón para ingresar el tempo manualmente.
8. Codificador principal (con funcionalidad de botón): Gírelo para cambiar de batería, editar
parámetros en la pantalla, etc.
9. Botón de batería: Púlselo para alternar entre el modo de batería y el otro modo actualmente
activo (edición de batería, mezclador, pista de fondo, edición de disparadores y ajustes)
10. Subir/bajar selección: Pulse uno de estos botones para desplazar su selección hacia arriba
o abajo. La funcionalidad de estos botones depende en el modo actualmente activo.
11. Codificadores pequeños: Gírelos para ajustar los parámetros en los menús tales como
niveles de volumen, balance, etc.
12. Salida para auriculares (Panel frontal, 3,5 o 6,35 mm [1/8 o 1/4 pulg.], estéreo): Conecte
auriculares estéreo estándar en una de estas salidas.
Cómo ajustar el pedal del hi-hat
Para optimizar el funcionamiento de su soporte de hi-hat en particular, ejecute la calibración
de hi-hat desde el menú de edición de disparador y toque el botón HH Setup. Siga las
instrucciones de la pantalla para completar la calibración. Para realizar la sintonía fina del
hi-hat, desde el menú de edición de disparador, toque la ranura del disparador HH y luego
toque la pestaña de ajustes avanzados. Ajuste el parámetro Pedal Bottom hasta que se
sienta cómodo con los sonidos de hi-hat abierto y cerrado.
Si está experimentando interferencia (al golpear un tambor se dispara el sonido de otro),
desde el menú de baterías acceda al menú de edición de disparador, seleccione la zona que
está causando la interferencia (KD, SD, T1, etc.) y seleccione Learn XTalk. Siga las
instrucciones de la pantalla. Una vez realizados los cambios, pulse Save. Repita este proceso
para cualquier otro tambor o platillo que sufra interferencia.
Cómo seleccionar una batería
Para entrar al modo de selección de batería, si no está en pantalla el menú de baterías, pulse
el botón Kit para enumerar las baterías en la pantalla. Pulse los botones -/+, utilice la pantalla
táctil para desplazarse hacia arriba o hacia abajo o utilice el codificador principal para
visualizar la lista de baterías. Toque la batería deseada en la pantalla táctil o pulse el
codificador principal para seleccionarla.
Cómo editar una batería
Para editar una batería, desde el modo de batería, pulse el botón Kit Edit. Toque una ranura
de disparador de tambor para seleccionarla a fin de editarla. Deslice la pantalla hacia arriba
o hacia abajo, utilice los botones -/+ o desplácese con el codificador principal para asignar
el instrumento seleccionado a esa zona.
Como eliminar problemas de interferencia