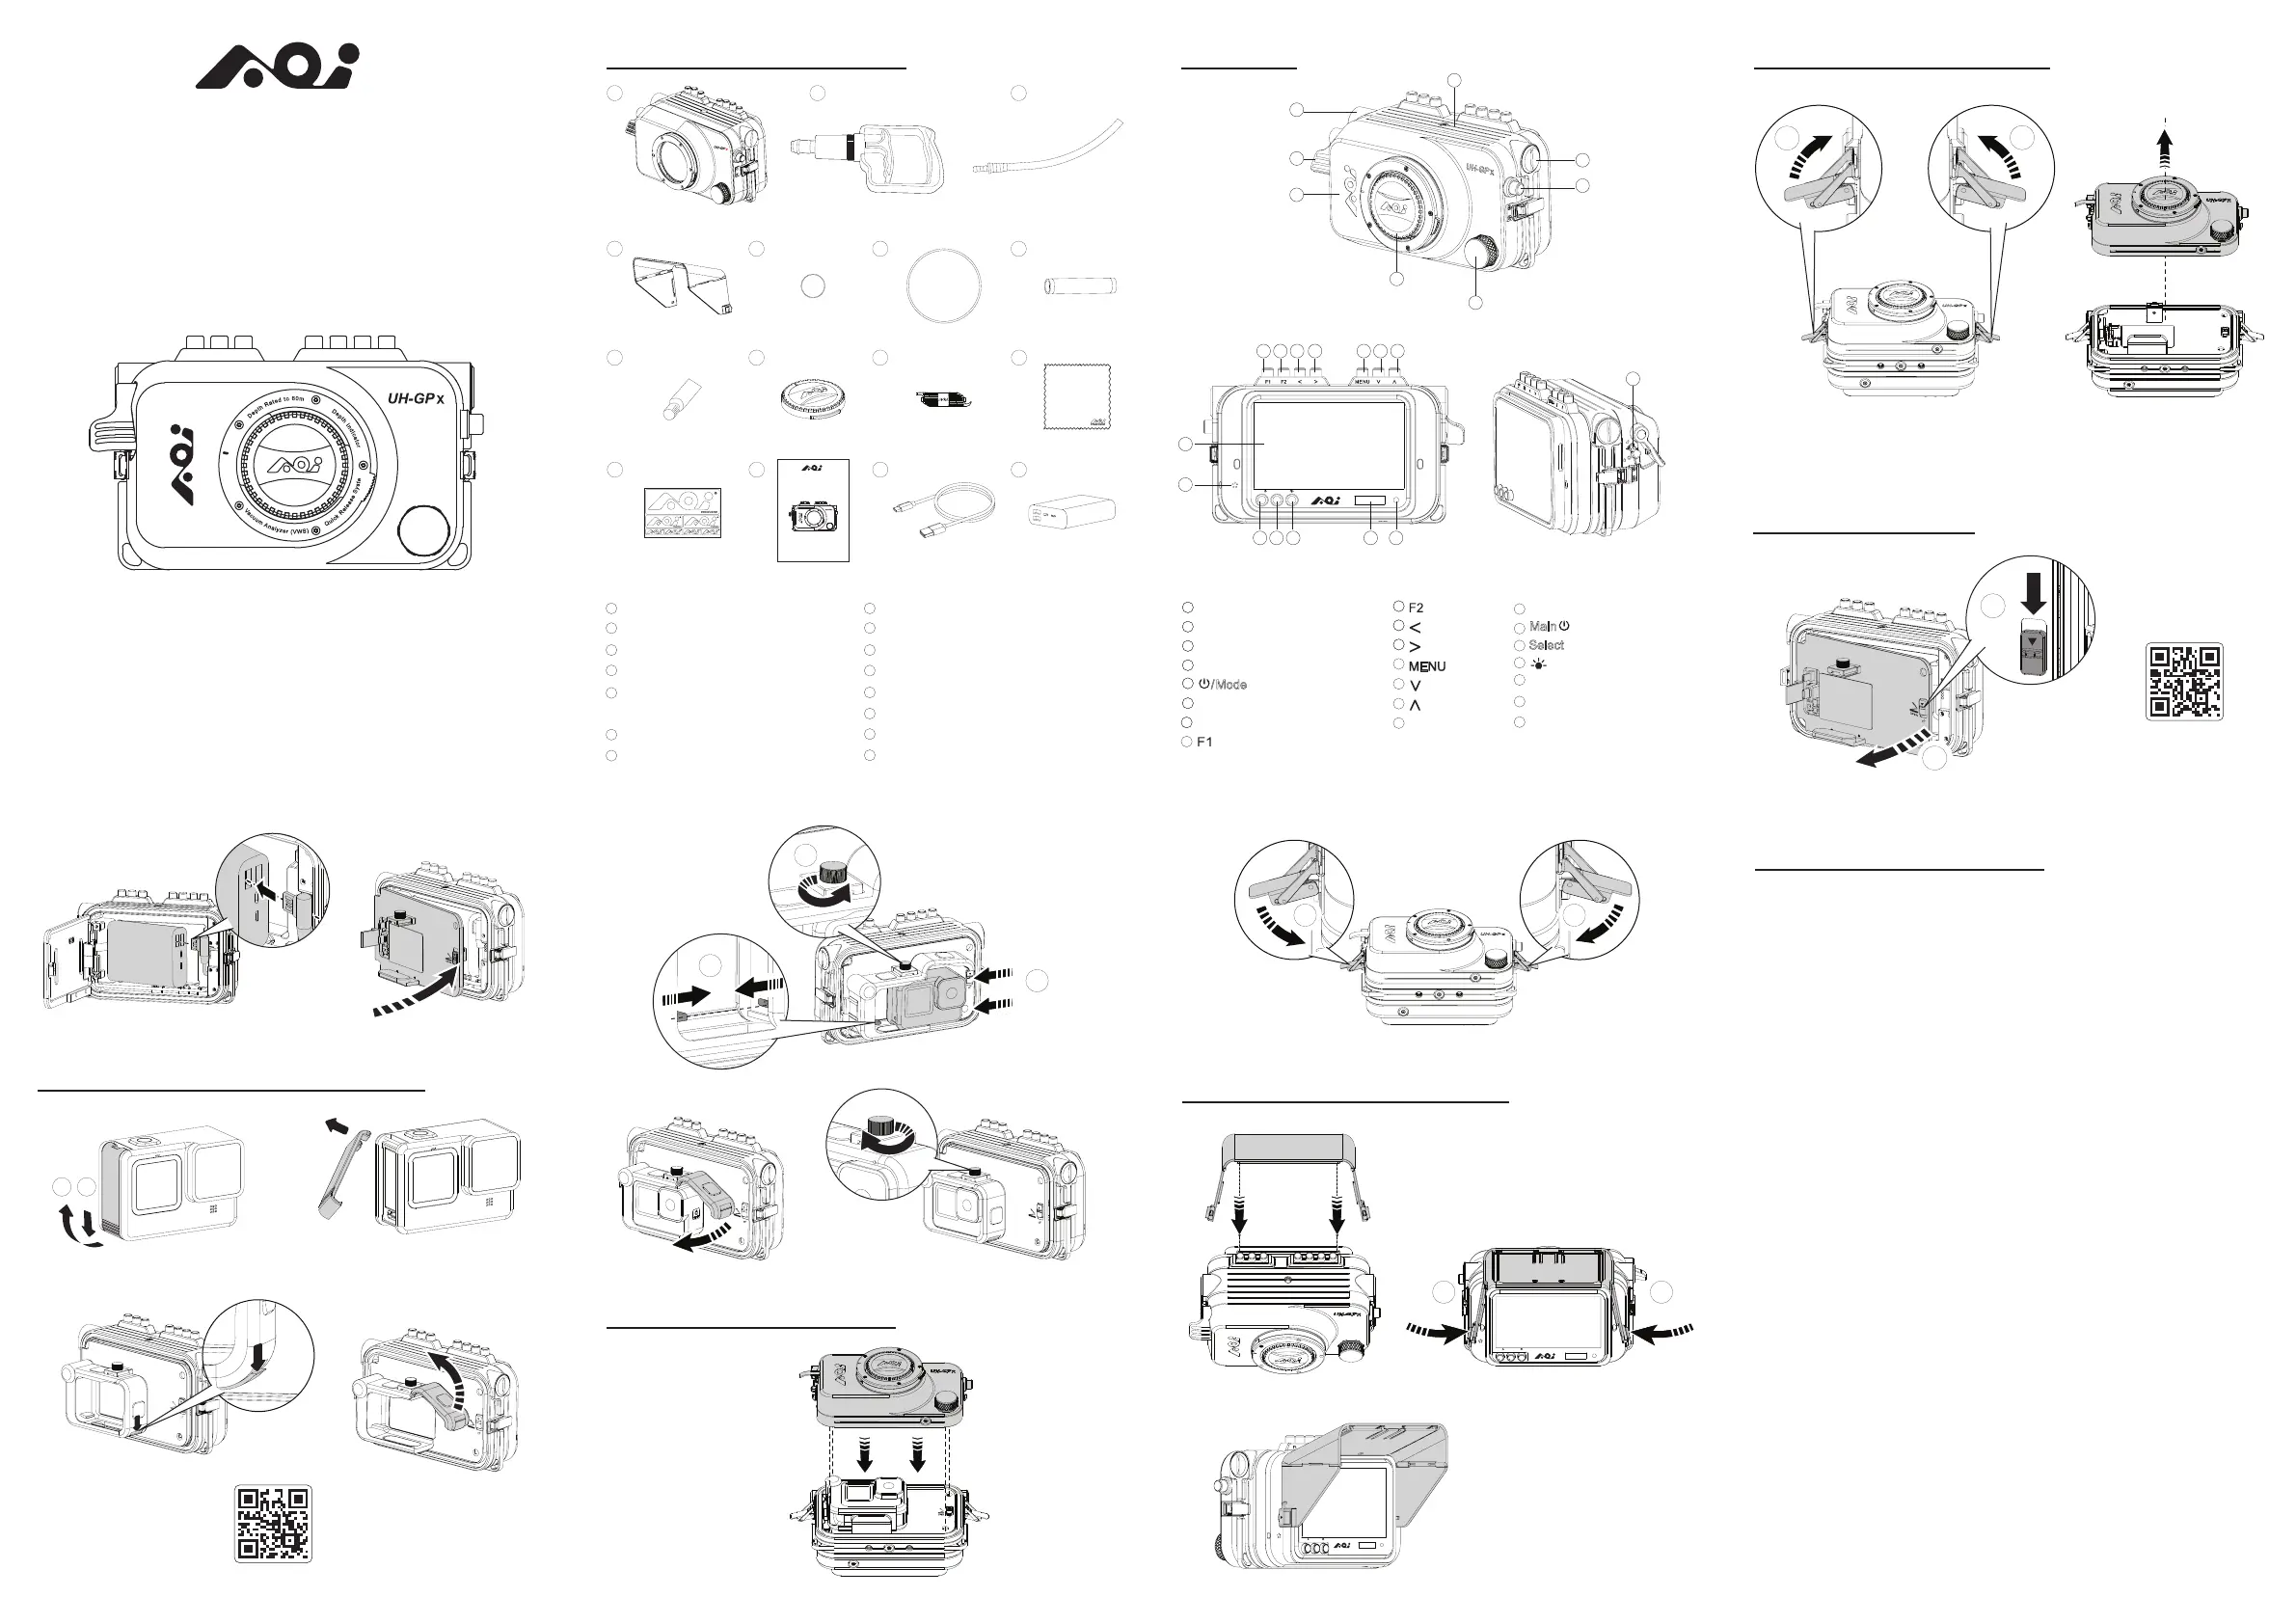
AOI UH-GPx Manual


Læs gratis den danske manual til AOI UH-GPx (2 sider) i kategorien Ikke kategoriseret. Denne vejledning er vurderet som hjælpsom af 5 personer og har en gennemsnitlig bedømmelse på 4.2 stjerner ud af 3 anmeldelser. Har du et spørgsmål om AOI UH-GPx, eller vil du spørge andre brugere om produktet?

Side 1/2
Depth Sensor
Main Power Button
Button
Brightness Control Button
Status Dispay
Power / Alert Indicator
Security Lock for Shutter
Release Lever
GENERAL GUIDE
AOI UH-GPx UNDERWATER HOUSING
Thank you for your purchase of an AOI product. Please read this general guide prior to
using the housing. It will provide an overview of how this product can be used for optimal
performance. For additional information, please consult your local dealer or write to
info@aoi-uw.com
9
3
4 5
10
2
6
1
12 13 14 15
7
11
8
Items Included in the Package
AOI UH-GPx Housing
Vacuum Pump (AOI VP-02)
Vacuum Pump Extension Hose
Camera Display Shade (AOI LCDH-02)
Spare O-Ring for Vacuum Valve
Protection Cap x 1pc.
Spare Main Seal O-Ring x 1pc.
Moisture Muncher Capsules
TM
x 1pc.
1
2
3
4
5
6
8
7
Silicone Grease (AOI SIGR-5)
Lens Port Front Cap
O-ring Remover (AOI ORR-02)
Micro-Fiber Cleaning Cloth (AOI MC-01)
AOI Logo Sticker
General Guide
USB Type-C Charging Cable
Power Bank
11
10
12
13
14
15
9
Parts Name
Installing Power Bank
8 9
10
11 12
16
17 18 19 20 21
22
15
13 14
1
2
3
5
6
- 2 - - 3 - - 4 -
- 5 - - 6 - - 7 - - 8 -
- 1 -
(ii)
(xi) (xii)
(xv) (xvi)
(iv) (v)
(xvii)
Opening UH-GPx Front Cover
Closing UH-GPx Front Cover
GENERAL GUIDE
AOI UH-GPx UNDERWATER HOUSING
Thank you for your purchase of an AOI product. Please read this general guide prior to
using the housing. It will provide an overview of how this product can be used for optimal
performance. For additional information, please consult your local dealer or write to
info@aoi-uw.com
- 1 -
2 1
Installing Camera Display Shade
4
4
Shutter Release Lever for Camera
Front Cover
Housing Body
Handle Extension Port Cap
Button for Camera
Vacuum Valve
Lens Port Front Cap
Button
Button
Left Button
Right Button
Button
Down Button
Up Button
Camera Display
14
1
2
3
4
5
6
7
11
8
9
10
13
12
15
16
17
18
19
20
21
22
Installing GoPro Camera to Media Mod
(vi) (vii)
(viii)
(x)
(ix)
How to maintain the housing
Wipe the housing dry and keep water away prior to opening the housing. Do not
allow water to be in contact with the interior of the housing. This will cause
irreparable damage to the Vacuum Analyzation and Wet Detection System (VWS)
and other electronic/electrical components!
When not using the housing, remove the Power Bank.
Do Not flush the holes of the Depth Sensor with High-Pressure water.
a.
a.
b.
c.
b.
c.
d.
e.
f.
g.
h.
Rinse the housing exterior thoroughly with running fresh water after every use.
Depress buttons and rotate knobs/dials repeatedly in fresh water to eliminate trapped
salt water or debris. Dry the housing and Lens Port with a soft, clean cloth to avoid
water spotting and damage.
To clean the Lens Port Glass, use a mild soap solution or lens cleaner. Do not rinse
the inside of port glass. Do not use alcohol or window cleaner on the Lens Port Glass.
In order to better inspect, position, clean or lubricate the Housing Main Seal O-ring,
carefully remove the required O-ring by using the provided AOI O-Ring Remover.
Clean the Main Seal O-ring and its O-ring groove by using a microfiber cloth only. Use
AOI O-Ring Remover to clean the O-Ring groove. Do not use cleaning substances
other than fresh water. Remove sand, dirt, hair or fibers that can prevent a proper
housing seal.
To lubricate O-rings, apply a small amount of silicone grease (AOI SIGR-5) on your
fingertips, gently pull the O-ring through the fingertips. This will lightly coat the entire
O-ring with silicone grease. Only use the AOI Silicone Grease supplied or those
approved by AOI. Using other brands of silicone grease may damage the O-ring. Do
not over stretch the O-ring.
Do not leave the camera and housing in direct sunlight for prolonged periods. Heat
may damage the camera and housing.
Dry well and remove the camera prior to travel and storage.
Store the housing in a cool and dry place.
IMPORTANT:
7
Main Select
DEPTH
SENSOR
Main
Select
(i)
(iii)
3
2
Main Select
(xiii)
(xiv)
USB
USB
2
1
1
1
USB
1
Mode/
1 1
Main Select
DEPTH
SENSOR
1 1
Video of Installing Power Bank
Video of Installing GoPro Camera to Media Mod
CAMERA DISPLAY
TURN OFF
- 09 - - 10 - - 11 -
Status Display Brightness Control
& Camera Display On/Off
AOI is a registered trademark of AOI Ltd. All rights reserved.
www.aoi-uw.com
6E011520-00001
GoPro is a trademarks for GoPro
Made in China
STATUS DISPLAY
HIGH BRIGHTNESS
Water leaking
has been detected
Release Vacuum Valve or Air
Leaking Extensively
Over Warning Depth
Exceed Warning Depth
Current Depth Blinking
Below Warning Depth
Ready for diving without
Vacuum Analysis
Press Select Button
to Change the
Warning Depth from
5M to 60M with
5M/step. Press and
Hold the Select
Button will continue
to increase the
Warning Depth in
cycle
Open Front Cover for
Sealing Check
Open Front
Cover for
Sealing
Check
Vacuum Analysis
FAILED
Press Select Button to go
to Depth Gauge Screen
Vacuum Analysis
PASSED
System Stabilize Internal
Pressure for 10 seconds
Required to Release Some
Air through the Vacuum Valve
Open Front Cover for
Seal Rings Checking
STATUS DISPLAY
MEDIUM BRIGHTNESS
Proceed
Vacuuming
UNDER
Vacuuming
Vacuuming
Vacuuming
Vacuuming
OVER
Vacuuming
Reach
Desired
Pressure
Vacuum
Analysis
3 minutes Analysis
3 Seconds
2 Seconds
3 minutes Analysis
STATUS DISPLAY
LOW BRIGHTNESS
STATUS DISPLAY
TURN-OFF
Ready for diving
VWS ! Blinking
Status Display Operation Flow Chart
Power-on the
Housing again
Open the Front Cover and
Check for housing sealing
and clean the water inside
of the housing
Close the Front Cover
Power-off the housing
Safely dive up to
water surface
Press & hold Main Button for more than 1
second to Power Off the system
Press & hold Main Button for more
than 1 second to Power On the system
Press Main
Button to set
Warning Depth
Press Main Button
to confirm setting
and exit to Vacuum
Analysis screen
Press Main Button
to confirm setting
and exit to Vacuum
Analysis screen
Short Press Button
Short Press Button
Short Press Button
Short Press Button
Press and Hold
Button for
more than
2 seconds
Specifications
Power Off
Press Select Button to skip
from Vacuum Analysis Process
to Depth Gauge Display
Current Water Depth has Reached to the Pre-set Warning Depth
(
Current Depth Blinking
)
Internal Pressure is Lower than Desired Pressure
and Required to Release Some Air through the Vacuum Valve
Wet Sensor has Detected Water Droplets and / or Heavy Moisture
inside the Housing
a) Vacuum Analysation and Wet Detection System is working OK
b) Display Current Water Depth
Perform Vacuuming
Internal Pressure Reach Desired Pressure
and Stop Vacuuming
Stablizing Internal Pressure for 10 seconds
Vacuum Analysis in Progress with Count-down Clock
PASSED in the Vacuum Analyzation Process
FAILED in the Vacuum Analyzation Process
Vacuum Analysation is skipped and Wet Detection System
is still in working
Pre-set the Warning Depth
a) Main has been Turned-on.
b) Greeting Front Page
Status Display Description
The Housing is Severely Leaking or its Vacuum has been Released
(VWS ! in Blinking)
Internal Pressure is Higher than Desired Pressure
and Required to continue vacuuming
STATUS DISPLAY DESCRIPTION
Power Off and On Again will go into this screen directly
until you open the cover,and then you can perform
Vacuum Analysis again.
CAMERA DISPLAY
TURN ON
MODEL NO.
DESCRIPTION
COMPATIBILITY
DEPTH RATING
BODY MAIN MATERIAL
MAIN BODY COLOR
LENS PORT MOUNT
& FILTER SLOT
LENS PORT GLASS
WATER LEAKAGE
PROTECTION
BUILT-IN
WATER DEPTH MONITOR
MAIN BODY WEIGHT
(INCL.: HOUSING BODY, POWER BANK,
MEDIA MOD, CAMERA, CAMERA BATT.)
On Land: Approx. 1,877 g
Underwater : Approx. 546 g
Focus Peaking Assist
Digital Zoom (4x, 9x, 16x) Assist
RGB Histogram, Waveform, Vector Scope
& Monochrome …etc. Functions
POWER SUPPLY
( FOR GOPRO CAMERA, DISPLAY MONITOR,
DEPTH MONITOR & VWS)
Operation Time: 2 Hours 30 minutes
AOI UH-GPx
Underwater Housing for GoPro HERO Cameras
GoPro HERO12, 11, 10 and 9
60 Meters
BUILT-IN
DISPLAY MONITOR
MAIN BODY DIMENSIONS
Removable Power Bank (22.5W, 10,000mAh)
5" Full HD (1920x1080 pixels) 16:9 Display Monitor
Viewing Angle 80° / 80° (L/R & U/D)
High Brightness 400 cd/m
2
and Contrast 1000:1
Silicone Grease x 1pc.
USB Type-C Charging Cable
Vacuum Hand Pump x 1pc.
Marine Grade Aluminum Alloy
Two Custom-setting Buttons (F1 & F2)
AOI Quick Release System (QRS) - QR2 Mount
with Color Filter Slot
Built-in Vacuum Analyzation & Water Detection System (VWS)
Multi-layers AR and Hydrophobic Coating
Max. Monitoring Depth up to 60 Meters
with Preset D
epth Alarm Function
Anodize Flat Black
Detachable & Foldable Monitor Hood x 1pc.
Removable Power Bank (22.5W, 10,000mAh) x 1pc.
Spare O-ring for Vacuum Valve Protection Cap x 1pc.
Spare Main Seal O-ring x 1pc.
Hardcoat Type III Anodizing
SURFACE FINISHING
STANDARD ACCESSORIES
Moisture Muncher Capsules
TM
x 1pc.
W
H
D
192mm(W) x 114mm(H) x 106mm(D)
Setting up Camera Display
Button
Function when menu is
not displayed
F1 Custom button
F2 Custom button
/
/
Display Main menu
/
/
/
/
Select previous menu item
Select next menu item
Exit current menu
Function when menu is displayed
Decrease or adjust value of
selected parameter
Increase or adjust value of
selected parameter
Up
Down
Left
Right
1
#
1
#
1
#
1
#
1
#


Produkt Specifikationer

Mærke: AOI
Kategori: Ikke kategoriseret
Model: UH-GPx

Har du brug for hjælp?

Hvis du har brug for hjælp til AOI UH-GPx stil et spørgsmål nedenfor, og andre brugere vil svare dig


Ikke kategoriseret AOI Manualer

AOI

AOI UH-GPx Manual

1 Oktober 2025

Ikke kategoriseret Manualer

Nyeste Ikke kategoriseret Manualer