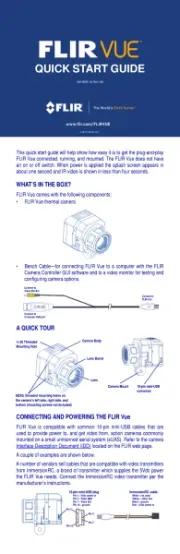
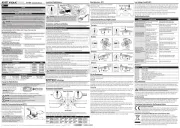
Archos PicoDrone Manual

Archos Drone PicoDrone

Læs gratis den danske manual til Archos PicoDrone (168 sider) i kategorien Drone. Denne vejledning er vurderet som hjælpsom af 14 personer og har en gennemsnitlig bedømmelse på 3.6 stjerner ud af 7.5 anmeldelser. Har du et spørgsmål om Archos PicoDrone, eller vil du spørge andre brugere om produktet?

Side 1/168
Quick Start Guide
Safety Notice for Drone Battery
Please read the user handbook carefully and then keep it in a safe place
for future reference and maintenance.
- Only use the provided charger.
- When you install the battery, you must follow the electrode
instructions. It is not allowed to reverse the batteries, which can cause
short circuits.
- Non-rechargeable battery can’t be used, and the rechargeable battery
can only be charged under adult supervision.
- Different types of batteries (new and old) can’t be mixed
- Please contact your environmental government bureau to know how to
dispose and recycle Lipo batteries
- Please don’t overcharge the battery or leave the battery charging
alone.
- Don’t throw the battery into fire or put it in a high temperature
location, this may cause battery explosion
- The charger and battery are not toys.
- This product contains electronic components. Under water immersion
and humid environments are forbidden.
- Use dry cloth to wipe the surface
- Check the product regularly to see if there is any damage to the
components, if so please stop using until it has been repaired.
Do not put the battery in high temperature place, such as in the fire or
on a heating device to avoid damage or explosion.
Do not slam the battery on a hard surface.
Do not put the battery in water and keep it in dry place.
Do not open the battery.
Do not leave the battery without supervision when charging.
Make sure that there is no short circuit of the power wire.
Please use the recommended charger only.
Check the charger’s wire, plug, surface regularly. Do not
use any broken charger.
If you do not fly the drone at least once a week, maintain the
drone battery with about 50% power to keep its performance.
Charging Instructions for the Drone Battery
1. Connect the drone battery with USB cable first then
choose one of the methods as on the picture below
to connect with USB plug.
2. The red USB indicator light is on when charging and
the light turns green when fully charged( The switch
must be powered off when charging).
* For faster charging, it is recommended to use an
adapter with 5V 2A output current (not included) to
charge the battery
Phone charger
Power bank
Computer
charging
Car charger
Li-Po Battery Disposal & Recycling
Wasted Lithium-Polymer batteries must not be placed with
household trash. Please contact local environmental or waste
agency or the supplier of your model or your nearest Li-Po
battery recycling center.
Check List Before Your Flight
1. Make sure the drone’s battery and transmitter’s
battery are fully charged.
2. Make sure the left lever of the transmitter is in the
middle position.
3. Please strictly follow the instructions to turn on and
turn off before operation. Turn on the transmitter
power first and then turn on the drone power before
flying; turn off the drone power first and then turn off
the transmitter power when you are finishing flying.
Improper turn on and turn off order may cause the
drone to lose control and threaten people’s safety.
Please make sure you correctly turn on and turn off.
4. Make sure the connection is strong between battery
and motor etc. The ongoing vibration may cause bad
connection of power terminal and make the drone
lose control.
5. Improper use may cause drone to crash, which may
lead to motor defects and noise, and then affect the
flying status or even stop flying. Please go to the
local distributor to buy new replacement parts in
case of damage.
Instructions for Drone and Transmitter
Drone
Propeller
Guard
Front Camera Propeller Guard
Drone Cover
Housing
Propeller
Guard
Propeller Guard
Switch Rear
ON/OFF
Left Right
Front LED (Green)
Propeller B
Propeller B
Propeller A
Propeller A
Drone Bottom
Housing
Rear LED (Red)
Installing the batteries:
Open the battery cover on the back side of the
transmitter and put 3 alkaline batteries (AAA, not
included) into the box in accordance with electrode
instructions, as picture shown.
Pre-ight Operation Instructions
Frequency Pairing
1. Turn on the transmitter switch (Picture 1) and the
power indicator light flashes rapidly. Push the Left
lever all the way down to the lowest position and
then release. The Left lever moves back to the middle
position automatically. (Picture 2 / 3) The power
indicator light flashes slowly, indicating the transmitter
is ready for frequency pairing.
Battery cover
3X1.5V
Alkaline Batteries
Notice:
1. Make sure the electrodes match.
2. Do not mix new with old batteries.
3. Do not mix dierent kinds of batteries.
4. Do not charge non rechargeable batteries.
Picture 1 Picture 3
Picture 2
2. Turn on the drone. (Picture 4)
3. Put the drone on a flat surface, the drone body lights
turn from flashing to solid bright, which indicates
successful frequency pairing.
Important Notice: Please make sure the drone is placed
on the horizontal position after powering on the drone,
so that the drone can work well.
Checklist before Flight
1. The camera is in front of the drone. Keep the drone
front away from you.
2. Power on the drone and check the direction of
the rotating propellers. The left front and right rear A
propellers rotating clockwise while the right front and
left rear B propellers rotating counterclockwise.
3. Move the Left Stick and Right Stick at the same
time as Picture 5 shown(45 degree inward) to start
the motors and repeat previous step again to lock the
motors.
Picture 4
4. After starting the motors, push up the left lever to
fly the drone slowly, and then pull down the left lever to
the lowest position slowly, then the drone lands on the
ground.
5. It’s recommended to repeat above Steps 4 to
practice.
6. Adjust relative transmitter Trimmer button to adjust
the rudder if the drone tilts to one side when flying.
Picture 5
Calibration Instructions
Please follow below steps to calibrate the drone if the
drone becomes imbalanced after crashing during the
flight, and can not be adjusted by trimmer button and
causes flight difficulties.
1. Turn off the drone, then turn off the transmitter
switch.
2. Turn on the transmitter switch, push the left lever all
the way down to the lowest position (Picture 6) and
then release. The left lever goes back to the middle
position automatically (Picture 7). The transmitter is
ready for frequency pairing mode.
Picture 6 Picture 7
3. Turn on the drone and put it on a flat surface in a
horizontal position. The drone’s body lights change
from flashing to solid bright, which indicates
successful frequency pairing.
4. Do not move the left lever before successful
calibration. Push the right lever
as Picture 8 shown and then
release. The drone’s body lights
flash, which indicates that
the drone is calibrating. When
the drone’s body lights become solid, the calibration
is complete.
Notice: If the drone crashes, the gyroscope can be
affected causing flight issues. If so, turn the power
off and on again to calibrate.
Flying Control
Notice: Every time before the drone takes off, move the
left lever and right lever at the same time as shown on
Picture 5(inward 45 degree) to start the motors. Push
up the left lever slowly to fly the drone or press down
the one button take off .
Picture8
=
Push the lever up, the
drone goes forward.
Pull the lever down, the
drone goes backward.
Turn the lever to the left,
the drone turns to left
Turn the lever to the right,
the drone turns to right
Right Stick
Forward and backward trimmer
During take o, if the drone tilts forward,
press down the left lever in the center,
and push the right lever backwards.
Otherwise push forwards.
Left and right turning trimmer
During take o, if the drone head rotates
to left, then press down the left lever in
the center and push left lever to right.
Otherwise push left.
Left and right side ying trimmer
During take o, if the drone tilts to left,
then press down the left lever in the
center and push the right lever to right
side. Otherwise push left.
Functions Introduction
Two Take Off Methods
1. Method 1 (Take off) : After successful frequency
pairing, move the Left and Right levers at the same
time as shown Picture 5 (inward 45 degree) to start
the motors. Push up the Left lever to fly the drone to
a certain altitude and then release the lever.
2. Method 2 (One Button Take Off): Press the Take Off
/ Landing / Emergency Stop Button (Picture 9) , the
drone flies up automatically and keep flying at an
altitude of approximately 1.2 meters.
Landing Methods
1. Method 1 (Landing): Push the Left lever all the way
down to the lowest position(Picture 2/6) and hold
it till the motors stop and the drone will land on the
ground.
2. Method 2 (One Button Landing): Press the Take
Off / Landing / Emergency Stop Button once
shortly(picture 9), and the drone will land on the
ground automatically.
(When using this function, you can not touch the left
lever, if not, then the function will fail)
Picture 9
Take o/Landing/Emergency stop button
High / Medium/Low Speed Mode Switch
1. Low Speed Mode (Mode 1) is suitable for beginners.
2. Medium Speed Mode (Mode 2) is suitable for skillful
pilots to play in the gentle breeze.
3. High Speed Mode (Mode 3) is suitable for experts to
experience aerial stunts outdoors.
Heading Hold Mode
* Drones generally have a front and rear indicated by
LED lights or colored propellers. By default, users are
required to tell the front and the rear of the drone when
flying. Under heading hold mode, users can operate the
drone without worrying about the orientation (left is left
and right is right all the time, regardless of where your
drone is pointing at).
Heading Hold Mode is designed for beginners and users
who fly the drone in daylight or at a far distance.
When the drone is in heading hold mode, push the Right
lever forward / backward / left / right, and the drone will
fly forward / backward / left / right accordingly.
High/Medium/Low
Speed Mode Switch
Propeller guards installation and
disassembly diagram
When disassembling, remove one side of the guard from
the buckle, and then pull out ( Picture 14).
When installing, aim the groove of the motor housing
buckle and then press down (Picture 15).
Picture 14 Picture 15
Description du Drone et de la
télécommande
Drone
Protection
d’hélice
Avant
Protection d’hélice
Couvercle
supérieur
Protection
d”hélice
Protection d’hélice
ON/OFF
Gauche Droite
Lampe avant (vert)
Hélice B
Hélice B
Hélice A
Hélice A
Couvercle
inférieur
Lampe arrière (rouge)


Produkt Specifikationer

Mærke: Archos
Kategori: Drone
Model: PicoDrone
Bredde: 66 mm
Dybde: 66 mm
Højde: 38 mm
Vægt: 23.2 g
Brugervejledning: Ja
Produktfarve: Black, Green
Opladningstid: 40 min.
Batterispænding: 3.7 V
Batterikapacitet: 200 mAh
Wi-Fi: Ja
Understøttede videotilstande: 480p
Wi-Fi-standarder: 802.11b, 802.11g
Frekvensbånd: 2.4 GHz
Maksimal videoopløsning: 640 x 480 pixel
Videoopløsninger: 640 x 480 pixel
Gyroskop: Ja
Accelerometer: Ja
Oplader: Ja
Maksimal driftstilstand: 15 m
Maksimal hastighed: 4.3 m/s
Maksimal vægtkapacitet: - kg
Nem at bruge: Ja
Transmitter vægt: 64 g
Transmitter bredde: 108 mm
Transmitter dybde: 68 mm
Transmitter højde: 34.7 mm
Antal rotorer: 4 rotorer
Antal gyroskop akser: 6
Sender: Ja
Maksimal flyvetid: 8 min.
Bevægelseskontrolfunktioner: Backward, Downward, Flying sideways, Forward, Turn left, Turn right, Upward

Har du brug for hjælp?

Hvis du har brug for hjælp til Archos PicoDrone stil et spørgsmål nedenfor, og andre brugere vil svare dig