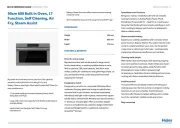
Atag CSX4692D Manual
Læs gratis den danske manual til Atag CSX4692D (192 sider) i kategorien Ovn. Denne vejledning er vurderet som hjælpsom af 5 personer og har en gennemsnitlig bedømmelse på 4.9 stjerner ud af 3 anmeldelser.
Har du et spørgsmål om Atag CSX4692D, eller vil du spørge andre brugere om produktet?

Produkt Specifikationer
| Mærke: | Atag |
| Kategori: | Ovn |
| Model: | CSX4692D |
| Afrimningsfunktion: | Ja |
| Bredde: | - mm |
| Dybde: | - mm |
| Højde: | 450 mm |
| Produktfarve: | Black,Grey,Stainless steel |
| Kontroltype: | Sensor |
| Indbygget skærm: | Ja |
| Skærmtype: | TFT |
| Skærm diagonal: | 6 " |
| Placering af apparat: | Indbygget |
| Mikrobølgeeffekt: | 1000 W |
| Integreret ur: | Ja |
| Urtype: | Elektronisk |
| Installationsrum bredde: | 568 mm |
| Installationsrum dybde: | 550 mm |
| Installationsrum højde: | 450 mm |
| Antal madlavningsprogrammer: | 143 |
| Grill: | Ja |
| Damp madlavning: | Ja |
| Rotisserie: | Ja |
| Børnesikring: | Ja |
| Selvrensende: | Ja |
| Kontrolposition: | Front / Top front |
| Nem at rengøre: | Ja |
| Timer type: | Digital |
| Rengøringstype: | Damp |
| Varmebeskyttende dør: | Ja |
| Ovn - størrelse: | Medium |
| Ovntype: | Elektrisk ovn |
| Samlet indvendig ovn kapacitet: | - L |
| Strøm for samtlige ovne: | 3000 W |
| Antal ovne: | 1 |
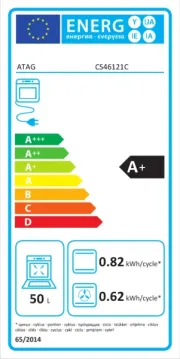
| Ovn nettokapacitet: | 50 L |
| Ovn termostatinterval: | 30 - 230 °C |
| Holde varm funktion: | Ja |
| Energiforbrug (konventionel): | - kWh |
| Energiforbrug (tvungen konvektion): | - kWh |
| Hurtig varme: | Ja |
| Dør med blød lukning: | Ja |
| Udtrækkelige drejeknapper: | Ingen |
| Bageplade: | Ja |
| Grillrist inkluderet: | Ja |
| Opvarmning i både top og bund: | Ja |
| Mikroovn madlavning: | Ja |
| Grill med fuld overflade: | Ja |
| Antal bageplader: | 1 |
| Brødfremstilling kapacitet: | Ja |
| Installationsrum bredde (min.): | 560 mm |
| Bund opvarmning: | Ja |
| Varmluft grill: | Ja |
| Ovnfast fad i glas inkluderet: | Ja |
| Top opvarmning: | Ja |
| Fuld overflade grill + varmluft (enkelt tilstand): | Ja |
| Stegetermometer: | Ja |
| Stegetermometer type: | Ledningsført |
| Antal damp madlavningsbeholdere: | 1 |
| Damp madlavningsbeholdertyper inkluderet: | Perforeret dampkoge beholder |
Har du brug for hjælp?
Hvis du har brug for hjælp til Atag CSX4692D stil et spørgsmål nedenfor, og andre brugere vil svare dig
Ovn Atag Manualer


Ovn Manualer
- Hoover
- Ferrari
- Flama
- Samsung
- Inventum
- Fotile
- Thetford
- Orava
- Bush
- Rosieres
- Companion
- Backyard Pro
- Tiger
- Danby
- Beautiful
Nyeste Ovn Manualer