1
Replacing an oven light bulb
9 WARNING
Risk of electri
Risk of electri
Risk of electri
Risk of electriRisk of electric shock!
c shock!
c shock!
c shock!c shock!
Light socket is live when door is open if main power
supply is not turned off.
Turn off main power supply at the service panel
before changing the light bulbs.
9 WARNING
Risk of injury!
Risk of injury!
Risk of injury!
Risk of injury!Risk of injury!
Make sure the appliance and lights are cool and
power to the appliance has been turned off before
replacing the light bulb(s). Failure to do so could
result in electrical shock or burns.
The lenses must be in place when using the
appliance.
The lenses serve to protect the light bulb from
breaking.
The lenses are made of glass. Handle carefully to
avoid breaking. Broken glass can cause an injury.
Light bulb specifications
Refer to this chart for information on the light bulb you
must to use for your oven model.
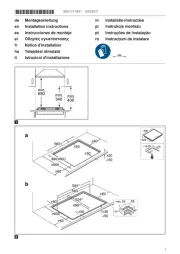
Replacing a G9 base oven light
1.
Turn off the power to the oven at the main power
supply (fuse or breaker box).
2.
Remove the oven racks.
3.
Slide the tip of a flat blade screw driver between the
holder clip and the lamp housing.
4.
Support the glass lens cover with fingers along the
bottom edge to prevent the cover from falling to the
bottom of the oven. Gently twist the flat blade screw
driver to loosen the glass lens cover .
5.
Remove the glass lens cover.
6.
Remove the bulb by grasping and sliding the bulb
straight back until the two prongs have cleared the
ceramic holder .
7.
DO NOT
DO NOT
DO NOT
DO NOTDO NOT touch the glass of the new replacement bulb
with your fingers. It may cause the bulb to fail when it
first lights. Grasp the replacement bulb with a clean
dry cloth. Locate the two prongs in the ceramic holder,
gently poking until the two prongs locate in the
ceramic socket .
8.
Press in to seat the bulb.
9.
Slide the protective lens into the holder clip and push
the other end until the fixing clip snaps back into the
housing .
10.
Turn on the circuit breaker.
Bulb description Bulb image
25 Watt, 25WPRE14,
incandescent bulb,
European base, 120 volts
40 Watt, incandescent
bulb, Edison base, 120
volts
25 Watt, halogen bulb, G9
base, 120 volts