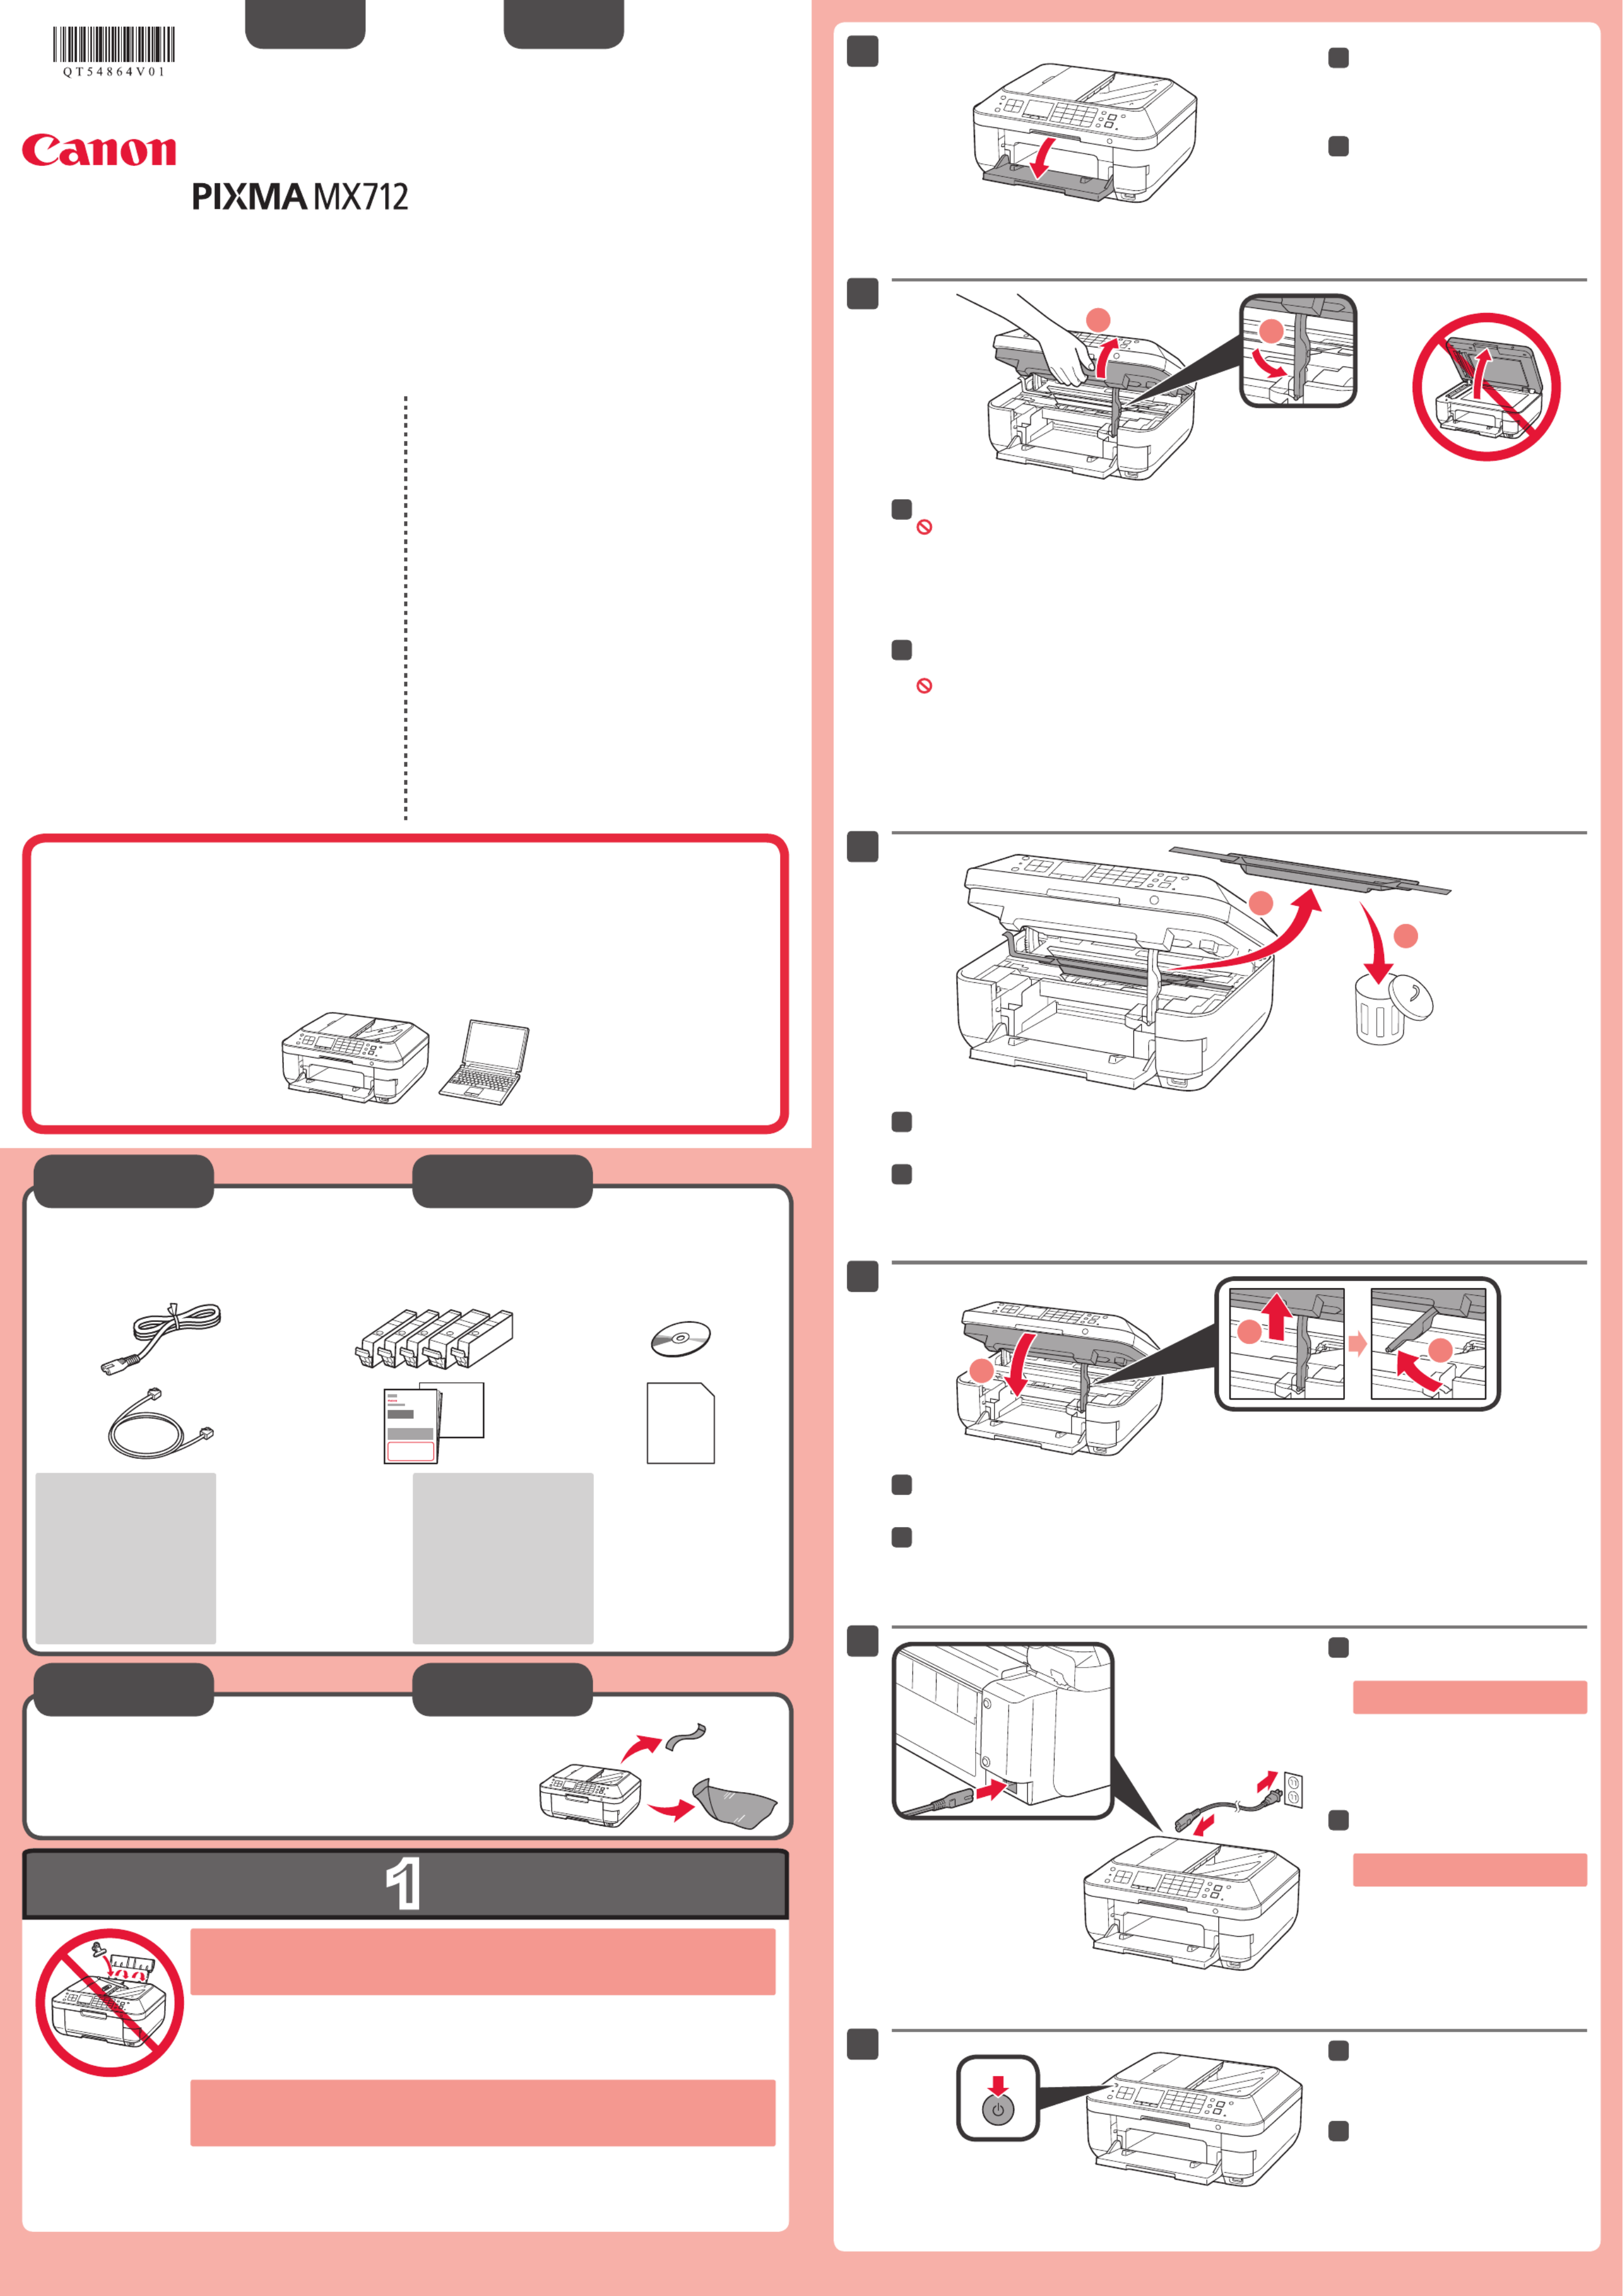
Canon Pixma MX712 Manual

Canon Printer Pixma MX712

Læs gratis den danske manual til Canon Pixma MX712 (4 sider) i kategorien Printer. Denne vejledning er vurderet som hjælpsom af 27 personer og har en gennemsnitlig bedømmelse på 3.5 stjerner ud af 14 anmeldelser. Har du et spørgsmål om Canon Pixma MX712, eller vil du spørge andre brugere om produktet?

Side 1/4
1
XXXXXXXX ©CANON INC.2012
5
1
3
4
2
1
2
6
1
2
1
2
3
series
Retire las hojas protectoras (protective sheets) y la cinta (tape).
Compruebe que se le han suministrado los siguientes elementos.
Conexión de red: prepare
el cable Ethernet o los
dispositivos de red, como el
router o el punto de acceso,
según convenga.
Conexión USB: es
necesario un cable USB
(no suministrado).
Evite que caigan objetos dentro del equipo. Podrían provocar fallos en el funcionamiento.
La bandeja de salida del papel (Paper Output Tray) se abre automáticamente al comenzar la
impresión. Mantenga la parte frontal de la bandeja libre de obstáculos.
No conecte aún el cable USB
o Ethernet.
Conecte el cable de alimentación.
5
Pulse el botón ACTIVADO (ON).
6
Abra la bandeja de salida del papel
(Paper Output Tray).
1
Retire las hojas y la cinta naranja (orange tape) y el material de protección (protective material).
3
Cierre la cubierta/unidad de escaneado (Scanning Unit / Cover).
4
Preparativos
Elementos
suministrados
Levante la cubierta/unidad de escaneado (Scanning Unit / Cover), y sujétela con el soporte de la
unidad de escaneado (Scanning Unit Support).
¡La cubierta de documentos (Document Cover) debe estar cerrada para levantar la cubierta/unidad de escaneado
(Scanning Unit / Cover)!
2
¡Léame en primer lugar!
Consérvelo a mano para utilizarlo
como referencia en el futuro.
Windows es una marca comercial o una marca comercial registrada de Microsoft
Corporation en EE. UU. y/u otros países.
Windows Vista es una marca comercial o una marca comercial registrada de Microsoft
Corporation en EE. UU. y/u otros países.
Macintosh, Mac, Mac OS, AirPort y Bonjour son marcas registradas de Apple Inc.,
registradas en EE. UU. y otros países.
Número de modelo: K10376 (MX712)
Para llevar a cabo la instalación, coloque el equipo cerca del punto de acceso* y del
ordenador.
(* necesario para LAN inalámbrica)
Guía de inicio
ESPAÑOL
Equipo multifunción para ocina Canon Inkjet
Ayuda de Canon
Asistencia técnica por correo electrónico:
www.usa.canon.com/support
Asistencia técnica gratuita: 1-800-OK-CANON
Esta opción proporciona asistencia telefónica técnica personal,
sin cargo por servicio, de lunes a viernes (excepto festivos),
durante el periodo de garantía.
Se dispone de un dispositivo telefónico auxiliar para sordos (TDD)
en 1-866-251-3752.
Remove the protective sheets and tape.
Check the included items.
Network connection:
Prepare the Ethernet cable
or network devices such as a
router or an access point as
necessary.
USB connection: A USB
cable (not included) is
required.
Do not allow objects to fall inside the machine. These could cause malfunction.
The Paper Output Tray opens automatically as printing starts. Keep the front of the tray clear of any
obstacles.
Do not connect the USB or Ethernet
cable yet.
Connect the power cord.
5
Press the button.ON
6
Open the Paper Output Tray.
1
Remove the orange tape and protective material.
3
Close the Scanning Unit / Cover.
4
Lift the Scanning Unit / Cover, then x it with the Scanning Unit Support.
Document Cover must be closed to lift Scanning Unit / Cover!
2
Getting Started Read me rst!
Keep me handy for future reference.
Windows is a trademark or registered trademark of Microsoft Corporation in the U.S.
and/or other countries.
Windows Vista is a trademark or registered trademark of Microsoft Corporation in the
U.S. and/or other countries.
Macintosh, Mac, Mac OS, AirPort and Bonjour are trademarks of Apple Inc., registered
in the U.S. and other countries.
Model Number: K10376 (MX712)
To perform setup, place the machine near the access point* and computer.
(* Required for wireless LAN)
ENGLISH
Canon Inkjet Ofce All-In-One
Getting Help from Canon
Email Tech Support — www.usa.canon.com/support
Toll-Free Tech Support— 1-800-OK-CANON
This option provides live telephone technical support, free of
service charges, Monday-Friday (excluding holidays), during the
warranty period.
Telephone Device for the Deaf (TDD) support is available at
1-866-251-3752.
QT5-4864-V01 PRINTED IN XXXXXXXX
2
1
2
8
1
2
3
5
6
1
2
2
4
(B)(A)
1
2
7
1
2
1
2
BK:CLI-226BK 4546B001
M: CLI-226M 4548B001
C: CLI-226C 4547B001
PGBK: PGI-225PGBK 4530B001
Y: CLI-226Y 4549B001
Cuando aparezca esta pantalla,
pulse el botón .OK
8
Abra la cubierta/unidad de escaneado (Scanning Unit / Cover) como en - .
1
Gire y retire la tapa naranja.
(A) No presione los laterales si la ranura en forma de L está bloqueada.
(B) ¡No tocar!
3
Introduzca y empuje hacia abajo el depósito de tinta (ink tank) en la ranura del color correspondiente.
Compruebe que la lámpara de tinta (ink lamp) está encendida y coloque el siguiente depósito de tinta (ink tank).
4
Compruebe que todas las
lámparas están encendidas.
5
Si aparece un mensaje
de error, compruebe
que el depósito de tinta
(ink tank) está instalado
correctamente.
Cierre la cubierta/unidad de
escaneado (Scanning Unit / Cover)
como en - .
Espere aproximadamente de 3 a
4 minutos hasta que desaparezca
la pantalla y continúe.
6
Aquí deben instalarse los depósitos de tinta
(ink tanks).
No toque hasta que se detenga.
Seleccione su idioma y, a
continuación, pulse el botón .OK
7
Para cambiar el ajuste de idioma, pulse
el botón .Atrás (Back)
Retire totalmente la cinta naranja
(orange tape).
Retire el envoltorio protector.
2
Botón Atrás (Back)
Los depósitos de tinta (ink tanks) siguientes son
compatibles con este equipo.
Información
para pedidos
Llame al 1-800-OK-CANON para buscar un distribuidor cerca de usted o visite la
tienda en línea de Canon en www.shop.usa.canon.com
Número para pedidos
Open the Scanning Unit / Cover as in - .
1
Twist and remove the orange cap.
(A) Do not press the sides when the L-shaped groove is blocked.
(B) Do not touch!
3
Insert and push down the ink tank into the matching color slot.
Check that the ink lamp is lit, then install the next ink tank.
4
Check that all lamps are lit.
5
If an error message
appears, check that
the ink tank is installed
correctly.
Close the Scanning Unit / Cover as
in - .
Wait for about 3 to 4 minutes until this
screen disappears, then proceed.
6
When this screen is displayed,
press the button.OK
8
Remove the orange tape completely.
Remove the protective wrap.
2
This is where the ink tanks are to be installed.
Do not touch it until it stops.
Select your language, then press
the button.OK
7
To change the language setting, press
the button.Back
Back button
The following ink tanks are compatible with this machine.
Ordering
Information
Call 1-800-OK-CANON to locate a dealer near you, or visit the Canon online store at
www.shop.usa.canon.com
Order #


Produkt Specifikationer

Mærke: Canon
Kategori: Printer
Model: Pixma MX712

Har du brug for hjælp?

Hvis du har brug for hjælp til Canon Pixma MX712 stil et spørgsmål nedenfor, og andre brugere vil svare dig