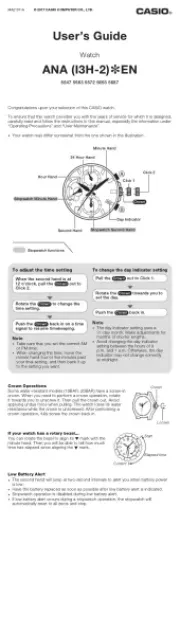
Casio Baby-G BGA-250-7A2ER Manual
Læs nedenfor 📖 manual på dansk for Casio Baby-G BGA-250-7A2ER (7 sider) i kategorien Ur. Denne guide var nyttig for 25 personer og blev bedømt med 4.9 stjerner i gennemsnit af 13 brugere
Side 1/7

Operation Guide 5570
E-9
Hand Setting Mode
C
Stopwatch Mode Alarm Mode
C C
E-8
Selecting a Mode
x Press C to cycle between the modes as shown below.
x In any mode (except when a setting screen, with flashing digits is on the display),
press to illuminate the display.B
Timekeeping Mode
C
World Time Mode Countdown Timer Mode
C C
E-7
Mode Reference Guide
Your watch has 6 “modes”. The mode you should select depends on what you
want to do.
To do this: Enter this mode: See:
x View the current date in the Home City
x Configure Home City and daylight saving time (DST)
settings
x Configure time and date settings
Timekeeping Mode E-11
View the current time in one of 27 cities
(29 time zones) around the globe World Time Mode E-19
Use the countdown timer Countdown Timer Mode E-21
Use the stopwatch to measure elapsed time Stopwatch Mode E-27
Set an alarm time Alarm Mode E-30
Adjust the analog hands Hand Setting Mode E-34
E-6
To turn an alarm and the Hourly Time Signal on and off……………………E-33
To stop the alarm ………………………………………………………………E-33
Adjusting the Analog Hand Setting…………………………………………………E-34
To adjust the analog time ………………………………………………………E-34
Illumination ……………………………………………………………………………E-36
To turn on illumination …………………………………………………………E-36
To change the illumination duration …………………………………………E-37
Troubleshooting ………………………………………………………………………E-38
Specifications …………………………………………………………………………E-39
Operating Precautions ………………………………………………………………E-41
User Maintenance ……………………………………………………………………E-52
E-5
To specify standard time or daylight saving time (DST) for a city …………E-20
Countdown Timer………………………………………………………………………E-21
To enter the Countdown Timer Mode …………………………………………E-21
To configure the countdown timer ……………………………………………E-24
To perform a countdown timer operation ……………………………………E-26
To stop the alarm ………………………………………………………………E-26
Using the Stopwatch …………………………………………………………………E-27
To enter the Stopwatch Mode …………………………………………………E-27
To perform an elapsed time operation ………………………………………E-28
To pause at a split time …………………………………………………………E-28
To measure two finishes ………………………………………………………E-28
Using the Alarm ………………………………………………………………………E-30
To enter the Alarm Mode ………………………………………………………E-31
To set an alarm time ……………………………………………………………E-32
To test the alarm ………………………………………………………………E-33
E-4
Contents
About This Manual …………………………………………………………………… E-2
Things to check before using the watch ………………………………………… E-3
Mode Reference Guide ……………………………………………………………… E-7
Timekeeping ……………………………………………………………………………E-11
Configuring Home City Settings ……………………………………………………E-12
To configure Home City settings ………………………………………………E-12
To change the Daylight Saving Time (summer time) setting ………………E-14
Adjusting the Digital Time and Date Settings ……………………………………E-15
To configure the digital time and date settings ………………………………E-15
Checking the Current Time in a Different Time Zone ……………………………E-19
To enter the World Time Mode ………………………………………………E-19
To view the time in another time zone ………………………………………E-19
E-3
Things to check before using the watch
1. Check the Home City and the daylight saving time (DST) setting.
Use the procedure under “To configure Home City settings” (page E-12) to configure
your Home City and daylight saving time settings.
Important!
x Proper World Time Mode data depend on correct Home City, time, and date
settings in the Timekeeping Mode. Make sure you configure these settings
correctly.
2. Set the current time.
x See “Adjusting the Digital Time and Date Settings” (page E-15).
The watch is now ready for use.
E-2
About This Manual
x Depending on the model of your watch, display text appears either as dark figures
on a light background, or light figures on a dark background. All sample displays in
this manual are shown using dark figures on a light background.
x Button operations are indicated using the letters shown in the illustration.
x Note that the product illustrations in this manual are intended for reference only,
and so the actual product may appear somewhat different than depicted by an
illustration.
E-1
ENGLISH
Congratulations upon your selection of this CASIO watch.
To ensure that this watch provides you with the years of service for which it is
designed, carefully read and follow the instructions in this manual, especially the
information under “Operating Precautions” and “User Maintenance”.
MO1802-EA © 2018 CASIO COMPUTER CO., LTD.

Operation Guide 5570
E-19
Checking the Current Time in a Different Time Zone
You can use the World Time Mode to view the current
time in one of 29 time zones (27 cities) around the
globe. The city that is currently selected in the World
Time Mode is called the “World Time City”.
To enter the World Time Mode
Use to select the World Time Mode as shown on C
page E-8.
To view the time in another time zone
In the World Time Mode, use (East) to scroll through D
city codes.
Currently selected
World Time City
Current time in the currently
selected World Time City
E-18
Note
x For information about selecting a Home City and configuring the DST setting, see
“Configuring Home City Settings” (page E-12).
x While 12-hour format is selected for timekeeping, a indicator will appear for PM
times from noon to 11:59 p.m. No indicator appears for times from midnight to
11:59 a.m. With 24-hour format, time is displayed from 0:00 to 23:59, without any
PM indicator.
x The watch’s built-in full automatic calendar makes allowances for different month
lengths and leap years. Once you set the date, there should be no reason to
change it except after you have the watch’s battery replaced.
x The day of the week changes automatically when the date changes.
E-17
3. When the timekeeping setting you want to change is flashing, use and/or D B
to change it as described below.
Screen To do this: Do this:
Reset the seconds to 00 Press D.
Toggle between Daylight Saving Time (ON)
and Standard Time (OFF)Press D.
Change the city code Use (East) and (West).D B
Change the hour or minute Use (+) and (–).D B
Toggle between 12-hour ( ) and 24-hour 12H
(24H) timekeeping Press D.
Change the year, month, or day Use (+) and (–).D B
4. Press to exit the setting screen.A
E-16
2. Press to move the flashing in the sequence shown below to select the other C
settings.
Time and Date
Seconds
C
DST
C
Home City Code
C
Hour
C
Minutes
C C
Illumination Duration
C
Day
C
Month
C
Year
C
12/24-Hour Format
x The following steps explain how to configure timekeeping settings only.
E-15
Adjusting the Digital Time and Date Settings
Use the procedure below to adjust the digital time and date settings.
Note
x After adjusting the digital time and date setting, be sure to adjust the analog hands
so the settings match.
x See “Adjusting the Analog Hand Setting” (page E-34).
To configure the digital time and date settings
1. In the Timekeeping Mode, hold down for about twoA
seconds until the seconds start to flash. This is the
setting screen.
l
l
l
l
l
l
l
l
ll
l
l
l
l
l
l
l
l
l
l
l
l
l
l
l
l
l
l
l
l
l
l
l
l
l
l
l
l
l
l
l
l
l
l
l
l
l
l
l
l
l
l
l
l
l
l
l
l
l
l
Seconds
E-14
To change the Daylight Saving Time (summer time) setting
1. In the Timekeeping Mode, hold down for about two A
seconds until the seconds start to flash. This is the
setting screen.
2. Press to display the DST setting screen.C
3. Press to toggle between Daylight Saving Time (On) D
and Standard Time (OFF).
4. After the setting is the way you want, press to A
return to the Timekeeping Mode.
x The indicator appears to indicate that DaylightDST
Saving Time is turned on.
l
l
l
l
l
l
l
l
l
l
l
l
l
l
l
l
l
l
l
l
l
l
l
l
l
l
l
l
l
l
l
l
l
l
l
l
l
l
l
l
l
l
l
l
l
l
l
l
l
l
l
l
l
l
l
l
l
l
l
l
l
l
l
l
l
l
l
l
l
l
l
l
l
l
l
l
l
l
l
l
l
l
l
l
l
l
l
l
l
l
l
l
l
l
l
l
l
l
l
l
l
l
l
l
l
l
l
l
ll
l
l
l
l
l
l
l
l
l
l
DST indicator
E-13
2. Press twice to move the flashing to the city code.C
x For details about city codes, see the “City Code
Table” at the back of this manual.
3. Press (East) and (West) to select the city code D B
you want to use as your Home City.
x Keep pressing or until the city code you wantD B
to select as your Home City appears on the display.
4. After the setting is the way you want, press to A
return to the Timekeeping Mode.
Note
x After you specify a city code, the watch will use UTC* offsets in the World Time
Mode to calculate the current time for other time zones based on the current time
in your Home City.
* Coordinated Universal Time, the world-wide scientific standard of timekeeping.
The reference point for UTC is Greenwich, England.
City Code
E-12
Configuring Home City Settings
There are two Home City settings: actually selecting the Home City, and selecting
either standard time or daylight saving time (DST).
Note
x After configuring Home City and/or Daylight Saving Time
(summer time) settings, be sure to adjust the analog
hands to match the digital settings.
x See “Adjusting the Analog Hand Setting” (page E-34).
To configure Home City settings
1. In the Timekeeping Mode, hold down for about twoA
seconds until the seconds start to flash. This is the
setting screen.
x The watch will exit the setting screen automatically
if you do not perform any operation for about two or
three minutes.
l
l
l
l
l
l
l
l
l
l
l
l
l
l
l
l
l
l
l
l
l
l
l
ll
l
l
l
l
l
l
l
l
l
l
l
l
l
l
l
l
l
l
l
l
l
l
l
l
l
l
l
l
l
l
l
l
l
l
l
Seconds
E-11
Timekeeping
Use the Timekeeping Mode to set and view the current
time and date.
x Each press of D cycles the digital display contents as
shown below.
D D D
PM indicator
D
Day of the Week Month-Day Hour : Minutes Seconds
Hour
Day of week
Minutes
E-10
General Functions (All Modes)
The functions and operations described in this section can be used in all of the
modes.
Auto Return Features
If you leave a setting screen with flashing digits on the display for two or three
minutes without performing any operation, the watch exits the setting screen
automatically.
Initial Screens
When you enter the World Time Mode or Alarm Mode, the data you were viewing
when you last exited the mode appears first.
Scrolling
The and buttons are used on the setting screen to scroll through data on the B D
display. In most cases, holding down these buttons during a scroll operation scrolls
through the data at high speed.
Produkt Specifikationer
Mærke: | Casio |
Kategori: | Ur |
Model: | Baby-G BGA-250-7A2ER |
Har du brug for hjælp?
Hvis du har brug for hjælp til Casio Baby-G BGA-250-7A2ER stil et spørgsmål nedenfor, og andre brugere vil svare dig
Ur Casio Manualer

7 April 2025

7 April 2025

30 Marts 2025

22 December 2024

22 December 2024

21 December 2024

21 December 2024

21 December 2024

21 December 2024

21 December 2024
Ur Manualer
- Ur La Crosse Technology
- Ur Just
- Ur Bering
- Ur Bruno Sohnle
- Ur ADE
- Ur DMC
- Ur IHome
- Ur Zuiver
- Ur TMI
- Ur Rolex
- Ur Grand Seiko
- Ur Grandeux
- Ur Focus Electrics
- Ur Ikea
- Ur Zenith
Nyeste Ur Manualer

9 Juni 2025

8 Juni 2025

8 Juni 2025

7 Juni 2025

7 Juni 2025

6 Juni 2025

6 Juni 2025

6 Juni 2025

6 Juni 2025

6 Juni 2025