Citizen Star Wars Rebel Pilot JG2131-51H Manual
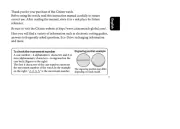
Citizen Ur Star Wars Rebel Pilot JG2131-51H

Læs nedenfor 📖 manual på dansk for Citizen Star Wars Rebel Pilot JG2131-51H (35 sider) i kategorien Ur. Denne guide var nyttig for 18 personer og blev bedømt med 4.8 stjerner i gennemsnit af 9.5 brugere

Side 1/35
INSTRUCTION MANUAL
ENGLISH
FRANÇAIS
ESPAÑOL
DEUTSCH
ITALIANO
PORTUGUÊS
中文(繁体字
中文(簡体字
1
Thank you for your purchase of this Citizen watch.
Before using the watch, read this instruction manual carefully to ensure correct use.
After reading the manual, store it in a safe place for future reference.
Visit the Citizen website (https://www.citizenwatch-global.com/) to view visual guides
for operation of your watch. Some models may be equipped with external features
(calculation scale, tachymeter, etc.). Visual guides for operation of such external
features can also be found on the website.
To check the movement number
A case number—4 alphanumeric characters and 6 or
more alphanumeric characters—is engraved on the
case back. (Figure on the right)
The first 4 characters of the case number represent
the movement number of the watch.
In the example on the right, “ ” is the
movement number.
Engraving position example
The engraving position may differ
depending on watch model.
2
Safety precautions — IMPORTANT
This manual may contain certain safety advisories. Your watch should be used in
accordance with these advisories at all times to ensure optimal enjoyment of your
watch and to prevent injury to yourself, other persons and/or damage to property.
Understand the meaning of the following symbols and read pages from .20 to 29
Safety advisories are categorized and depicted in this manual as follows:
DANGER Highly likely to cause death or serious injury
WARNING Can cause serious injury or death
CAUTION Can or will cause minor or moderate injury or damage
Important instructions are categorized and depicted in this manual as follows:
Warning (caution) symbol followed by instructions that should be
followed or precautions that should be observed.
Warning (caution) symbol followed by prohibited matters.
3
Before using this watch
Band adjustment
We recommend seeking the assistance of an experienced watch technician for sizing
of your watch. If adjustment is not done correctly, the bracelet may unexpectedly
become detached leading to loss of your watch or injury.
Consult your nearest an authorized service center.
Protective stickers
Be sure to remove any stickers covering the metal parts (back cover, band, clasp) or
glass of the watch before use. Otherwise, perspiration or moisture may enter the gaps
between the protective stickers and the parts, which may result in a skin rash and/or
corrosion of the metal parts.
4
Table of contents
Features ..............................................................................................6
Displays and buttons ...........................................................................6
Setting the time ..................................................................................8
Setting the calendar ......................................................................... 10
Using temperature display function .................................................. 12
Using the alarm ................................................................................ 14
Using the chronograph ..................................................................... 16
Using the dual time .......................................................................... 18
5
Low battery warning function........................................................... 19
Reset operation ................................................................................ 19
Water resistance ............................................................................... 20
Precautionary items and usage limitations ........................................ 23
Specifications ................................................................................... 30
Features
6
This watch is a combination quartz watch equipped with time and calendar functions as well as
alarm, chronograph and dual time functions. It is also provided with a temperature display function
that displays the current temperature at all times.
Displays and buttons
Analog 1
Button M
Button C
Mode mark
(arrow)
Temperature sensor
Analog 2
Button B
Analog 2 identification mark
( )
Button A
Digital displays
12
6
3
9
12
6
3
9
DATE
TIME
ALM
ALMSEC
TEMP
DU.T
DU.T
ST.W
ST.W
1/1000 SEC
A
A1 A2
A2
CHI
7
The lamp is switched on by pressing button .C
Analog 1: Provides a continuous display of the current time (hour, minute).
Analog 2: Provides “second”, a rough indication of “alarm time” or “local time”. In the
chronograph mode, it switches to “measured time (hour)”.
Changing the function modes:
Each time you press button , the mode mark changes as follows: TIME <time> - DATE M
<calendar> - ALM <alarm> - DU.T <dual time> - ST.W <chronograph>.
Changing the indication of the Analog 2:
Each time you press button , the indication changes as follows: SEC <second> - ALM <alarm B
time> - DU.T <local time>.
<Tips for the digital indication settings>
(time, calendar, alarm and local time)
Pressing and holding button advances the flashing indication continuously when you set the A
calendar, time, or alarm.
Pressing button while setting returns the indication to normal.M
The indication automatically returns to normal if no button is operated for more than 2 minutes
while setting the digital indication (digital indication is flashing).
Displays and buttons
8
Setting the time
<Normal time display>
Button M
Chime ON mark
Button B
Button A
Second
Hour, Minute
12
6
39
12
6
39
DATE
TIME
ALM
ALMSEC
TEMP
DU.T
DU.T
ST.W
ST.W
1/1000 SEC
A
A1 A2
A2
CHI
1. Press button repeatedly to change the mode mark to the time mode.M
2. Press and hold button until the “second digit starts flashing.B
3. Each time you press button , the flashing (adjustable) part changes as follows: [time B
on the digital display: second, minute, hour, 12/24-hour] - [Analog 1] - [Analog 2]
4. Press button repeatedly to set the flashing part.A
5. Press button to return to the normal time display.M
9
Setting the time
When correcting the second, pressing button returns the second display to “00” after which the A
watch starts running.
When changing the 12/24-hour, the 12/24-hour clock display is switched alternately by pressing
button A.
When correcting Analog 1 (“hour” and “minute” are flashing simultaneously), pressing button
A corrects the hand. The hand advances to the clockwise direction in 1/3 minute (20 seconds)
intervals each time button is pressed. Adjust the time as the same as the digital time.A
When correcting Analog 2 (“00” and the analog 2 identification mark are flashing simultaneously),
pressing button corrects the hand. The hand advances to the clockwise direction in one scale A
interval each time button is pressed. Adjust the time at the 12:00 position.A
During the normal time display, pressing button for at least 2 seconds switches the chime on or A
off each time it is pressed. When the chime is switched on, the chime ON mark (CHI) is displayed
below the mode mark display.
<Note>
Operation of thesecond” display of Analog 2 is linked with the “second” of the digital time.
10
Setting the calendar
<Normal calendar display>
Button M
Day
Button B
Button A
Date
12
6
39
12
6
39
DATE
TIME
ALM
ALMSEC
TEMP
DU.T
DU.T
ST.W
ST.W
1/1000 SEC
A
A1 A2
A2
Temperature
(Month is displayed when setting the calendar.)
1. Press button repeatedly to change the mode mark to the calendar mode.M
2. Press and hold button until the “month” starts flashing on the lower digital display.B
3. Each time you press button , the flashing (adjustable) part changes as follows: B
[month-date-year]
4. Press button repeatedly to set the flashing part.A
5. Press button to return to the normal calendar display.M
11
Setting the calendar
Second is continuously displayed in the Analog 2 in the calendar correction mode.
Year of calendar can be set to 2000-2099.
The day is corrected automatically by correcting the year, month and date.
The date does not have to be corrected on the last day of the month, including leap years. The
watch performs this automatically.
12
Using temperature display function
The temperature display function can be used in the calendar mode. This function automatically
measures ambient temperature and display it on the digital display. In addition, the interval at which
temperature is measured can be selected either every second or every minute.
<Switching of temperature measuring interval>
During the normal calendar display, pressing button switches the temperature measuring interval A
between measurement every second and every minute. The “°C” mark flashes at the measuring
interval that has been selected.
However, in the case of temperature being measured every second, the watch automatically switches
to measurement every minute after measuring temperature every second for about 3 minutes.
<Temperature measuring range and measurement accuracy>
Displayed temperature range −9.9°C to 59.9°C/14.2°F to 139.8°F
Display units 0.1°C/0.2°F
Measurement accuracy +20°C to +30°C: ±1°C/68°F to 86°F: ±2°F
−5°C to 40°C: ±2°C/23°F to 104°F: ±4°F
13
Using temperature display function
<Notes>
During temperature measurement, the measured temperature will be body temperature when the
watch is worn on the wrist. In order to obtain an accurate temperature measurement, remove the
watch from the wrist and adapt to the temperature in which temperature is to be measured for at
least 20-30 minutes. The amount of time required for the watch to be adapted to the temperature
varies according to the temperature difference, location and so forth.
Do not use the temperature display function of the watch in extremely low or high temperatures, as
it may cause a malfunction.
14
Using the alarm
<Normal alarm display (ON)>
Button M
Alarm ON mark
Button B
Button A
Temperature memo
Set time
12
6
39
12
6
39
DATE
TIME
ALM
ALMSEC
TEMP
DU.T
DU.T
ST.W
ST.W
1/1000 SEC
A
A1
A2
ALM
1. Press button repeatedly to change the mode mark to the alarm mode.M
2. Press and hold button until the “hour” digit starts flashing.B
3. Press button repeatedly to set the hour of the alarm time.A
4. Press button to change the adjustable digit to “minute.B
5. Press button repeatedly to set the minute of the alarm time.A
6. Press button to return to the normal alarm display.M
15
Using the alarm
In the alarm correction mode, Analog 2 serves as a rough indicator of the set alarm time.
During the normal alarm display, pressing button activates/deactivates the alarm alternately. A
When the alarm is switched on, the alarm ON mark (ALM) is displayed below the mode mark
display.
If button is pressed in the normal alarm display, the alarm monitor starts sounding, then keeps A
sounding while the button is pressed and held. (Sound monitor)
In addition, the temperature at the set alarm time is automatically stored in memory, and displayed
as a temperature memo.
The temperature memo stored in memory is displayed either until the temperature of the next set
time is stored in memory or until the alarm is reset.
<Notes>
The time indication (12/24-hour) of the alarm mode follows the setting on the time mode.
The alarm sounds for about 20 seconds.
Pressing any button will stop the sound.
16
Using the chronograph
<Chronograph initial indication>
Button Button M B
Button A
Measured time (1/1000 second)
Measured time
(minute, second)
Measured time (hour)
12
6
3
9
12
6
3
9
DATE
TIME
ALM
ALMSEC
TEMP
DU.T
DU.T
ST.W
ST.W
1/1000 SEC
A
A1 A2
A2
1000
1
* The watch automatically returns to
measurement of elapsed time after
about 10 seconds.
Measurement STOPReset
Split time
B B
A*
A
A
<Note>
“Split time” means the elapsed time since you start timing.
17
Using the chronograph
Press button repeatedly to change the mode mark to the chronograph mode. Buttons M A and B
are used for the chronograph operation.
You can switch to other modes by pressing button even while timing. The timing continues M
while indicating other modes. Pressing button repeatedly to return to the chronograph mode M
and display the timing indication.
If button is pressed during measurement, the split time flashes for 10 seconds. A
(“SPLflashes while indicating the split time.)
Press button while measurement is stopped to reset the chronograph.A
Pressing button gives a beep to confirm the operation.A or B
The chronograph measures and displays time in 1/1000 second interval up to a maximum of 11
hours, 59 minutes and 59.999 seconds.
If the chronograph has measured 12 hours, it returns to “00 minute 00 second 000” and stops.
<Note>
Battery life is shortened if you leave the chronograph running. Be sure to reset the chronograph to
the initial status after using it.


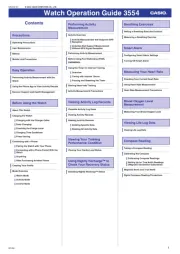
Produkt Specifikationer

Mærke: Citizen
Kategori: Ur
Model: Star Wars Rebel Pilot JG2131-51H

Har du brug for hjælp?

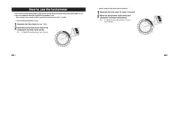
Hvis du har brug for hjælp til Citizen Star Wars Rebel Pilot JG2131-51H stil et spørgsmål nedenfor, og andre brugere vil svare dig