GREAT BRITAIN • customer service
tel: 020 8247 9300 customerservice@clasohlson.co.uk www.clasohlson.co.uk postal: 10 – 13 Market Place, Kingston Upon Thames, Surrey, KT1 1JZe-mail internet:
Art.no 31-9263 Model TP-GAZ1661
Please read theentire instruction manual before using theproduct
and then save it for future reference. Wereserve theright for
any errors in text or images and any necessary changes made
to technicaldata. Intheevent of technical problems or other
queries, please contact our Customer Services.
• Erect thegazebo on aflat and dry surface where it can be
securely anchored to theground.
• Position thegazebo in asite free of heavy overhanging tree
• Never grill or light fires inside or close to thegazebo.
• Never smoke inside thegazebo.
• Never store combustible liquids inside thegazebo.
• Never use fossil-fuelled lanterns or heaters inside
Item PictureDescription Quantity
• Get at least one other person to help you to assemble
• Take care not to pinch or crush your fingers.
• Use asturdy step ladder.
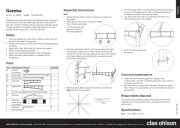
4. With theaid of one or more assistants, lift theroof assembly
up and slot thepegs on therafter into theconnectors on
theframe as shown in thepicturesbelow.
5. Lay thecanopy over theroof assembly and fasten it to
theprotruding ends of therafters.
1. Join theleft and right
2. Slot theassembled lintels into thecorner posts as shown
in thepicture. Makesure to insert theleft-hand (D) lintel
pieces first and see that they slide all theway to thebottom
of theslots. Makesure that therafter connectors are on
theinside of thegazebo.
3. Slide therafters (B and C) into thecentre connector (A).
Note: Dothis on theground.
6. Push theanchor pegs into
• Clean theexterior of thegazebo by wiping it with
adampcloth. Useonly mild cleaning agents, never solvents
• Remove theroof canopy (and side walls if fitted) and store
them indoors in bad weather such as during high winds and
Theproduct should be disposed of in accordance with local
regulations. Ifyou are unsure how to proceed, contact your