Cleanmaxx 04061 Manual

Cleanmaxx mop 04061

Læs gratis den danske manual til Cleanmaxx 04061 (4 sider) i kategorien mop. Denne vejledning er vurderet som hjælpsom af 3 personer og har en gennemsnitlig bedømmelse på 4.4 stjerner ud af 2 anmeldelser. Har du et spørgsmål om Cleanmaxx 04061, eller vil du spørge andre brugere om produktet?

Side 1/4
DE Anleitung
Kundenservice / Importeur:
DS Produkte GmbH, Am Heisterbusch 1, 19258 Gallin, Deutschland •
+49 38851 314650 *)
*) 0 – 30 Ct. / Min. in das dt. Festnetz. Kosten variieren je nach Anbieter.
Alle Rechte vorbehalten.
Sehr geehrte Kundin, sehr geehrter Kunde,
haben. Sollten Sie Fragen haben, kontaktieren Sie den Kunden-
service über unsere Webseite: www.service-shopping.de
WICHTIGE HINWEISE
Dieser Artikel ist zum trockenen und feuchten Reinigen von
glatten Ober ächen (Fußböden, Treppen etc.) geeignet.
Der Artikel ist für den Privatgebrauch, nicht für eine gewerbli-
che Nutzung konzipiert. Nur wie in der Anleitung beschrieben
nutzen. Jede weitere Verwendung gilt als bestimmungswidrig.
Von der Gewährleistung ausgeschlossen sind alle Mängel, die
durch unsachgemäße Behandlung, Beschädigung oder Re-
paraturversuche entstehen. Dies gilt auch für den normalen
Verschleiß.
Kinder und Tiere vom Verpackungsmaterial fernhalten. Es be-
steht Erstickungsgefahr!
Nur Zubehörteile vom Hersteller verwenden.
Artikel nicht fallen lassen und keinen starken Stößen aussetzen.
Ausreichend Abstand zu Wärmequellen wie z. B. Herdplatten,
Öfen, Kaminen oder offenem Feuer etc. halten.
Artikel keinen extremen Temperaturen, starken Temperatur-
schwankungen oder direkter Sonneneinstrahlung aussetzen.
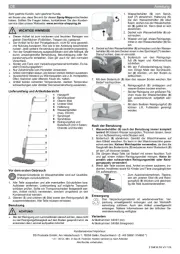
Lieferumfang und Artikelübersicht
1 Handgriff
2 Sprühauslöser
3 Oberer Stiel
4 Unterer Stiel
5 Halterung
6 Wasserbehälter
(max. 350 ml)
7 Sprühkopf
8 Sprühdüse
9 Reinigungsfuß und
Bodentuch (mit 2 Seiten:
Chenille und Koralle)
Vor dem ersten Gebrauch
Wasserckstände im Wasserbehälter sind auf Qualitäts-
prüfungen zurückzuführen.
Aufkleber entfernen. Lieferumfang auf mögliche Transport-
schäden pfen. Sollte ein Transportschaden festgestellt wer-
den, Artikel nicht (!) verwenden, sondern umgehend an den
Kundenservice wenden.
zusammenstecken. Alle Teile müssen einrasten.
Benutzung
ACHTUNG!
Bei der Reinigung von Laminatböden darauf achten, dass nicht
zu viel Reinigungsfl üssigkeit auf den Boden gesprüht wird, da
ansonsten das Laminat aufquellen könnte!
1. Wasserbehälter (6) vom Sprüh-
kopf ( ) abnehmen: Halterung ( ), 7 5
die den Wasserbehälter (6) oben
xiert, drehen bis der Wasserbehäl-
ter ( ) gelöst ist. Dann lässt er sich 6
abnehmen.
2. Deckel vom Wasserbehälter ( ) ab-6
schrauben.
3. Wasser und ggf. etwas Reinigungs-
mittel in den Wasserbehälter (6) fül-
len.
4. Deckel auf den Wasserbehälter (6) schrauben und den Wasser-
behälter (6) mit dem Deckel voran in den Sprühkopf ( )7 stecken.
Darauf achten, dass er einrastet.
5. Bodentuch um den Reinigungs-
fuß (9) legen und Klettverschluss
schließen.
6. Mit der Fußbodenreinigung begin-
nen: Einige Male den Sprühauslö-
ser (2) drücken, um den Boden zu
befeuchten.
7. Mit dem Bodentuch ( ) über den nassen Boden wischen. Bei 9
Bedarf nachsprühen.
8. Reinigungsf ( ) umklappen und 9
nassen Boden trocken wischen.
Bei der Reinigung von größeren Flä-
chen muss der Wasser behälter (6)
ggf. zwischendurch aufgefüllt wer-
den.
Mit dem exiblen Reinigungsfuß ( ) 9
können z.B. Fußleisten gereinigt
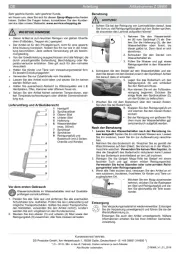
werden.
Nach der Benutzung
1. Wasserbelter (6) nach der Benutzung immer komplett
leeren! Mit klarem Wasser ausspülen. Trocknen lassen, bevor
er zur Aufbewahrung verschlossen wird.
dem Etikett waschen. Es kann in der Waschmaschine gewa-
schen werden. da dies die Keinen Weichspüler verwenden,
Saugkraft des Bodentuchs ( ) reduzieren kann! Bodentuch ( ) 9 9
an der Luft trocknen lassen.
3. Die übrigen Mopp-Teile bei Bedarf mit einem feuchten Tuch
und ggf. einem milden Reinigungsmittel reinigen. Keine ät-
zenden oder scheuernden Reinigungsmittel oder Reini-
gungspads verwenden!
4. Wenn alle Teile trocken sind, Artikel an einem sauberen, tro-
ckenen, frostfreien sowie für Kinder und Tiere unzugänglichen
Ort aufbewahren.
Zum Auseinander nehmen, Rastna-
sen am unteren Stiel (4) und Reini-
gungsfuß ( ) drücken und gleichzei-9
tig die Teile auseinanderziehen.
Entsorgung
Das Verpackungsmaterial ist wiederverwertbar. Ver-
packung umweltgerecht entsorgen und der Wertstoff-
sammlung zuführen. Auch den Artikel umweltgerecht
entsorgen. Nähere Informationen bei der örtlichen Ge-
meindeverwaltung verfügbar.
Varianten
Artikelnummer: 04061 (rot)
Artikelnummer: 04068 (limegreen)
1
2
3
4
6
8
9
7
5
Z SMf M DS V3 1116
EN Instructions
Customer Service / Importer:
DS Produkte GmbH, Am Heisterbusch 1, 19258 Gallin, Germany •
+49 38851 314650 *)
*) Calls to German landlines are subject to charges. The cost varies depending on the service provider.
All rights reserved.
Dear Customer,
We are delighted that you have chosen this If you spray mop.
have any questions, contact the customer service department via
our website: www.service-shopping.de
IMPORTANT INSTRUCTIONS
This article is suitable for the dry and damp cleaning of smooth
surfaces (fl oors, stairs etc.).
The article is designed for personal use only and is not in-
tended for commercial applications. Only use it as described
in the operating instructions. Any other use is deemed to be
improper.
The following are excluded from the warranty: all defects
caused by improper handling, damage or unauthorised at-
tempts at repair. This also applies to normal wear and tear.
Keep children and animals away from the packaging material.
There is a danger of suffocation!
Only use accessories from the manufacturer.
Do not drop the article or subject it to severe impacts.
Maintain a suf cient distance from sources of heat such as
hobs, ovens, fi replaces or naked fl ames, etc.
Do not expose the article to extreme temperatures, strong tem-
perature fl uctuations or direct sunlight.
Items Supplied and Article Overview
1 Handle
2 Spray trigger
3 Upper shaft
4 Lower shaft
5 Holder
6 Water container
(max. 350 ml)
7 Spray head
8 Spray nozzle
9 Cleaning foot and fl oor
cloth (with 2 sides: che-
nille and coral)
Before Initial Use
Water residues in the water container are attributable to
quality checks.
1. Unpack all parts and remove all protective lms and stickers
that may be present. Check the items supplied for possible
transport damage. If you should nd any transport damage, do
not use the article(!), but contact the customer service depart-
ment immediately.
2. Plug together the upper (3) and lower (4) shaft and the cleaning
foot ( ). All parts must engage in one another. 9
Use
CAUTION!
too much cleaning liquid onto the oor as otherwise the lami-
nate could swell!
1. Remove the water container (6)
from the spray head ( ): Twist the 7
holder (5) which fi xes the water con-
tainer ( ) in place at the top until it 6
is released. It can then be removed.
2. Unscrew the lid from the water con-
tainer (6).
3. Pour water and a little cleaning
agent if necessary into the water
container (6).
4. Screw the lid back onto the water
container ( ) and push it with the lid 6
rst into the spray head ( ). Make 7
sure that it locks in place.
5. Place the oor cloth around the
cleaning foot (9) and close the hook-
and-loop fastener.
6. You can now start cleaning the oor:
Press the spray trigger (2) a few
times to make the fl oor damp.
7. Mop the wet oor with the oor
cloth (9). Spray a little more if nec-
essary.
8. Turn over the cleaning foot (9) and
then mop the wet fl oor until it is dry.
If you are cleaning fairly large sur-
faces, the water container ( ) may 6
need to be topped up in between
times.
You can use the exible cleaning
foot ( ) to clean skirting boards, for 9
example.
After Use
1. Always fully empty the water container (6) after use! Rinse
it with clear water. Allow it to dry before you close it for safe
storage.
2. Remove the oor cloth ( ). Wash it in accordance with the 9
washing instructions on the label. You can wash it in the wash-
ing machine. as this can Do not use any fabric softener
reduce the suction of the oor cloth ( )! Then allow the oor 9
cloth (9) to dry in the air.
3. Clean the other parts of the mop with a damp cloth and mild
washing-up liquid if necessary. Do not use any caustic or
abrasive cleaning agents or cleaning pads!
4. Once all parts are dry, store the article in a clean, dry, frost-
free location that is out of the reach of children and animals.
If you want to take the mop apart,
press the locking lugs of the lower
shaft ( ) and the cleaning foot ( ) 4 9
and pull the parts simultaneously to
separate them.
Disposal
The packaging material is recyclable. Please dispose of it
in an environmentally friendly manner and take it to a re-
cycling centre. Dispose of the article in an environmentally
friendly manner as well. You can obtain more information
from your local authorities.
Variants
Product number: 04061 (red)
Product number: 04068 (limegreen)
1
2
3
4
6
8
9
7
5
Z SMf M DS V3 1116


Produkt Specifikationer

Mærke: Cleanmaxx
Kategori: mop
Model: 04061

Har du brug for hjælp?

Hvis du har brug for hjælp til Cleanmaxx 04061 stil et spørgsmål nedenfor, og andre brugere vil svare dig


mop Cleanmaxx Manualer

Cleanmaxx

Cleanmaxx 04061 Manual

26 Juli 2025
Cleanmaxx

Cleanmaxx 04250 Manual

9 December 2024

Cleanmaxx Manualer

Cleanmaxx

Cleanmaxx 08004 Manual

26 Juli 2025
Cleanmaxx

Cleanmaxx 04061 Manual

26 Juli 2025
Cleanmaxx

Cleanmaxx 01720 Manual

1 April 2025
Cleanmaxx

Cleanmaxx 11377 Manual

31 Marts 2025
Cleanmaxx

Cleanmaxx 04250 Manual

9 December 2024
Cleanmaxx

Cleanmaxx 07846 Manual

9 December 2024
Cleanmaxx

Cleanmaxx 09996 Manual

3 September 2024
Cleanmaxx

Cleanmaxx 09965 Manual

2 September 2024
Cleanmaxx

Cleanmaxx 01660 Manual

2 September 2024
Cleanmaxx

Cleanmaxx 09860 Manual

30 August 2024