DE/AT/CH DE/AT/CH DE/AT/CH DE/AT/CH DE/AT/CH DE/AT/CH
DE/AT/CH DE/AT/CH DE/AT/CH DE/AT/CH DE/AT/CH DE/AT/CH DE/AT/CH DE/AT/CH DE/AT/CH
DE/AT/CH DE/AT/CH DE/AT/CH DE/AT/CH DE/AT/CH
1
DE/AT/CH DE/AT/CH DE/AT/CH
DE/AT/CH DE/AT/CH DE/AT/CH DE/AT/CH DE/AT/CH DE/AT/CH DE/AT/CH DE/AT/CH DE/AT/CH
DE/AT/CH
Fahrradcomputer
Einleitung
Wir beglückwünschen Sie zum Kauf Ihres neuen
Produkts. Sie haben sich damit für ein hochwertiges
Produkt entschieden. Die Bedienungsanleitung ist
Teil dieses Produkts. Sie enthält wichtige Hinweise
für Sicherheit, Gebrauch und Entsorgung. Machen
Sie sich vor der Benutzung des Produkts mit allen
Bedien- und Sicherheitshinweisen vertraut. Benut-
zen Sie das Produkt nur wie beschrieben und für
die angegebenen Einsatzbereiche. Händigen Sie
alle Unterlagen bei Weitergabe des Produkts an
Dritte mit aus.
Bestimmungsgemäßer
Gebrauch
Das Produkt ist zur Verwendung als Fahrradcompu
ter
bestimmt. Nicht für den gewerblichen Einsatz.
Funktionen
– Menüsprachen: GB, DE, FR, NL, IT, ES
– Uhr
– Stoppuhr
– Temparaturanzeige °C / °F
– Memory-Funktion für min. und max. Temperatur
– Fahrgeschwindigkeitsanzeige (0–99,9 km / h)
–
Durchschnittsgeschwindigkeitsanzeige
(0–99,9 km / h)
– Höchstgeschwindigkeit (0–99,9 km / h)
– Geschwindigkeitsvergleich
– Geschwindigkeitstrend
– Fahrtzeit-Timer (max. 9:59:59) (rückwärts oder
vorwärts zählend)
– Kilometerzähler (Countdown oder vorwärts
zählend)
– Gesamtkilometer- und Gesamtfahrtzeitanzeige
– Kalorienzähler
– Fettverbrennungsanzeige
– CO2-Ersparnis
– Scan-Anzeige (Funktionen werden miteinander
verbunden)
– Automatische Startfunktion
– ETA (voraussichtliche Ankunftszeit)–Distanz
– voraussichtliche Ankunftszeit
– Kraftstoffeinsparung
– Rückleuchte EIN / AUS
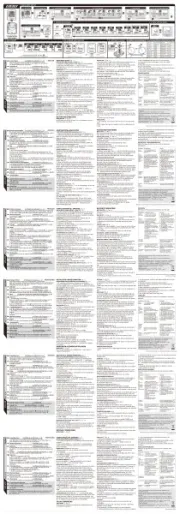
Bestandteile
1 Magnet
2 Kabelbinder
3 Batterie
4 Halterung
5 Sensor
6 Dämpfer für Fahrradcomputerhalterung
7 Batteriedeckel des Fahrradcomputers
8 Fahrradcomputer
9 Primäre Funktionswertanzeige
10 Funktionsanzeige
11 Sekundäre Funktionswertanzeige
12 LC–Display
13 MODE-Taste (M)
14 Geschwindigkeitsvergleich-Anzeige:
Vergleicht die aktuelle Geschwindigkeit mit der
Durchschnittsgeschwindigkeit
▲ höher als die Durchschnittsgeschwindigkeit
▼ niedriger als die Durchschnittsgeschwindigkeit
15 SCAN-Display
16 Wartungsintervallanzeige
17 Batteriestatusanzeige
18 Geschwindigkeitstrend
Dies zeigt die Entwicklung, ob die Geschwin-
digkeit steigt (großer Balken, rechts) oder sinkt
(kleiner Balken, links).
19 SET-Taste (S)
Technische Daten
Batterie: 3 V (Gleichstrom)
(CR2032 Knopfzelle)
Betriebstemperatur: 0–50 °C
Lieferumfang
1 Fahrradcomputer
1 Halterung mit Sensor
1 Magnet
6 Kabelbinder
1 Batterie 3 V
(Gleichstrom), Typ
CR2032 Knopfzelle
1 Bedienungsanleitung
Allgemeine
Sicherheitshinweise
BEWAHREN SIE ALLE SICHERHEITSHINWEISE
UND ANWEISUNGEN FÜR DIE ZUKUNFT AUF!
Dieses Produkt kann von Kindern ab 8 Jahren
und darüber sowie von Personen mit verringer-
ten physischen, sensorischen oder mentalen
Fähigkeiten oder Mangel an Erfahrung und
Wissen benutzt werden, wenn sie beaufsichtigt
oder bezüglich des sicheren Gebrauchs des
Produktes unterwiesen wurden und die daraus
resultierenden Gefahren verstehen. Kinder
dürfen nicht mit dem Produkt spielen. Reini-
gung und Benutzerwartung dürfen nicht von
Kindern ohne Beaufsichtigung durchgeführt
werden.
Bitte beachten Sie, dass die Garantie keine
Schäden abdeckt, die durch unsachgemäße
Handhabung, Nichtbeachtung der Betriebs- und
Sicherheitshinweise oder Gebrauch durch
Unbefugte entstehen.
Sicherheitshinweise für
Batterien / Akkus
LEBENSGEFAHR! Halten Sie Batterien /
Akkus außer Reichweite von Kindern. Suchen
Sie im Falle eines Verschluckens sofort einen
Arzt auf!
EXPLOSIONSGEFAHR! Laden
Sie nicht aufladbare Batterien niemals
wieder auf. Schließen Sie Batterien /
Akkus nicht kurz und / oder öffnen Sie diese
nicht. Überhitzung, Brandgefahr oder Platzen
können die Folge sein.
Werfen Sie Batterien / Akkus niemals in Feuer
oder Wasser.
Setzen Sie Batterien / Akkus keiner mechanischen
Belastung aus.
Risiko des Auslaufens von Batterien /
Akkus
Vermeiden Sie extreme Bedingungen und Tem-
peraturen, die auf Batterien / Akkus einwirken
können z. B. auf Heizkörpern / direkte Sonnen-
einstrahlung.
Vermeiden Sie den Kontakt mit Haut, Augen
und Schleimhäuten! Spülen Sie bei Kontakt mit
Batteriesäure die betroffenen Stellen sofort mit
klarem Wasser und suchen Sie umgehend einen
Arzt auf!
SCHUTZHANDSCHUHE TRA-
GEN! Ausgelaufene oder beschä-
digte Batterien / Akkus können bei
Berührung mit der Haut Verätzungen verursachen.
Tragen Sie deshalb in diesem Fall geeignete
Schutzhandschuhe.
Im Falle eines Auslaufens der Batterien / Akkus
entfernen Sie diese sofort aus dem Produkt, um
Beschädigungen zu vermeiden.
Verwenden Sie nur Batterien / Akkus des gleichen
Typs. Mischen Sie nicht alte Batterien / Akkus
mit neuen!
Entfernen Sie die Batterien / Akkus, wenn das
Produkt längere Zeit nicht verwendet wird.
Risiko der Beschädigung des Produkts
Verwenden Sie ausschließlich den angegebenen
Batterietyp / Akkutyp!
Setzen Sie Batterien / Akkus gemäß der Polari-
tätskennzeichnung (+) und (-) an Batterie /
Akku und des Produkts ein.
Reinigen Sie Kontakte an Batterie / Akku und
im Batteriefach vor dem Einlegen!
Entfernen Sie erschöpfte Batterien / Akkus
umgehend aus dem Produkt.
Vor der Inbetriebnahme
Entfernen Sie vor dem ersten Gebrauch die Schutz-
folie vom LC-Display 12 .
Hinweis: Dieses Produkt sollte nicht an einem
E-Bike verwendet werden. Der Motor könnte
Funktionsstörungen am Produkt auslösen.
Batterie einlegen
Gehen Sie zum Einlegen der Batterie 3 vor,
wie in Abb. A dargestellt.
Verwenden Sie zum Öffnen des Batteriefachs
eine Münze. Drehen Sie mit dieser den Batte-
riefachdeckel gegen den Uhrzeigersinn.
Achten Sie darauf, die Batterie korrekt in das
Batteriefach einzulegen (Polarität). Diese wird
auf der Rückseite des Produkts angezeigt.
Drehen Sie den Batteriefachdeckel mit der
Münze im Uhrzeigersinn auf das Batteriefach,
um dieses zu schließen.
Befestigung des
Fahrradcomputers
Zur Anbringung des Produkts gehen Sie wie in
den Abbildungen B bis I dargestellt vor.
Hinweis: Stellen Sie sicher, dass das Kabel
richtig befestigt ist. Es darf sich nicht in den
Radspeichen verfangen oder neben ihnen
hängen.
Inbetriebnahme
Veränderung der
Grundeinstellungen
Grundeinstellungen: Sprache > Anwendungs-
profil > Reifengröße > Längeneinheit > Alter >
Gewichtseinheit > Gewicht > Zeitformat > Uhrzeit
> Datumsformat > Datum > CO2-Ersparnis >
Wartungsintervall > Licht AN/ AUS > ETA-Distanz
> ETA-Modus > Kraftstoffformat > Kraftstoffverbrauch
> Temperatureinheit
Wichtige Funktionen
MODE-Taste 13 zur Konfiguration der Werte /
SET-Taste 19 zur Bearbeitung und Übernahme der
Einstellungen
- Sprache: Auswahl aus 6 Sprachen
- Anwendungsprofil: Auswahl zwischen FORTGES
(fortgeschritten) und
EINFACH
(einfach).
- Reifengröße: Geben Sie den Reifenumfang in mm
ein, Eingabe einer vierstelligen Zahl.
Hinweis: Sie können die Reifengröße (U) errechnen,
indem Sie den Reifendurchmesser (D) mit 3,1416
multiplizieren (Abb. M). Die Liste (Abb. N) enthält
die Reifenumfänge (U) der herkömmlichen Reifen-
durchmesser (D).
- Längeneinheit: Auswahl zwischen KM/KMH oder
MILE / MPH.
- Alter: Eingabe einer zweistelligen Zahl.
- Gewichtseinheit: Auswahl zwischen KG und LB.
- Gewicht: Eingabe einer dreistelligen Zahl.
- Zeitformat: Auswahl zwischen 12 und 24 Stunden.
- Uhrzeit: Eingabe von Stunde und Minute.
- Datumsformat: Auswahl zwischen DD-MM-YY
oder MM-DD-YY.
- Datum: Eingabe von Jahr, Monat und Tag.
- CO2 -Ersparnis: Eingabe einer dreistelligen Zahl.
- Wartungsintervall: Eingabe einer dreistelligen
Zahl.
Hinweis: Wenn das Wartungsintervall auf „000“
steht, wird die Wartungsanzeige ausgestellt.
- Licht EIN / AUS: Schaltet die Hintergrundbeleuchtung
AN oder AUS. Wenn die Hintergrundbeleuchtung
eingeschaltet ist, können Sie die AN- und AUS-Zeit
einstellen.
- ETA-Distanz: Eingabe einer fünfstelligen Zahl.
- ETA-Modus: Auswahl zwischen CLOCK (Uhrzeit)
und TIME (Fahrzeit),
- Kraftstoffformat: Auswahl zwischen LITER und
GALLON (Gallone).
- Kraftstoffverbrauch: Eingabe einer dreistelligen
Zahl.
- Temperatureinheit: Auswahl zwischen °C und °F.
Drücken Sie die SET-Taste 19 , um in den Einstellungs-
modus zu gelangen. Drücken Sie die MODE-Taste
13 und oder FORTGES
EINFACH
wird angezeigt.
b) Drücken Sie die SET-Taste
19
, um zwischen
FORTGES und
EINFACH
zu wählen. Bei wieder-
holtem Drücken der MODE-Taste 13 können Sie
zwischen dem - und dem FORTGES
EINFACH
-
Modus auswählen.
EINFACH
-Modus, drücken und
halten Sie die SET-Taste 19, um in den Einstellungs-
modus zu gelangen. Drücken Sie die SET-Taste 19
erneut. Drücken Sie die MODE-Taste 13 , um
individuelle Einstellungen zu aktivieren oder zu
deaktivieren (z. B. CLOCK). Wählen Sie „ON“, um
die gewählte
Funktion zum EINFACH-Modus hinzuzu-
fügen. Wählen
Sie „OFF“, wenn Sie die gewünschte
Funktion nicht zum
EINFACH
-Modus hinzufügen
wollen.
Drücken Sie die SET-Taste 19 , um Ihren Eintrag zu
bestätigen. Drücken Sie die MODE-Taste 13, um
Bestätigen Sie Ihre Auswahl mit der SET-Taste 19 .
Drücken Sie die MODE-Taste 13 zum Beenden der
Einstellungen. Sie haben die Grundeinstellungen
nun erfolgreich eingestellt.
Wenn Sie die Grundeinstellungen ändern wollen,
folgen Sie den Schritten im Kapitel „Fahrradcomputer
zurücksetzen“ und stellen Sie alle Grundeinstellungen
neu ein.
Verwendung des
Fahrradcomputers
Hinweis: Der Fahrradcomputer wird automatisch
in den Standby-Modus wechseln, wenn er länger
als 5 Minuten nicht verwendet wurde. Das Drücken
einer Taste oder eine Vibration reaktivieren den
Computer. Die Funktionsanzeige zeigt den derzeit-
igen Modus
Drücken Sie die MODE-Taste 13 mehrfach, um
durch die verschiedenen Funktionen zu scrollen (siehe
zur nächsten Funktion zu gelangen, und wiederholen
Sie die oben beschriebenen Schritte.
Drücken Sie die MODE-Taste 13, um die Einstellungen
zu verlassen.
Verwendung der
Hintergrundbeleuchtung
Drücken Sie die SET-Taste 19, um die Hintergrund-
beleuchtung vorübergehend einzuschalten. Die
Hintergrundbeleuchtung schaltet sich nach kurzer
Zeit automatisch aus.
Fahrradcomputer
zurücksetzen
Drücken und halten Sie zuerst die SET-Taste 19
und halten Sie die MODE-Taste 13, um in den Ein-
stellungsmodus zu gelangen. SETTING OPEN (Ein-
stellung offen) oder SETTING RESET (Einstellung
zurückgesetzt) erscheint. Drücken Sie die MODE-
Taste 13 bis SETTING RESET angezeigt wird,
Kapitel „Verwendung der Funktionen“). Drücken
und halten Sie die SET-Taste 19, um die gespeicherten
Werte aufzurufen oder zurückzusetzen.
Der Fahrradcomputer verfügt üder die
folgenden Funktionen:
FORTGES-Modus: Durch Drücken der MODE-
Taste 13 können Sie aus den folgenden Funktions-
anzeigen auswählen:
UHRZEIT> GESAMTKM> GESAMTTM> TAGES-
KM> MAX-KMH> DURCH-KM> FAHRTZEIT>
GRAD> STOPPUHR> KAL RATE> KALORIE> FETT>
CO2 KG> SPAREN> ETA> KM+/-> TIMER+/-
> SCAN
- UHRZEIT: Zeigt die Uhrzeit an.
Drücken und halten Sie die SET-Taste 19 für 3 Sekun-
den und drücken Sie die SET-Taste 19 erneut, um
Zeit- und Datumeinstellungen aufzurufen.
GESAMTKM: Gesamtkilometerzähler.
Drücken und halten Sie die SET-Taste 19 für
3 Sekunden und drücken Sie die SET-Taste 19
erneut, um die Einstellungen zu Reifengröße,
Hodometer und Wartungsintervall zu ändern.
GESAMTTM: Gesamtfahrtzeit.
Drücken und halten Sie die SET-Taste 19 für
3 Sekunden und drücken Sie die SET-Taste 19
erneut, um die gespeicherte Gesamtfahrtzeit zu
ändern.
TAGES-KM: Fahrdistanz.
Drücken und halten Sie die SET-Taste 19 für
3 Sekunden, um die Fahrdistanz, Durchschnittsge-
schwindigkeit, Höchstgeschwindigkeit und Fahrtdauer
auf 0 zu stellen.
MAX-KMH: Höchstgeschwindigkeit.
Drücken und halten Sie die SET-Taste
19
für 3 Sekunden
,
um die Höchstgeschwindigkeit auf 0 zu stellen.
DURCH-KM: Durchschnittsgeschwindigkeit.
Drücken und halten Sie die SET-Taste 19 für 3 Sekun-
den, um die Durchschnittsgeschwindigkeit auf 0 zu
stellen.
FAHRTZEIT: Fahrtzeit.
GRAD: Thermometer.
Drücken Sie die SET-Taste 19, um den erreichten
Höchsttemperaturwert (HI) anzuzeigen. Drücken
Sie die SET-Taste 19 erneut, um den erreichten
Tiefsttemperaturwert (LO) anzuzeigen. Drücken Sie
die SET-Taste 19 und halten Sie sie gedrückt, um
die höchste und niedrigste Temperatur auf die
momentane Temperatur zurückzusetzen und die
gespeicherten Informationen zu löschen. Drücken
und halten Sie die SET-Taste 19 für 3 Sekunden
und drücken Sie die SET-Taste 19 erneut, um die
Einstellungen der Temperatureinheit aufzurufen.
STOPPUHR: Stoppuhr.
Drücken Sie die SET-Taste 19, um die Stoppuhr zu
starten. Drücken Sie die SET-Taste 19 erneut, um
die Stoppuhr zu stoppen. Drücken und halten Sie
die SET-Taste 19 für 3 Sekunden, um die Stopuhr
auf 0 zu stellen.
KAL RATE: Momentaner Kalorienverbrauch.
KALORIE: Kalorienzähler.
Drücken und halten Sie die SET-Taste 19 für 3 Sekun-
den, um den Kalorienzähler auf 0 zu stellen.
FETT: Fettverbrennung in Gramm.
Drücken und halten Sie die SET-Taste 19 für 3 Sekun-
den, um den Fettverbrennungswert auf 0 zu stellen.
CO2 KG: CO2-Ersparnis.
Drücken und halten Sie die SET-Taste 19 für 3 Sekun-
den und drücken Sie die SET-Taste 19 erneut, um
den Referenzwert der CO2-Einstellung zurückzusetzen.
SPAREN: Kraftstoffersparnis verglichen mit einem
Auto.
Drücken und halten Sie die SET-Taste 19 für
3 Sekunden und drücken Sie die SET-Taste 19
erneut, um die Einstellung der Einheit und des
Referenzwerts vom Kraftstoffverbrauch aufzurufen.
ETA: voraussichtliche Ankunftszeit.
Drücken und halten Sie die SET-Taste 19 für 3 Sekun-
den und drücken Sie die SET-Taste 19 erneut, um
den ETA-Distanzcountdown aufzurufen. Drücken
Sie die MODE-Taste 13 und drücken Sie die SET-
Taste 19 , um zwischen „CLOCK“ (ETA-Uhrzeit) und
„TIME“ (ETA-Countdown-Stoppuhr) auszuwählen.
KM+/-: Kilometerzähler.
Drücken und halten Sie die SET-Taste 19 für 3 Sekun-
den und drücken Sie die SET-Taste 19 erneut, um
die Einstellungen des Kilometerzählers aufzurufen.
Das LC-Display zeigt die Symbole für Erhöhung
und Reduzierung der Nummer (+ oder -) und den
berechneten Wert der Entfernung.
TIMER+/->: Timer.
Drücken und halten Sie die SET-Taste 19 für
3 Sekunden, um die Timereinstellungen zu ändern.
Der LC-Display zeigt die Symbole für Erhöhung und
Reduzierung der Zahl (+ oder -) und den berechne-
ten Wert des Timers.
SCAN: Scan
Hinweis: Im Scan-Modus wechselt das Display
automatisch zwischen Fahrdistanz, Höchstge-
schwindigkeit, Durchschnittsgeschwindigkeit und
Fahrtzeit.
Hinweis: Zur Änderung der Einstellungen lesen
Sie das Kapitel „Grundeinstellungen“.
Hinweis: Um den Scan-Modus zu beenden,
drücken Sie die Mode-Taste 13 , um zum FORTGES-
Modus zurückzukehren.
CUSTOMIZE (Anpassungs)-
Modus
Neben dem - und dem FORTGES
EINFACH
-
Modus können Sie auch Ihre eigenen Einstellungen
im CUSTOMIZE-Modus anlegen. Es gibt zwei
Möglichkeiteen, um den CUSTOMIZE-Modus
aufzurufen:
a) Drücken und halten Sie zuerst die SET-Taste 19
und halten Sie die MODE-Taste 13 , um in den Ein-
stellungsmodus zu gelangen. SETTING OPEN (Ein-
stellung offen) oder SETTING RESET (Einstellung
zurückgesetzt) erscheint. Drücken Sie die MODE-
Taste 13 bis SETTING OPEN angezeigt wird.
Fehlerbehebung
Hinweis: Das Produkt enthält elektronische Bau-
teile. Daher kann es, wenn es sich in der Nähe von
Produkten befindet, die Radiosignale aussenden,
Störungen auslösen.
- Treten Fehlanzeigen im Display auf, entfernen Sie
solche Produkte aus der Umgebung des Produkts.
Entfernen Sie bei solchen Funktionsstörungen kurz-
zeitig die Batterie und setzen Sie sie erneut ein.
Batterie. Achten Sie beim Einlegen auf die richtige
Polarität. Diese wird im Batteriefach angezeigt. Ver-
gewissern Sie sich, dass der Dichtungsring vor dem
Einsetzen der Batterie ordnungsgemäß angebracht
ist. Drehen Sie den Batteriefachdeckel mit einer
Münze im Uhrzeigersinn in Richtung des -
Symbols, um das Batteriefach zu schließen. Drücken
und halten Sie eine beliebige Taste zur Rückkehr in
den normalen Betriebsmodus.
Hinweis: Wenn die Batterie entfernt ist, werden
nach etwa 20 Sekunden alle Daten gelöscht.
Fahrradcomputer vom
Fahrrad abmontieren
Drücken Sie den Verschluss der Halterung her-
unter und ziehen Sie den Fahrradcomputer ab
(siehe Abb. L).
Schneiden Sie die überstehenden Enden der
Kabelbinder 2 mit einem geeigneten Werk-
zeug, beispielsweise Seitenschneider, ab.
Problem Lösung
Leeres LC-Display oder
keine Antwort nach
erneutem Einlegen der
Batterie
Entnehmen Sie die Bat-
terie. Führen Sie einen
spitzen Gegenstand
(z. B. Schraubendreher)
in das mit „RESET“ ge -
kennzeichnete Loch. Set-
zen Sie die 3 V-Batterie
so in das Batteriefach
ein, dass der +-Pol nach
oben weist. Setzen Sie
den Batteriefachdeckel
auf das Batteriefach. Der
Mikroprozessor wird
zurückgesetzt und neu
gestartet.
Problem Lösung
Keine Fahrgeschwindig-
keits- oder Kilometeran-
zeige
Richten Sie Magnet und
Sensor korrekt aus.
- Prüfen Sie, ob die
Batterie polrichtig
eingesetzt ist.
Display schwarz Die Umgebungstempe-
ratur ist zu hoch oder
der Fahrradcomputer
wurde zu lange direkter
Sonnenstrahlung ausge-
setzt. Entfernen Sie das
Produkt aus dem direkten
Sonnenlicht und lassen
Sie es eine Weile
abkühlen.
Das LC-Display zeigt
irreguläre Symbole.
Entnehmen Sie die Bat-
terie und setzen Sie sie
anschließend wieder ein.
Reinigung und Pflege
Benutzen Sie zur Reinigung keine Flüssigkeiten
oder Reinigungsmittel. Ansonsten drohen Schä-
den am Produkt.
Reinigen Sie das Produkt nur äußerlich mit einem
weichen, trockenen Tuch.
Wartung
Entfernen Sie die Batterie, wenn Sie das Pro-
dukt für längere Zeit nicht verwenden werden.
Überprüfen Sie regelmäßig das Kabel und die
Komponenten auf Beschädigung und sicheren
Sitz.
Entsorgung
Die Verpackung besteht aus umweltfreundlichen
Materialien, die Sie über die örtlichen Recycling-
stellen entsorgen können.
b
a
Beachten Sie die Kennzeichnung
der Verpackungsmaterialien bei der
Abfalltrennung, diese sind gekenn-
zeichnet mit Abkürzungen (a) und
Nummern (b) mit folgender Bedeutung:
1–7: Kunststoffe / 20–22: Papier und
Pappe / 80–98: Verbundstoffe.
Das Produkt und die Verpackungs-
materialien sind recycelbar, entsorgen
Sie diese getrennt für eine bessere
Abfallbehandlung. Das Triman-Logo gilt
nur für Frankreich.
Möglichkeiten zur Entsorgung des aus-
gedienten Produkts erfahren Sie bei
Ihrer Gemeinde- oder Stadtverwaltung.
Werfen Sie Ihr Produkt, wenn es
ausgedient hat, im Interesse des
Umweltschutzes nicht in den Hausmüll,
sondern führen Sie es einer fachgerech-
ten Entsorgung zu. Über Sammelstellen
und deren Öffnungszeiten können Sie
sich bei Ihrer zuständigen Verwaltung
informieren.
Defekte oder verbrauchte Batterien / Akkus
müssen gemäß Richtlinie 2006/66/EG und deren
Änderungen recycelt werden. Geben Sie Batterien /
Akkus und / oder das Produkt über die angebotenen
Sammeleinrichtungen zurück.
Umweltschäden durch falsche
Entsorgung der Batterien /
Akkus!
Batterien / Akkus dürfen nicht über den Hausmüll
entsorgt werden. Sie können giftige Schwermetalle
enthalten und unterliegen der Sondermüllbehand-
lung. Die chemischen Symbole der Schwermetalle
sind wie folgt: Cd = Cadmium, Hg = Quecksilber,
Pb = Blei. Geben Sie deshalb verbrauchte Batterien /
Akkus bei einer kommunalen Sammelstelle ab.
Garantie
Das Produkt wurde nach strengen Qualitätsrichtlini
en
sorgfältig produziert und vor Anlieferung gewissen-
haft geprüft. Im Falle von Mängeln dieses Produkts
stehen Ihnen gegen den Verkäufer des Produkts
gesetzliche Rechte zu. Diese gesetzlichen Rechte
werden durch unsere im Folgenden dargestellte
Garantie nicht eingeschränkt.
Sie erhalten auf dieses Produkt 3 Jahre Garantie ab
Kaufdatum. Die Garantiefrist beginnt mit dem Kauf-
datum. Bitte bewahren Sie den Original-Kassenbon
gut auf. Diese Unterlage wird als Nachweis für den
Kauf benötigt.
Tritt innerhalb von 3 Jahren ab dem Kaufdatum
dieses Produkts ein Material- oder Fabrikationsfehler
auf, wird das Produkt von uns – nach unserer Wahl
– für Sie kostenlos repariert oder ersetzt. Diese
Garantie verfällt, wenn das Produkt beschädigt,
nicht sachgemäß benutzt oder gewartet wurde.
Die Garantieleistung gilt für Material- oder Fabrika-
tionsfehler. Diese Garantie erstreckt sich nicht auf
Produktteile, die normaler Abnutzung ausgesetzt
sind (z. B. Batterien) und daher als Verschleißteile
angesehen werden können oder Beschädigungen
an zerbrechlichen Teilen, z. B. Schalter, Akkus oder
die aus Glas gefertigt sind.
Bestätigen Sie das Zurücksetzen Ihres Produkts,
indem sie die SET-Taste 19 drücken.
Nun können Sie die vorher eingerichteten Grund-
einstellungen anpassen (Sprache, Alter, Gewicht,
Uhrzeit). Die übrigen gespeicherten Daten werden
gelöscht.
Batterie auswechseln
Hinweis: Die Batterie des Fahrradcomputers muss
gewechselt werden, wenn die Batteriestatusanzeige
17 auf dem LC-Display angezeigt wird. Drücken und
halten Sie zuerst die MODE-Taste 13 halten Sie
gleichzeitig die SET-Taste 19 und lassen Sie beide
gedrückt, bis auf dem LC-Display das Batteriesymbol
und {{----}} angezeigt wird. Zum Wechseln der Batterie
gehen Sie wie in Abbildung A dargestellt vor. Drehen
Sie den Batteriefachdeckel mit einer Münze gegen
den Uhrzeigersinn in Richtung des -Symbols, um
das Batteriefach zu öffnen. Entnehmen Sie die alte
Batterie und ersetzen Sie diese durch eine neue
FAHRRADCOMPUTER / BIKE
COMPUTER / COMPTEUR VÉLO
IAN 292844
G
1
F5
2
E
2
5
D
5
1
B
A
8
3
7
I
1
5
H
1 5
J
9
10
11
13
14
15
16
17
18
19
5
23 1
4 6
C2
6
8
1
5
4
12
L
K
8
4
ND U
20 1598 mm
22 1759 mm
24 1916 mm
26 (650 A) 2073 mm
26,5 (Tubular) 2117 mm
26,6 (700 x 25C) 2124 mm
26,8 (700 x 28C) 2136 mm
27 (700 x 32C) 2155 mm
28 (700B) 2237 mm
ATB24 x 1,75 1888 mm
ATB26 x1,4 1995 mm
ATB26 x1,5 2030 mm
ATB26 x1,75 2045 mm
ATB26 x 2 (650B) 2099 mm
27 x 1 2138 mm
27 x 1 1 / 4 2155 mm
D
U
M
FAHRRADCOMPUTER
Bedienungs- und Sicherheitshinweise
BIKE COMPUTER
Operation and Safety Notes
COMPTEUR VÉLO
Instructions d‘utilisation et consignes de sécurité
FIETSCOMPUTER
Bedienings- en veiligheidsinstructies
CICLÓMETRO
Instruções de utilização e de segurança
CONTADOR PARA BICICLETA
Instrucciones de utilización y de seguridad
TACHOMETR
Pokyny pro obsluhu a bezpečnostní pokyny