— ENGLISH P.2 —— ENGLISH P.1 —
— ENGLISH P.4 — — ENGLISH P.5 —
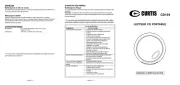
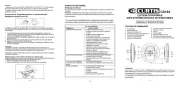
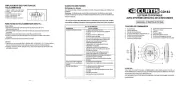
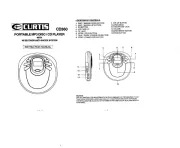
PORTABLE MP3 DISC/CD PLAYER
40 SECONDS ANTI-SHOCK SYSTEM
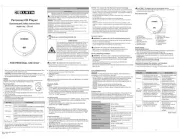
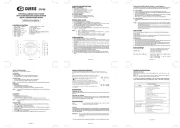
2. SKIP / SEARCH DOWN BUTTON
3. SKIP / SEARCH UP BUTTON
8. STOP / (POWER OFF) BUTTON
9. PLAY / PAUSE (POWER ON) BUTTON
USE OF CONTROLS OR ADJUSTMENTS OR PERFORMANCE OF PROCEDURES OTHER
THAN THOSE SPECIFIED HEREIN MAY RESULT IN HAZARDOUS RADIATION EXPOSURE.
THIS SHOULD NOT BE ADJUSTED OR REPAIRED BY ANYONE EXCEPT QUALIFIED
PREPARATIONS BEFORE USING
1. Open Battery Compartment cover.
2. Insert 2 batteries (LR6, “AA” size, or equivalent)
in the correct polarity as indicated.(Batteries not included)
(Heavy duty batteries are recommended.)
3. Close the cover properly.
1. Plug the DC output of the adaptor to the DC Jack.
2. Connect the adaptor (4.5V/500mA) to a power outlet. (Adaptor not included)
Make sure the voltage is compatible.
This CD player is designed to play the 8cm and 12cm compact disc without using adaptor.
Set the HOLD button to “ON” position, all the buttons will be locked. Before operation, be sure to
set the switch to “OFF” position, for normal operation.
1. Insert the headphone/earphone plug to PHONE JACK.
2. Push the OPEN button to right side, and then the door open, put a disc into the CD compartment
3. Push the disc gently around the centre area until it clicks so that the disc fits into the pivot.
(To remove the disc : Pick up the disc, holding the edge, while pressing the pivot gently.)
4. Close the door and press the PLAY/PAUSE button once.
5. The Display will show the total number of tracks of the disc, then begin to play the first track.
Play/Pause Buttons —Press once to start playback in the original order.
Press again to stop the disc play temporarily.
Stop Button —Press once to stop playback.
Press again to turn off power
Skip / Search Buttons —Press once to skip to next track or back to
—Press continuiously to search forward
ASP / Directory UP Button —ASP ON/OFF (For CD Disc).
—Directory UP (For MP3 Disc).
MODE/PROG Button — There are 3 kinds of functions : (FOR CD)
•Press the MODE/PROG button once to play the current track repeatedly.
•The repeat indicator will appear in the display.
•Press the MODE/PROG button twice to play the entire disc repeatedly.
•The repeat indicator will appear in the display.
NOTE - To cancel REPEAT simply press the MODE/PROG button until the repeat indicator
•Press the MODE/PROG button 3 times.
•The RND will appear in the display.
•Press the PLAY button, all tracks on the disc will be played in random sequence. After all the
tracks have been played the system will stop automatically.
NOTE - To cancel RANDOM PLAY simply press the MODE/PROG button until the RND indicator
•Press the MODE/PROG button 4 times.
•The INT indicator will appear in the display.
•Press the PLAY button to play the first 10 seconds of each track on the disc.
NOTE - To cancel INTRO SCAN simply press the MODE/PROG button until the INT indicator
MODE/PROG button - there are 3 kinds of functions: (FOR MP3 DISC)
•Press the MODE/PROG button once to play the current track repeatedly.
•The repeat indicator will appear in the display.
•Press the MODE/PROG button twice to play the current DIRECTORY repeatedly.
•The repeat indicator will appear in the display.
•Press the MODE/PROG button three times to play the ENTIRE DISC repeatedly.
•The repeat indicator will appear in the display.
NOTE - To cancel REPEAT simply press the MODE/PROG button until the repeat indicator
•Press the MODE/PROG button 4 times.
•The RND will appear in the display.
•Press the PLAY button, all the files on a disc to be played in a random sequence and after all
files are played, system will stop automatically.
NOTE - To cancel RANDOM PLAY simply press the MODE/PROG button until the RND display
•Press the MODE/PROG button 5 times.
•The INT indicator will appear in the display.
•Press the PLAY button to play the first 10 seconds of each file on the disc.
NOTE - To cancel INTRO SCAN simply press the MODE/PROG button until the INT indicator
1. In stop mode, press the MODE/PROG button to make program memory.
2. “ PGM CD 00 P01” will be displayed, “00” means track number to memory and “P01” means
3. Press or button to select the desired track.
4. Press the MODE/PROG button to enter the track into memory, the program numbers which
will be increment one step.
* The program no. “P01” has become “P02” on the display.
5. Repeat step 3 and 4 until memory is full.
6. Press button to start the program play.
7. To stop the program play, press the STOP button.
8. For program play in step “ 7 ” , press the MODE/PROG button & button.
9. To erase the program memory, TURN off the power or open the door.
PROGRAM PLAY (FOR MP3 DISC)
1. In stop mode, press the MODE/PROG button to make program memory.
2. “ PGM 00 000 P01 ” will be displayed. “ 00 ” means DIRECTORY number,
“ 000 ” means file number, “P01” means program number.
3. Press the ASP/DIR button to select the desired directory.
4. Press or button to select the desired file.
5. Press the MODE/PROG button to enter the DIRECTORY and file into memory.
The program number which will be increment one step.
* The program no.“P01” has become “P02” on display.
6. Repeat step 3 to 5 until memory is full (UP TO 60 FILES).
7. Press button to start the program play.
8. To stop the program play, press the STOP button.
9. For program play in step “ 8 “, press the MODE/PROG button & button.
10. To erase the program memory, turn off the power or open the door.
* If you do not need to select directory, only select files, the above step 3 can pass.
DIGITAL ANTI-SHOCK OPERATION
The DIGITAL ELECTRONIC SHOCK PROTECTION function uses semiconductor memory to
prevent the second from skipping when the unit is subjected to shocks and vibration during play.
When the PLAY/PAUSE button is pressed and the power turns on, the Digital Electronic Shock
Protecyion function tums on automatically.
It will give approximately 40 seconds (MP3 120seconds) of protection against interruption of
sound output, if the player is subjected to shocks of more than 40 seconds duration, some inter-
ruption of sound output will occur, this is normal and to be expected, the sound will resume once
the player has stabilized from the shock.
•To turn this function off, press ASP/DIR button once, the ASP indicator will disappear.
•In MP3 disc always has the ASP function and the ASP time is 120 seconds at 128 Kbps bit rate.
BBS (BASS BOOST SYSTEM) FUNCTION
Set the BBS button to on position to enhance the bass effect.
PRESET EQUALIZER FUNCTION
Press the EQ button activates 4 Kinds of sound effect as follows:
* The EQ indicator will appear on the display.
If the lens becomes dusty, clean it with camera lens blower. Be careful not to scratch the surface
From time to time, clean the cabinet with a soft dry cloth. For more stubborn stains, slightly
moisten the cloth with water or a mild detergent solution. Never use benzene, alcohol or other
solvents as they may damage the finish of the cabinet.
Output Power : 20MW (32 )
Freq. Response : 100 ~ 20000 Hz
Power Source : 2 x UM-3 or AA size batteries
4.5V (500mA) AC - DC adaptor
Dimensions : 142(W) x 142(D) x 33(H) mm
** For improvement purposes, specification and design are subject to change without
N o s ou n d fr om E a r pho n e s
N o s ou n d w h en playe d throu g h
a n e xter n al a m p li fie r
Inte r m itte nt S o un d
• Ea rp h o n es ' p lug is no t f irm ly in s e rte d in to the Ph o n es so c ket .
• C onn ec tio n i s inc orre ct.
• Dirty or de fec tiv e d isc.
• D irty pick u p le ns .
• Th e pla y er i s su b je ct to e xc e ss iv e vib rat ion o r s ho c k .
• Lo w b a ttery p o w er.
• Po o r E a rp ho ne co nne ctio n .
• Po we r to an extern al a m p lifier no t s w itche d o n.
• Ea rp h o n es h a ve be en ins erte d into the lin e ou t sock e t.
P lay er fails to functi o n • T h e dis c m ay be in se rt ed up s id e dow n.
• Th e dis c n o t m oun te d c orre c tly o n th e c h u ck.
• Dirty o r a defe ct ive di sc.
• D irty pick u p le ns .
• Pla y e r li d n o t c lo s e d.
• AC Po w e r to an adap tor s w itch ed o ff.
• Ho ld sw it ch es a t O N po s itio n , sw i tch to O F F p osi ti o n.
• Au to p o w er off ha s o ccu rred , pre ss PL AY button to re s to re po w er.
• M oistu re co nd en sa t io n , a llow the p la ye r to wa rm up to ro o m
tem p e ra tu r e fo r 6 0 m in u te s.
When a disc becomes dirty, clean it with a cleaning cloth. Wipe the disc from the center out.
Note - Do not use solvents such as benzine, thinner, commercially available cleaners or anti-
static spray intended for analogue discs.
** Should you experience difficulties in the use of this player please refer to the following
chart before contacting your dealer or the place of purchase.