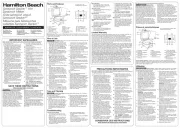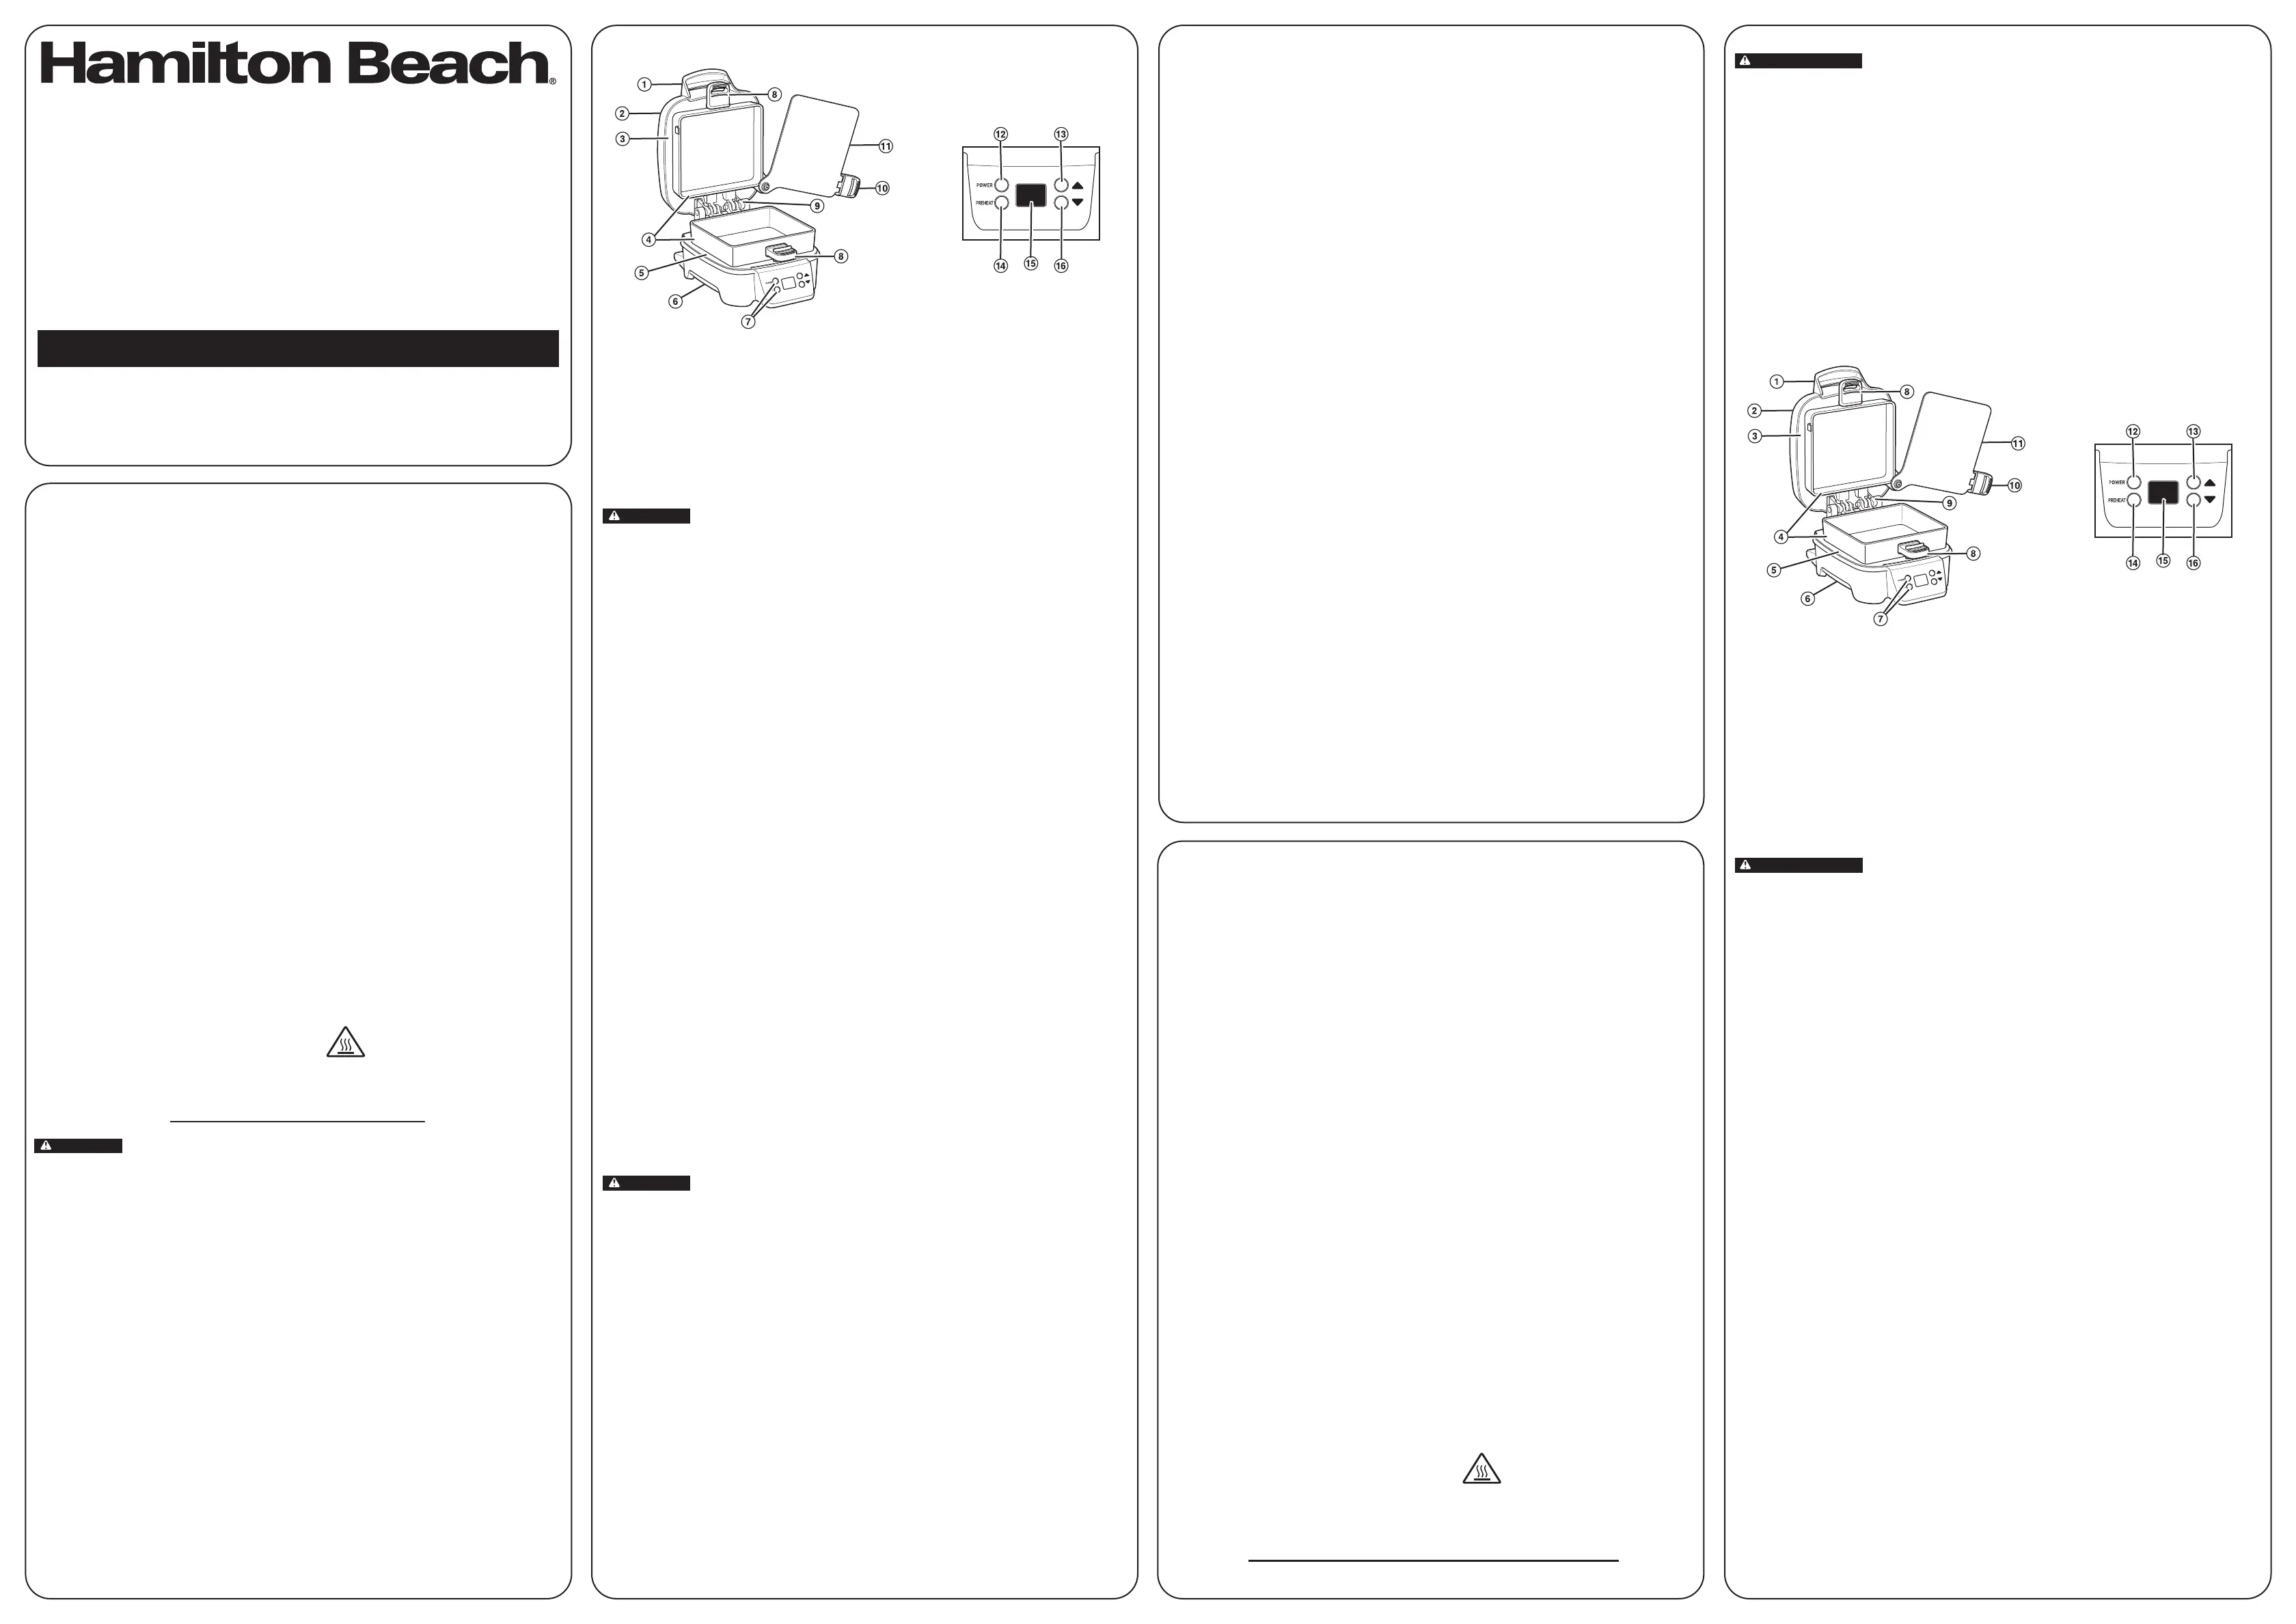
1. Cover Handle
2. Cover
3. Top Heating Plate
4. Removable Ring
Assembly
5. Bottom Heating Plate
6. Base
7. Indicator Lights
8. Ring Handles
9. Hinge
10. Cooking Plate Handle
11. Cooking Plate
12. Red POWER Light
13. Timer Up Button
14. Green PREHEAT Light
15. Timer
16. Timer Down Button
IMPORTANT SAFEGUARDS
When using electrical appliances, basic safety precautions should always be followed to
reduce the risk of fire, electric shock, and/or injury to persons, including the following:
1. Read all instructions.
2. This appliance is not intended for use
by persons (including children) with
reduced physical, sensory, or mental
capabilities, or lack of experience and
knowledge, unless they are closely
supervised and instructed concerning
use of the appliance by a person
responsible for their safety.
3. Close supervision is necessary when any
appliance is used by or near children.
Cleaning and user maintenance shall
not be made by children unless they
are supervised. Children should be
supervised to ensure that they do not
play with the appliance.
4. To protect against a risk of electrical
shock, do not immerse cord, plug, or
any part of the appliance in water or
other liquid.
5. Unplug from outlet when not in use and
before cleaning. Allow to cool before
cleaning. Allow to cool before putting
on or taking off parts, or moving the
appliance. To unplug, grasp the plug and
pull from the outlet. Never pull from the
power cord.
6. Do not operate any appliance with a
damaged supply cord or plug, or after
the appliance malfunctions or has been
dropped or damaged in any manner.
Supply cord replacement and repairs
must be conducted by the manufacturer,
its service agent, or similarly qualified
persons in order to avoid a hazard.
Contact Customer Service for
information on examination, repair, or
adjustment as set forth in the Limited
Warranty.
7. Do not place on or near a hot gas or
electric burner or in a heated oven.
8. Do not let cord hang over edge of
table or counter or touch hot surfaces,
including stove.
9. Do not use outdoors.
10. Do not use appliance for other than
intended purpose.
11. Do not touch hot surfaces. Use handles
or knobs.
12. Do not operate the appliance by means
of an external timer or separate remote-
control system.
13. Do not leave the appliance unattended
while the appliance is connected to an
electrical outlet.
14. Extreme caution must be used when
moving an appliance containing hot oil
or other hot liquids.
15. The use of accessory attachments
not recommended by the appliance
manufacturer may cause injuries.
16. To unplug, grasp the plug and pull from
the outlet. Never pull from the power
cord.
17. Place the appliance only on a dry, level,
and nonflammable surface.
18. During use, provide 4 to 6 inches air
space above, behind, and on both
sides for air circulation. Do not use
on surfaces where heat may cause
a problem.
19. Never remove food with any kind of
cutting device or other metallic kitchen
utensil.
20. Always allow the appliance to cool down
completely before putting away. Never
wind the cord around the appliance
while it is still hot.
21. CAUTION! HOT SURFACE.
The temperature of accessible
surfaces may be high when the
appliance is operating.
SAVE THESE INSTRUCTIONS
Other Consumer Safety Information
This appliance is intended for household use only.
WARNING
Electrical Shock Hazard:
This product is provided with either a
polarized (one wide blade) or grounded
(3-prong) plug to reduce the risk of electric
shock. The plug fits only one way into a
polarized or grounded outlet. Do not defeat
the safety purpose of the plug by modifying
the plug in any way or by using an adapter.
If the plug does not fit fully into the outlet,
reverse the plug. If it still does not fit, have
an electrician replace the outlet.
The length of the cord used on this
appliance was selected to reduce the
hazards of becoming tangled in or tripping
over a longer cord. If a longer cord is
necessary, an approved extension cord
may be used. The electrical rating of the
extension cord must be equal to or greater
than the rating of the appliance. If the
appliance is of the grounding type, the
extension cord should be a grounding-type,
3-wire cord. Care must be taken to arrange
the extension cord so that it will not drape
over the countertop or tabletop where it
can be pulled on by children or accidentally
tripped over.
To avoid an electrical circuit overload, do
not use another high-wattage appliance on
the same circuit with this appliance.
If using an extension cord, it should be
connected to the unit’s power cord before
it is plugged into the outlet. In the case of a
power failure, the same procedure should
be followed.
To order parts, visit:
hamiltonbeach.com/parts
Before first use: Lift Cover to remove Ring Assembly. Wash in dishwasher or in hot, soapy water.
Rinse and dry. Wipe Top and Bottom Heating Plates with a damp, soapy cloth. Remove soap with
a damp cloth; dry thoroughly.
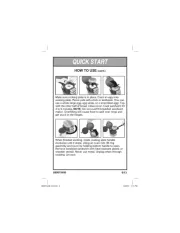
How to Use
WARNING
Burn Hazard. Always use an oven mitt to protect hand when opening cover. Hot
surfaces and escaping steam can burn.
1. To insert Ring Assembly: Lift Cover. Hold
Ring Handles and insert left side of Ring
Assembly into groove on left side of Hinge.
Lower right side of Ring Assembly into
slot on right side of Hinge. NOTE: If Ring
Assembly is not correctly inserted, Cover
won’t close properly.
2. Plug into outlet. Red POWER Light will
glow. Spray Rings and Cooking Plate with
nonstick cooking spray or wipe or brush
with vegetable oil, if necessary.
3. Let unit preheat with Cover closed and
Cooking Plate rotated in between Rings.
NOTE: Green PREHEAT Light will come on
when unit is heated to the correct temperature
and will cycle on and off during cooking. It
is NOT an indicator when sandwich is ready.
Red POWER Light stays on.
4. Use Handle to lift Cover, Top Ring, and
Cooking Plate.
5. Place a slice of bread onto Bottom Heating
Plate.
6. Top bread with ingredients such as
precooked meats, vegetables; and if
not using eggs, divide some ingredients
between the bottom and top of Sandwich
Stacker. DO NOT overfill. Overfilling will
cause food to spill over Ring and get stuck
in the Hinges.
7. Lower Top Ring and Cooking Plate. Make
sure Cooking Plate is rotated securely to
back of Rings as far as it will go to prevent
leaking of egg.
8. If using eggs, crack onto Cooking Plate.
Pierce yolk(s) with a fork or toothpick. Top
Ring will hold up to 2 whole large eggs or
3 large egg whites.
9. Top with another slice of bread.
10. Close Cover. Cook time for most
sandwiches is 2–5 minutes. If using eggs,
cook for 4–5 minutes. NOTE: Do not push
Cover all the way down when loaded with
ingredients or when using a jumbo egg.
Cover may rise as scrambled eggs cook.
11. Set the Timer: press Timer Up or
Timer Down Button to desired time in
half-minute (0.5) increments. If Timer Up or
Timer Down Button has not been pressed
in 5 seconds, the Timer will start.
12. When there is less than 1 minute
remaining, Timer switches to seconds and
continues to count down.
13. Timer will beep when time is up. This unit
does not turn off automatically.
14. When finished cooking, grasp Cooking
Plate Handle and pivot Cooking Plate out
until it stops.
15. Using an oven mitt, grasp Cover Handle
and bottom Ring Handle simultaneously to
lift open.
16. Remove sandwich with plastic or wooden
utensil. Never use metal.
17. If making additional sandwiches, close
Lid and wait until Green PREHEAT Light
is illuminated before cooking another
sandwich.
18. Unplug. Allow to cool.
TIPS
• Get your ingredients together before
cooking your sandwich.
• Always keep Cover closed with Rings and
Cooking Plate in place when preheating.
• Check to make sure Cooking Plate is in place
before preheating, and when adding food.
• If top bread is not toasting, use thicker
bread, or add more ingredients to Top Ring.
You may need to experiment to find the
perfect combination. DO NOT overfill.
• Buttering outside of bread will give a
better appearance and “toasted” quality for
sandwiches. Use about 1 to 2 teaspoons
softened butter or margarine per slice of
bread. This is optional.
Care and Cleaning
WARNING
Electrical Shock Hazard. Disconnect power before cleaning. Do not immerse
cord, plug, or base in any liquid.
1. Unplug. Allow to cool.
2. To remove Ring Assembly for cleaning,
hold Ring Handles and tilt right side up to
remove.
3. Wash Ring Assembly in top rack only of
dishwasher or in hot, soapy water. Rinse and
dry. Do not use steel wool, scouring pads,
or abrasive cleansers on any part of the
unit. Never use sharp or pointed objects for
cleaning. DO NOT use “SANITIZE” setting
when washing in dishwasher. SANITIZE
cycle temperatures could damage your
product.
4. Wipe Top and Bottom Heating Plates with
a damp, soapy cloth. Remove soap with a
damp cloth; dry thoroughly.
5. To replace Ring Assembly: Lift Cover. Hold
Ring Handles and insert left side of Ring
Assembly into groove on left side of Hinge.
Lower right side of Ring Assembly into
slot on right side of Hinge. NOTE: If Ring
Assembly is not correctly replaced, Cover
won’t close properly.
6. Wipe outside of unit with a damp cloth.
Troubleshooting
Low, poor, or slow heating.
• Unit needs to be preheated with Cover
closed with Ring Assembly and Cooking
Plate in place.
• Sandwich Stacker wasn’t preheated until
PREHEAT Light was illuminated. Green
PREHEAT Light will come on in about 5 to
7 minutes, indicating unit is heated to the
correct temperature. Light will cycle on and
off during cooking and does not indicate
sandwiches are ready.
• Wait until Green PREHEAT Light is
illuminated before cooking another
sandwich.
• Overfilled. Reduce amount of ingredients in
your sandwiches.
• Make sure Cooking Plate is rotated
securely to back of Ring as far as it will go
to prevent leaking of eggs, and Cover is
closed when preheating.
Egg undercooked.
• Extra-large eggs, frozen, or very cold
ingredients may lengthen cooking time.
Add additional cooking time.
Top bread not done.
• Add additional ingredients to Top Ring, or
use thicker bread.
• Add additional cooking time.
Egg overcooked.
• Cooking time is about 5 minutes. Cooking
time may vary if you are using small eggs,
scrambled eggs, or egg whites. Reduce
cooking time for future recipes.
Ingredients stick to Rings or nonstick Cooking
Plate.
• Use a plastic or wooden utensil to loosen
any baked-on ingredients. Lightly spray
with nonstick cooking spray before
preheating for next use.
Eggs leak out of Rings.
• Unit is overfilled. Only use large eggs and
reduce amount or size of ingredients. Do
not press down on Cover.
• Cooking Plate may not have been in the
correct position. Make sure Cooking Plate
is rotated securely to back of Rings as far
as it will go to prevent leaking of egg.
• Used very thin purchased egg whites. Use
fresh egg whites or try a different brand of
egg whites.
• Make sure unit is properly preheated.
Cover rises when cooking my sandwich.
• The air whisked into large scrambled eggs
may cause Cover to rise while the eggs are
cooking. Do not press down on Cover.
Bread too brown.
• Higher fat content and sugars may cause
breads to darken. Cook eggs for several
minutes without top bread and with Cover
down. Then add bread to finish cooking
your sandwiches. Also, have ingredients
ready to assemble so bottom bread
does not cook much longer than top
ingredients.
Limited Warranty
This warranty applies to products purchased and used in the U.S. and Canada. This is the only
express warranty for this product and is in lieu of any other warranty or condition.
This product is warranted to be free from defects in material and workmanship for a period of
one (1) year from the date of original delivery in the U.S. and Canada. During this period, your
exclusive remedy is replacement of this product or any component found to be defective, at
our option; however, you are responsible for all costs associated with our returning a product
or component under this warranty to you. If the product or component is unavailable, we will
replace with a similar one of equal or greater value.
This warranty does not cover glass, filters, wear from normal use, use not in conformity with the
printed directions, or damage to the product resulting from accident, alteration, abuse, or misuse.
This warranty extends only to the original consumer purchaser or gift recipient. Keep the original
sales receipt, as proof of purchase is required to make a warranty claim. This warranty is void if
the product is used for other than single-family household use or subjected to any voltage and
waveform other than as specified on the rating label (e.g., 120 V ~ 60 Hz).
We exclude all claims for special, incidental, and consequential damages caused by breach of
express or implied warranty. All liability is limited to the amount of the purchase price. Every
implied warranty, including any statutory warranty or condition of merchantability or fitness
for a particular purpose, is disclaimed except to the extent prohibited by law, in which case
such warranty or condition is limited to the duration of this written warranty. This warranty
gives you specific legal rights. You may have other legal rights that vary depending on where
you live. Some states or provinces do not allow limitations on implied warranties or special,
incidental, or consequential damages, so the foregoing limitations may not apply to you.
To make warranty claim, do not return this appliance to the store. Please call 1.800.851.8900
in the U.S. or 1.800.267.2826 in Canada or write Hamilton Beach Brands, Inc., Attn: Consumer
Affairs, 261 Yadkin Road, Southern Pines, NC 28387, or visit hamiltonbeach.com/customer-
service in the U.S. or hamiltonbeach.ca/customer-service in Canada. For faster service, include
the model, type, and series numbers on your appliance.
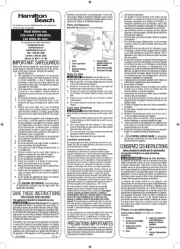
Parts and Features
Read before use / Lire avant utilisation / Lea antes de usar.
For recipes, tips,
product information
and registration:
hamiltonbeach.com
Pour des recettes,
des conseils, des
renseignements sur le
produit et l’enregistrement :
hamiltonbeach.ca
Para recetas, consejos,
información del producto
y registro:
hamiltonbeach.com.mx
Sandwich Stacker™ Hot
Sandwich Maker
Grille-sandwich chaud
Sandwich Stacker
MC
Máquina para Sándwiches
calientes Sandwich Stacker™
PRÉCAUTIONS IMPORTANTES
Pour utiliser un appareil électroménager, vous devez toujours prendre des mesures
élémentaires de sécurité pour réduire le risque d’incendie, d’électrocution et/ou de blessure
corporelle, en particulier les mesures suivantes :
1. Lire toutes les instructions.
2. Cet appareil n’est pas destiné à être
utilisé par des personnes (y compris les
enfants) dont les capacités physiques,
sensorielles ou mentales sont
réduites, ou manquant d’expérience
et de connaissance, sauf si elles sont
étroitement surveillées et instruites
sur l’utilisation de l’appareil par une
personne responsable de leur sécurité.
3. Une surveillance étroite est requise
pour tout appareil utilisé par ou près
des enfants. Le nettoyage et l’entretien
ne doit pas fait par des enfants à moins
d’être sous supervision. Surveiller que
les enfants ne jouent pas avec l’appareil.
4. Pour protéger contre le risque de choc
électrique, ne pas immerger le cordon, la
fiche ou le four grille-pain dans l’eau ou
autre liquide.
5. Débrancher le appareil de la prise de
courant lorsqu’il n’est pas utilisé et avant
le nettoyage. Le laisser refroidir avant
d’y ajouter ou d’y enlever des pièces ou
de le déplacer. Pour le débrancher, tenir
la fiche et la retirer de la prise. Ne jamais
tirer sur le cordon.
6. Ne pas faire fonctionner un appareil
électroménager avec un cordon ou
une fiche endommagée, ou lorsque
l’appareil ne fonctionne pas bien ou
a été échappé ou endommagé d’une
manière quelconque. Le remplacement
et la réparation du cordon d’alimentation
doivent être faits par le fabricant, son
agent de service ou toute personne
qualifiée de façon à éviter tout danger.
Veuillez communiquer avec le service à
la clientèle pour obtenir de l’information
concernant l’inspection, la réparation
ou le réglage, comme précisé dans la
garantie limitée.
7. Ne pas placer l’appareil sur ou près d’un
brûleur chaud à gaz ou d’un élément
électrique, ou dans un four chauffé.
8. Ne pas laisser pendre le cordon de
la table ou du comptoir et éviter tout
contact entre le cordon et les surfaces
chaudes incluant la cuisinière.
9. Ne pas utiliser à l’extérieur.
10. N’utiliser cet appareil que pour les
fonctions auxquelles il est destiné.
11. Ne pas toucher les surfaces chaudes.
Utiliser les poignées ou boutons.
12. Ne pas faire fonctionner cet appareil
avec une minuterie externe ou un
système de télécommande distinct.
13. Ne pas laisser l’appareil sans
surveillance lorsqu’il est branché dans
une prise de courant.
14. Exercer une très grande prudence lors
du déplacement d’un appareil contenant
des aliments, de l’eau ou tout autre
liquide chaud.
15. L’utilisation d’accessoires non
recommandés par le fabricante
d’appareil peut causer des blessures.
16. Pour débrancher, tenir la fiche
fermement et tirer de la prise. Ne jamais
tirer par le cordon d’alimentation.
17. Veuillez placer l’appareil seulement
sur une surface sèche, plane et
ininflammable.
18. Pendant le fonctionnement, prévoir de
4 à 6 po (10,2 à 15,2 cm) d’espace tout
autour de l’appareil.
19. Ne jamais retirer les aliments à l’aide
d’ustensiles de cuisine métalliques ou
tout autre dispositif de coupe.
20. Toujours permettre le refroidissement de
l’appareil avant de le ranger et ne jamais
enrouler le cordon autour de l’appareil
pendant qu’il est chaud.
21. ATTENTION : SURFACE
CHAUDE : La température des
surfaces extérieures sera plus
élevée pendant le fonctionnement de
l’appareil.
CONSERVER CES INSTRUCTIONS
Autres consignes de sécurité pour le consommateur
Cet appareil est destiné à un usage domestique uniquement.
AVERTISSEMENT
Risque de choc
électrique : Cet appareil est doté d’une
fiche polarisée (lame plus large) ou d’une
fiche (3 lames et mise à la terre) pour
réduire le risque d’électrocution. Cette fiche
s’insère d’une seule manière dans une prise
polarisée ou prise avec mise à la terre. Ne
pas transformer le dispositif de sécurité de
la fiche en modifiant celle-ci de quelconque
façon ou en utilisant un adaptateur. Si vous
ne pouvez pas insérer complètement la fiche
dans la prise, inversez la fiche. Si elle refuse
toujours de s’insérer, faire remplacer la prise
par un électricien.
La longueur du cordon installé sur cet
appareil a été sélectionnée afin de réduire
les risques d’enchevêtrement ou de faux
pas causés par un fil trop long. L’utilisation
d’une rallonge approuvée est permise, si le
cordon est trop court. Les caractéristiques
électriques de la rallonge doivent
être équivalentes ou supérieures aux
caractéristiques de l’appareil. Si cet appareil
est du type à mise à la terre, la rallonge
doit être du type à mise à la terre, à 3 fils.
Prendre toutes les précautions nécessaires
pour installer la rallonge de manière à ne
pas la faire courir sur le comptoir ou sur une
table pour éviter qu’un enfant ne tire sur le
cordon ou trébuche accidentellement.
Pour éviter la surcharge du circuit
électrique, ne pas utiliser un autre appareil à
haute puissance sur le même circuit que cet
appareil.
Avec l’utilisation d’une rallonge, celle-ci doit
être branchée au cordon d’alimentation de
l’appareil avant de la brancher dans la prise
murale. En cas de panne de courant, la
même méthode doit être suivie.
1. Poignée du couvercle
2. Couvercle
3. Plaque de chauffage
supérieure
4. Assemblage d’anneau
amovible
5. Plaque de chauffage
inférieure
6. Base
7. Témoins lumineux
8. Poignées d’anneaux
9. Charnières
10. Poignée de la plaque
de cuisson
11. Plaque de cuisson
12. Témoin de POWER
(alimentation) rouge
13. Bouton d’augmentation
de la minuterie
14. Témoin de PREHEAT
(préchauffage) vert
15. Minuterie
16. Bouton de diminution
de la minuterie
Pour commander des pièces, visiter :
hamiltonbeach.ca/parts
Avant la première utilisation : Soulever le couvercle pour retirer l’assemblage d’anneau. Le
laver au lave-vaisselle ou dans l’eau chaude savonneuse. Rincer et sécher. Essuyer les plaques
supérieure et inférieure à l’aide d’un chiffon imbibé d’eau savonneuse. Enlever le savon avec un
chiffon humide. Sécher soigneusement.
Utilisation
AVERTISSEMENT
Risque de brûlure. Toujours utiliser un gant de cuisinier pour protéger
les mains au moment de l’ouverture d’un couvercle. Les surfaces chaudes et la vapeur qui
s’échappe peuvent causer des brûlures.
1. Pour insérer l’assemblage d’anneau :
Soulever le couvercle. Tenir les poignées
d’anneaux et insérer le côté gauche de
l’assemblage d’anneau dans la rainure du
côté gauche de la charnière. Abaisser le
côté droit de l’assemblage d’anneau dans
la fente située du côté droit de la charnière.
REMARQUE : Si l’assemblage d’anneau
n’est pas inséré convenablement, le
couvercle ne fermera pas correctement.
2. Brancher l’appareil sur une prise. Le
témoin de POWER (alimentation) rouge
s’illuminera. Vaporiser les anneaux et
la plaque de cuisson d’enduit à cuisson
antiadhésif ou les badigeonner d’huile
végétale, au besoin.
3. Laisser l’appareil se réchauffer avec couvercle
fermé et les plaques de cuisson insérées entre
les anneaux.
REMARQUE
: Le témoin de PREHEAT
(préchauffage) vert s’allumera lorsque la
température adéquate est atteinte puis
s’allumera et s’éteindra pendant la cuisson. Ce
voyant n’indique PAS que le sandwich est prêt
à manger. Le témoin de POWER (alimentation)
rouge reste allumé.
4. Utiliser la poignée pour soulever le
couvercle, l’anneau supérieur et la plaque
de cuisson.
5. Déposer une tranche de pain sur la plaque
de chauffage inférieure.
6. Déposer sur la tranche de pain des
ingrédients comme des viandes précuites
et des légumes et, si aucun œuf n’est
utilisé, diviser certains ingrédients entre les
parties inférieure et supérieure du grille-
sandwich. NE PAS trop remplir la plaque.
Trop la remplir ferait déborder les aliments
par-dessus l’anneau et ils resteraient
coincés dans les charnières.
7. Abaisser l’anneau supérieur et la plaque de
cuisson. S’assurer de faire pivoter la plaque
de cuisson autant qu’elle est capable de le
faire vers l’arrière des anneaux pour éviter
que les œufs ne coulent des anneaux.
8. Si des œufs sont utilisés, les casser sur la
plaque de cuisson. Percer les jaunes avec
une fourchette ou un cure-dents. L’anneau
supérieur peut contenir jusqu’à 2 gros œufs
entiers ou le blanc de 3 gros œufs.
9. Recouvrir les ingrédients d’une autre
tranche de pain.
10. Fermer le couvercle. Le temps de cuisson
de la plupart des sandwichs est de 2 à 5
minutes. Si des œufs sont utilisés, cuire le
sandwich de 4 à 5 minutes.
REMARQUE : Ne pas pousser le couvercle
jusqu’en bas lorsque l’appareil est chargé
d’ingrédients ou d’un œuf de très grand
format. Le couvercle peut se soulever
pendant la cuisson d’un œuf brouillé.
11. Régler la minuterie : appuyer sur le
bouton d’augmentation ou de diminution
de la minuterie à la durée souhaitée par
incréments d’une demie (0,5) minute.
Si les boutons d’augmentation ou de
diminution de la minuterie n’ont pas été
actionnés dans les 5 secondes, la minuterie
démarrera.
12. Lorsqu’il reste moins de 1 minute, la
minuterie continuera le compte à rebours
en indiquant les secondes.
13. La minuterie émettra un signal sonore à la
fin du temps de cuisson. Cet appareil ne
s’éteint pas automatiquement.
14. Une fois la cuisson terminée, prendre la
plaque de cuisson par la poignée et la faire
pivoter vers l’extérieur de l’appareil jusqu’à
ce qu’elle s’arrête.
15. À l’aide de gants de cuisine, tenir la
poignée du couvercle et celle de l’anneau
inférieur simultanément pour ouvrir le
grille-sandwich.
16. Retirer le sandwich à l’aide d’un ustensile
en plastique ou en bois. Ne jamais utiliser
d’ustensiles en métal.
17. Pour faire griller d’autres sandwichs, fermer
le couvercle et attendre que le témoin
PREHEAT (préchauffage) vert s’allume
avant de déposer un autre sandwich.
18. Débrancher. Laisser refroidir.
Pièces et caractéristiques