DeLonghi DDC 606 DF-1 Manual
Læs gratis den danske manual til DeLonghi DDC 606 DF-1 (52 sider) i kategorien Ovn. Denne vejledning er vurderet som hjælpsom af 12 personer og har en gennemsnitlig bedømmelse på 4.5 stjerner ud af 6.5 anmeldelser.
Har du et spørgsmål om DeLonghi DDC 606 DF-1, eller vil du spørge andre brugere om produktet?

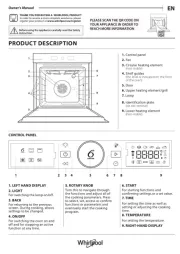
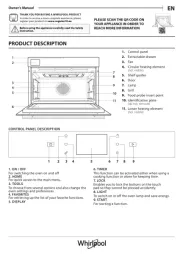
Produkt Specifikationer
| Mærke: | DeLonghi |
| Kategori: | Ovn |
| Model: | DDC 606 DF-1 |
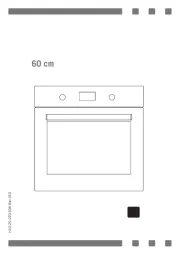
| Bredde: | 600 mm |
| Dybde: | 600 mm |
| Højde: | 900 mm |
| Kontroltype: | Dreje |
| Indbygget skærm: | Ja |
| Pakkevægt: | 7100 g |
| Indvendig belysning: | Ja |
| Integreret ur: | Ja |
| Grill: | Ja |
| Damp madlavning: | Ingen |
| Konvektion madlavning: | Ja |
| Forsinket start-timer: | Ja |
| Justerbare fødder: | Ingen |
| Selvrensende: | Ingen |
| Komfurtype: | Gaskomfur |
| Blus/kogeplade zone 1 strøm: | 1000 W |
| Blus/kogeplade zone 1 position: | Venstre front |
| Blus/kogeplade zone 1 strømkilde: | Gas |
| Blus/kogeplade zone 2 position: | Venstre bagende |
| Blus/kogeplade zone 2 strømkilde: | Gas |
| Tilsluttet belastning (elektrisk): | 4300 W |
| Blus/kogeplade zone 4 strømkilde: | Gas |
| Blus/kogeplade zone 3 strømkilde: | Gas |
| Blus/kogeplade zone 3 position: | Højre forside |
| Blus/kogeplade zone 4 position: | Venstre bagende |
| Tilsluttet belastning (gas): | 8500 W |
| Overløbsbeskyttelse: | Ja |
| Energieffektivitetsklasse: | A |
| Varmebeskyttende dør: | Ingen |
| Kølende ventilator i døren: | Ingen |
| Antal ovne: | 2 |
| Ovn nettokapacitet: | 39 L |
| Konventionel madlavning: | Ja |
| Energiforbrug (konventionel): | 0.7 kWh |
| Energiforbrug (tvungen konvektion): | 0.83 kWh |
| Mikroovn madlavning: | Ingen |
| Ovndør åbning: | Dropdown åbning |
| Alarm klar: | Ja |
| Aftaglig ovndør: | Ja |
| Antal hylder: | 3 hylder |
| Antal hyldepositioner: | 4 |
| Aftagelig dørglas: | Ja |
| Langsom madlavning: | Ja |
| Antal gasbrændere: | 4 |
| Blus/kogeplade zone 4 strøm: | 1750 W |
| Blus/kogeplade zone 3 strøm: | 3500 W |
| Kogezone 2 boost: | 1750 W |
| Stegetermometer: | Ingen |
| Ovn strømkilde: | Elektrisk |
| Teleskopskinne medfølger: | Ja |
| Ovn 2 nettokapacitet: | 59 L |
| Ovn 2 energiforbrug (konventionel): | 0.7 kWh |
| Ovnen slukker automatisk: | Ja |
| Ovnens indvendige belægning: | Emalje |
| Ovndør materiale: | Glas/metal |
| Ovn 2 antal hylder: | 1 hylder |
| Ovn 2 døråbning: | Dropdown åbning |
| Ovn 2 interiør belysning: | Ja |
| Ovn 2 dørmateriale: | Glas/metal |
| Aftagelig ovnlåge 2: | Ja |
| Ovn 2 grill: | Ja |
| Ovn 2 aftageligt glas i låge: | Ja |
| Ovn timer: | Ja |
| Ovnposition: | Top |
| Ovn 2 position: | Bund |
| Ovn 2 antal hyldepositioner: | 4 |
| Ovn 2 teleskopiske hylder: | Ja |
| Kan omdannes til flydende petroliumsgas (LPG): | Ja |
| Ovn 2 energiforbrug (tvungen varmluft): | 0.83 kWh |
| Blus timer: | Ingen |
| Komfur, automatisk slukning: | Ingen |
| Elektronisk antændelsestype: | Enhåndstænding |
| Nem at rengøre (blus): | Ja |
| Ovn 2 indvendig belægning: | Emalje |
Har du brug for hjælp?
Hvis du har brug for hjælp til DeLonghi DDC 606 DF-1 stil et spørgsmål nedenfor, og andre brugere vil svare dig
Ovn DeLonghi Manualer


Ovn Manualer
- Rival
- Smev
- Wamsler
- AEG
- Daewoo
- Saturn
- Bluesky
- Riviera Bar
- Godrej
- Fagor
- SilverCrest
- Baumatic
- Mora
- Tracer
- Crosley
Nyeste Ovn Manualer