Dimplex DXLWP400 Manual


Læs gratis den danske manual til Dimplex DXLWP400 (4 sider) i kategorien Varmeapparat. Denne vejledning er vurderet som hjælpsom af 49 personer og har en gennemsnitlig bedømmelse på 4.5 stjerner ud af 25 anmeldelser. Har du et spørgsmål om Dimplex DXLWP400, eller vil du spørge andre brugere om produktet?

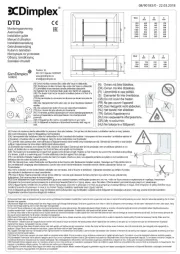
Side 1/4
Important Safety Advice
When using electrical appliances, basic
precautions should always be followed to
reduce the risk of re, electrical shock, and
injury to persons, including the following:
IMPORTANTThe wall bracket supplied with
the appliance must be used.
WARNING DO NOT USE THIS HEATER
IN THE IMMEDIATE SURROUNDINGS OF A
BATH, A SHOWER OR A SWIMMING POOL.
IMPORTANT If the heater is installed in a
room containing a bath or shower, it must be so
installed that switches and other controls cannot
be touched by a person using a bath or shower.
Do not use outdoors.
Do not locate the heater immediately below a
xed socket outlet or connection box.
WARNING: In order to avoid overheating, do
not cover the heater. Do not place material
or garments on the heater, or obstruct the
air circulation around the heater, for instance
by curtains or furniture, as this could cause
overheating and a re risk.
NEVER cover or obstruct in any way the heat
outlet slots at the top of the heater or the air
inlet slots in the base of the heater.
The heater carries the Warning symbol
indicating that it must not be covered.
CAUTION - Some parts of this product can
become very hot and cause burns. Particular
attention has to be given where children and
vulnerable people are present.
This appliance can be used by children aged
from 8 years and above and by persons with
reduced physical, sensory or mental capabilities
or lack of experience and knowledge if they
have been given supervision or instruction
concerning use of the appliance in a safe way
and understand the hazards involved.
Dimplex Low Wattage Panel Heaters
Models: DXLWP400, DXLWP400TI,
DXLWP800, DXLWP800TI N & ARLWP800TI
Installation and Operating Instructions
Dimensions
(millimetres)
Models Speci cation
DXLWP400 400W Neon Heat Switch
DXLWP400TI 400W Neon Heat Switch / 24 Hour Timer
DXLWP800 800W Neon Heat Switch
DXLWP800TI N 800W Neon Heat Switch / 24 Hour Timer
ARLWP800TI 800W 2 Neon Heat Switches / 24 Hour Timer
THESE INSTRUCTIONS SHOULD BE READ CAREFULLY AND RETAINED FOR FUTURE REFERENCE
600 mm - 400W
800 mm - 800W
500 mm
INDUKLWPRG Issue 9
Children shall not play with the appliance.
Cleaning and user maintenance shall not be
made by children without supervision.
Children of less than 3 years should be kept
away unless continuously supervised.
Children aged from 3 years and less than 8
years shall only switch on/off the appliance
provided that it has been placed or installed in
its intended normal operating position and they
have been given supervision or instruction
concerning use of the appliance in a safe way
and understand the hazards involved. Children
aged from 3 years and less than 8 years shall
not plug in, regulate and clean the appliance
or perform user maintenance.
Note that due care and consideration must be
taken when using this heater in series with a
thermal control, a program controller, a timer
or any other device that switches on the heat
automatically, since a re risk exists when the
heater is accidentally covered or displaced.
If the supply cord is damaged it must be
replaced by the manufacturer or service agent
or a similarly quali ed person in order to avoid
a hazard.
WARNING: Servicing and product
repairs should only be undertaken by the
manufacturers approved service agent or a
similarly quali ed person, using only exact
manufacturer approved spare parts.
Installation
The Fixing Kit should contain: 1 Drilling Template, 3 Screws, 3
Rawlplugs and 1 Mounting Bracket.
Wall Mounted Operation Fig. 2(see )
Suggested Fixings
SOLID BRICK/BLOCK: No. 8 Rawlplug inserts, 6mm drill bit.
PLASTERBOARD: If possible locate studding and use No. 8
woodscrews directly into the wood, otherwise M5 rawlplug intersets
are suitable.
NOTE: FOR OTHER WALL TYPES (e.g. Timber frame and hollow
concrete) SEEK SPECIALIST ADVICE.
1. Select the position for the heater ensuring there is clearance
from any furniture and ttings of at least 150mm above the
heater, 50mm below and 25mm each side. Curtains must
not be closer than 150mm from the top of theheater.
2. Position the drilling template provided on the wall ensuring
it is level. Mark the position of the relevant holes on the
wall at the edge of template. Before drilling check that the
distance between the hole centres is correct, 340mm for
400W Models and 540mm for 800W models (see ).Fig. 2
Fig. 2
Positioning the Heater
Select the position for the heater ensuring there is clearance from
any furniture and ttings of at least 150mm above the heater, 50mm
below (wall mounted) and 25mm each side. Curtains must not be
closer than 150mm from the top of the heater.
Free Standing Operation Fig. 1(see )
NEVER USE THE HEATER FREE STANDING WITHOUT THE
FEET FITTED (FEET ARE PACKED SEPARATELY IN CARTON).
1. Lay the heater on its front.
2. Remove the two star head screws from the base of the
heater using a x-head screwdriver.
3. Place feet over base of heater, align holes and engage hook
on foot into the recess on the back of the heater - see Fig.
1.
4. Replace the screws but do not overtighten.
Fig. 1
Rear View
3. Drill the wall at the three marked positions and t the wall
plugs.
Ensure template has been removed.
4. Fix two No. 8 screws to the top two holes leaving 3mm of
the screw exposed. Hang the heater on the screws.
5. Fit the bottom bracket, found in the xing kit, in the slot at
the base of the heater and screw the bracket to the wall.
Test that the heater is now securely xed to the wall.
130mm 340mm - 400W
540mm - 800W
95mm
150mm
50mm
420mm
25mm 25mm
130mm
Drilling Holes
Bracket
Electrical Connection
WARNING THIS APPLIANCE MUST BE EARTHED
If the socket outlets in your home are not of the 13 amp BS1363
type they will not accept the plug connected to this heater,
therefore cut othe plug. When cut off this plug can constitute
a shock hazard if inserted into a socket outlet. It must therefore
be disposed of safely.
Before wiring the appropriate plug please note that the wires in this
mains lead are coloured in accordance with the following code.
GREEN/YELLOW: EARTH
BLUE: NEUTRAL
BROWN: LIVE
Connect the Green/Yellow E wire to the terminal marked or the
earth symbol or coloured or Green Green/Yellow.
Connect the wire to the terminal marked or coloured Brown L Red.
Connect the wire to the terminal marked or coloured Blue N Black.
DO NOT connect the Brown (Live Blue) or the (Neutral) wires
to the terminal of your 13 amp plug. If the terminals of the Earth
plug are unmarked or you are in any doubt, consult a quali ed
electrician.
CAUTION: If you use this heater in conjunction with a thermal
control, programme controller, timer or any other device which
switches the heater on automatically observe all safety warnings
at all times.


Produkt Specifikationer

Mærke: Dimplex
Kategori: Varmeapparat
Model: DXLWP400
Type: Radiator
Tænd-/slukkontakt: Ja
Overophedningsbeskyttelse: Ja
Varmeevne: 400 W
Varmestrøm (min.): - W
Bredde: 600 mm
Dybde: 200 mm
Højde: 530 mm
Vægt: 4600 g
Placeringsmuligheder: Wall,Floor
Produktfarve: Hvid

Har du brug for hjælp?

Hvis du har brug for hjælp til Dimplex DXLWP400 stil et spørgsmål nedenfor, og andre brugere vil svare dig


Varmeapparat Dimplex Manualer
Dimplex

Dimplex DX 521 Manual

13 Januar 2025
Dimplex

Dimplex VFE 20 Manual

13 Januar 2025
Dimplex

Dimplex VFE 30 Manual

13 Januar 2025
Dimplex

Dimplex Mini Cube Manual

30 December 2025
Dimplex

Dimplex DX 425E Manual

30 December 2025
Dimplex

Dimplex DTD4T Manual

30 December 2025
Dimplex

Dimplex MPH500 Manual

8 Oktober 2024
Dimplex

Dimplex ECOT4FT Manual

8 Oktober 2024
Dimplex

Dimplex FUTM2CE Manual

4 Oktober 2024
Dimplex

Dimplex VFM60HY Manual

4 Oktober 2024

Varmeapparat Manualer

Nyeste Varmeapparat Manualer

XPower

XPower B-55 Manual

14 Juni 2025
XPower

XPower B-2 Manual

14 Juni 2025
XPower

XPower M-27 Manual

14 Juni 2025
XPower

XPower P-80 Manual

14 Juni 2025
Aura

Aura CF15120B Manual

14 Juni 2025
XPower

XPower B-4 Manual

14 Juni 2025