Dragonshock Orion Glow Manual

Dragonshock Joystick Orion Glow

Læs gratis den danske manual til Dragonshock Orion Glow (1 sider) i kategorien Joystick. Denne vejledning er vurderet som hjælpsom af 2 personer og har en gennemsnitlig bedømmelse på 4.4 stjerner ud af 1.5 anmeldelser. Har du et spørgsmål om Dragonshock Orion Glow, eller vil du spørge andre brugere om produktet?

Side 1/1
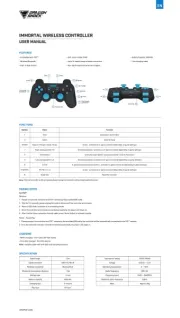
ORION GLOW WIRELESS CONTROLLER
USER MANUAL
LED INDICATORS
ABXY
BUTTONS
RIGHT
JOYSTICK / R3
- (SELECT)
CAPTION BUTTON
+ (START)
HOME BUTTON
LEFT
JOYSTICK / L3
D-PAD
3.5MM AUDIO JACK
(AUDIO FUNCTION WORKS
ONLY IN WIRED MODE)
1
2 3
4
5
6
7
8
9
10
11
M2
M1
PROGRAMMING
SWITCH BUTTON
R2
RESET
SETTING BUTTON FOR
RGB CONTROL & PROGRAMMING
L2
TYPE-C CHARGING PORT
R1
L1
12
21
19
20
13
14
15
16
17
18
FEATURES
• Wireless Bluetooth®
• Customized bright RGB lights
• Built-in dual motors
• Programmable back buttons
• Turbo function
• Motion control
• Six-axis sensor (Gyro)
• Battery capacity (800mAh)
• Type-C charging cable, 2m
• 3.5 mm audio headset port – plug & play
(Audio function works only in wired mode)
PAIRING STEPS
*Audio function works only in wired mode.
*iOS compatibility works only with the games downloaded via Apple Store. Ensure the games are compatible with controller.
RECONNECTING
Once the controller has been paired with the device once, you do not need to repair the device. When the controller is off, simply press HOME button to reconnect.
FIRMWARE UPDATE
- Firmware update instruction available on www.dragonshock.com.
- Find and select Orion Glow Controller.
- Click 'Download' and follow the instructions on the screen.
TURBO
Support buttons – ABXY, L1 / L2, R1 / R2, D-pad.
Setup – Example, set L1 as Turbo.
Shoot, Press and hold ‘T + L1’.
Auto shoot, Press and hold ‘T + L1’, 2nd time.
Clear Turbo, Press and hold ‘T + L1’, 3rd time.
Clear all Turbo functions - Press and hold ‘T + -’ for 3 seconds.
L1
Turbo
- (Select)Turbo
Turbo L3
VIBRATION ADJUSTMENT
High
Press and hold the ‘TURBO’ button, and press L3 towards up direction.
Low
Press and hold the ‘TURBO’ button, and press L3 towards down direction.
Turbo L3
Turbo
- (Start)
SPEED ADJUSTMENT
High
Press and hold the ‘TURBO’ button, and press
SELECT (-) towards up direction.
Low
Press and hold the ‘TURBO’ button, and press
START (+) towards down direction.
Turbo - (Select)
MACRO PROGRAMMING
Support buttons: ABXY, L1 / L2, R1 / R2, L3 / R3, D-pad
Programming switch: on the back of the controller, switch the programing button to the right, Macro programming mode is on.
Setup
1. Press and hold the 'SETTING' and 'M2' buttons simultaneously until all 4 LED indicators flash.
2. Press any buttons or combinations of buttons you want to program.
3. Press the 'M2' button again.
4. The LED indicators will return to their previous state, indicating the setting is complete.
SIX-AXIS CALIBRATION
1. Pair the controller to your Switch console.
2. Press and hold the 'A' + 'SELECT (-)' buttons together for 2 seconds.
3. Wait for the controller to vibrate, indicating that the calibration process is complete.
Clear
1. Press and hold the 'SETTING' and 'M2' buttons simultaneously until all 4 LED indicators flash.
2. Press ‘M2’ button again.
3. The LED indicators will return to their previous state, indicating the setting is cleared.
Note: The programming buttons have memory function.
When charging - the 4 indicator LEDs rotate slowly.
Fully charged - all LEDs off.
*When playing through wired mode, the controller will be charged by the computer or console.
CHARGING
RGB LEDS CONTROL
- To choose your preferred colour, press the 'SETTING' button.
- Available colours & sequence: RGB MIX WAVE, PURPLE, EMERALD, ORANGE, RED, GREEN, BLUE, CYAN, or OFF.
- The RGB LEDs will remember your selection.
3 4
21
3 seconds
4 LEDs
indicators flash
2m
Bluetooth 5.0
8m
Li-ion
800mAh
3H
≥8H
Type-C charging cable
Wireless connection
Bluetooth transmission distance
Battery type
Battery capacity
Charging hour
Play hour
0.15W
5V
0-45
ISM 2.4G
2402-2480MHZ
0dbm
approx. 205±5g
Input power rating
Voltage
Operating temperature
Radio frequency
Frequency band
Maximum radio-frequency
Mass
SPECIFICATION
DSCNSW-GLW V.001
For SWITCH™ / SWITCH™ OLED
Wireless BT
1. On your Switch console's Home screen, go to [Controllers] > [Change Grip / Order] and follow the on-screen instructions.
2. Hold the 'HOME' button for 5 seconds to turn on the controller. LED lights 1 through 4 will flash one after the other, all RGB lights will turn on, indicating it's in pairing mode.
3. When the controller and console are successfully connected, one LED light will stay on, and the controller will vibrate.
Wired
1. Connect the Nintendo Switch dock and TV using the HDMI cable.
2. Connect the controller to the Nintendo Switch dock using the Type-C cable provided. When connected, 4 LED indicators will flash.
3. When the connection is successful, one LED indicator will stay on, all RGB lights will turn on, and the controller will vibrate.
For Mobile
Wireless BT / Android
1. Turn the controller off, press and hold the ‘Y + HOME’ buttons together for 3-5 seconds. Now the LED lights flash in sequence, followed by LED2 + LED3 flashing and all RGB
lights will turn on, indicating pairing mode.
2. Look for "Orion Controller" in the list of Bluetooth devices on your device, select it to pair.
3. Once successfully connected, LED2 + LED3 will stop flashing and stay on.
Wireless BT / iOS
1. Turn the controller off, press and hold the ‘X + HOME’ buttons together for 3-5 seconds. Now the LED lights flash in sequence, followed by LED1 + LED4 flashing and all RGB
lights will turn on, indicating pairing mode.
2. Look for "Xbox Wireless Controller" in the list of Bluetooth devices on your device, select it to pair.
3. Once successfully connected, LED1 + LED4 will stop flashing and stay on.
For PC
Wireless BT
1. Turn off the controller, press and hold the ‘X + HOME’ buttons together for 3-5 seconds. Now the LED lights flash in sequence, followed by LED1 + LED4 flashing and all RGB
lights turning on, indicating pairing mode.
2. Look for "Xbox Wireless Controller" in the list of Bluetooth devices on your device, select it to pair.
3. Once successfully connected, LED1 + LED4 will stop flashing and stay on.
Wired
1. Connect the controller to your PC using the provided Type-C cable. Now LED1 + LED4 flashing and all RGB LEDs light up.
2. Once the connection is successful, LED1 + LED4 will stop flashing and remain on.
3. Your controller is now recognized as an X-input controller device.
Switch to D-input mode
Press and hold the - (SELECT) and + (START) buttons for 3-5 seconds until LED2 + LED3 light up.
Controller recognised as:
X-INPUT: Xbox 360 Controller for Windows
D-INPUT: Orion Controller


Produkt Specifikationer

Mærke: Dragonshock
Kategori: Joystick
Model: Orion Glow

Har du brug for hjælp?

Hvis du har brug for hjælp til Dragonshock Orion Glow stil et spørgsmål nedenfor, og andre brugere vil svare dig


Joystick Dragonshock Manualer

Joystick Manualer

Nyeste Joystick Manualer

Renkforce

Renkforce RF-GC-01 Manual

14 August 2025
Daikin

Daikin BRC1H52K Manual

12 August 2025
Daikin

Daikin BRC7EA629 Manual

12 August 2025
Asus

Asus ROG Kunai 3 Manual

11 August 2025
DJI

DJI D-RTK 2 Manual

11 August 2025
Daikin

Daikin BRC1H82K Manual

11 August 2025
Daikin

Daikin BRC7EA631 Manual

11 August 2025
Daikin

Daikin BRC1H519K7 Manual

11 August 2025
Daikin

Daikin EWYD510BZSS Manual

11 August 2025