...an explanation for householders
Programmers allow you to set ‘On’ and ‘Off’ time periods.
Some models switch the central heating and domestic hot
water on and off at the same time, while others allow the
domestic hot water and heating to come on and go off at
Set the ‘On’ and ‘Off’ time periods to suit your own lifestyle.
On some programmers you must also set whether you want
the heating and hot water to run continuously, run under the
chosen ‘On’ and ‘Off’ heating periods, or be permanently off.
The time on the programmer must be correct. Some types
have to be adjusted in spring and autumn at the changes
between Greenwich Mean Time and British Summer Time.
You may be able to temporarily adjust the heating pro-
gramme, for example, ‘Override’, ‘Advance’ or ‘Boost’. These
are explained in the manufacturer’s instructions.
The heating will not work if the room thermostat has switched
the heating off. And, if you hav hot-water cylinder, thee a
water heating will not work if the cylinder thermostat detects
that the hot water has reached the correct temperature.
INSTALLAT N IIO NST CTRU IONS
P SE TE:LEA NO INSTALLAT N T ONLY BEIO MUS
CARRIED OUT BY A QUALIFI ELECTRICIAED N OR
MA SUR MAIKE E NS INPUT S A 3 P SE.HA AM FU
Lifes e and Ti estyl Programmers m wit ech s conform to the
es ial sent req rementui s thof e
2014/30/EU - Electromagnetic compatibility Directive
2014/35/EU - Low Voltage Directive
2012/19/EU - WEEE Directive
2006/66/E - Battery DirectiveC
Ther are e 3 models in e Lif e ranth estyl ge:
LP241S 24hr oi – a pr gra wim, th central a ng d t rhe ti an ho wate
working ind d ly r up to 3 at g periods ch day, depen ent fo he in ea an
LP522Si – a 5/2-day p am all g r drogr owin fo iff imerent t ings at
the weeke dsn , with tral hecen ating and hot water ngworki
indep ndene tly for up t to 3 hea in peg riods each day.
LP722S 7-i – a day gram lowing for dpro al ifferen ingt tim s on
e h y of e w k, w h central he g and t w erac da th ee it atin ho at
working ind d ly r up to 3 at g periods ch day.epen ent fo he in ea
If the eng er ’t set y r timi s for u, y r o am rine hasn ou ng yo ou pr gr me
wi worll k with a ard o m that s bstand pr gra ha ee se thn t at e
factory. If is dth oe susn’t it you, it’s v y easy to ch ge it –er an
when e r d is introductyou’v ea th ory sect oni , sim y go to epl th
s ion t t tains ur rammer m el.ect ha con yo prog od
Make your ch ges g e SET?, YE -, d + tons onan usin th S/ an but
the programmer, found under the bottom flap.
You can’ ONt set 1 as the last ming bti efor dne mi ig , t youht bu
can set F3 after mid vi ng it’s t re n 23OF ni proght – di no mo tha
hours and 59 minutes af r ON1.te
You n d to set e mings in s e – i.e. 1, O 1, 2,ee th ti equenc ON FF ON
OF ONF2, 3, OFF3. If u t out of q e, the dyo ge se uenc isplay llwi
ON 1 – start of first timed rpe iod
OFF 1 – end of first t d r dime pe io
ON 2 – start of second timed period
OFF 2 – end of second timed r dpe io
ON 3 – start of third t d periodime
OFF 3 – final tc ff of the dayswi h-o
Th hae g ren inee s set you pror gram and timing yous –
w t d to do an g se. st p is g e in aon’ nee ythin el Ju kee th uid
safe place r t e ce.fo fu ur referen
Sometimes you mi t d to cgh nee ha th wange e y you use y rou
c tral he g or hot er te aen atin wat mpor ril pery – haps due to an
unusua y c d day, or e tll ol xcep ional de nd r hot er.ma fo wat
H s how to do i wi t aere’ t – thou ffe in ou proct g y r gram.
On the ont of the o mmer tfr pr gra here are otw Advance/Boost
bu heatt e r lon ons – fo centra ting d one for hot water. Tan hey
allow you to swi h ur system ttc yo ei her on or off, pec ve ofirres ti
th oge pr ram. So if e atth he in wag or tho ter is off, and you want
warmth or hot water now, u can eityo her –
1. ess to s tch it on (ADV ll be di l d), and it wPr Advance wi wi sp aye ill
stay on until the end of e next per d. Or if tth io
water is on and you don’t n d it, ss A e and it ll goee pre dvanc wi
off u il the begnt inning of e nth ext ON iod.per
Advanc wi onle ll y oper e in TIMED or CE mod .at ON es
2. ess & Hold to swPr Boost itch on for an tra r ( & BST willex hou
be ay ), n ss again for two ( ) or ree ( ) hours.displ ed the Pre th
To el Boost, ss Boost again ( ). Or if the a ng/ tcanc Pre he ti ho
wa lreter is a ady , using Bon oo test ll exwi nd e ON time by o ,th ne
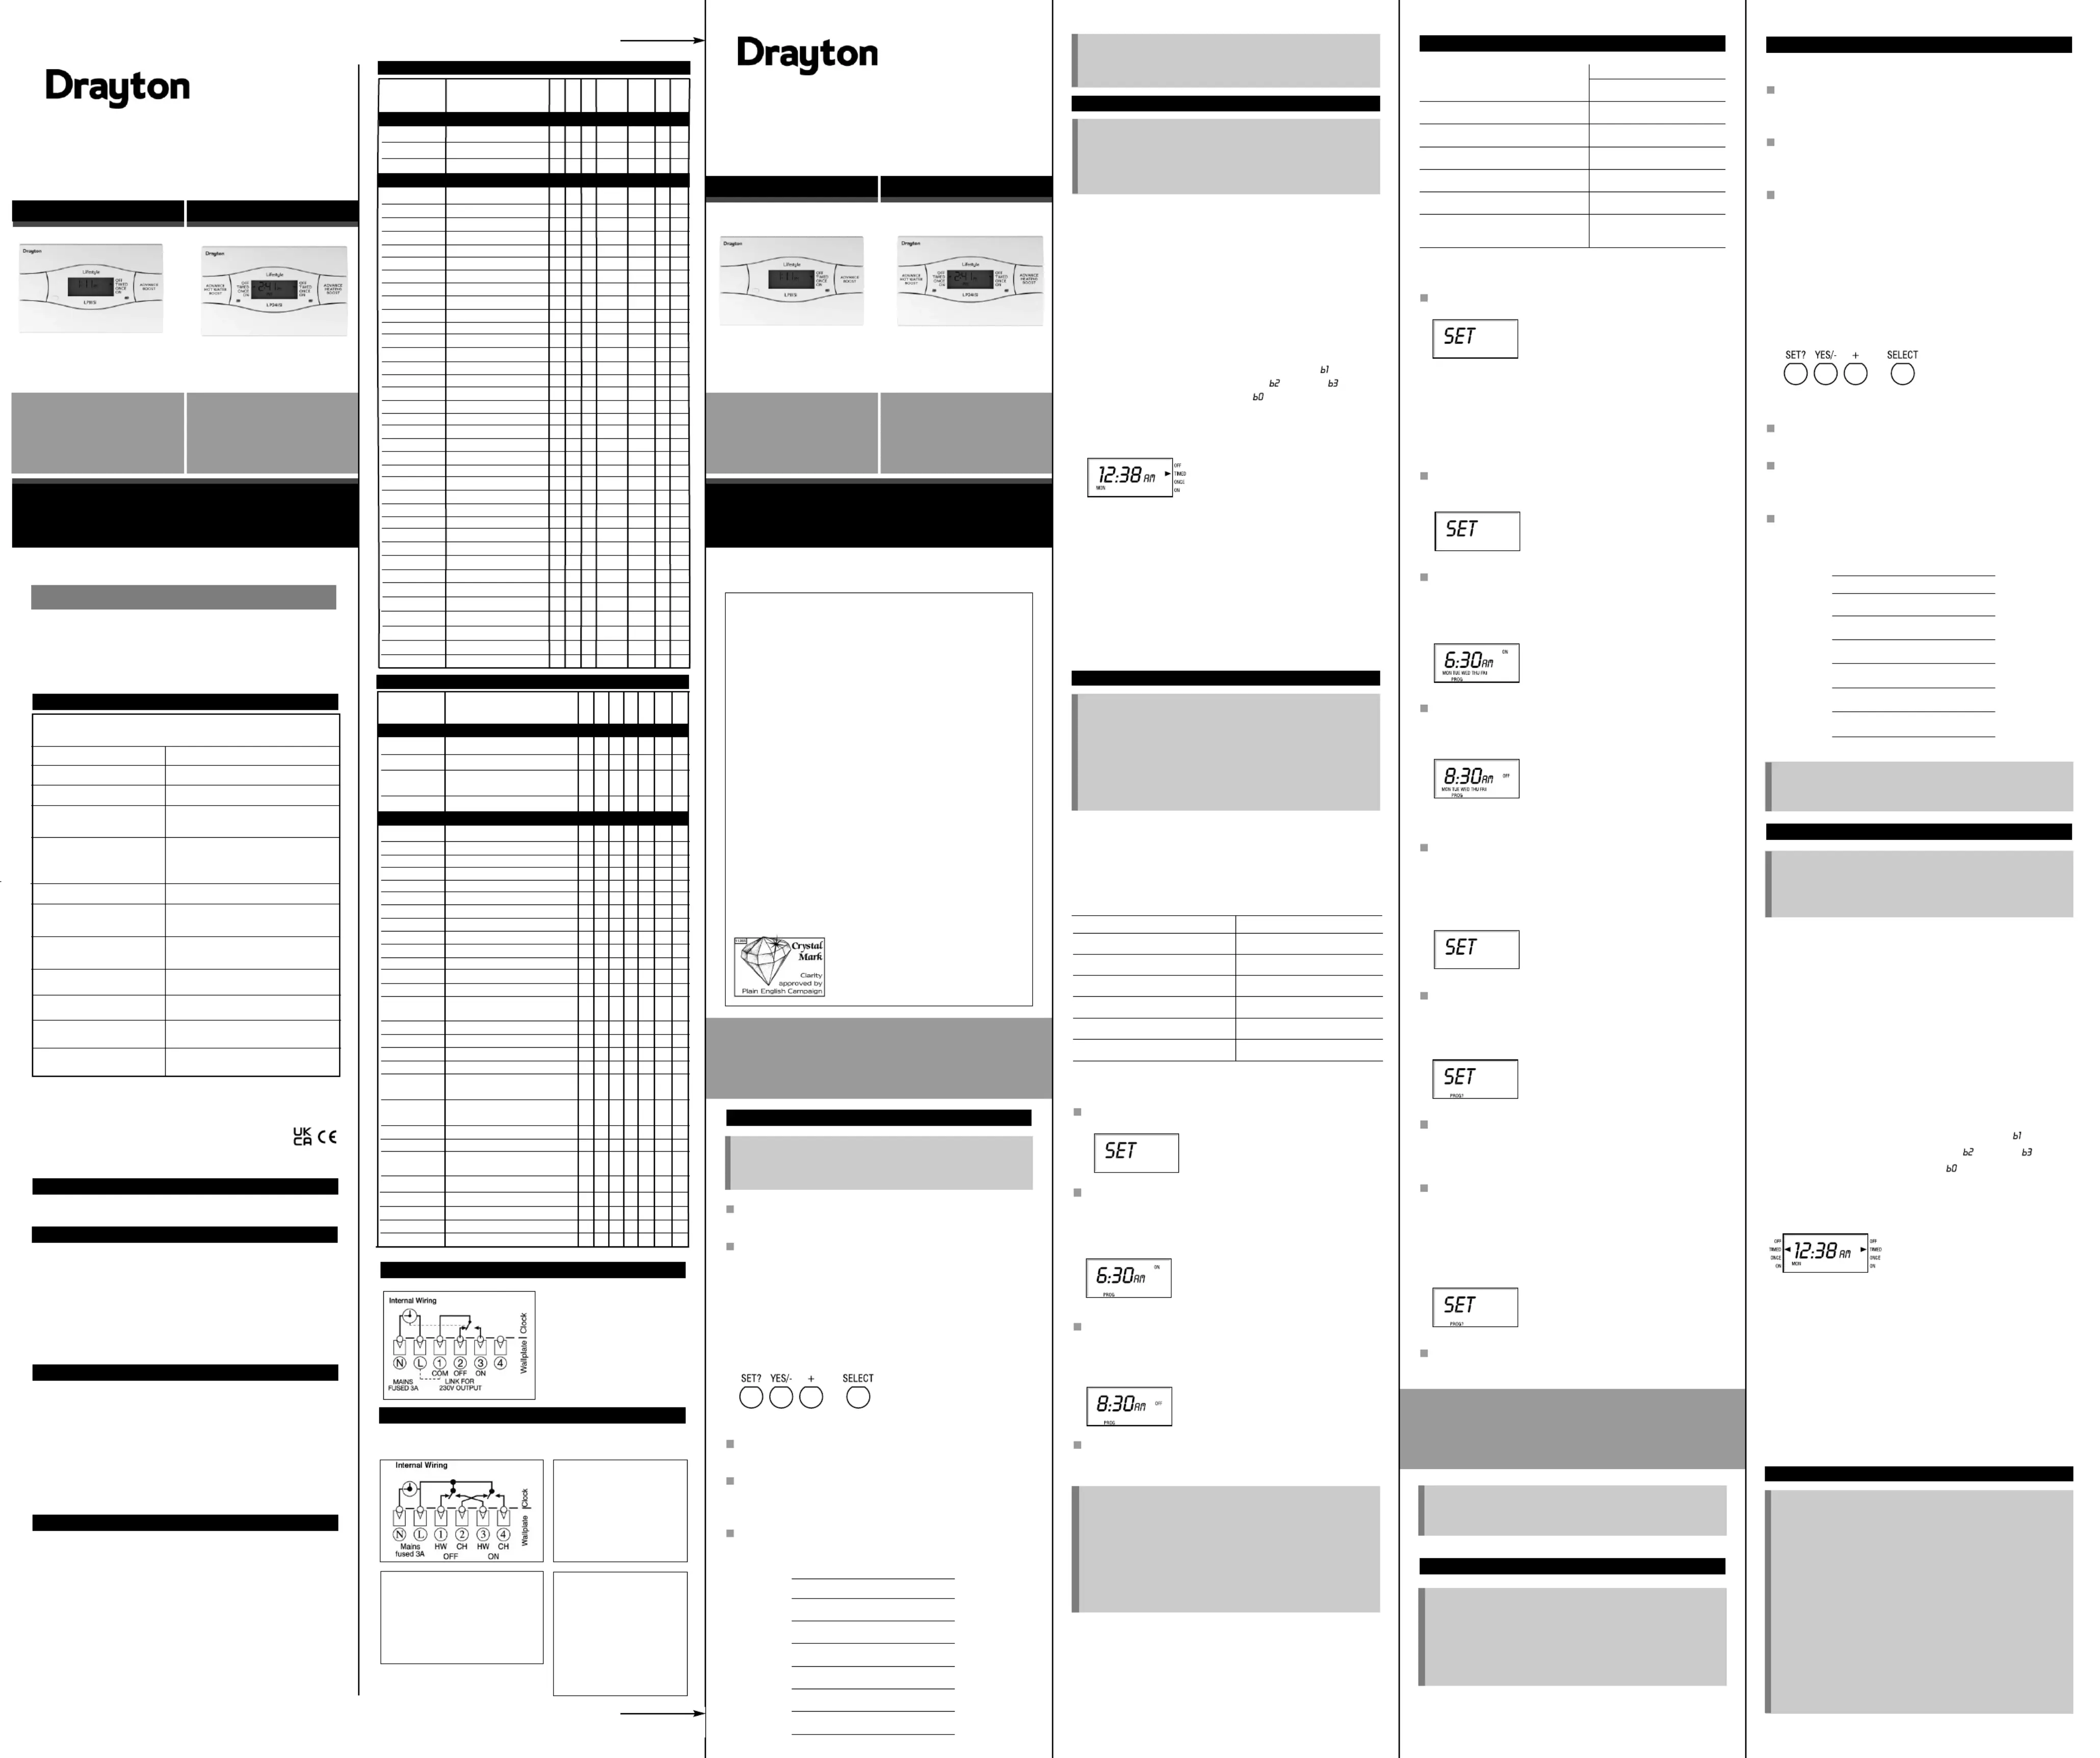
LP241Si, Si & SiLP522 LP722 PROGRAMMERS
LP LP111Si & 711Si TIMESWIT HEC S
2 V a . + % - 10% 50Hz30 .c 10
2 ) A 230V a(1 .c. each chswit
Program mti es: a ays r dlw prese ve
Fixed wi ng only, to comply w hri it
c ent E r ionsurr IE eg atul
Maint nane ce Must be m ntained b qu fai y a ali ied
electrician or ng enheati gi een r
Drayton Tempus 6, 7 N L 1 2 3 4
Drayton Lifestyle LP112, LP241, LP522, LP722 N L 1 2 3 4
Switchmaster 400, 600 N L 4 3 1
(no connection to terminal 4 on 600)
Switchmaster 805, 900, 900i N L 4 2 3 1
ACL FP (Towerchron) 2 1 8 11 6 10
Tempus 3, 4, 6 (old models), , 7
C , CP7 , 15, 715 8P15 15 FP FP (Mk1
Danfoss Randall 3020P, 3060 E 7 6 4 2
Danfoss Randall 4033 (link 1-6) E 7 6 5 3 4 2
Danfoss Randall 102, 102E, 102E5, 102E7 (link 6-3) E 5 6 1 2
Danfoss Randall 701 (link L-5 and 5-6) E N L 3 1
Danfoss Randall 702 (link L-5 and 5-6) E N L 4 2 3 1
Danfoss Randall 922, 972 (link L-2 and 2-5) E N L 1 4 3 6
Danfoss Randall SET2, SET2E, SET3E, SET3M, FP975 E N L 3 6 1 4
Grasslin Towerchron DP 72, QE2 N L 1 2 3 4
Honeywell ST 699/799 (link L-5 and 5-8) N L 7 4 6 3
Honeywell ST 6200, ST 6300, ST 6400, ST 6450 N L 1 2 3 4
Honeywell ST 7100 (link L-3 and 3-6) N L 7 4 8 5
Horstmann 525, 527, 425 Diadem, H21, H27, E N L 3 6 1 4
H121, Tiara (link L-2 and 2-5)
Landi Staefa*s & RWB2, RWB2E, 20, 40, 102, 200, N L 1 2 3 4
Myson Microtimer (link L-5 and 5-8) N L 7 4 6 3
Potterton Myson All EP2000’s,
EP3000’s, EP6000’s N L 1 2 3 4
Potterton Myson* Mini Minder N L 1 2 3 4
Sunvic Select 207, SunPro 2000 N L 1 2 3 4
Sunvic SP50, SP100 (link L-3) N L 1 4 2 5
Drayton Tempus 1, 2 (new models) N L 1 2 3 4
LP111, LP711, LP111Si, LP711Si
ACL TC (Towerchron) 2 1 4 7
Drayton Tempus 1, 2 (old models) N L 1 2 3 4
Danfoss Randall TS15, 75 (Mk18) E N L 1 4 2 5/6
Danfoss Randall TS715, TS715Si N L 1 4 2 3
Danfoss Randall TS975 E N L 5 4 6 1,2,3
Danfoss Randall SET1, SET1E E N L 5 4 6
Danfoss Randall SET4 E N L 5 4 6
Danfoss Randall 103, 103E, 103E5, 103E7 4 5 6 3 1 2
Danfoss Randall 911, 971 E N L 5 6 4 2
Grasslin Towerchron QE1 N L 2 4
Grasslin Towerchron T2001, T2001Q E N L 7
Honeywell ST 6100A, ST 6100C N L 1 4 2
Horstmann Centaur SC1, SC7
Centaur Plus, C11, C17, C17-ZW
Horstmann Emerald 423, Pearl Auto N L 2 4
Horstmann 517, Coronet, H11, H17 E N L 3 4
Landi Staefas & RWB30, RWB50, 100, 152, 170
Potterton Myson EP4000, 4001, 4002, 5002 N L 5 4 2
Smiths Centroller Mk1, Mk2 N L 3 2
Smiths Centroller 30 1 2 3/4
Smiths Centroller 300, 980 N L 4 1
Sunvic Select 107, SunProl1000 N L 1 3 2 4
Venner Vennerette N L LINE LOAD
LP241Si, LP522Si, LP722Si
Technical Helpline: 0333 000 6226
Email: customer.care@draytoncontrols.co.uk
Web: www.draytoncontrols.co.uk
Installation Instructions
First, m e sure the ma s ly is i d o !ak in supp sw tche ff
The ammer m t be t to e e of tem it is to con-progr us se th typ sys
tr lin bac ni twol. The k on the k of the u t sha o settings d G.– P an
P = a fully pumpe and d contr ll syo ed ste all gm – owin
h tea in an teg d hot wa r to be set y.se atelpar
G = a vitygra -fe wad hot ter system – which does not allow
in epend den set in ea wit t g of h ting th ho ateout t w r, hthoug
hot er n be twat ca con rol nele lod a .
USIN EXISTING AN G WALL LATE-P
Loo sec rin screwsen the u g s on the old gra er dpro mm an
u ug it. Cnpl he ha theck t t re’s 70mm ara e to e right ofcle nc th
the l , d m e . Cwal -plate an 25m abov it heck the c rt on eha th
n t e to e rmi s and if necess y, ch e theex pag compar te nal ar ang
wi g of the wallrin -plate to it. w ug e Lifestyle u t osu No pl th ni int
the l e d en e uring s .wal -plat an tight th sec crews
Ch k e 3A fuse, d iec th an sw tch on the mains.
FI TIN NET G A W WALL LATE-P
The i l location is 4m e fl r level, th asonabledea 1. abov oo wi re
lightin goo accessg, d , no cond nsa one ti , no extremes of
temperat re anu , d a su o ing ace t fully covers thepp rt surf tha
Po on h 70mm clsiti wit ear nc ria e to eth ght, 25mm above, dan
su iff cient room to s e uring sacces th sec crews undernea .th
F , h inals at the , e her dix wit term top it irect to a flat ll using llwa wa
p gs d No. 6 x 1” ( ) wlu an 25mm oodscrews fl, or on a ush mou -nt
in ing s gle uit x e UA1 (BS4662) using 5 x 14 bolts.cond bo typ M3.
DO T FACE N NG BOX.NO US SURE A MOU TI
T H RMI L MPA SIMESWITC TE NA CO RISON
Earth
Neutral
Live
Common
On
Off
Spare
P A ER RMIROGR MM TE NAL PA NSCOM RISO
Earth
Neutral
Live
Ch1 on
Chl2 on
Ch3 on
Ch4 on
D ntisco in d/Coue mpet to Moi rs’ dels
* Can simply be removed from the backplate and replaced without any disturbance to the existing wiring.
Make the g t s aswirin connec ion
ab . Note that the ouove tput
co s e v g , sontact ar olta e-free
po r eds to be put on towe ne
Termina eil 1 ther by g mlinkin fro
Termina frl L or om a separate
su ly th a .pp wi 3A efus
Arrowed num s reber late to
Co ult bns oil ander h book
USIN DRAYTON SIMP-L-FIT, ALTHOUGH NOTG A
NECESSARY, WILL MAKE THIS INSTALLATION EASIER.
ON 1 – start of first timed r d 0am 0ampe io 6.3 7.0
OFF 1 – end of first t d r d 30am 9 0amime pe io 8. .0
ON 2 – start of second timed period* 1 00pm 1 00pm2. 2.
OFF 2 – end of second timed r * 1 00pm 1 00pmpe iod 2. 2.
ON 3 – start of third t d period 4 m 4ime .30p .00pm
OFF 3 – final tc ff of the day 30pm 11 mswi h-o 10. .00p
LP241Si LP522Si LP722S, , i
Technical Helpline: 0333 0006226
Email: customer.care@draytoncontrols.co.uk
Web: www.draytoncontrols.co.uk
THE 11Si AY R C TIMLP7 7-D ELECT ONI ESWITC CoH nt...
Press e SET? bth ut outon and y ’ll see ‘ T ’.SE PROG?
F t u set the t es that are goirs yo im ing to be e same for eachth
weekday, then u can select each day diyo in vi uald ly and make
any fur er a tmth djus ents. If you want e h y to be teac da qui
d ere , go s aiiff nt tr ght to ‘Set eac ay’h d .
Press e YES ttth bu on, and the display will ask ‘ T N to ISE MO FR
Pr an yo ONess SYE d u’ll see 1, e start of y r t ath ou firs he ting peri-
od. Adjust it in 1-m e steps g and + tinut usin the – bu tons.
If th and + tons e held d , e t e ch es ine – but ar own th im ang
Press SET?, and you’ll see OFF1, the end of you her fi trs ating
period. j t s in the same y, s SET?, en rep tAd us thi wa pres th ea
th due proce re for ON2, F2, 3 d .OF ON an OFF3
If, after you’ve set OFF3 you want to e- ne one or m efin tu or
weekd s, ess SET? until you find e st day you t toay pr th fir wan
a ust – then go thr h e odj oug th pr ce erdu ltre, a ing any time you
wi Pre SEsh. ss T? to move on to the xt day. When y vene ou’
fini prshed, ess SET? until you see ‘SET SAT N ?’.SU PROG
If you don’t want to alter any iindiv du daal ys, k p singee pres
SET? unt yoil u e ‘SET SAT N .se SU PROG?’
Pr aness SYE d alter 1, OFF1, ON2, , ON3 d OFF3ON OFF2 an
If, after you’ve set OFF3 for th SAT & N, u t to fine-bo SU yo wan
tune Saturday or Su ay, ss SET? until u find the fi t ynd pre yo rs da
yo anu w t to adjust – t n go h the oche th ugro pr edu , altere rin ang y
time you w . ss SET? to move on to e n t day. Wish Pre th ex hen
you press SET? after set ng y r t w er for Sunti ou ho at days, the o-pr
grammer ll go ck to normal operwi ba ation.
If you don’t want to alter ei r day, keep g SET?the pre inss
u il e o mmer es back to no al o .nt th pr gra go rm pera onti
If e gth en ineer s set y r pha ou rogram and tim gin s – you
w t d to do an g se. st p is g e in aon’ nee ythin el Ju kee th uid
safe place r t e ce.fo fu ur referen
L le P grifesty ro ammer ils w l automat ca sw tci lly i h you enr c tral
he g and hot water on and f at times t t s t y .atin of ha ui ou
D depen in oug on y r tem, c tral he g and hot ersys en atin wat
ca thn ei er both come on and f at e e time, or w kof th sam or
indepen end tly. e t on e t of e grammerTh ligh th fron th pro
sh wh acows en e h e is .on on
L le Time itifesty sw ches w l automati y cil call on rot l your emsyst
by i hing it on and f at times that it . The ght on esw tc of su you li th
front of e time i h ows en it’s .th sw tc sh wh on
LP1 1S 24 pro ram eatin peri1 i – a hr g , up to 3 h g ods
eac dah y, d y y the .an ever da same
LP7 1S 7-da progr1 i – a y am, g r tallowin fo differen
tim ngi s on h y of the weeac da ek, up to 3 h tea in riodg pe s
If e gth en inee asn’ se yor h t t ur t s r yiming fo ou, ur ti i hyo mesw tc
wil wor wit stanl k h a dar prograd m that has b n t at theee se
fac ort y. If this ’t s t u, it’s y y to ch e it –doesn ui yo ver eas ang
w n yhe ou’v reae d this u y tintrod ctor sec ion simp, ly turn to
the e r ur i h mpag fo yo timesw tc odel.
Make your changes using the SET?, YES/-, and + buttons
You t t 1 as the t g e d ht, but ucan’ se ON las timin befor mi nig yo
ca se OFF aftn t 3 er h g it’s not m e than 23midnig t – providin or
hours d 59 es r 1.an minut afte ON
You d to t the s in e – . ON1, 1, ,nee se timing seq ncue i.e OFF ON2
OFF ON3 OFF3 yo ge2, , . If u t out of sequ , the lay lence disp wil
ON 1 – s rt of st d dta fir time perio
OFF 1 – d of st d r den fir time pe io
ON 2 – s rt of d t d periodta secon ime
OFF 2 – d of s d d den econ time perio
ON 3 – s rt of rd timed r dta thi pe io
OFF 3 – l f of e yfina switch-of th da
Installer note: After installation, tear along perforations indicated and retain this section - only leave
the User instructions with the end user
Installer note: After installation, tear along perforations indicated and retain this section - only leave
the User instructions with the end user
LP 117 Si 7- y gr , a w– a da pro am llo in fo differeng r t tim gs onin
each day of e wth eek, up to 3 heat g s each day.in period
Want to timleave a ing as it is? st ss S ? and move onJu pre ET
If you d to set ynee re our tim gs to the ard gram andin stand pro
start a , ss ’ and ’ together to go back to egain pre ‘SET ‘+ th
Your m ll e on r up to 3 hsyste wi com fo ea int g periods every
24 rs ON start firs one OFF finish . 1 s the t , 1 hes it, d so .an on
Not ON an OFF ar se sa me.ice that 2 d 2 e t to eth me ti * isTh
mean yo sys ur ste won’ resp ndm t o , but if u t to t ateyo wan ac iv
t t mha iddl perioe d or ch e any r m gang othe ti in s – rea ond .
W n u s ? r ing , the t h willhe yo pres SET afte sett OFF3 imeswitc
ret norma operationurn to l .
If e gth en ineer has set you pror gram and timing you w ts – on’
need to do anythin el Jug se. st p this g de i fe placekee ui n a sa
fo fu ur referenr t e ce.
Sometimes you might d to c nge e y you use y rnee ha th wa ou
system tem apor ril per duy – haps e to an exc pte ion lla y cold day.
Here’s how to do i with t at – ou ffe inct g e tim gs in y rth in ou
On the ont of the s h th e is anfr time witc er Advance/Boost button.
It s u to sallow yo witc yo ysteh ur s m either on or f, i e tof rr spec ive of
the am. So if the h ing is f, d you t h w,progr eat of an wan warmt no
1. ssPre Advance to h it on (ADV ll be di d), d it willswitc wi splaye an
stay on until the d of the t . Or if the g is on anden nex period heatin
yo don nee it pres dvanc an wiu ’t d , s A e d it ll go f u l eof nti th
beg nnini g of the t ON .nex period
Adv nc wil ona e l ly e in D or E s.operat TIME ONC mode
2. s d to h on for an a hour ( & BST w lPre s & Hol Boost switc extr il
l , then s in r o ( ) or th e ( ) hours.ayed) Pres aga fo tw re
To l st, s st ain ( ). Or if the g iscance Boo Pres Boo ag heatin
alr ad one y , usin Boos wilg t l extend the ON e by , o ortim one tw
At the e of the y thsid displa ere
ar fo operatin modese ur g :
TIMED = on r up to 3 ifo per od das a y.
ONCE = on fo perior 1 d a day, m the t of 1fro star ON
ON = c inuo ly .ont us on
Us SELe eth ECT bu n u r the p to ch ge thetto nde fla an
T s t r the ti s in ur ghi won’ alte ming yo pro ram ic yo, wh h u
ca retn urn to by se g T D.lectin IME
THE LP111Si 24hr ELECTRONIC TIMESWITCH
LP 111 Si 24hr gram, up to 3 heat– a pro in periodg s each y,da
and ev y day the me.er sa
Want to timleave a ing as it is? st ss S ? and move onJu pre ET
If you d to set ynee re our tim gs to the ard gramin stand pro
and rt asta ag in pre ‘S, ss ET’ and ’ toge er to go back to‘+ th
Your m ll e on r up to 3 hsyste wi com fo ea int g periods every
24 rs ON start firs one OFF finish . 1 s the t , 1 hes it, d so .an on
Not ON an OFF ar se sa me.ice that 2 d 2 e t to eth me ti * isTh
mean yo sys ur ste won’ resp ndm t o , but if u t to t ateyo wan ac iv
t t mha iddl perioe d or ch e any r m gang othe ti in s – rea ond .
SWITCHING STA ARD AMND PROGR
ON 1 – s rt of st d d 6. mta fir time perio 30a
OFF 1 – d of st d r d 8. men fir time pe io 30a
ON 2 – s rt of d t d perita secon ime od 12 00p* . m
OFF 2 – d of s d d * .en econ time period 12 00pm
ON 3 – s rt of rd timed r d 4. mta thi pe io 30p
OFF 3 – l f of e y . mfina switch-of th da 10 30p
Press the ? n and y l e T G .SET butto ou’l se ‘SE PRO ?’
Press the YES bu , d u l e , the art of ytton an yo ’l se ON1 st our tfirs
heatin periog d. Adjust it in inute s u g th d +1-m step sin e – an
b . If th d + b s e held , the me c esuttons e – an utton ar down ti hang
Pre SET? an yo ’l se OFFss , d u l e 1, the d of ur t hen yo firs ea int g
per od Adji . ust t s in the s e y, s T? then eat thehi am wa pres SE rep
proced fo ON2 OFF2 ON andOure r , , 3 FF3
LP241Si r p gram, with c tral heat g and hot ter– a 24h ro en in wa
w g porkin inde enden fotly r up to 3 heat g s ein period ac dah y,
and ev y day e e.er th sam
If e tim gs havth in en’ eet b n set r yfo ou, en yth ou pror gr eramm
w l st l be on e fail il th ctory-set n rd r p gram, withsta da 24h ro
c tral he g and hot water open atin er inat g toge er on eth th
same tim gs r ev y day of the win fo er eek. But it’s e y to keas ma
changes, and e hehav ating and er w g d d tlywat orkin in epen en
– just w the s.follo in ru ionst ct
Want to timleave a ing as it is? Press SET? and move on to
If you d to set ynee re our tim gs to e ard p gramin th stand ro
and rt , ss ’ and ‘+’ toge er to go k tosta again pre ‘SET th bac
If you d t p ss an g r o mon’ re ythin fo tw inutes, the grapro mmer
automatica y gll oe nors k tobac mal op .er ionat
THE LP241Si 24hr ELECTRONIC PROGRAMMER
TIMED = on r up to 3 periods a day.fo
ONCE = on for 1 perio day, om the s rt of 1d a fr ta ON
On each side of the di lay t re are ur osp he fo perating modes –
one up for al heating, e other for hot w er. You cangro centr th at
ch e modes w h mediate ect by g e a ateang it im eff usin th ppropri
SELECT butt Thion. s t alter e twon’ th imings in ur o am,yo pr gr
wh h you can rn to by lect g TI D.ic retu se in ME
on the programmer, found under the bottom flap.
Mictrotimer (link L-5 and 5-8)
British Gas EMT2, UT1, UT2
MiTimeMT711R, MiTime RF Pack1
Di tscon inu d/Come petitors’ Models
MiTime MT721R, MiTimeRF Pack 2 & 3