1/14
A B C D E F G H I J
1
2
3
4
5
6
7
8
1/2"
7.825
198.755
2.088
53.023
30.125
765.175
12.000
304.800
.888
22.543
27.750
704.850
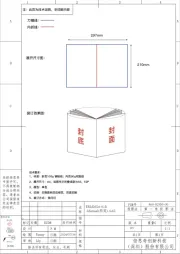
4X Ø .500
PILOT HOLE
12.700
PILOT HOLE
X
OUTLINE OF 9"
VERTICAL LIFT SYSTEM
MOUNTING HEIGHT EQUATION FOR SITTING
APPLICATIONS:
52.0 0 (132 1MM) - X = H
X = D ISTANCE FROM THE TOP OF THE MONITOR
SCREEN TO THE CENTER OF THE MOUNTING
SCREW PATTERN ( SEE PICTORIAL)
H = HEIGHT FROM FLOOR TO MOUNTING HEIGHT
LINE (ABO VE)
MOUNTING HEIGHT LINE:
(OBTAINED BY SOLVING
EQUATION BELOW)
MOUNTING HEIGHT EQUATION FOR STANDIN G
APPLICATIONS:
67.5 0 (171 5MM) - X = H
X = DISTAN CE FROM THE TOP OF THE MONITOR
SCREEN TO THE CENTER OF THE MOUNTING
SCREW PATTERN
H = HEIGHT FROM FLOOR TO MOUNTING HEIGHT
LINE (ABO VE)
1. REFER TO THE MANUAL.
2. MEASURE THE DISTANCE FROM THE TOP OF THE MONITOR
SCREEN TO THE CENTER OF THE MOUNTING SCREW PATTERN.
3. DETERMINE ERGONOMICLLY CORRECT VIEWING HEIGHT BY
USING EQUATION ABOVE (OR BELOW).
4. MARK THE DETERMINED VALUE FOR H, ON THE WALL.
5. ALIGN MOUNTING HEIGHT LINE TO MARK ON THE WALL.
USING A LEVEL, LEVEL THE TEMPLATE, THEN TACK IN PLACE.
6. CLEARLY MARK THE POSITIONS FOR FOUR PILOT HOLES
INTO THE WALL.
7. DRILL THE FOUR PILOT HOLES.
HH
ERGOTrO N
SIZE DWG. NO .
D
REV.
DATEDRAW N CHECK ED
TITLE
C
888-122
MJS 1/21/99
MANUAL,VISUAL GUIDE,TEMPLATE,
TO MOUNT 9" VERTICAL LIFT SYSTEM
TO WALL
OBSOLETE
PART NUMBER
888-122 STATUS
888 -1 22 -0 1 ACTIVE - AS SHOWN
HCS
2
1
1/2"
5/32"
3/32"
3/16"
Ø 1/2" (12.8 mm)
1x
1x
1x
1x
1x
1x
1x
2x
2x 2x 1x 1x
1x
1x
1x 1x
1x
1x
8-32 x 1/4" M4 x 6mm
M4 x 10mm
M4 x 20mm
M4 x 10mm
1/4-20 x 1-1/2"
4x 4x 1x 5x
4x 12x4x4x4x4x
2.5mm
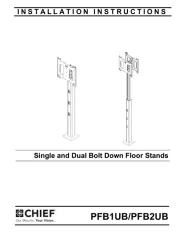
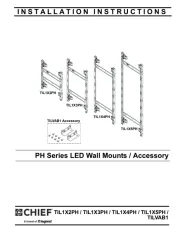
StyleView® Vertical Lift, PATIENT ROOM User's Guide
Soporte de pared StyleView, habitación de pacientes - Guía del usuario
Ajustement vertical StyleView, chambre du patient - Manuel de l’utilisateur
StyleView Vertical Lift, Patientenzimmer - Gebruikersgids
StyleView® verticale monitorophanging, patiëntkamer - Benutzerhandbuch
Braccio per sollevamento verticale StyleView, stanza del paziente - Guida per l’utente
StyleView 垂直升降支架,病房 用户指南
StyleView ,
CAUTION: Do Not remove cardboard spacer until instructed to do so.
PRECAUCIÓN: No retire el separador de cartón hasta que lo indiquen las instrucciones.
ATTENTION : NE PAS retirer l’espaceur en carton tant qu’il ne vous est pas demandé de le faire.
VORSICHT: Entfernen Sie die Abstandshalter aus Pappe erst, wenn Sie dazu aufgefordert werden.
ATTENZIONE: non rimuovere il distanziale in cartone fi nché non si arriva all’istruzione specifi ca.
:
小心: 除非要求,否则请勿取下纸垫片。
: .
888-60-503-G-00 rev. C • 12/08
1x
1/2"
www.ergotron.com