Extron QC 101 C Manual
Læs gratis den danske manual til Extron QC 101 C (4 sider) i kategorien Ikke kategoriseret. Denne vejledning er vurderet som hjælpsom af 18 personer og har en gennemsnitlig bedømmelse på 4.6 stjerner ud af 9.5 anmeldelser.
Har du et spørgsmål om Extron QC 101 C, eller vil du spørge andre brugere om produktet?
Produkt Specifikationer
| Mærke: | Extron |
| Kategori: | Ikke kategoriseret |
| Model: | QC 101 C |
| Bredde: | 221 mm |
| Dybde: | 305 mm |
| Højde: | 42 mm |
| Vægt: | 1500 g |
| Produktfarve: | Sort |
| Produkttype: | Embedded PC |
| Pakkevægt: | 2180 g |
| Pakkedybde: | 295 mm |
| Pakkebredde: | 411 mm |
| Pakkehøjde: | 137 mm |
| Wi-Fi: | Ingen |
| Opbevaringstemperatur (T-T): | -40 - 70 °C |
| Relativ luftfugtighed ved drift (H-H): | 10 - 90 % |
| Relativ luftfugtighed ved opbevaring (H-H): | 10 - 90 % |
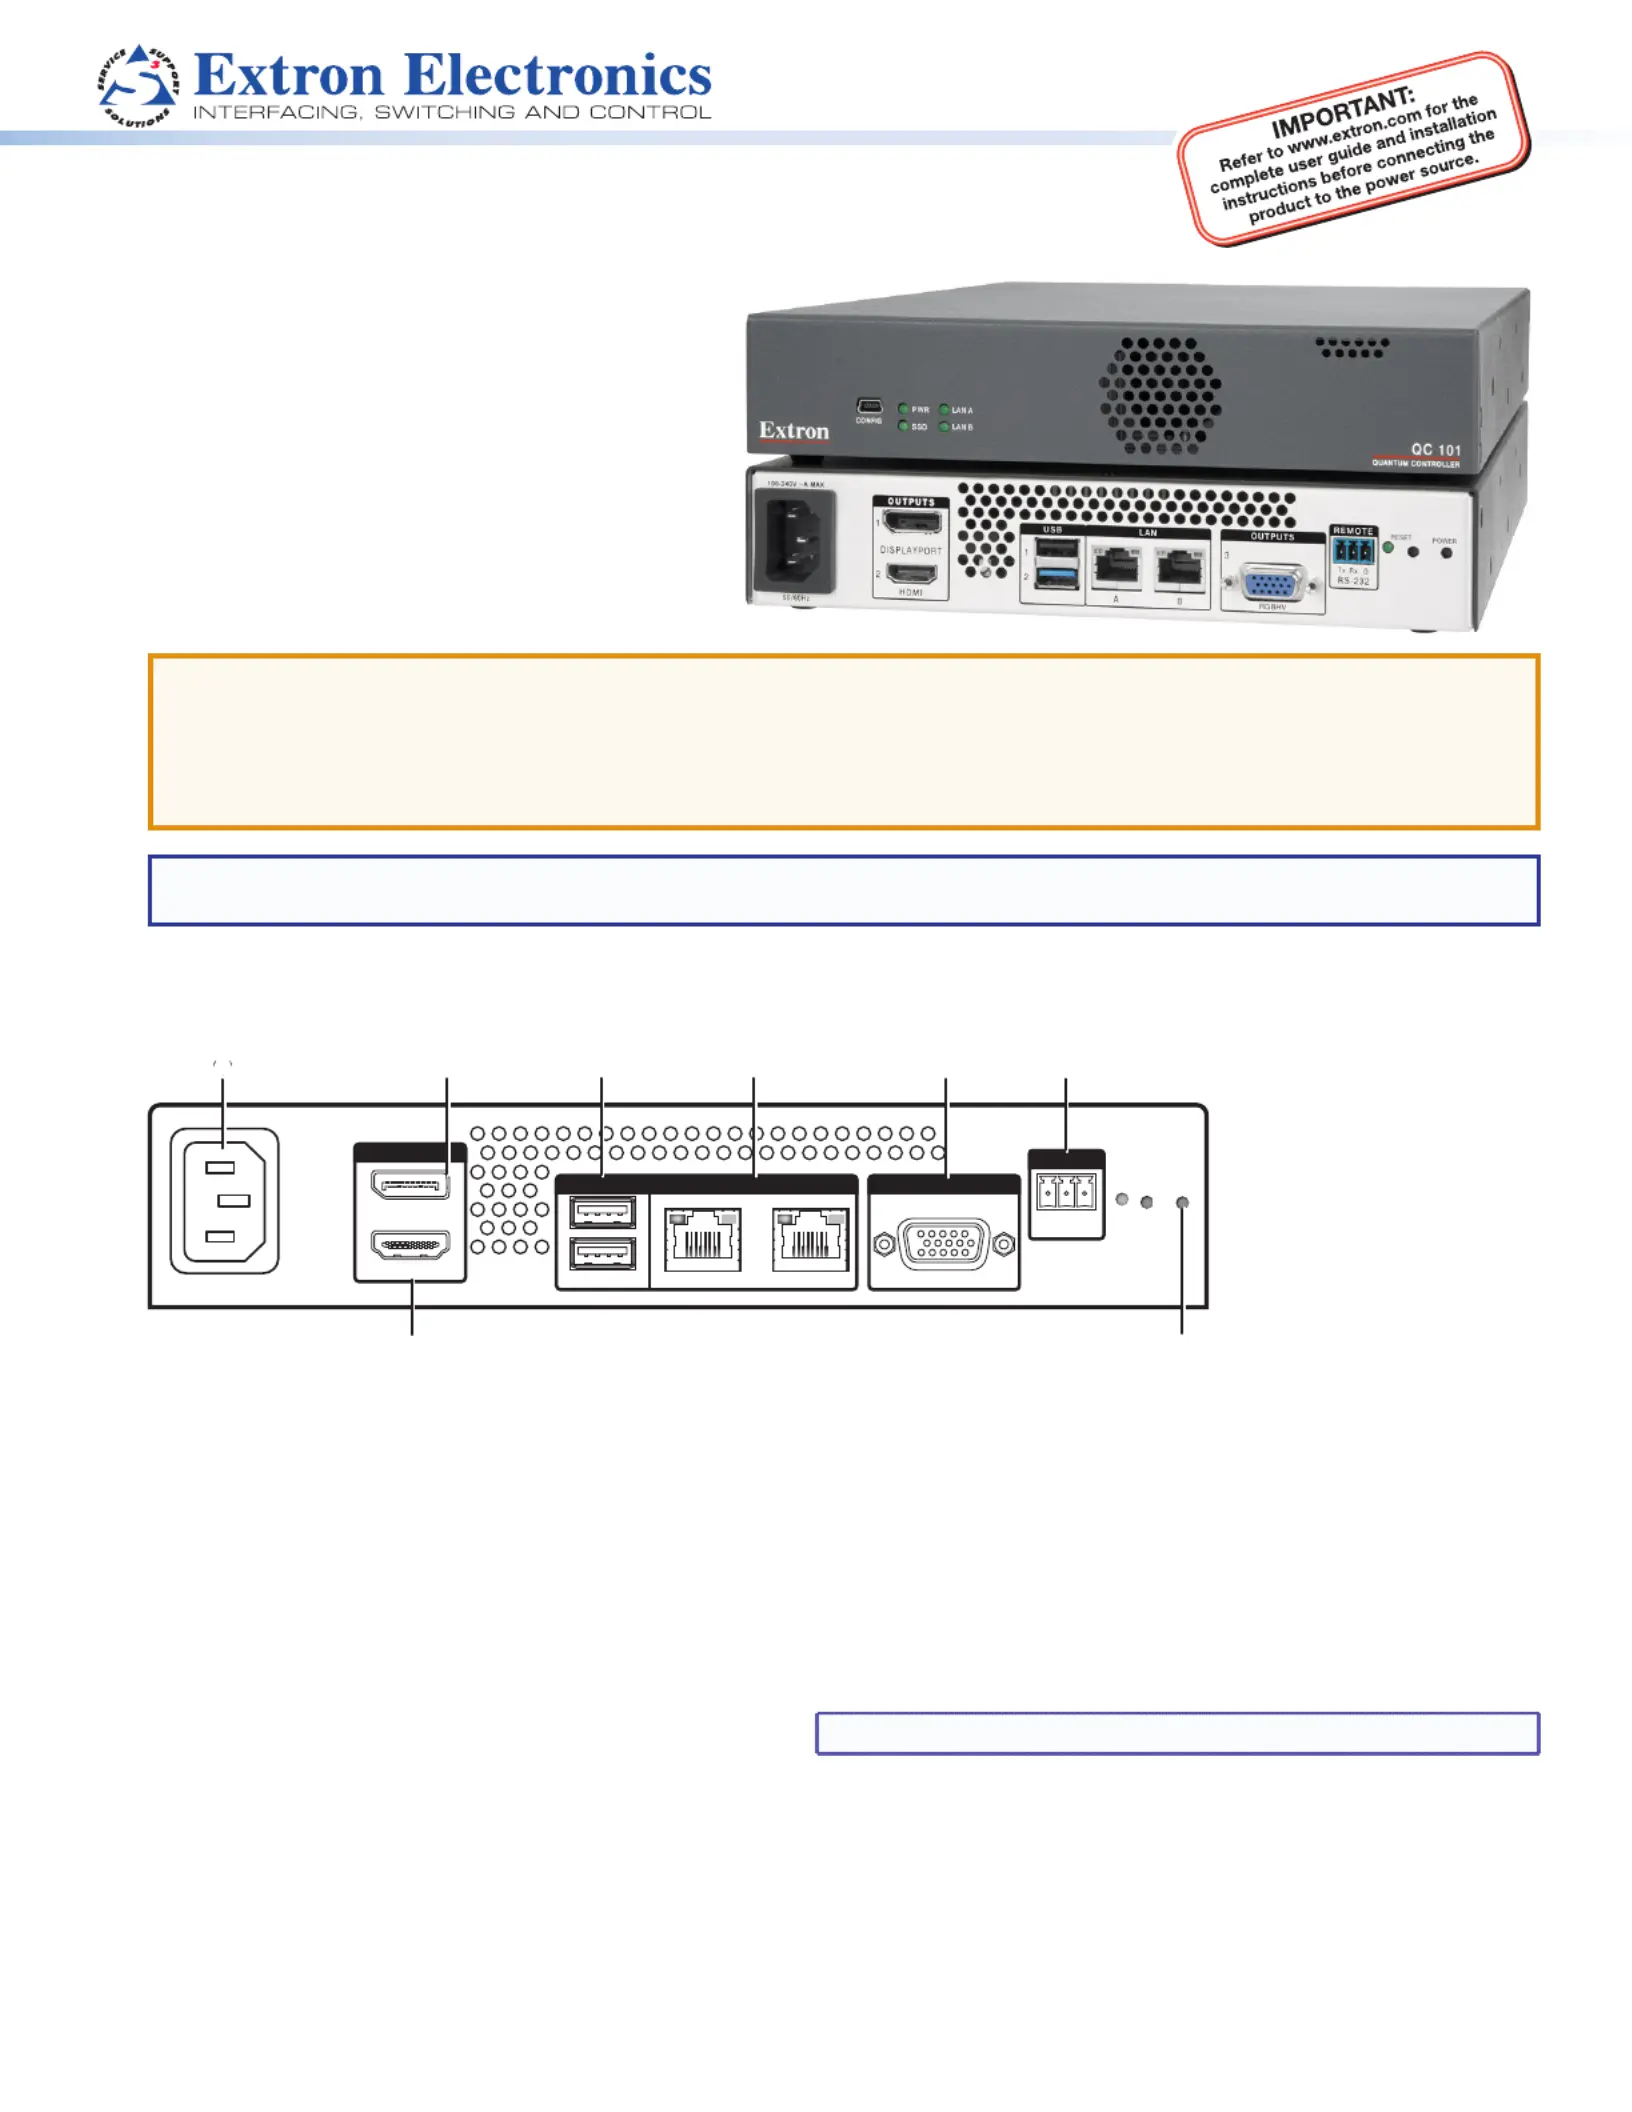
| Antal HDMI-porte: | 1 |
| DVI-port: | Ingen |
| Ethernet LAN-porte (RJ-45): | 2 |
| Antal USB 2.0-porte: | 1 |
| Antal USB 3.2 Gen 1 (3.1 Gen 1) type-A-porte: | 1 |
| Ethernet LAN: | Ja |
| Driftstemperatur (T-T): | 0 - 50 °C |
| Ethernet LAN-datahastigheder: | 10,100,1000 Mbit/s |
| Intern hukommelse: | 4 GB |
| Operativsystem installeret: | Windows Embedded 8 |
| Certificering: | CE, c-UL, UL, FCC Class A, ICES, VCCI |
| Kabelteknologi: | 10/100/1000Base-T(X) |
| Indbygget kortlæser: | Ingen |
| Antal USB-porte: | 1 |
| Strømforsyningens indgangsfrekvens: | 50 - 60 Hz |
| Processorfrekvens: | 2.42 GHz |
| Processorserie: | Intel® Celeron® |
| Intern hukommelsestype: | DDR3-SDRAM |
| Maksimal intern hukommelse: | 4 GB |
| Samlet lagringskapacitet: | 80 GB |
| Lagermedie: | SSD |
| On-board grafikkort, model: | Intel® HD Graphics |
| Diskret grafikadaptermodel: | Ikke tilgængelig |
| On-board grafikkort: | Ja |
| Diskret grafikadapter: | Ingen |
| Mikrofonindgang: | Ingen |
| Antal DisplayPorts: | 1 |
| Antal VGA-porte (D-sub): | 1 |
| USB-stik type: | Mini-USB |
| Antal installerede SSD'er: | 1 |
| SDD-kapacitet: | 80 GB |
| Optisk drevtype: | Ingen |
| Skærm inkluderet: | Ingen |
| Strømforsyning indgangsspænding: | 100 - 240 V |
| Antal installerede processorer: | 1 |
| Kabinettype: | 2L størrelse PC |
| Strømforsyning: | 16 W |
| Operativsystemets arkitektur: | 64-bit |
| Antal installerede lagerdiske: | 1 |
| Vandkølesystem: | Ingen |
| RS-232/422-port: | Ja |
Har du brug for hjælp?
Hvis du har brug for hjælp til Extron QC 101 C stil et spørgsmål nedenfor, og andre brugere vil svare dig
Ikke kategoriseret Extron Manualer


Ikke kategoriseret Manualer
- ECS
- Deltaco
- Bora
- Celestion
- GEEKOM
- IsoTek
- Piko
- Dantherm
- Silent Knight
- Nitek
- JSAUX
- Opkon
- Magewell
- Crest
- GR Bass
Nyeste Ikke kategoriseret Manualer


