Festo EFSD-20-PV-M12 Manual

Festo Ikke kategoriseret EFSD-20-PV-M12

Læs gratis den danske manual til Festo EFSD-20-PV-M12 (4 sider) i kategorien Ikke kategoriseret. Denne vejledning er vurderet som hjælpsom af 3 personer og har en gennemsnitlig bedømmelse på 4.5 stjerner ud af 2 anmeldelser. Har du et spørgsmål om Festo EFSD-20-PV-M12, eller vil du spørge andre brugere om produktet?

Side 1/4
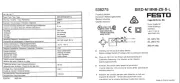
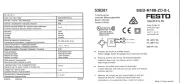
Translation of the original instructions
1 Further applicable documents
All available documents for the product www.festo.com/pk.è
2 Safety
2.1 General safety informations
Observe labelling on the product.
Prior to mounting, installation and maintenance work: Switch off power supply
and secure it from being switched back on.
ment. Ensure that storage times are kept to a minimum.
Comply with the handling specifications for electrostatically sensitive devices.
Observe tightening torques. Unless otherwise specified, the tolerance is
±20%.
2.2 Intended use
Fig. 1
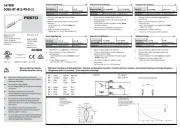
The EFSD electric stopper cylinder is intended for use in stopping the transported
material.
This product can generate high frequency interference, which may make it neces-
sary to implement interference suppression measures in residential areas.
2.3 Training of specialised personnel
Installation, commissioning, maintenance and disassembly should only be con-
ducted by qualified personnel.
The qualified personnel must be familiar with installation of electrical control sys-
tems.
3 Further information
Accessories www.festo.com/catalogue.è
Spare parts www.festo.com/spareparts.è
4 Service
Contact your regional Festo contact person if you have technical questions
èwww.festo.com.
4.1 Function
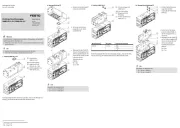
The electric stopper cylinder isolates/stops transported material in transfer sys-
tems. Cushioning over a stop is done through an air cushion. Retraction of the
stop (release of transported material) and the position inquiry are done electric-
ally.
There are 3 positions:
Fig. 2
Position 1:
Stopper cylinder closed in initial position (closed):
Stop is extended and located in the initial position. The stopper cylinder is
ready to stop a transported material.
Position 2:
Stopper cylinder closed in stop position (closed):
The stopper cylinder travels to the stop and moves the stop from the initial pos-
ition into the stop position. This causes the transported material to be braked
and then stopped through internal dampening.
Position 3:
Stopper cylinder opened (open):
Stop retracts and releases the transported material.
4.2 Configuration
1
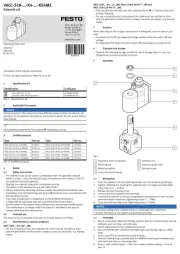
Electrical connection (actuator),
M12 plug (5-pin)
2
Electrical connection (sensor), M12
plug (5-pin)
3
LED display (power): operating
status
4
LED display (open): stop retracted
5
LED display (closed): stop exten-
ded
6
Cushioning setting
7
Stop
8
Mounting interface
Fig. 3
5 Installation
Requirements
Do not modify the screws and threaded pins. Exception: Immediate demand for
modification in this instruction manual.
Install product without tension or distortion. Evenness of the mounting surface
must be maintained within 0.1mm.
8061883
Stopper cylinder
EFSD
8061883
2017-06
[8061885]
Instructions - Operation
Festo SE & Co. KG
Ruiter Straße 82
73734 Esslingen
Germany
+49 711 347-0
www.festo.com
Mount product
Fig. 4
EFSD-20
Fig. 5
EFSD-50/100
1. Position the stopper cylinder so that its operating elements are accessible
(e.g. cushioning setting).
2. Fasten stopper cylinder (e.g. with fastening kit
èwww.festo.com/catalogue).
3. Evenly tighten screws/nuts.
Size 20 50 100
Screw/nut M6 M8
Centring hole [mm] 4.8±0.05 10.2 (+0.07 / –0.05)
Tightening torque [Nm] 10 15
Tab. 1
6 Installation
6.1 Electrical installation
WARNING!
Risk of injury due to electric shock.
For the electric power supply, use only PELV circuits that ensure a reliable elec-
tric disconnection from the mains network.
Observe IEC60204-1/EN60204-1.
1
Electrical connection (actuator)
2
Electrical connection (sensor)
Fig. 6
1. Switch off power to the controller. It is not sufficient just to cancel the enable
signal.
2. Safeguard the controller from being switched on again unintentionally.
3. Use permitted connecting cables. Frequently, an unscreened cable guide is
sufficient for the 24V signals. Screened control lines must be used in areas
with strong interference.
4. Connect stopper cylinder to the controller at the ports and Tab. 2.1 2 è
Tightening torque: 0.3Nm.
M12 plug (5-pin, A-
coded)
Pin
1)
Port 1
(actuator)
Port 2
(sensor)
1 (BN)
brown
Unused Supply voltage +24VDC
2 (WH)
white
Input Output 1
open
3 (BU)
blue
0V 0V
4 (BK)
black
Supply voltage +24VDC Output 2
closed
5 (GY)
grey
Functional earth (FE)
2)
Functional earth (FE)
2)
1)
Wire colour with use of connecting cables according to accessories www.festo.com/catalogue
2) Functional earth must always be connected.
Tab. 2
6.1.1 Earthing
For use of the EFSD-20:
NOTICE!
Malfunction due to electrostatic influence.
Earth product at the earth terminal.
9
Earth terminal
10
Toothed disc
11
Disc
12
M5 hexagon head screw
Fig. 7
1. Remove the screw plug.
2. Connect an earthing cable to the earth terminal . 9
The earthing elements are included in the scope of delivery. The earthing
cable is not included in the scope of delivery.
Connect the cable lug of the earthing cable between the disc and theaA
toothed disc . Tightening torque of the hexagon head screw : 5Nm. aJ aB


Produkt Specifikationer

Mærke: Festo
Kategori: Ikke kategoriseret
Model: EFSD-20-PV-M12

Har du brug for hjælp?

Hvis du har brug for hjælp til Festo EFSD-20-PV-M12 stil et spørgsmål nedenfor, og andre brugere vil svare dig