Instrucciones de montaje
Tener en cuenta lo siguiente:
Montar el compostador siguiendo los siguientes pasos y
colocarlo sobre una base plana.
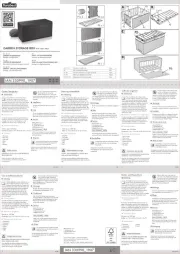
Volumen de entrega:
4 paneles laterales cada uno con compuerta de extracción
montada previamente
1 tapa
1 rejilla base
4 varillas de puesta a tierra
Elegir el lugar de colocación
El lugar ideal para colocar el compostador es parcialmente
a la sombra de flores y setos. Asegurarse de que el
compostador tenga contacto directo con la tierra del jardín.
Solo así podrán trabajar los organismos necesarios del
suelo. Para conservar la humedad lo más adecuado es una
capa de ramaje, residuos de trituradora o turba.
•Enganchar las dos piezas de la rejilla base entre sí
Introducir la pestaña de sujeción (1) en la ranura (2) y
dejar que encaje. Introducir las 4 varillas de puesta a tierra
a través de las perforaciones en las esquinas de la rejilla
base y engancharlas al suelo.
•Enganchar los paneles laterales entre sí. Advertencia:
Colocarse fuera del compostador para poder montarlo más
fácilmente. Con ayuda del pie izquierdo fijar el panel lateral
izquierdo e introducir las pestañas de fijación del panel
lateral derecho en las ranuras del panel lateral izquierdo.
2a Pestaña de sujeción (1) y ranura (2)
2b Introducir la pestaña de sujeción en la ranura
2c Presionar hacia abajo
•Colocar los cuatro paneles laterales de modo que
formen un cuadrado
Colocar los cuatro paneles laterales (2 juntados) de modo
que formen un cuadrado rectángulo.
Unir la rejilla base con los paneles laterales
Colocar los paneles laterales unidos sobre la rejilla base.
Presionarlas ligeramente hacia abajo y dejar que encajen
los paneles laterales.
•Colocar la tapa y dejar que encaje
Inclinar la tapa ligeramente hacia delante, presionar hacia
abajo y encajar
Colocar la tapa en el panel lateral deseado en los puntos
de la bisagra y dejar que se encaje (véase esquema). Si se
daña una pieza de la bisagra se podrá utilizar la pieza de la
bisagra de otro panel lateral.
•El montaje p1-ha acabado
El compostador dispone de un orificio para el candado
(véase fig. 4.1). En caso necesario, cerrar el compostador
con un candado (no incluido en el volumen de entrega).
COMPOSTADOR
Rellenar correctamente el compostador
• empezar con una capa de tierra
• seguir con residuos de jardín; a ser posible con capas de
madera y hojas entremedio, es decir, mezclar residuos
verdes ricos en nitrógenos y ricos en carbono
• las capas no deben superar los 15 cm de altura cada una
• evitar malos olores; para ello, mezclar ligeramente con un
rastrillo el compost dentro del compostador, así absorberá
aire fresco favoreciendo el proceso de descomposición
• los materiales que se tiran al compostador son
relativamente pobres en nutrientes, su valor principal
radica en el contenido de humus, por esto se recomienda
enriquecerlo adicionalmente con nutrientes (p. ej.,
estiércol)
• regar el compost de vez en cuando para evitar que se
seque completamente (especialmente en los meses de
verano)
Los residuos adecuados para el compost son, entre
otros:
• residuos de jardín (triturados o cortados en trocitos)
• césped cortado, ligeramente seco
• follaje (a ser posible troceado)
• restos de poda de setos y árboles (triturados)
• posos de café con filtro, bolsitas de té, cáscaras de huevo
• ceniza de madera y hollín
Echar los residuos de forma que queden sueltos. No
presionar ni comprimirlos para que los organismos puedan
trabajar en el compost.
No echar en el compost, entre otros:
• residuos de la cocina como restos de carne, pescado,
queso, sopas, grasa de cocinar, aceite, huesos ni pan.
¡Estos productos contribuyen a la formación de moho!
• asimismo se deberán evitar las pieles de las patatas
tratadas con productos químicos
• no echar nunca al compost las pieles de los cítricos
Consejos para acelerar el proceso del compostaje
La rapidez del proceso de compostaje en el compostador
depende en gran medida de la composición de los
materiales, su contenido de humedad y temperatura.
Los residuos de césped, verduras y jardín y el estiércol
de establo se descomponen en pocos meses. El
proceso de descomposición se acelera si se esparce
activador de compostaje (a la venta en establecimientos
especializados), abono orgánico y tierra de compost usada
entre cada una de las capas bien mezcladas y húmedas,
o se añaden lombrices de tierra. De forma alternativa se
puede utilizar la tierra del jardín, polvo de roca o cal de
algas. Especialmente en los meses de verano proliferan los
microorganismos provocando una rápida descomposición
de las plantas.
Retirar el compost listo
• Primero comprobar el grado de madurez del compost.
Abrir la compuerta para analizar la estructura del humus.
La tierra de compost lista debe presentar un color marrón
oscuro, ser granulada y oler a tierra de bosque.
• Antes de utilizar la tierra de compost lista colarla (que
no quede extremadamente fina). Volver a introducir
en el compostador los componentes que no se hayan
descompuesto bien, p. ej., ramaje.
Istruzione di montaggio
Per favore osservate:
Montare il composter nel modo descritto di seguito e
posizionarlo solo su una superficie piana.
Contenuto della fornitura:
4 pezzi laterali con dispositivo di prelievo già montato.
1 coperchio
1 Rete da pavimento
4 picchetti
Scegliere la posizione
La posizione adatta per il composter è a mezz’ombra di fiori
e siepi. Fare sì che il composter abbia il contatto diretto con
la terra del giardino. In questo modo gli organismi della terra
necessari possono lavorare senza impedimenti. Uno strato
di sterpi oppure torba sono adatti per mantenere l’umidità.
1) Ancorate i due pezzi della rete tra loro
Inserite il naso di fissaggio (1) nell’incavo (2) e fateli
incastrare. Inserite i 4 picchetti attraverso i fori agli angoli
della rete da pavimento e ancorateli al pavimento.
2) Agganciare le parti laterali tra loro
Nota: Posizionatevi al di fuori del composter, in modo da
poterlo montare più facilmente. Fissare con il piede la parte
sinistra ed inserire i naselli di fissaggio della parte destra
nei incavi della parte sinistra.
2a Nasello di fissaggio (1) & Incavo (2)
2b Inserire il nasello di fissaggio dell’incavo
2c Premere verso il basso
3) Sistemare le quattro parti laterali in modo
rettangolare
Sistemare le quattro parti laterali – assemblati come in 2
– in modo rettangolare (90°).
Collegate la rete da pavimento con i pezzi laterali
Inserite i pezzi laterali collegati sulla rete da pavimento.
Premeteli un poco verso il basso e fate incastrare i pezzi
laterali.
3) Inserire il coperchio e farlo incastrare
Orientare il coperchio leggermente verso in avanti…
premere ed incastrare
Apporre il coperchio su qualsiasi parte laterale nei
punti di cerniera e farlo incastrare (schema). In caso di
danneggiamento della parte della cerniera, è possibile
usare la parte della cerniera di un’altra parte laterale.
4) Il montaggio è terminato
Il composter è provvisto di un foro per lucchetto (vedi Fig.
4.1). In caso di necessità serrare il composter con un
lucchetto (il lucchetto non è compreso nella fornitura).
COMPOSTER
Riempire il composter in modo corretto
• iniziare con uno strato di terra
• poi rifiuti da giardino: possibilmente con qualche legno e
foglia, cioè rifiuti verdi ricchi di azoto mischiati con rifiuti
ricchi di carbonio.
• i singoli strati non dovrebbero superare circa 15 cm di
altezza
• impedite disturbi olfattivi: per questo è bene mischiare il
materiale di compostaggio nel composter con una forca da
giardino – in questo modo si fa entrare dell’aria fresca che
velocizza il processo di decomposizione.
• Materiali che entrano nel composter sono abbastanza
poveri di sostanze nutritive; il loro valore principale sta
nella percentuale di humus; per questo si consiglia
l’arricchimento con sostanze nutritive (p.es. stallatico).
• impedire che il composto si asciughi completamente
(specialmente nei mesi estivi), mettendone dell’acqua di
tanto in tanto.
Rifiuti adatti per il compostaggio sono tra l’altro:
• rifiuti da giardino (tagliati in pezzettini)
• erba tagliata e leggermente asciugata
• foglie (possibilmente tritturati)
• Tagli di alberi e siepi (triturati)
• Fondo da caffè, buste da tè, gusci d’uova
• Cenere di legno e fuliggine
Immettere tutti i rifiuti in modo leggero Non premere o
comprimere i rifiuti, in modo che gli organismi nel composto
possano lavorare.
Non immettere nel composto:
• Rifiuti da cucina come carnem pesce, formaggio, zuppa,
grasso, olio, ossa e pane. Questi prodotti possono creare
muffe!
• si dovrebbe evitare inoltre le bucce di patate trattate con
mezzi chimici.
• Non immettere mai le bucce di agrumi nel composto
Consigli per velocizzare la procedura di compostaggio
Quanto tempo serve per arrivare alla maturità del
composto, dipende dalla composizione del materiale, dal
contenuto di umidità e dalla temperatura. Tagli di erba, rifiuti
di verdura e da giardino, si decompongono in pochi mesi.
Il processo di decomposizione può essere velocizzato, se
si sparge i singoli strati ben mischiati ed umidi con avviatori
di compostaggio (nel commercio), con concime organico
e terra vecchia da compostaggio oppure se si aggiunge
lombrichi. In alternativa si può usare anche terra
da giardino, farina di pietra oppure calcare d’alghe.
Specialmente nei mesi estivi i microrganismi aumentano
fortemente e decompongono velocemente le parti di piante.