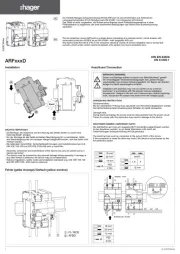
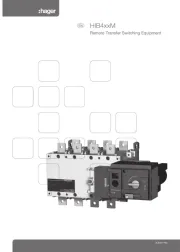
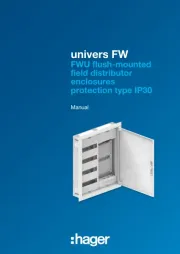
Hager EE810 Manual

Hager Skifte EE810

Læs gratis den danske manual til Hager EE810 (5 sider) i kategorien Skifte. Denne vejledning er vurderet som hjælpsom af 59 personer og har en gennemsnitlig bedømmelse på 3.5 stjerner ud af 30 anmeldelser. Har du et spørgsmål om Hager EE810, eller vil du spørge andre brugere om produktet?

Side 1/5
6LE001596C
aDetecteur de présence 1 canal
zOne-Channel Presence Detector
Présentation du produit et
principes de fonctionnement
Le détecteur EE810, 52366 est un détecteur
de présence 1 canal permettant de détecter
des mouvements de faible amplitude
(ex : personne travaillant à un bureau).
Cette détection se fait à l’aide de 2 capteurs-
pyroélectriques qui se trouvent sous les len-
tilles de détection 5.
Le capteur 6 mesure en continu la luminosi
dans la pièce et la compare au niveau prédéfini
par réglage sur le potentiomètre 2.
La tête du détecteur est orientable à 90° et
permet d’adapter la zone de détection suivant-
la configuration du local.
Commande sortie éclairage S1 :
La sortie éclairage S1 est commutée dès
lorsque le niveau de luminosité défini par le
potentiomètre 2 est jugé insuffisant et qu’une
présence est détectée.
Après détection, la lumière reste allumée pen-
dant la durée prédéfinie par le potentiomètre
1 ou sera coupée automatiquement dès que
la luminosité ambiante sera suffisante.
La temporisation 1 est relancée après cha-
quedétection de présence.
Commande de minuterie : Sortie S2
A l'aide de sa sortie impulsion _, le tecteur
EE810, 52366 peut commander une minuterie.
Pour ce fonctionnement, le potentiomètre 1 doit
être sur la position _. Le seuil de luminosité est
glé par le potentiomètre 2. Dans ce mode, la
sortie éclairage n'est plus commandée.
Association de plusieurs détecteurs : sortie S2
Le détecteur EE810, 52366 peut être associé à
un détecteur 2 canaux EE811 ou un détecteur
1/10V EE812 afin d’étendre la zone de couver-
ture. (Sortie S2). Pour utiliser ce mode, il suffit
de régler le potentiomètre 2 sur “On” et le
potentiomètre 1 sur la position _.
Dans ce
mode, la sortie éclairage n'est plus commandée.
Mode Test :
Ce mode permet de valider la zone de détection.
Pour sélectionner ce mode, mettre le potentio-
mètre 1 sur la position " test ".
Chaque détection sera alors signalée par l’allumage
du voyant V1 4 durant 1 seconde, si le niveau
d'éclairement est inférieur au seuil réglé.
La sortie d'éclairage S1 n'est pas commandée dans
ce mode, les réglages de temporisation sont ignorés.
Réglages
Les 2 tableaux ci-dessous vous permettront d’ef-
fectuer les réglages nécessaires au bon fonctionne-
ment du détecteur.
Ordre de grandeur de luminosité
Les positions du potentiomètre de ce tableau sont
indicatives et dépendent de l'environnement
d'installation (mobilier, sol, mur…).
Montage
cf annexe
Product description and
operation principles
Detector EE810, 52366, is a one-channel pres-
ence presence detector designed to detect low
amplitude movements (e.g. workersitting at a
desk).
Detection is by means of 2 pyroelectric sensors
located under detection lens 5 6. The sensor
measures the brightness in the room on a conti-
nuous basis and compares it against the level
preset by means of potentiometer 2.The head
of the detector is directional at 90° and can be
used to adjust the detection area according to
the room configuration.
Control of lighting output :
The lighting output S1 is switched on as soon
as the brightness level set by thepotentiometer
2 is considered too low and a presence is
detected.
After detection, the light remains switched on
during the time period preset by the potentio-
meter 1 or will be switched off automatical-
lyas soon as the brightness level in the room
ishigh enough.
The time delay 1 is started each time after-
presence detection has occurred.
Control of timer: Output S2
Using its impulse output , the detectorEE810,
52366 can control a timer.
For this operation, the potentiometer 1 must
be set to the position _.
The brightness threshold is under control ofthe
potentiometer 2. In this mode, the lighting
ouput is no longer under control.
Association of several detectors: Output S2
Detector EE810, 52366 can be associated with
two-channel detector EE811, 52367 or to a
1/10V detector EE812, 52368 to extend its
zoneof coverage. (S2 Output).
To use this mode, just set the potentiometer
2 to the “On” position and the potentiometer
1 to the position _. In this mode, the
lighting output is no longer under control.
Test Mode:
This mode makes it possible to validate the
detection area. To select this mode, set the
potentiometer 1 to the position "test".
Indicator V1 4 will indicate any detection by
lighting for one second if the level of illumina-
tion is lower than the preset threshold. The
lighting output S1 is not controlled in this
mode, the time settings will remain ignored.
e
i
ANotice d’instructions
ZUser instructions
Position du
potentiomètre
Valeur
en Lux
Lieux
d’application
1 5
2 100 Couloir
3 200 Couloir, WC
4 300 Travail sur écran
5 500 Bureaux
6 800 Salles de classes,
Laboratoire
On
Mesure de la
luminosité inhibée
lux
5'
min
Commande éclairage
sortie S1
lux
Commande sortie S2
mode 1
lux
On Commande sortie S2
mode 2
test
lux
Test
1
EE810, 52366
Type de charges / Lighting loads S1
10A AC1
230 V v
S2
0.8A max.
230 V v
Incandescentes, Halogène 230 V
Incandescent Halogen 230 V
2300 W -
Halone TBT (12 ou 24 V) via transformateur ferromagnétique ou électronique
Halogen ELV (12 or 24 V) via ferromagnetic or electronic transformer
1500 W
-
Tubes fluorescents compensés en parallèle
Parallel compensated fluorescent tubes
290 W / C=32µF -
Ballast électronique
Electronic ballast
580 W -
Lampes fluocompactes
Compact fluorescent
20 x 18 W -
LED / LED
20 x 18 W -
6LE001596C
230 V v
1
2
3
4
5
61
5
10
15
30
lux
min
test
On
1
2
3
4
5
6 1
5
10
15
30
lux
min
test
On
6LE001596C
Zones de détection - Detection areas
Spécifications techniques / Technical characteristics
1
2
3
4
5
6
1
5
10
15
30
lux
min
test
On
2
1
6
5
4
Description du détecteur - Description of detector
Capteur de mesure
de luminosité
Brightness
measurement sensor
Potentiomètre de réglage
du seuil de luminosité
Brightness threshold
adjustment potentiometer Lentilles de tection
Detection lenses
Voyant de signalisation V1
Signalling indicator light V1
Adjustments
Refer to the two tables below to make the
adjustments required for a correct operation
of the detector.
Instances of lighting levels
The positions of the potentiometer of this table
are indicative and depend on the installation
environment (furniture, ground, walls,...).
Installation
See Appendix.
Potentiomètre de réglage
de la temporisation
d’éclairage
Lighting time delay
adjustment
potentiometer
0 ... 9
Potentiomètres de réglages
Adjustment potentiometers
Position of
potentiometer
Lux
Value
Application
1 5
2 100 Corridor
3 200
Corridor, WC
4 300 VDU work
5 500 Offices
6 800 Laboratory,
classrooms
On
Measurement of
brightness inhibited
Caractéristiques électriques Electrical specifications
Tension d’alimentation : Supply voltage : 230 V v 50 HZ
Consommation à vide : 1,2 WPower consumption :
Caractéristiques fonctionnelles Entering instructions
Durée de fonctionnement sortie éclairage :
Seuil de luminosité :
Hauteur d'installation recommandée :
Lighting output operating time:
Brightness threshold:
Recommended installation distance
from ground:
1 —> 30 min
5 —> 1200 Lux
2,5 m —> 3,5 m
Environnement Environment
de fonctionnement : Operating temperature : 0 °C —> +40 °C
stockage : Storage temperature : -10 °C —> +60 °C
Classe d’isolation : Class of isolation : III
IK : IK : IK03
Indice de protection :
Protection en amont :
disjoncteur 10A
Protection index :
Upstream protection :
circuit breaker 10A
IP41
10A
Capacité de raccordement Electrical connection
1mm2
= 4 mm2 1mm2
= 4 mm2
X
7 m
Y
zone de
passagepassage
h
X
Y
X
Y
2.5 m
13 15,5
7
3 m
8
18
3.5 m
9
h
X
Y
zone de
présence
presence
area
trac
1
trac
lux
5'
min
Control of lighting
output S1
lux
Control of timer
output S2
lux
On Association of several
output detectors 2
test
lux
Test
2
2


Produkt Specifikationer

Mærke: Hager
Kategori: Skifte
Model: EE810

Har du brug for hjælp?

Hvis du har brug for hjælp til Hager EE810 stil et spørgsmål nedenfor, og andre brugere vil svare dig


Skifte Hager Manualer

Hager

Hager ESC225 Manual

1 Januar 2025
Hager

Hager SPB413 Manual

30 December 2025
Hager

Hager HTG465H Manual

30 December 2025
Hager

Hager HIC412G Manual

30 December 2025
Hager

Hager LVSG3CPX Manual

30 December 2025
Hager

Hager EC2560CT Manual

30 December 2025
Hager

Hager VZ218T Manual

30 December 2025
Hager

Hager VU12NC Manual

30 December 2025
Hager

Hager HZC001 Manual

9 December 2024
Hager

Hager VZ118P Manual

9 December 2024

Skifte Manualer

Nyeste Skifte Manualer