DE
1. Sicherheitshinweise
Bei Schäden, die durch
Nichtbeachtung dieser
Bedienungsanleitung
verursacht werden, erlischt
jeglicher Garantieanspruch.
Durch Nichtbeachtung der
Sicherheitshinweise und
unsachgemäße Bedienung des
Geräts wird für Folgeschäden
sowie bei Sach- oder
Personenschäden keine Haftung
von der GO Europe GmbH
übernommen.
Achtung!
• Vor Gebrauch des Geräts die
Bedienungsanleitung lesen!
• Die Bedienungsanleitung ist
ein Teil des Geräts und muss
bei Weitergabe an dritte
Personen mit ausgehändigt
werden. Sie enthält wichtige
Hinweise zur Inbetriebnahme
und Handhabung des Ge-
räts.
• Heben Sie die Bedienungs-
anleitung stets zum Nachle-
sen auf!
Allgemeine Sicherheitshinweise:
• Das Gerät kann von Kindern
ab einem Alter von 8 Jahren
und von Personen mit ein-
geschränkten physischen,
sensorischen oder geistigen
Fähigkeiten oder einem Man-
gel an Erfahrung und Wissen
verwendet werden, wenn Sie
beaufsichtigt werden oder
unterwiesen wurden bezüg-
lich des sicheren Gebrauchs
des Geräts und den entspre-
chenden Gefahren bewusst
sind. Kinder dürfen nicht mit
dem Gerät spielen. Reini-
gungsarbeiten und Benutzer-
wartung dürfen nicht von Kin-
dern durchgeführt werden.
• Sollten das Gerät oder die
Kabel beschädigt sein, darf
das Gerät nicht an die Span-
nungsversorgung ange-
schlossen werden. Wenden
Sie sich an den Hersteller,
seinen Service-Techniker
oder eine Person mit ähn-
lichen Qualikationen, um
Gefahren zu vermeiden.
• Stellen Sie das Gerät nicht
unmittelbar unterhalb einer
Steckdose auf.
• Das Gerät nicht mit einem
Programmschalter oder ir-
gendeiner anderen Einrich-
tung verwenden, die das
Gerät automatisch einschal-
tet, da Brandgefahr besteht,
wenn das Gerät abgedeckt
oder falsch aufgestellt wird.
• Das Gerät nicht in unmittel-
barer Nähe einer Badewan-
ne, einer Dusche oder eines
Schwimmbeckens benutzen.
Es besteht Lebensgefahr
durch einen durch Wasser
entstehenden Kurzschluss!
• Verwenden Sie das Gerät
nicht nachdem es herunter-
gefallen ist.
• Verwenden Sie das Gerät
nicht falls es Anzeichen von
Schäden zeigt.
• Stellen Sie das Gerät auf ei-
ne horizontale und stabile
Fläche, um Sie zu benutzen.
Warnung!
Verwenden Sie das Gerät
nicht in kleinen Zimmern,
wenn sich dort Personen auf-
halten die unfähig sind den
Raum alleine zu verlassen,
es sei denn, es ist eine stän-
dige Beaufsichtigung gege-
ben.
Warnung!
Der Mindestabstand des Ge-
räts zu Möbeln und leicht
brennbaren Materialien, wie
Gardinen und Vorhängen,
muss 100 cm betragen.
• Kinder unter 3 Jahren sollen
vom Gerät ferngehalten wer-
den, es sei denn, sie werden
ständig beaufsichtigt.
• Kinder ab 3 Jahren und un-
ter 8 Jahren dürfen das Ge-
rät nur ein- und ausschalten,
wenn das Gerät in seiner
vorgesehenen normalen Po-
sition positioniert oder in-
stalliert ist und wenn Sie
beaufsichtigt werden oder
Unterwiesen wurden, bezüg-
lich des sicheren Gebrauchs
des Geräts und sich den
entsprechenden Gefahren
bewusst sind. Kinder ab 3
Jahren und unter 8 Jahren
dürfen das Gerät nicht mit
der Stromversorgung verbin-
den, regulieren oder Reini-
gungsarbeiten und Benutzer-
wartung durchführen.
Vorsicht!
• Verbrennungsgefahr durch
heiße Geräteoberäche.
Während der Benutzung er-
hitzt sich die Geräteoberä-
che. Die Geräteoberäche
während des Betriebs nicht
berühren. Warten Sie nach
dem Betrieb einige Minuten,
bis sich das Gerät abgekühlt
hat, bevor Sie die Geräteo-
beräche berühren. Beson-
dere Aufmerksamkeit muss
Kindern und schutzbedürf-
tigen Menschen geschenkt
GO Europe GmbH
Zum Kraftwerk 1, 45527 Hattingen (Germany)
www.go-europe.com
Service-Hotline 0180 5 007514
(Kosten aus dem dt. Festnetz bei Drucklegung: 14 ct/Min.,
maximal 42 ct/Min. aus den Mobilfunknetzen)
Wickeltischheizstrahler / Changing Table Radiant Heater / Chauage radiant pour table à langer / Riscaldatore per fasciatoio / Radiador para cambiadores / Luiertafel-warmtestraler
BR 80
werden, wenn sie anwesend
sind.
Wichtig!
• Mindestabstände: Der
Abstand vom Gerät zum
Wickeltisch darf 100 cm
nicht unterschreiten.
Der Abstand vom Gerät
zur Decke darf 35 cm
nicht unterschreiten.
Der Mindestabstand zu
Möbeln und brennbaren
Materialien muss 65 cm
betragen. Ansonsten besteht
Brandgefahr!
Sicherheitshinweise
Wandmontage:
Achtung!
• Die Wandhalterung muss
mindestens 1,8 m über dem
Boden montiert werden.
• Der Abstand zu anderen
Wänden und der Decke
muss mindestens 50 cm zum
Gerät betragen. Es besteht
die Gefahr von Überhitzung.
• Das Gerät darf nur orts-
fest und waagerecht an der
Wand montiert werden. Eine
Montage an der Decke ist
nicht zulässig.
• Das Gerät darf nicht auf
Holz, Plastik oder sonstigem
brennbarem Material, oder
unterhalb von oder direkt vor
Steckdosen montiert werden.
• Bei Montage in Bade- oder
Duschräumen sind die Vor-
schriften des örtlichen EVU
zu beachten. Der Strahler
muss so positioniert werden,
dass der Zugschalter nicht
von der Badewanne oder
Dusche aus betätigt werden
kann. Das Gerät darf nicht
über der Badewanne mon-
tiert werden!
Weitere Sicherheitshinweise:
• Das Gerät entspricht der
Schutzklasse I. Um diesen
Zustand zu erhalten und ei-
nen gefahrlosen Betrieb des
Geräts zu gewährleisten,
müssen die Sicherheits- und
Warnhinweise vom Anwen-
der unbedingt beachtet wer-
den! Aus Sicherheits- und
Zulassungsgründen ist das
eigenmächtige Umbauen
bzw. Verändern des Geräts
verboten.
• Betreiben Sie das Gerät nie-
mals unbeaufsichtigt.
• Schalten Sie das Gerät nach
der Benutzung aus.
• Setzen Sie das Gerät kei-
nen starken Vibrationen oder
mechanischen Belastungen
aus.
• Gießen Sie niemals Flüs-
sigkeiten über das Gerät.
Es besteht Gefahr eines
Brandes oder eines lebens-
gefährlichen elektrischen
Schlags. Falls dennoch un-
gewollt eine Flüssigkeit über
das Gerät verschüttet wer-
den sollte, ziehen Sie so-
fort den Netzstecker aus der
Steckdose und wenden Sie
sich an einen Fachmann.
• Der Bestrahlungsabstand
von 100 cm vom Kind zum
Gerät ist unbedingt einzuhal-
ten.
• Kinder mit erhöhter Tempera-
tur dürfen nicht bestrahlt wer-
den. Es besteht die Gefahr
einer Körperüberhitzung.
• Achten Sie darauf, dass Kin-
der nicht direkt auf die Heiz-
stäbe schauen können.
• Reparaturen nur von autori-
siertem Fachpersonal durch-
führen lassen.
• Reektor und Heizstab dür-
fen nur von autorisiertem
Fachpersonal gereinigt wer-
den.
• Wenn Sie das Gerät für län-
gere Zeit nicht nutzen, zie-
hen Sie den Netzstecker aus
der Steckdose.
• Ist der Netzstecker oder das
Netzkabel des Geräts be-
schädigt, muss es durch den
Hersteller, seinen Service-
Techniker oder eine Person
mit ähnlichen Qualikationen
ersetzt werden, um Gefahren
zu vermeiden.
• Für Schäden, die durch un-
zureichende oder falsche
Aufstellung des Geräts ent-
stehen, können an die GO
Europe GmbH keine Ansprü-
che geltend gemacht wer-
den!
• Wenn ein gefahrloser Be-
trieb des Geräts nicht mehr
möglich ist, müssen Sie das
Gerät sofort außer Betrieb
setzen und gegen unbeab-
sichtigten Betrieb sichern.
• Verwenden Sie das Ge-
rät nicht in Verbindung mit
einem Programmierer, Timer
oder anderen Schaltgeräten,
die das Gerät automatisch
einschalten, da Brandgefahr
besteht falls das Gerät abge-
deckt oder falsch positioniert
ist.
• Verwenden Sie das Gerät
nicht, wenn es nach längerer
ungünstiger Lagerung nicht
mehr funktioniert.
Sicherheitshinweise
Brandschutz:
• Berühren Sie niemals das
Schutzgitter, wenn das Gerät
in Betrieb ist. Es besteht Ver-
brennungsgefahr!
• Keine leicht entammbaren
Stoe oder Sprays in der
Nähe des in Betrieb bend-
lichen Geräts aufbewahren
oder benutzen. Brandgefahr!
• Das Gerät nicht in der Nähe
von Garderoben oder Gar-
dinen anbringen. Es besteht
Brandgefahr!
• Keine Kleidungsstücke,
Handtücher oder ähnliches
zum Trocknen über das Ge-
rät legen! Überhitzungs- und
Verbrennungsgefahr!
• Um die Brandgefahr zu ver-
ringern, halten Sie Textilien,
Gardinen und
alle anderen brennbaren Ma-
terialien mindestens 1 m vom
Luftauslass entfernt.
• Achten Sie darauf, dass Ihr
Kind nicht zu lange ohne
Kleidung unter dem Gerät
liegt, um Verbrennungen zu
vermeiden.
Sicherheitshinweise Spannung:
• Niemals unter Spannung ste-
hende Teile berühren, es be-
steht Lebensgefahr!
• Keine Fremdobjekte in die
Geräteönungen einfüh-
ren! Verletzungsgefahr durch
Stromschlag und Beschädi-
gung des Geräts!
2. Lieferumfang
– Wickeltischheizstrahler:
- 1 × Heizelement
- 1 × obere Stange
- 1 × mittlere Stange
- 1 × untere Stange
- 1 × Grundplatte
- 5 × Standfuß
– Bedienungsanleitung
– Montagematerial
Prüfen Sie den Verpackungsinhalt
Ihres Geräts, bevor Sie Ihr Gerät
in Betrieb
nehmen. Sollte etwas fehlen oder
beschädigt sein, nehmen Sie Ihr
Gerät
keinesfalls in Betrieb. Wenden Sie
sich an unseren Service.
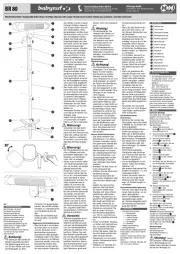
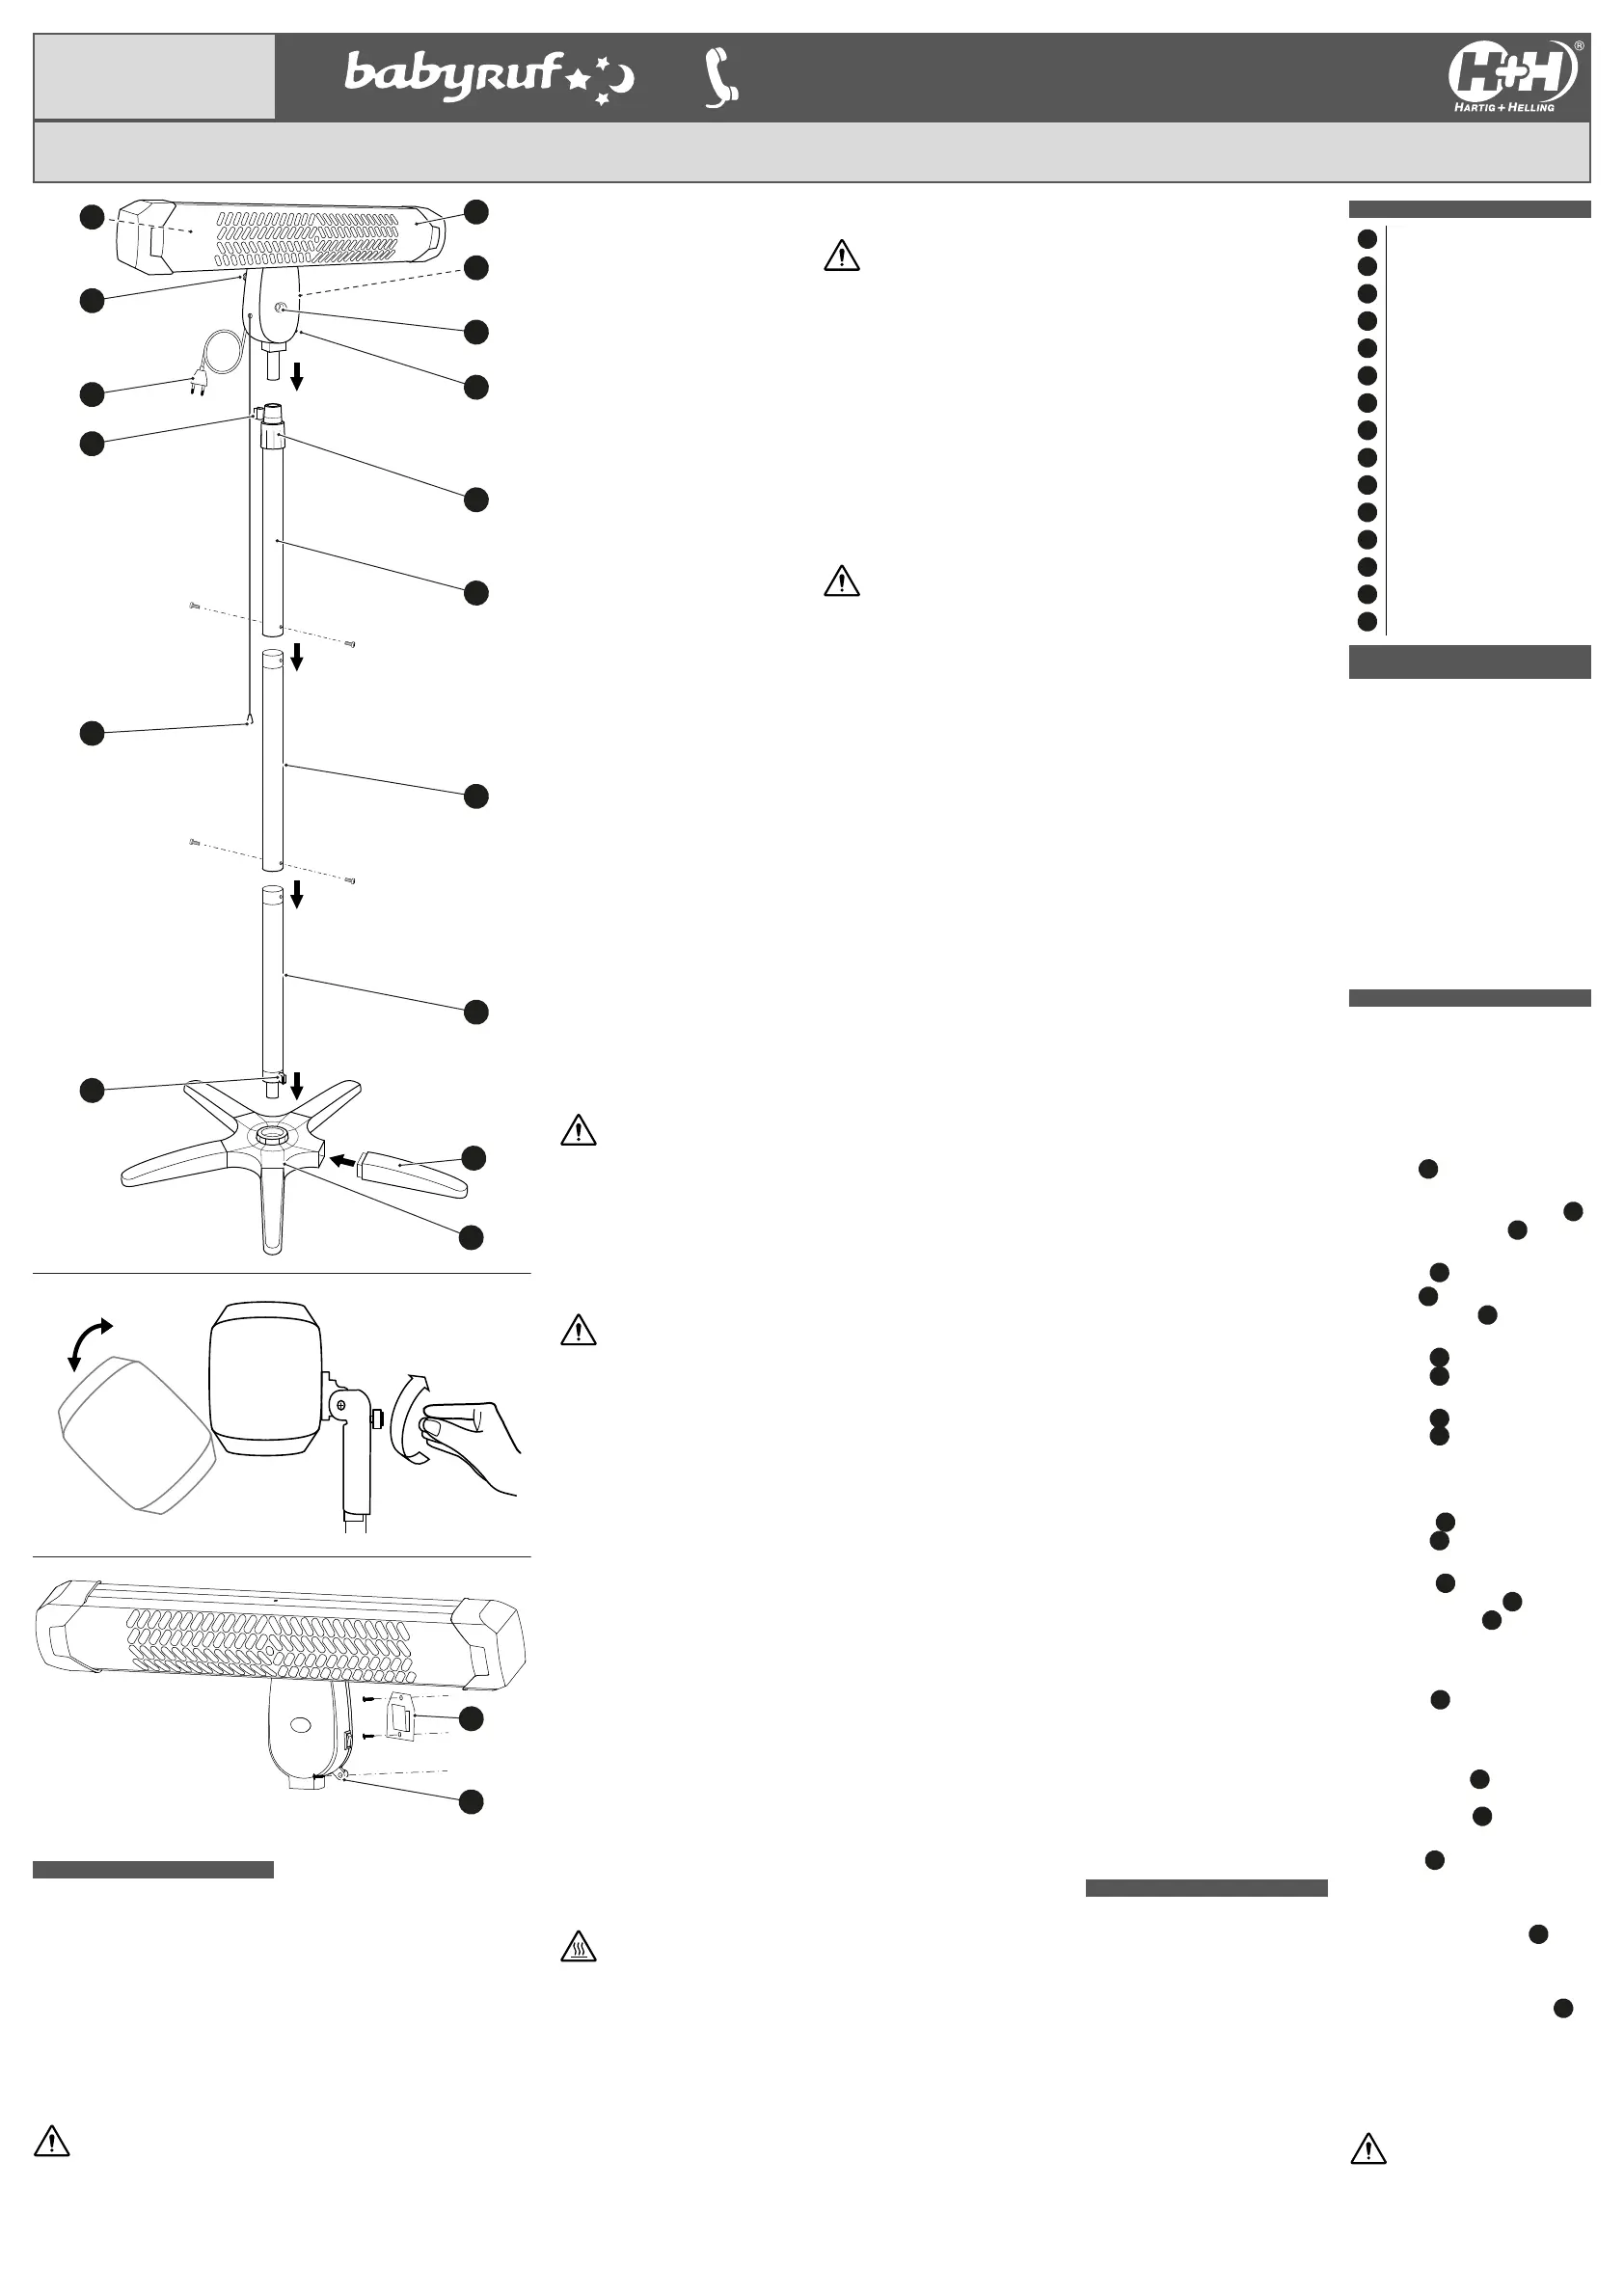
3. Bestandteile
Heizelement
Timer-Taste
Leistungs-Anzeige
Montagesicherung
Verbindungsstück
obere Stange
mittlere Stange
untere Stange
Standfuß
Grundplatte
Kabelführung
Zugschalter
Netzstecker
Befestigungsknauf
Wandhalterung
4. Bestimmungsgemäße
Verwendung
• Der Wickeltischheizstrahler -
im Folgenden Gerät - ist für die
Verwendung in Innenräumen
geeignet.
• Das Gerät darf nur an
220 - 240 V 50-60 Hz
Schutzkontaktsteckdosen
betrieben werden.
Eine andere Verwendung als
zuvor beschrieben führt zur
Beschädigung des Geräts. Des
Weiteren besteht die Gefahr eines
Kurzschlusses, eines Brandes
oder eines elektrischen Schlags.
Das Gerät darf weder umgebaut,
geönet noch verändert werden.
5. Montage
Stehende Montage
Das Gerät wird in Einzelteilen
geliefert und muss vor der
Bedienung montiert werden.
Beachten Sie die
Sicherheitshinweise zur
Wandmontage,
1. Stellen Sie die Grund-
platte
an einem ebenen
Verwendungsort auf.
2. Stecken Sie die Standfüße
an die Grundplatte
.
3. Stecken Sie die untere
Stange
in die Grund-
4. platte
und drehen Sie die
untere Stange
fest.
5. Stecken Sie die mittlere
Stange
auf die untere
Stange
.
6. Stecken Sie die obere
Stange
auf die mittlere
Stange
.
7. Verbinden Sie die Stangen mit
den beiliegenden Schrauben.
8. Stecken Sie das Heiz-
element
auf die obere
Stange
.
9. Verschrauben Sie das Heiz-
element
mit dem
Verbindungsstück
der
oberen Stange
.
Variieren Sie die Höhe je nach
Bedarf.
10. Stecken Sie den Netz-
stecker
in eine
ordnungsgemäß installierte
Steckdose.
11. Fixieren Sie das Kabel des
Netzsteckers
bei Bedarf
oben und unten an der
Kabelführung
.
Sie können auch auf einzelne
Standfüße
verzichten, um
das Gerät näher an einer Wand
aufstellen zu können.
Hinweis: Bei einer Montage mit
weniger als 5 Standfüßen
müssen Sie die Standstabilität des
Geräts anderweitig gewährleistet
werden. Stellen Sie das Gerät nie
mit weniger als 5 Standfüßen
frei im Raum auf!
Wandmontage
Beachten Sie vor der
Wandmontage die
Sicherheitshinweise zur
Wandmontage.
Wichtig! Gefahr
von schweren Verletzungen
durch Beschädigung von
Kabeln oder Leitungen! Achten
Sie bei der Montage auf
30°
3
6
5
7
8
9
10
14
13
12
11
11
15
2
4
4
15