Hisense HS673C60X Manual
Læs gratis den danske manual til Hisense HS673C60X (44 sider) i kategorien Opvaskemaskine. Denne vejledning er vurderet som hjælpsom af 17 personer og har en gennemsnitlig bedømmelse på 4.7 stjerner ud af 9 anmeldelser.
Har du et spørgsmål om Hisense HS673C60X, eller vil du spørge andre brugere om produktet?

Produkt Specifikationer
| Mærke: | Hisense |
| Kategori: | Opvaskemaskine |
| Model: | HS673C60X |
| Bredde: | 599 mm |
| Dybde: | 598 mm |
| Højde: | 846 mm |
| Kontroltype: | Berøring |
| Indbygget skærm: | Ja |
| Skærmtype: | LED |
| Ledningslængde: | 1.73 m |
| Pakkedybde: | 665 mm |
| Pakkebredde: | 640 mm |
| Pakkehøjde: | 890 mm |
| Placering af apparat: | Fritstående |
| Inverter-teknologi: | Ja |
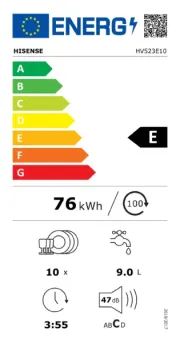
| Støjniveau: | 42 dB |
| Tilløbsslange, længde: | 1.75 m |
| Antal vaskeprogrammer: | 7 |
| Forsinket start-timer: | Ja |
| Børnesikring: | Ja |
| Justerbare fødder: | Ja |
| Dør farve: | Rustfrit stål |
| Balje materiale: | Rustfrit stål |
| Vandforbrug pr. cyklus: | 9.6 L |
| Indbygget vandblødgører: | Ja |
| Bestik rum type: | Skuffe |
| Farve på kontrolpanel: | Sølv |
| Antal kuverter: | 16 kuverter |
| Cyklustid: | 200 min. |
| Forsinket start (maks.): | 24 t |
| Opvaskeprogrammer: | 60min, Auto, Eco, Glass/delicate, Hygiene, Intensive, Night |
| Indikator for afspændingsmiddel: | Ja |
| Energiforbrug pr. cyklus: | 0.76 kWh |
| Energieffektivitetsskala: | A til G |
| Antal temperaturindstillinger: | 7 |
| AquaStop funktion: | Ja |
| Indikator for resterende tid: | Ja |
| Udøsslange længde: | 1.5 m |
| Produktstørrelse: | Fuld størrelse (60 cm) |
| Wi-Fi kontrolleret: | Ja |
| Vandpåfyldning: | Cold, Hot |
| Overløbsbeskyttelse: | Ja |
| Støjemissionsklasse: | B |
| Energieffektivitetsklasse: | C |
| Energiforbrug pr. 100 cyklusser: | 76 kWh |
| Brugerdefineret panel klar: | Ingen |
| Temperatur (maks): | - °C |
| Saltindikator: | Ja |
| Øverste kurv indstillelig højde: | Ja |
| Kurves indstillelige placering: | Øvre |
| Selvrensende filter: | Ja |
| Antal kurve: | 3 kurv(e) |
| Lydalarm: | Ja |
| Maksimal varmtvandsforsyning temperatur: | 70 °C |
| Ready-indikator: | Ja |
| Automatiske programmer: | Ja |
| Nedtællingsur: | Ja |
Har du brug for hjælp?
Hvis du har brug for hjælp til Hisense HS673C60X stil et spørgsmål nedenfor, og andre brugere vil svare dig
Opvaskemaskine Hisense Manualer


Opvaskemaskine Manualer
- Hobart
- Stirling
- Scandomestic
- Deante
- Bluesky
- Novy
- Hyundai
- ELIN
- Rosieres
- Seiki
- Bertazzoni
- Sharp
- Nuova Simonelli
- Salora
- Winia
Nyeste Opvaskemaskine Manualer


