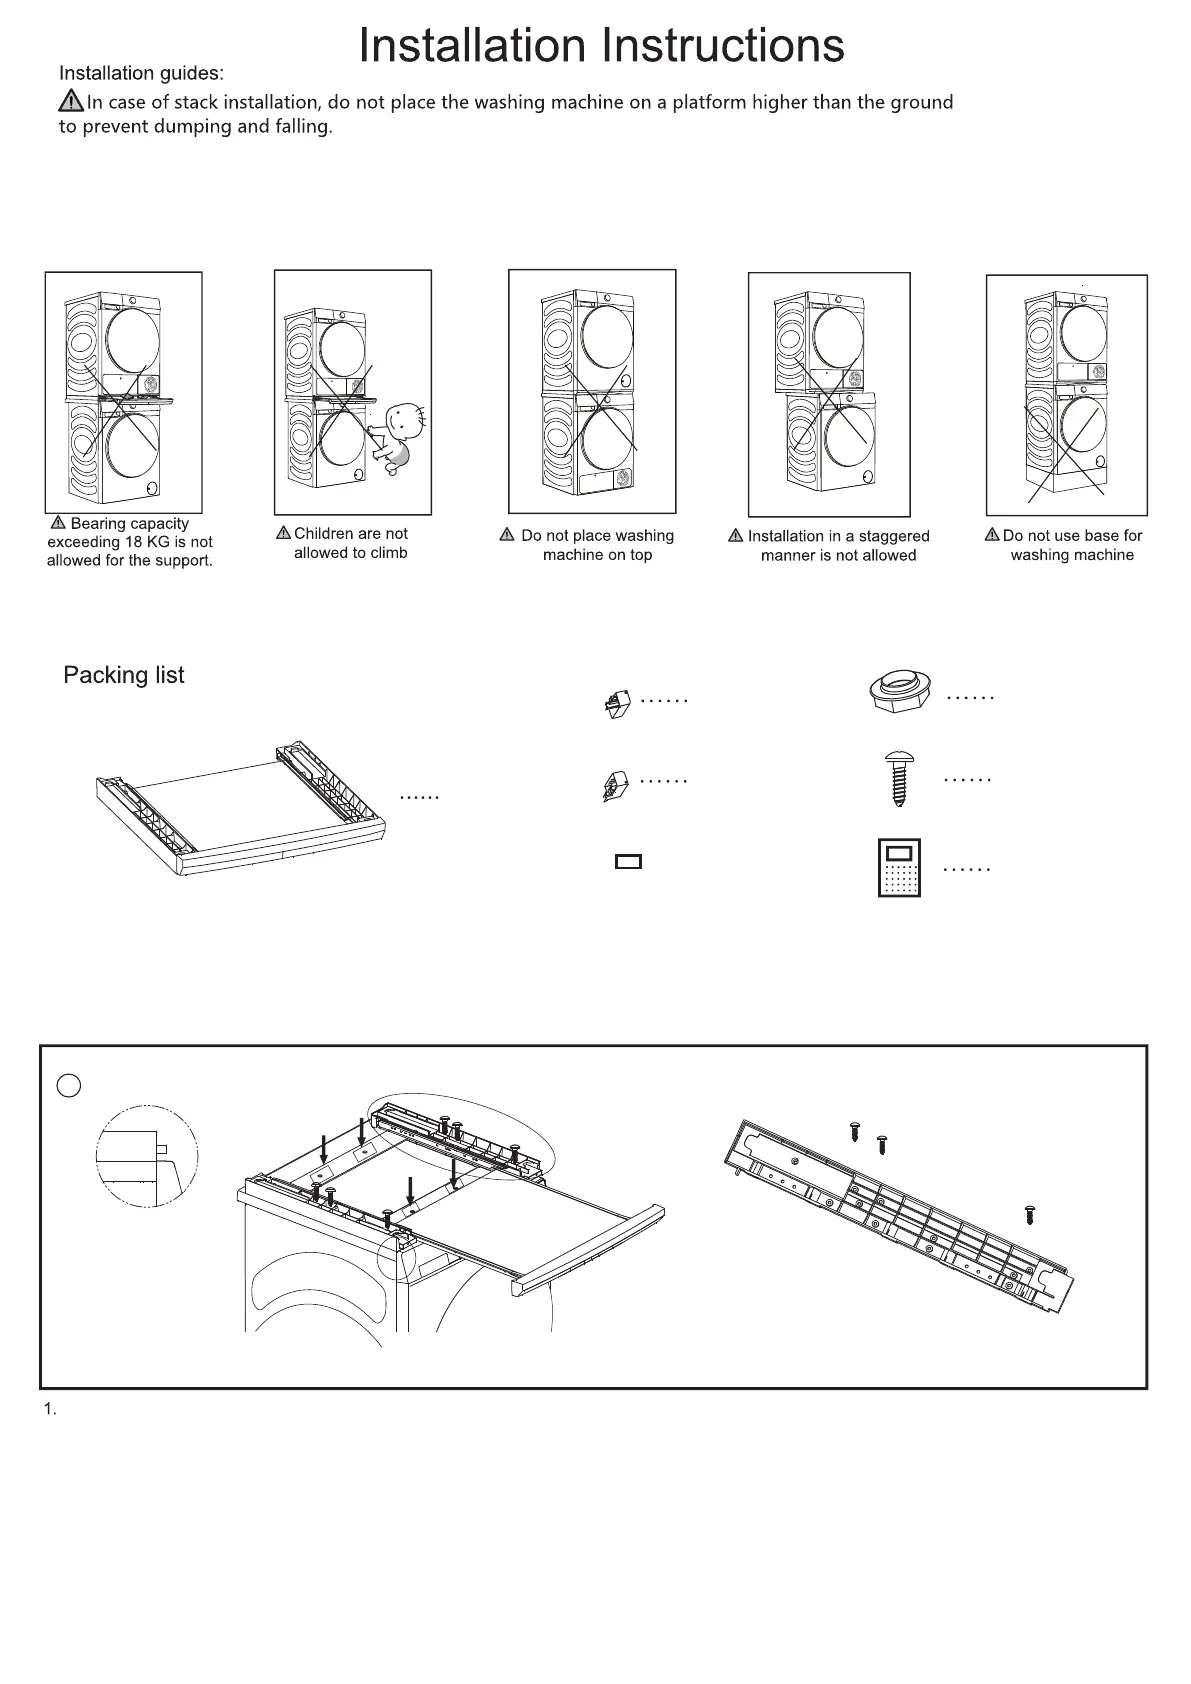
Hisense WZXX90-BEW001 Manual

Hisense Ikke kategoriseret WZXX90-BEW001

Læs gratis den danske manual til Hisense WZXX90-BEW001 (2 sider) i kategorien Ikke kategoriseret. Denne vejledning er vurderet som hjælpsom af 3 personer og har en gennemsnitlig bedømmelse på 3.9 stjerner ud af 2 anmeldelser. Har du et spørgsmål om Hisense WZXX90-BEW001, eller vil du spørge andre brugere om produktet?

Side 1/2
Note: the pictures shown are schematic diagrams.
Support× 1
Left fixing clip × 1
Right fixing clip × 1
Foot
accessory × 4
Round head
screw × 8
Instruction × 1
1.
Do not strip the screws, you must use the attachment screws to prevent them from becoming mismatched after replacement.
2.
During installation, two people must work together while keeping a safe distance from the wall.
3. Be careful to prevent the bracket and wooden support from falling out and causing injury.
......
3M tape×4
1
......
......
......
Place the bracket flat on the top cover of the washing machine. Align the front end of the bracket with the side panel according to the
enlarged diagram on the left side. Pull out the drawer to its maximum distance to expose the two middle connecting plates. At the
four screw holes on the connecting plates, as shown in the diagram, attach the four pieces of 3M tape provided in the accessories
between the connecting plate and the washing machine top cover. Lean forward and press the 3M tape position for more than three
minutes. Then, according to the enlarged diagram on the right side, use three round head screws to fix the bracket on the top cover
of the washing machine through the outermost three screw holes of the bracket. Please NOTE: this will result in small holes being
made in the top cover of the washing machine.
3M tape ×4
4
3
5
3.
Draw the water box, and empty it if there is residual condensate water in
it. (This step can be ignored for new machines)
5.
Install the left and right fixing clips on the left and right supports
respectively as shown in the figure, and then fix them with 2 round head
screws.
4.
Take out the drawer board and place dryer on the rail of supporting
bracket. Make sure that 2 feet at the back are placed according to the
diagram, then push in direction of the arrow. Finally put all 4 feet in the
socket of the bracket based on the diagram.
6
6. Check whether the whole machine is firmly installed.
After installation, you can use an additional drain pipe to connect to the original drainage pipe, floor drain or water box.


Produkt Specifikationer

Mærke: Hisense
Kategori: Ikke kategoriseret
Model: WZXX90-BEW001
Bredde: 595 mm
Dybde: 590 mm
Højde: 45 mm
Vægt: 4500 g
Antal pr. pakke: 1 stk
Produktfarve: Hvid
Produkttype: Skuffe, der kan trækkes ud
Pakkevægt: 7000 g
Pakkedybde: 710 mm
Pakkebredde: 670 mm
Pakkehøjde: 120 mm

Har du brug for hjælp?

Hvis du har brug for hjælp til Hisense WZXX90-BEW001 stil et spørgsmål nedenfor, og andre brugere vil svare dig


Ikke kategoriseret Hisense Manualer

Ikke kategoriseret Manualer

Nyeste Ikke kategoriseret Manualer