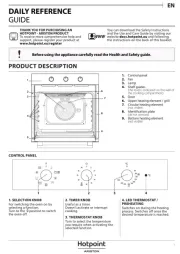
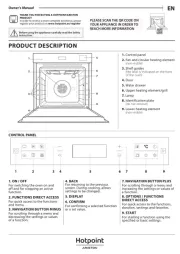
Hotpoint FA4S 844 P IX HA Manual
Læs gratis den danske manual til Hotpoint FA4S 844 P IX HA (16 sider) i kategorien Ovn. Denne vejledning er vurderet som hjælpsom af 41 personer og har en gennemsnitlig bedømmelse på 5.0 stjerner ud af 21 anmeldelser.
Har du et spørgsmål om Hotpoint FA4S 844 P IX HA, eller vil du spørge andre brugere om produktet?
Produkt Specifikationer
| Mærke: | Hotpoint |
| Kategori: | Ovn |
| Model: | FA4S 844 P IX HA |
| Afrimningsfunktion: | Ingen |
| Justerbar termostat: | Ja |
| Vekselstrømsindgangsspænding: | 220 - 240 V |
| Vekselstrømsindgangsfrekvens: | 50 - 60 Hz |
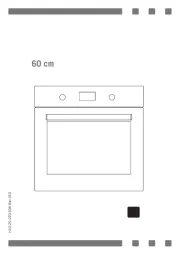
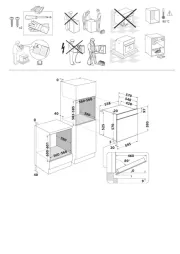
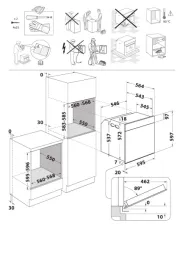
| Bredde: | 595 mm |
| Dybde: | 551 mm |
| Højde: | 595 mm |
| Vægt: | 27100 g |
| Produktfarve: | Rustfrit stål |
| Kontroltype: | Rotary, Touch |
| Indbygget skærm: | Ja |
| Skærmtype: | LED |
| Strøm: | 16 A |
| Ledningslængde: | 1 m |
| Pakkevægt: | 28400 g |
| Pakkedybde: | 650 mm |
| Pakkebredde: | 640 mm |
| Pakkehøjde: | 670 mm |
| Husmateriale: | Rustfrit stål |
| Placering af apparat: | Indbygget |
| Indvendig belysning: | Ja |
| Dørhængsel: | Ned |
| Integreret ur: | Ja |
| Urtype: | Elektronisk |
| Installationsrum bredde: | 568 mm |
| Installationsrum dybde: | 560 mm |
| Installationsrum højde: | 585 mm |
| Tilsluttet belastning: | 3300 W |
| Genopvarmningsfunktion: | Ja |
| Antal madlavningsprogrammer: | 11 |
| Grill: | Ja |
| Damp madlavning: | Ja |
| Konvektion madlavning: | Ja |
| Forsinket start-timer: | Ja |
| Børnesikring: | Ja |
| Døråbningsvinkel: | 89 ° |
| Certificering: | CE |
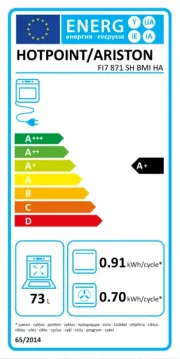
| Energieffektivitetsskala: | A+++ til D |
| Selvrensende: | Ja |
| LED-indikatorer: | Ja |
| Installationsrum højde (min.): | 583 mm |
| Kontrolposition: | Front |
| Nem at rengøre: | Ja |
| Timer type: | Digital |
| Wi-Fi kontrolleret: | Ingen |
| Rengøringstype: | Pyrolyse |
| Antal glasdørpaneler: | 3 |
| Antal gitre: | 1 |
| Varmebeskyttende dør: | Ja |
| Ovn - størrelse: | Medium |
| Ovntype: | Elektrisk ovn |
| Samlet indvendig ovn kapacitet: | 71 L |
| Strøm for samtlige ovne: | - W |
| Antal ovne: | 1 |
| Ovn nettokapacitet: | 71 L |
| Ovn termostatinterval: | 50 - 250 °C |
| Konventionel madlavning: | Ja |
| Holde varm funktion: | Ingen |
| Pizza fremstillingsfunktion: | Ja |
| Antal lamper: | 1 Lampe( r) |
| Energiforbrug (konventionel): | 0.89 kWh |
| Energiforbrug (tvungen konvektion): | 0.69 kWh |
| Hurtig varme: | Ingen |
| Bageplade: | Ja |
| Opvarmning i både top og bund: | Ja |
| Mikroovn madlavning: | Ingen |
| Blæser grillfunktion: | Ja |
| Grill med fuld overflade: | Ja |
| Antal bageplader: | 2 |
| Strømstiktype: | Intet stik |
| Alarm klar: | Ingen |
| Aftaglig ovndør: | Ja |
| Antal hylder: | 2 hylder |
| Antal hyldepositioner: | 5 |
| Belysning placering: | Side |
| Timer tilstande: | Cooking time, Timer |
| Aftagelig dørglas: | Ja |
| Dørmateriale: | Glas |
| Brødfremstilling kapacitet: | Ja |
| Installationsrum bredde (min.): | 560 mm |
| Maksimal temperatur (varmluft): | 250 °C |
| Maksimal temperatur (konventionel): | 250 °C |
| Fuld overflade grill + varmluft (enkelt tilstand): | Ja |
| Stegetermometer: | Ingen |
| Programmer til at forberede brød & dej: | Dej |
| Brød, maksimal vægt: | 2000 g |
| Indvendig materiale: | Emalje |
| Brød, minimum vægt: | 80 g |
| Sikkerhedsventil: | Ingen |
| Spildbakke: | Ingen |
| Roaster funktion: | Ja |
| Turbo-tilstand: | Ja |
| Ovntilberedningsmetode: | Blæsertvungen |
| Garantiperiode: | 2 År |
Har du brug for hjælp?
Hvis du har brug for hjælp til Hotpoint FA4S 844 P IX HA stil et spørgsmål nedenfor, og andre brugere vil svare dig
Ovn Hotpoint Manualer

Ovn Manualer
- Edy
- Korona
- Barazza
- Asko
- Grundig
- Vitrokitchen
- White And Brown
- Proline
- Cres Cor
- ECG
- Nesco
- Rösle
- Hotpoint Ariston
- Galanz
- Germanica
Nyeste Ovn Manualer