Hotpoint GA2 124 BL HA Manual

Hotpoint Ovn GA2 124 BL HA

Læs gratis den danske manual til Hotpoint GA2 124 BL HA (8 sider) i kategorien Ovn. Denne vejledning er vurderet som hjælpsom af 39 personer og har en gennemsnitlig bedømmelse på 4.2 stjerner ud af 20 anmeldelser. Har du et spørgsmål om Hotpoint GA2 124 BL HA, eller vil du spørge andre brugere om produktet?

Side 1/8
EN
1
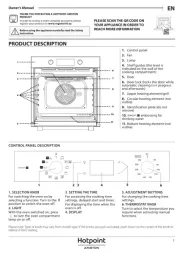
PRODUCT DESCRIPTION
DAILY REFERENCE
GUIDE
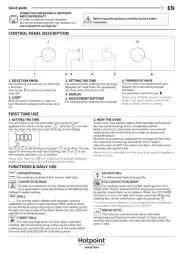
CONTROL PANEL
Before using the appliance carefully read the Health and Safety guide.
1. Control panel
2. Lamp
3. Shelf guides
(the level is indicated on the wall of
the cooking compartment)
4. Door
5. Upper heating element/grill
6. Recess for roasting spit
7. Identification plate
(do not remove)
8. Burner
(not visible)
1. TIMER KNOB
Use to set the timer.
Does not start or stop cooking.
2. ADJUSTMENT KNOB
For switching the oven on,
adjusting the temperature and
selecting theGrill function.
Turn to the position to switch
the oven off.
3. GRILL LED
This lights up when the grill is in
use.
4. LIGHT BUTTON
Press to switch the light on (1) or
off (0).
THANK YOU FOR PURCHASING AN
HOTPOINT-ARISTON PRODUCT
To receive more comprehensive help and
support, please register your product at
www.hotpoint.eu/register
WWW
You can download the Safety Instructions
and the Use and Care Guide by visiting our
website docs.hotpoint.eu and following
the instructions on the back of this booklet.
1 2 3 4
1
2
3
4
7
5
6
8
2
ACCESSORIES
Download the Use and Care Guide from
docs.hotpoint.eu for more information
WWW
WIRE SHELF DRIPPING PAN BAKING TRAY ROASTING SPIT
The number of accessories may vary depending on which model is purchased.
Other accessories can be purchased separately from the After-sales Service.
INSERTING THE WIRE SHELF AND OTHER
ACCESSORIES
Insert the wire shelf onto the level you require by
holding it tilted slightly upwards and resting the
raised rear side (pointing upwards) down first. Then
slide it horizontally along the shelf guide as far as
possible.
The other accessories, such as the baking tray, are
inserted horizontally by sliding them along the shelf
guides.
INSERTING THE WIRE SHELF AND OTHER
ACCESSORIES
Push the skewer through the centre of the meat
(bound with string if poultry) and slide the meat onto
the skewer until it is positioned firmly on the fork and
cannot move. Push the second fork onto the skewer
and slide it on until it holds the meat firmly in place.
Tighten the fixing screw to secure it in position.
Insert the end into the recess provided in the oven's
cooking compartment and rest the rounded part on
the support (placed on the third level).
To use the roasting spit, start the oven by selecting
the “Grill” function.
To collect the cooking juices, position a dripping pan
below and add 200 ml of drinking water.
To avoid burning yourself when the skewer is hot,
only handle it by the plastic handle (which must
always be removed before cooking).
FITTING THE COVER ON THE BURNER
To fit the cover on the burner
correctly, place it on the
bottom of the cooking
compartment.
Position it so that the words
AVANTI - FRONT are facing
the outside and so that the
cover cannot move sideways
once lowered into position.


Produkt Specifikationer

Mærke: Hotpoint
Kategori: Ovn
Model: GA2 124 BL HA

Har du brug for hjælp?

Hvis du har brug for hjælp til Hotpoint GA2 124 BL HA stil et spørgsmål nedenfor, og andre brugere vil svare dig