MXR-4 Bestellnummer 20.0250
MXR-6 Bestellnummer 20.0280
MONACOR INTERNATIONAL GmbH & Co. KG • Zum Falsch 36 • 28307 Bremen • Germany Copyright
©
by MONACOR INTERNATIONAL. All rights reserved. A-2019.99.03.05.2020
ELECTRONICS FOR SPECIALISTS ELECTRONICS FOR SPECIALISTS ELECTRONICS FOR SPECIALISTS ELECTRONICS FOR SPECIALISTS ELECTRONICS FOR SPECIALISTS ELECTRONICS FOR SPECIALISTS
MXR-4
H. P.FXRET
USB PH. PWR
48 V
M L M R
1 2
MIC/LINE MIC/LINE
LINE
RL
3/4
ON
LOW
CUT
ON
LOW
CUT
3/4
USB
10
10
20
25
30
40
60
0 dB
15
M
DSP
3
6
ON
3
10
0 dB
MIN MAX
H.
P.
MIN MAX
MIN MAX
P
R
O
G
D
E
L
A
Y
F
X
R
E
T
G
A
I
N
H
L
F
X
P
A
N
MIN MAXL R
3/4
|
USB
−15 dB +15
−15 dB +15
MIN MAX
MIN MAX
G
A
I
N
H
L
F
X
P
A
N
G
A
I
N
H
L
F
X
P
A
N
−15 dB +15
−15 dB +15
MIN MAX
L R
MIN
PK
MAX
1
−15 dB +15
−15 dB +15
MIN MAX
L R
MIN
PK
MAX
2
PK
10
10
20
25
30
40
60
0 dB
15
10
10
20
25
30
40
60
0 dB
15
10
10
20
25
30
40
60
0 dB
15
6
42
1
5
3
16
15
17
20
26
21
18
19 23
10
8
24
13
14 22 25
7
9 11 12
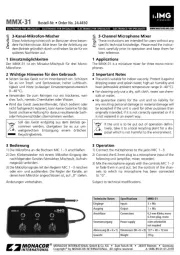
Audio-Mischpult
Diese Kurzanleitung soll den schnel-
len Einstieg in die Benutzung des
Geräts ermöglichen. Sie richtet sich
an Benutzer mit Grundkenntnissen
in der Audiotechnik. Bitte lesen
Sie die Anleitung vor dem Betrieb
gründlich durch und heben Sie sie
für ein späteres Nachlesen auf.
1 Einsatzmöglichkeiten
Dieses kompakte Mischpult lässt sich
vielfältig zum Mischen von Audiosigna-
len (Mikrofone, Instrumente, Geräte mit
Line-Pegel) einsetzen. Das Mischsignal
wird über die 6,3-mm-Klinkenbuchsen
M L, M R (10) und die USB-Buchse (5)
ausgegeben. Die USB-Buchse dient auch
als Eingang für Audiodaten bei der Ver-
bindung mit einem Computer und für den
integrierten Audiospieler zum Abspielen
von MP3-, WAV- oder WMA-Dateien von
einem USB-Stick. Der Audiospieler ist
außerdem mit einem Bluetooth- Modul
aus gestattet.
2 Sicherheitshinweise
Die Geräte (Mischpult und Netzgerät)
entsprechen allen relevanten Richtlinien
der EU und tragen deshalb das
-Zei-
chen.
WARNUNG Das Netzgerät wird mit
lebensgefährlicher Netz-
spannung versorgt. Neh-
men Sie deshalb niemals
selbst Eingriffe daran vor.
Es besteht die Gefahr eines
elektrischen Schlages.
•
Die Geräte sind nur zur Verwendung
im Innenbereich geeignet. Schützen Sie
sie vor Tropf- und Spritzwasser sowie
vor hoher Luftfeuchtigkeit. Der zuläs-
sigeEinsatztemperaturbereich beträgt
0 – 40 °C.
•
Ziehen Sie sofort das Netzgerät aus der
Steckdose, wenn:
1. sichtbare Schäden an einem der Ge-
räte vorhanden sind,
2. nach einem Sturz oder Ähnlichem
der Verdacht auf einen Defekt be-
steht,
3. Funktionsstörungen auftreten.
Lassen Sie die Geräte in jedem Fall in
einer Fachwerkstatt reparieren.
•
Verwenden Sie zum Reinigen nur ein
trockenes, weiches Tuch, niemals Che-
mikalien oder Wasser.
•
Werden die Geräte zweckentfremdet,
nicht richtig angeschlossen / bedient
oder nicht fachgerecht repariert, kann
keine Haftung für daraus resultierende
Sach- oder Personenschäden und keine
Garantie für die Geräte übernommen
werden. Ebenso kann keine Haftung
für durch Fehlbedienung oder durch
einen Defekt entstandene Datenver-
luste und deren Folgeschäden über-
nommen werden.
Sollen die Geräte endgültig
aus dem Betrieb genom-
men werden, übergeben Sie
sie zur umweltgerechten
Entsorgung einem örtlichen
Recyclingbetrieb.
2.1 Konformität und Zulassung
Hiermit erklärt MONACOR INTERNATIO-
NAL, dass das Bluetooth-Modul in den
Geräten MXR-4 und MXR-6 der Richtlinie
2014 / 53 / EU entspricht. Die EU-Konformi-
tätserklärungen sind im Internet verfüg-
bar: www.img-stageline.de
Das Bluetooth-Modul ist für den Betrieb
in den EU- und EFTA- Staaten allgemein
zugelassen und anmelde- und gebüh-
renfrei.
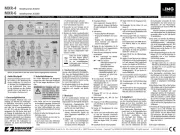
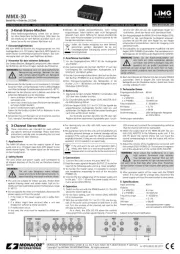
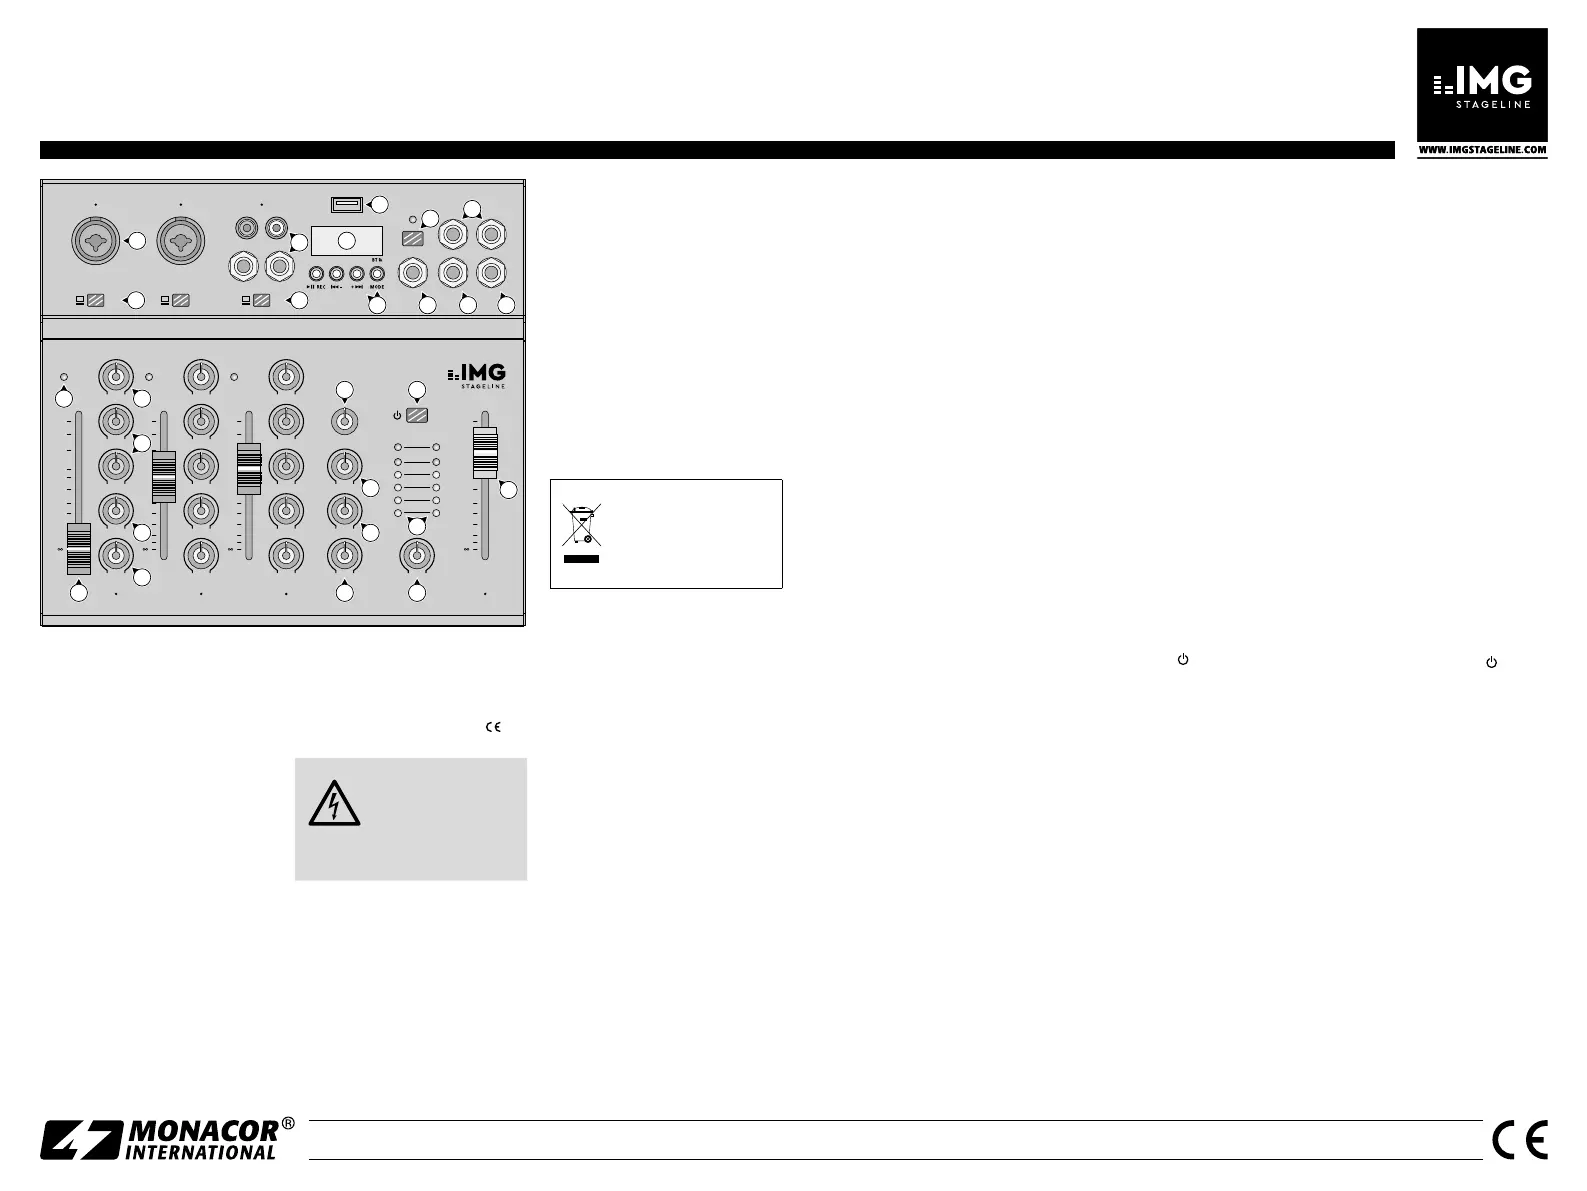
3 Übersicht
Auf der Geräterückseite befindet sich
die USB-Buchse 5 V⎓/1 A zur Stromver-
sorgung über das beiliegende Netzgerät.
1 kombinierte Eingangsbuchse MIC /
LINE für Mikrofone (XLR) und Ton-
quellen mit Line-Pegel (Klinke)
2 Low-Cut-Filter : Bei gedrückter Taste
werden unerwünschte Signale mit
tiefen Frequenzen unterdrückt, z. B.
Trittschall
3 Eingang LINE des Stereokanals über
Cinch- und 6,3-mm-Klinkenbuch-
sen für Geräte mit Line- Pegel (z. B.
CD-Spieler, weiteres Mischpult)
4 Eingangswahltaste:
Taste ausgerastet: Eingang LINE (3)
Taste gedrückt: Eingang USB-Buchse
(5) oder Audiospieler mit Bluetooth-
Modul
5 USB-Buchse
– Ausgang digitales Mischsignal
– Eingang für Audiodaten vom Com-
puter
– Eingang für Audiodateien von
einem USB-Stick zum Abspielen
mit dem Audiospieler
6 Display für den Audiospieler; ist die
USB-Buchse(5) nicht angeschlossen,
zeigt das Display „no“ an
7 Tasten für den Audiospieler mit Blue-
tooth-Modul
II
REC: Start / Pause von Wieder-
gabe /Aufnahme
I
−
+
I kurz drücken:
vorheriger / nächster Titel
gedrückt halten:
Lautstärke einstellen
MODE: Umschalten zwischen
– Wiedergabe (Anzeige „USb“)
– Bluetooth-Empfang („bt“)
– Aufnahme auf einen USB-
Stick („rEC“)
8 Ein- /Ausschalter PH. PWR der 48-V-
Phantomspeisung für alle XLR-Mik-
rofoneingänge MIC (1)
Vorsicht: Nur bei ausgeschaltetem
Mischpult betätigen, anderenfalls
können laute Schaltgeräusche auf-
treten.
9 Eingang RET z. B. für ein externes
Effektsignal
10 Stereo-Ausgang M L, M R für das
Mischsignal
11 Ausgang FX des Effektausspielwegs
zum Anschluss an den Eingang eines
Effektgeräts
12 Buchse H. P. (headphones) für einen
Kopfhörer
13 LED PK: Ein kurzes Aufleuchten zeigt
an, dass der maximale unverzerrte
Signalpegel erreicht ist. Leuchtet sie
länger, wird der Kanal übersteuert.
Dann den Regler GAIN (15) zurück-
drehen.
14 Kanalfader für die Kanallautstärke
15 Regler GAIN für die Eingangsverstär-
kung
16 Klangregler für die Höhen (H) und
Bässe (L)
17 Regler FX zum Mischen des Kanalsig-
nals auf die interne Effekteinheit und
den AusgangFX (11)
18 Panoramaregler PAN zum Platzieren
des Mono- Signals im Stereo-Klang-
bild,
beim Stereo-Kanal 3 / 4 (MXR-4) bzw.
5 / 6 (MXR-6) dient er als Balance-
regler
19 Drehknopf PROG zur Effektauswahl;
das Display (6) zeigt den gewählten
Effekt (01 – 16) kurz an
20 Regler DELAY für die Effektverzöge-
rungszeit
21 Regler FX zum Mischen des internen
Effektsignals auf das Ausgangssignal;
soll kein interner Effekt zugemischt
werden, den Regler auf MIN drehen
22 Regler RET (return) zum Mischen des
Signals der Buchse RET (9) auf das
Ausgangssignal, z. B. von einem ex-
ternen Effektgerät
23 Ein- /Ausschalter ; beim Einschalten
zeigt das Display (6) zur Begrüßung
kurz „HI“ an
24 Ausgangspegel- und Betriebsanzeige
25 Lautstärkeregler H. P. für den Kopf-
hörer
26 Master-Fader für den Ausgangspegel
des Mischsignals an den Buchsen M L,
M R (10) und an der USB-Buchse (5)
4 Schnellstart
Zum Schutz vor lauten Störgeräuschen
vor dem Herstellen / Trennen von Verbin-
dungen und vor dem Einschalten den
Regler H. P. (25) auf MIN drehen und den
Master-Fader (26) ganz zuziehen.
1) Die Signalquellen (Mikrofone, Instru-
mente usw.) an die Eingangsbuchsen
(1, 3) anschließen. Mikrofone über
XLR-Stecker anschließen, Geräte
mit Line- Pegel über Klinken- oder
Cinch-Stecker. Beim Anschluss an
die Eingangsbuchsen LINE (3) darf
die Taste (4) darunter nicht gedrückt
sein; wird die USB-Buchse (5) oder
der Audiospieler verwendet, die Taste
hineindrücken. Nur beim Einsatz von
Mikrofonen, die eine Phantomspei-
sung benötigen, die Taste PH. PWR. (8)
hineindrücken.
Wird ein Computer zum Abspielen
von Audiodateien oder für Aufnahmen
verwendet, diesen an die USB-Buchse
(5) anschließen.
2) Das Gerät, auf welches das Mischsig-
nal gegeben werden soll (Verstärker,
Aktivlautsprecherbox, Aufnahmege-
rät), an die Ausgangsbuchsen M L, M R
(10) anschließen. Ein Kopfhörer zum
Abhören kann an die Buchse H. P. (12)
angeschlossen werden.
3) Das beiliegende Netzgerät an die USB-
Buchse 5 V⎓/1 A auf der Rückseite (!)
anschließen und in eine Steckdose
(230 V/ 50 Hz) stecken.
4) Zur Grundeinstellung vorerst
– die Regler GAIN (15), H, L (16) und
PAN (18) in die Mittelstellung drehen
– die Regler FX (17, 21) und RET (22)
auf MIN drehen
– die Kanalfader (14) ganz zuziehen
5) Die Signalquellen einschalten, dann
das Mischpult mit der Taste
(23) und
zuletzt das an den Ausgangsbuchsen
(10) angeschlossene Gerät. Zum Aus-
schalten in umgekehrter Reihenfolge
vorgehen.
6) Den Master-Fader (26) auf die Position
0 dB schieben und mit den Kanalfadern
(14) die Eingangssignale mischen.
Muss ein Kanalfader sehr weit
aufgezogen werden, die Eingangsver-
stärkung durch Aufdrehen des Reglers
GAIN (15) erhöhen. Leuchtet jedoch
die LED PK (13) länger auf, den Regler
GAIN entsprechend zurückdrehen. Die
LED PK darf nur bei Signalspitzen kurz
aufflackern.
7) Den Klang der Eingangssignale mit den
Reglern H und L (16) einstellen. Das
Ausgangssignal für das nachfolgende
Gerät optimal mit dem Master- Fader
(26) aussteuern. Mit dem Regler H. P.
(25) die Kopfhörerlautstärke einstellen
(nicht zu hoch, hohe Lautstärken schä-
digen das Gehör!).
Änderungen vorbehalten.
Deutsch
MXR-4, bei dem MXR-6 sind zwei weitere Mono-Eingängskanäle vorhanden